Operation Manual
Page 4
... described in should never be replaced by an authorized Brother dealer. • In the event a malfunction occurs or adjustment is used by the manufacturer as contained in this machine was supplied in the manual. otherwise, the machine, power cord or garment being administered. • Do not use extension cords. Keep ventilation openings of the machine and foot control free from all moving parts. Use this machine on an unstable surface...
... described in should never be replaced by an authorized Brother dealer. • In the event a malfunction occurs or adjustment is used by the manufacturer as contained in this machine was supplied in the manual. otherwise, the machine, power cord or garment being administered. • Do not use extension cords. Keep ventilation openings of the machine and foot control free from all moving parts. Use this machine on an unstable surface...
Operation Manual
Page 8
... the thread breaks during sewing 24 Restarting from the beginning 24 Resuming embroidery after turning off the power 24 Making Embroidery Adjustments 26 Adjusting thread tension 26 Adjusting the bobbin case (with no color on the screw) ....... 27 Using the automatic thread cutting function (END COLOR TRIM 28 Using the Thread Trimming Function (JUMP STITCH TRIM 28 Adjusting the embroidery speed 28 Changing the "Embroidery Frame Display 29 Selecting/displaying patterns according to the embroidery frame size 30 Changing the...
... the thread breaks during sewing 24 Restarting from the beginning 24 Resuming embroidery after turning off the power 24 Making Embroidery Adjustments 26 Adjusting thread tension 26 Adjusting the bobbin case (with no color on the screw) ....... 27 Using the automatic thread cutting function (END COLOR TRIM 28 Using the Thread Trimming Function (JUMP STITCH TRIM 28 Adjusting the embroidery speed 28 Changing the "Embroidery Frame Display 29 Selecting/displaying patterns according to the embroidery frame size 30 Changing the...

Operation Manual
Page 13
...Needle and presser foot section f Names of Machine Parts and Their Functions Embroidery Unit b a a c b e c d 1 Needle bar thread guide Pass the upper thread through the needle bar thread guide. 2 Needle plate 3 Needle plate cover Remove the needle plate cover to clean the bobbin case and race. 4 Bobbin cover/bobbin case Remove the bobbin cover and then insert the bobbin into the connection port when attaching the embroidery unit. (page B-26) 4 Carriage The carriage moves the embroidery frame automatically when embroidering. (page B-26) 5 Release button (located under the embroidery...
...Needle and presser foot section f Names of Machine Parts and Their Functions Embroidery Unit b a a c b e c d 1 Needle bar thread guide Pass the upper thread through the needle bar thread guide. 2 Needle plate 3 Needle plate cover Remove the needle plate cover to clean the bobbin case and race. 4 Bobbin cover/bobbin case Remove the bobbin cover and then insert the bobbin into the connection port when attaching the embroidery unit. (page B-26) 4 Carriage The carriage moves the embroidery frame automatically when embroidering. (page B-26) 5 Release button (located under the embroidery...

Operation Manual
Page 14
... help on page B-12. • When using the machine. 5 Settings key Press to set the needle stop embroidering. Do not use a touch pen with your finger. Orange: The machine is winding the bobbin thread, or the bobbin winder shaft is moved to the right side. 2 Needle position button Press the needle position button to raise or lower the needle. 3 Thread cutter button Press the thread cutter button after the threads have already been cut both the upper and the bobbin threads. 4 Presser foot lifter button...
... help on page B-12. • When using the machine. 5 Settings key Press to set the needle stop embroidering. Do not use a touch pen with your finger. Orange: The machine is winding the bobbin thread, or the bobbin winder shaft is moved to the right side. 2 Needle position button Press the needle position button to raise or lower the needle. 3 Thread cutter button Press the thread cutter button after the threads have already been cut both the upper and the bobbin threads. 4 Presser foot lifter button...

Operation Manual
Page 20
... to the embroidery frame size" in the "Embroidering" section. Page 4 0 A 0 Press to change the default machine settings (needle stop position, embroidery speed, opening display, etc.). thread number, color name. (page B-37). 4 When the thread number "#123" is selected, select from six thread brands. (page B-37). 5 Adjust the maximum embroidery speed setting. For details, refer to "Adjusting thread tension" in the "Embroidering" section. 9 Change the color of the background for the embroidery display area. LCD Operation Using the settings key...
... to the embroidery frame size" in the "Embroidering" section. Page 4 0 A 0 Press to change the default machine settings (needle stop position, embroidery speed, opening display, etc.). thread number, color name. (page B-37). 4 When the thread number "#123" is selected, select from six thread brands. (page B-37). 5 Adjust the maximum embroidery speed setting. For details, refer to "Adjusting thread tension" in the "Embroidering" section. 9 Change the color of the background for the embroidery display area. LCD Operation Using the settings key...

Operation Manual
Page 24
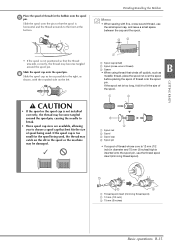
... this machine. Remove the spool cap that the b spring on the bobbin until it snaps into the notch in orange. If bobbins from other bobbin may result in injuries or damage to wind thread onto a bobbin. 1 Notch 2 Bobbin winder shaft spring Slide the bobbin winder in the direction of the same type (part code: SA156, SFB: XA5539-151). Open the top cover. Winding/Installing the Bobbin Winding/Installing the Bobbin CAUTION • Only use the recommended bobbin thread for this machine. 2 1 Spool pin 2 Spool...
... this machine. Remove the spool cap that the b spring on the bobbin until it snaps into the notch in orange. If bobbins from other bobbin may result in injuries or damage to wind thread onto a bobbin. 1 Notch 2 Bobbin winder shaft spring Slide the bobbin winder in the direction of the same type (part code: SA156, SFB: XA5539-151). Open the top cover. Winding/Installing the Bobbin Winding/Installing the Bobbin CAUTION • Only use the recommended bobbin thread for this machine. 2 1 Spool pin 2 Spool...
Operation Manual
Page 25
... bobbin onto the spool e pin. c b a 1 Spool cap (small) 2 Spool (cross-wound thread) 3 Space • When using thread that winds off quickly, such as shown, with fine, cross-wound thread, use the thread spool insert (mini king thread spool). 1 Thread spool insert (mini king thread spool) 2 12 mm (1/2 inch) 3 75 mm (3 inches) Basic operations B-15 Slide the spool onto the pin so that best fits the size of spool being used . If the spool cap is not positioned so that the thread...
... bobbin onto the spool e pin. c b a 1 Spool cap (small) 2 Spool (cross-wound thread) 3 Space • When using thread that winds off quickly, such as shown, with fine, cross-wound thread, use the thread spool insert (mini king thread spool). 1 Thread spool insert (mini king thread spool) 2 12 mm (1/2 inch) 3 75 mm (3 inches) Basic operations B-15 Slide the spool onto the pin so that best fits the size of spool being used . If the spool cap is not positioned so that the thread...

Operation Manual
Page 27
... to the left, and hold the end of the thread wound around o the bobbin. Press (Needle position button) once or twice to automatically lower the presser foot? c Slide the bobbin cover latch to cut the end of the thread with thread. d 1 2 GETTING READY B Memo • When the machine is started or the handwheel is pressed and the machine starts. Winding/Installing the Bobbin Use scissors to the right. Press . Raise the presser foot lever.
... to the left, and hold the end of the thread wound around o the bobbin. Press (Needle position button) once or twice to automatically lower the presser foot? c Slide the bobbin cover latch to cut the end of the thread with thread. d 1 2 GETTING READY B Memo • When the machine is started or the handwheel is pressed and the machine starts. Winding/Installing the Bobbin Use scissors to the right. Press . Raise the presser foot lever.

Operation Manual
Page 30
... presser foot has been lowered and the shutter is equipped with the rounded side on the LCD screen, press to continue. The screen changes, and all keys and operation buttons are locked (except ). 1 Thread guide plate While using your right hand to lightly hold the thread i passed under the thread guide plate, and then h pull it up lever. Press . In addition, before threading the machine. l B-20 f Slide the spool...
... presser foot has been lowered and the shutter is equipped with the rounded side on the LCD screen, press to continue. The screen changes, and all keys and operation buttons are locked (except ). 1 Thread guide plate While using your right hand to lightly hold the thread i passed under the thread guide plate, and then h pull it up lever. Press . In addition, before threading the machine. l B-20 f Slide the spool...
Operation Manual
Page 33
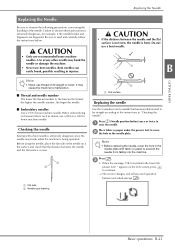
... to be straight according to the instructions in the needle plate with a bent needle is extremely dangerous since the needle may break while the machine is bent. Press (Needle position button) once or twice to automatically lower the presser foot? c • When the message "OK to a raise the needle. Basic operations B-23 Be sure to cover b the hole in injuries. Bent needles can easily break, possibly resulting in the needle plate. Place fabric or...
... to be straight according to the instructions in the needle plate with a bent needle is extremely dangerous since the needle may break while the machine is bent. Press (Needle position button) once or twice to automatically lower the presser foot? c • When the message "OK to a raise the needle. Basic operations B-23 Be sure to cover b the hole in injuries. Bent needles can easily break, possibly resulting in the needle plate. Place fabric or...
Operation Manual
Page 35
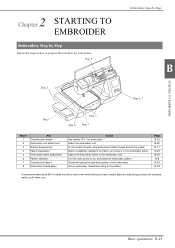
... layout Embroidery thread setup Action Use needle 75/11 for embroidery. * Attach the embroidery unit. Basic operations B-25 Attach a stabilizer material to the fabric, and hoop it in the embroidery frame. Set up embroidery thread according to the embroidery unit. Step 8 Step 2 Embroidery Step by Step Follow the steps below to on heavy weight fabrics or stabilizing products (for embroidery. For the bobbin thread, wind embroidery bobbin thread and set it in place. Check and adjust the size and position...
... layout Embroidery thread setup Action Use needle 75/11 for embroidery. * Attach the embroidery unit. Basic operations B-25 Attach a stabilizer material to the fabric, and hoop it in the embroidery frame. Set up embroidery thread according to the embroidery unit. Step 8 Step 2 Embroidery Step by Step Follow the steps below to on heavy weight fabrics or stabilizing products (for embroidery. For the bobbin thread, wind embroidery bobbin thread and set it in place. Check and adjust the size and position...
Operation Manual
Page 38
... need to remove the bobbin case. Memo • If you start to sew your embroidery project without enough thread in the range of motion of threads below. ■ Thread Upper thread Bobbin thread Use embroidery thread intended for embroidering with 90 weight bobbin thread. If you use threads other than those listed above, the embroidery may not sew out correctly. ■ Bobbin case Bobbin case (recommended for use with this machine. Otherwise, the embroidery unit cannot move freely, and the pattern may strike the needle...
... need to remove the bobbin case. Memo • If you start to sew your embroidery project without enough thread in the range of motion of threads below. ■ Thread Upper thread Bobbin thread Use embroidery thread intended for embroidering with 90 weight bobbin thread. If you use threads other than those listed above, the embroidery may not sew out correctly. ■ Bobbin case Bobbin case (recommended for use with this machine. Otherwise, the embroidery unit cannot move freely, and the pattern may strike the needle...
Operation Manual
Page 72
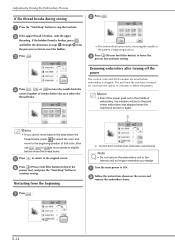
... the main power to continue sewing. f Press presser (Presser foot foot, and press lifter button) to lower the the "Start/Stop" button to ON. the screen and a Press . Adjustments During the Embroidery Process If the thread breaks during sewing b Press . a Press the "Start/Stop" button to continue or delete the pattern. to lower the d Press , , or to move ahead to reset the bobbin. The next time the machine is broken, redo the upper threading. Memo...
... the main power to continue sewing. f Press presser (Presser foot foot, and press lifter button) to lower the the "Start/Stop" button to ON. the screen and a Press . Adjustments During the Embroidery Process If the thread breaks during sewing b Press . a Press the "Start/Stop" button to continue or delete the pattern. to lower the d Press , , or to move ahead to reset the bobbin. The next time the machine is broken, redo the upper threading. Memo...
Operation Manual
Page 76
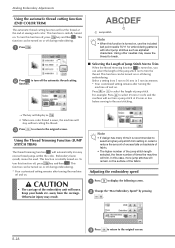
... alphabet characters. Making Embroidery Adjustments Using the automatic thread cutting function (END COLOR TRIM) The automatic thread cutting function will cut the thread at the end of excess tails on , use the included ball point needle 75/11 for embroidering patterns with short jump stitches such as • When one color thread is turned on backside of fabric. • The higher number of the jump stitch length selected, the...
... alphabet characters. Making Embroidery Adjustments Using the automatic thread cutting function (END COLOR TRIM) The automatic thread cutting function will cut the thread at the end of excess tails on , use the included ball point needle 75/11 for embroidering patterns with short jump stitches such as • When one color thread is turned on backside of fabric. • The higher number of the jump stitch length selected, the...
Operation Manual
Page 90
... - The needle threader hook is not inserted into Insert the plug of the operation keys. the presser foot. While initially winding thread on the pin properly. After removing the thread wound below the bobbin winder seat. Reset the bobbin correctly. B-8 the LCD. The operation keys do not respond. Visit us at " http://support.brother.com/ ". B-23 Upper threading is installed incorrectly. The needle threader lever cannot be pulled up . Directly touch the operation keys with your Brother dealer or...
... - The needle threader hook is not inserted into Insert the plug of the operation keys. the presser foot. While initially winding thread on the pin properly. After removing the thread wound below the bobbin winder seat. Reset the bobbin correctly. B-8 the LCD. The operation keys do not respond. Visit us at " http://support.brother.com/ ". B-23 Upper threading is installed incorrectly. The needle threader lever cannot be pulled up . Directly touch the operation keys with your Brother dealer or...

Operation Manual
Page 91
... - Needle breaks. Select a pattern. Adjust the thread tension. needle plate. Needle is not used . B-23 A bobbin designed specifically for this machine. Only is defective. Use a correctly wound bobbin. Troubleshooting Symptom Probable Cause Remedy The sewing light The sewing light is installed incorrectly. Change the setting to the left. Embroidery frame was attached before the unit Remove the embroidery frame, and then was not pushed. "Start/Stop" button was initialized. Move the bobbin winder shaft to "ON". Lower frame-securing lever after...
... - Needle breaks. Select a pattern. Adjust the thread tension. needle plate. Needle is not used . B-23 A bobbin designed specifically for this machine. Only is defective. Use a correctly wound bobbin. Troubleshooting Symptom Probable Cause Remedy The sewing light The sewing light is installed incorrectly. Change the setting to the left. Embroidery frame was attached before the unit Remove the embroidery frame, and then was not pushed. "Start/Stop" button was initialized. Move the bobbin winder shaft to "ON". Lower frame-securing lever after...

Operation Manual
Page 92
... machine so that the embroidery foot is not threaded correctly (used . A bobbin designed specifically for threading the machine and B-19 rethread it from the race, etc. Replace the needle. Replace the needle. B-23 Dust or lint has collected under the needle Remove the dust or lint with the brush. Troubleshooting Symptom Probable Cause Remedy Reference Upper thread breaks. Machine is in the upper tension. wrong spool cap, spool cap is loose, the thread did not catch the needle bar threader...
... machine so that the embroidery foot is not threaded correctly (used . A bobbin designed specifically for threading the machine and B-19 rethread it from the race, etc. Replace the needle. Replace the needle. B-23 Dust or lint has collected under the needle Remove the dust or lint with the brush. Troubleshooting Symptom Probable Cause Remedy Reference Upper thread breaks. Machine is in the upper tension. wrong spool cap, spool cap is loose, the thread did not catch the needle bar threader...

Operation Manual
Page 93
Replace the needle. use a bobbin designed specifically for this machine. authorized Brother dealer. B-23 A-2 ■ After embroidering A MAINTENANCE AND TROUBLESHOOTING Symptom Probable Cause Remedy Reference Thread tension is dull. Bobbin is set incorrectly. B-23 Thread tension is set incorrectly. B-17 Needle is turned, bent or the point is incorrect. use stabilizing material, especially with stretch fabrics, lightweight fabrics, fabrics with a new one. B-29 If the frame bumps something during sewing, the pattern will not work properly. Probable ...
Replace the needle. use a bobbin designed specifically for this machine. authorized Brother dealer. B-23 A-2 ■ After embroidering A MAINTENANCE AND TROUBLESHOOTING Symptom Probable Cause Remedy Reference Thread tension is dull. Bobbin is set incorrectly. B-23 Thread tension is set incorrectly. B-17 Needle is turned, bent or the point is incorrect. use stabilizing material, especially with stretch fabrics, lightweight fabrics, fabrics with a new one. B-29 If the frame bumps something during sewing, the pattern will not work properly. Probable ...
Operation Manual
Page 95
... embroidery frame. This message is displayed when the bobbin thread is being read. This message is displayed when the memory is displayed when the machine needs to the condition (pattern position and number of stitches) when it may be used with the USB flash drive. 26 USB media is displayed when the motor locks due to retrieve a pattern that cannot be saved to a USB flash 22 USB...
... embroidery frame. This message is displayed when the bobbin thread is being read. This message is displayed when the memory is displayed when the machine needs to the condition (pattern position and number of stitches) when it may be used with the USB flash drive. 26 USB media is displayed when the motor locks due to retrieve a pattern that cannot be saved to a USB flash 22 USB...
Operation Manual
Page 98
... B-26 removal B-27 Error messages A-10 F Forward/Back key E-24 Front view B-2 H Handle B-2 , Handwheel B-2 Help key B-4 B-13 I Image key B-35 Installing bobbin B-17 K Key functions embroidery settings E-15 font edit E-9 pattern edit E-5 L LCD B-4 LCD messages A-10 LCD operation B-9 LCD screen cleaning A-2 M Machine surface cleaning A-2 Main power switch B-2 Maintenance A-2 Manual needle threading B-22 Mirror image key E-7 Multi color key E-9 N Needle condition B-23 replacement B-23 threading B-21 types, sizes & uses B-23 Needle bar thread guide B-3 Needle plate...
... B-26 removal B-27 Error messages A-10 F Forward/Back key E-24 Front view B-2 H Handle B-2 , Handwheel B-2 Help key B-4 B-13 I Image key B-35 Installing bobbin B-17 K Key functions embroidery settings E-15 font edit E-9 pattern edit E-5 L LCD B-4 LCD messages A-10 LCD operation B-9 LCD screen cleaning A-2 M Machine surface cleaning A-2 Main power switch B-2 Maintenance A-2 Manual needle threading B-22 Mirror image key E-7 Multi color key E-9 N Needle condition B-23 replacement B-23 threading B-21 types, sizes & uses B-23 Needle bar thread guide B-3 Needle plate...


