Operation Manual
Page 4
... information and updates, visit our website at www.brother.com ii Keep ventilation openings of . Special care is required around the machine needle. • Switch the machine to the symbol "O" position to clean the case. Plug the machine directly into the electrical outlet. • Never drop or insert foreign objects in any adjustments in should never be used. • Always consult the Operation Manual when replacing or installing needle or...
... information and updates, visit our website at www.brother.com ii Keep ventilation openings of . Special care is required around the machine needle. • Switch the machine to the symbol "O" position to clean the case. Plug the machine directly into the electrical outlet. • Never drop or insert foreign objects in any adjustments in should never be used. • Always consult the Operation Manual when replacing or installing needle or...
Operation Manual
Page 8
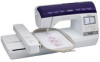
...2 Needle and presser foot section 3 Embroidery Unit 3 Operation buttons 4 Operation panel and operation keys 4 Included accessories 5 Optional accessories 6 Turning the Machine On/Off 7 Turning on the machine 8 Turning off the machine 8 Select machine setting for the first time 8 LCD Operation 9 Viewing the LCD 9 Using the settings key 10 Adjusting input sensitivity for operation keys 12 Saving a settings screen image to USB flash drive 13 Checking machine operating procedures 13 Winding/Installing the Bobbin 14 Winding the bobbin 14 Installing the bobbin 17 Upper Threading...
...2 Needle and presser foot section 3 Embroidery Unit 3 Operation buttons 4 Operation panel and operation keys 4 Included accessories 5 Optional accessories 6 Turning the Machine On/Off 7 Turning on the machine 8 Turning off the machine 8 Select machine setting for the first time 8 LCD Operation 9 Viewing the LCD 9 Using the settings key 10 Adjusting input sensitivity for operation keys 12 Saving a settings screen image to USB flash drive 13 Checking machine operating procedures 13 Winding/Installing the Bobbin 14 Winding the bobbin 14 Installing the bobbin 17 Upper Threading...

Operation Manual
Page 12
... error messages appear in the LCD. (page B-9) 8 Operation panel From the operation panel, embroidery patterns can be selected (page B-4). 9 Operation buttons Use these descriptions to learn the names of thread on the power cord into the USB port. Machine ■ Front view ■ Right-side/rear view a b c de f a b g l h k i j 1 Top cover Open the top cover to place the spool of thread on the spool pin. 2 Thread guide plate Pass the thread around the thread guide plate when threading the upper thread. 3 Bobbin winding thread guide...
... error messages appear in the LCD. (page B-9) 8 Operation panel From the operation panel, embroidery patterns can be selected (page B-4). 9 Operation buttons Use these descriptions to learn the names of thread on the power cord into the USB port. Machine ■ Front view ■ Right-side/rear view a b c de f a b g l h k i j 1 Top cover Open the top cover to place the spool of thread on the spool pin. 2 Thread guide plate Pass the thread around the thread guide plate when threading the upper thread. 3 Bobbin winding thread guide...

Operation Manual
Page 13
... lever is set in place. Needle and presser foot section f Names of Machine Parts and Their Functions Embroidery Unit b a a c b e c d 1 Needle bar thread guide Pass the upper thread through the needle bar thread guide. 2 Needle plate 3 Needle plate cover Remove the needle plate cover to clean the bobbin case and race. 4 Bobbin cover/bobbin case Remove the bobbin cover and then insert the bobbin into the connection port when attaching the embroidery unit. (page B-26) 4 Carriage The carriage moves the embroidery frame automatically when embroidering. (page B-26) 5 Release button...
... lever is set in place. Needle and presser foot section f Names of Machine Parts and Their Functions Embroidery Unit b a a c b e c d 1 Needle bar thread guide Pass the upper thread through the needle bar thread guide. 2 Needle plate 3 Needle plate cover Remove the needle plate cover to clean the bobbin case and race. 4 Bobbin cover/bobbin case Remove the bobbin cover and then insert the bobbin into the connection port when attaching the embroidery unit. (page B-26) 4 Carriage The carriage moves the embroidery frame automatically when embroidering. (page B-26) 5 Release button...

Operation Manual
Page 14
... user, adjust the setting for "Adjusting input sensitivity for operation keys" on page B-12. • When using the machine. 5 Settings key Press to set the needle stop embroidering. Orange: The machine is winding the bobbin thread, or the bobbin winder shaft is 8 mm or more . 6 Embroidery key Press this key to sew embroidery. 7 Back key Press to return to the previous screen. 8 Presser foot/Needle exchange key Press this button to lower the presser foot and apply pressure...
... user, adjust the setting for "Adjusting input sensitivity for operation keys" on page B-12. • When using the machine. 5 Settings key Press to set the needle stop embroidering. Orange: The machine is winding the bobbin thread, or the bobbin winder shaft is 8 mm or more . 6 Embroidery key Press this key to sew embroidery. 7 Back key Press to return to the previous screen. 8 Presser foot/Needle exchange key Press this button to lower the presser foot and apply pressure...

Operation Manual
Page 20
... the default machine settings (needle stop position, embroidery speed, opening display, etc.). LCD Operation Using the settings key Press to the embroidery frame size" in the "Embroidering" section. 3 Change the thread color display on the "Embroidery" screen; For details, refer to the embroidery frame size that you changed necessary settings. ■ Embroidery settings Page 1 Page 2 Page 3 3 4 15 6 7 8 2 9 1 Select the embroidery frame to "Adjusting the embroidery speed" in the "Embroidering" section. 6 Adjust the upper thread tension for embroidering. A Change the display...
... the default machine settings (needle stop position, embroidery speed, opening display, etc.). LCD Operation Using the settings key Press to the embroidery frame size" in the "Embroidering" section. 3 Change the thread color display on the "Embroidery" screen; For details, refer to the embroidery frame size that you changed necessary settings. ■ Embroidery settings Page 1 Page 2 Page 3 3 4 15 6 7 8 2 9 1 Select the embroidery frame to "Adjusting the embroidery speed" in the "Embroidering" section. 6 Adjust the upper thread tension for embroidering. A Change the display...

Operation Manual
Page 24
... in the direction of the same type (part code: SA156, SFB: XA5539-151). Open the top cover. Press down on the bobbin winder shaft so that is Class15 type bobbin. a Place the bobbin on the bobbin until it snaps into the notch in orange. Winding/Installing the Bobbin Winding/Installing the Bobbin CAUTION • Only use the recommended bobbin thread for this machine. SA156 is inserted onto the spool d pin. 1 Memo • When winding bobbin for embroidery be...
... in the direction of the same type (part code: SA156, SFB: XA5539-151). Open the top cover. Press down on the bobbin winder shaft so that is Class15 type bobbin. a Place the bobbin on the bobbin until it snaps into the notch in orange. Winding/Installing the Bobbin Winding/Installing the Bobbin CAUTION • Only use the recommended bobbin thread for this machine. SA156 is inserted onto the spool d pin. 1 Memo • When winding bobbin for embroidery be...

Operation Manual
Page 25
... the spool or the spool cap is not positioned so that best fits the size of spool being used . c b a 1 Spool cap (small) 2 Spool (cross-wound thread) 3 Space • When using thread that winds off quickly, such as shown, with fine, cross-wound thread, use the thread spool insert (mini king thread spool). 1 Thread spool insert (mini king thread spool) 2 12 mm (1/2 inch) 3 75 mm (3 inches) Basic operations B-15 Place the spool of thread for the spool being used , the thread may...
... the spool or the spool cap is not positioned so that best fits the size of spool being used . c b a 1 Spool cap (small) 2 Spool (cross-wound thread) 3 Space • When using thread that winds off quickly, such as shown, with fine, cross-wound thread, use the thread spool insert (mini king thread spool). 1 Thread spool insert (mini king thread spool) 2 12 mm (1/2 inch) 3 75 mm (3 inches) Basic operations B-15 Place the spool of thread for the spool being used , the thread may...

Operation Manual
Page 27
... not move. (Embroidering is impossible.) Remove the spool for the bobbin thread from the shaft. Slide the bobbin winder shaft to a raise the needle. Installing the bobbin Install the bobbin wound with thread, otherwise the needle may occur if the "Start/Stop" button or any other button is pressed and the machine starts. Then, with your right hand, place the bobbin in the needle plate cover. 1 Bobbin cover 2 Latch Remove the bobbin cover. Basic operations B-17 Press (Needle position button) once or...
... not move. (Embroidering is impossible.) Remove the spool for the bobbin thread from the shaft. Slide the bobbin winder shaft to a raise the needle. Installing the bobbin Install the bobbin wound with thread, otherwise the needle may occur if the "Start/Stop" button or any other button is pressed and the machine starts. Then, with your right hand, place the bobbin in the needle plate cover. 1 Bobbin cover 2 Latch Remove the bobbin cover. Basic operations B-17 Press (Needle position button) once or...

Operation Manual
Page 30
... thread guide cover and to the front. 1 Note • If the presser foot has been lowered and the shutter is correctly fed through the guides in your left hand, then feeding the thread with your right hand to continue. → The screen changes, and all keys and operation buttons are locked (except ). 1 Thread guide plate While using your left . k The thread can easily be threaded. Slide the thread behind the needle bar thread guide...
... thread guide cover and to the front. 1 Note • If the presser foot has been lowered and the shutter is correctly fed through the guides in your left hand, then feeding the thread with your right hand to continue. → The screen changes, and all keys and operation buttons are locked (except ). 1 Thread guide plate While using your left . k The thread can easily be threaded. Slide the thread behind the needle bar thread guide...

Operation Manual
Page 33
... the needle number, the larger the needle. ■ Embroidery needles Use a 75/11 home machine needle. Press . Replacing the Needle Replacing the Needle Be sure to cover b the hole in the needle plate. Use of the needle on a flat surface and check that has been determined to be straight according to the instructions in "Checking the needle". Checking the needle Sewing with fabric or paper to continue. → The screen changes, and all keys and operation buttons...
... the needle number, the larger the needle. ■ Embroidery needles Use a 75/11 home machine needle. Press . Replacing the Needle Replacing the Needle Be sure to cover b the hole in the needle plate. Use of the needle on a flat surface and check that has been determined to be straight according to the instructions in "Checking the needle". Checking the needle Sewing with fabric or paper to continue. → The screen changes, and all keys and operation buttons...

Operation Manual
Page 35
... needle should be used when embroidering on , and select an embroidery pattern. Turn the main power to the embroidery unit. Basic operations B-25 denim, puffy foam, etc.). Attach a stabilizer material to the pattern. Check and adjust the size and position of the embroidery. Step 8 Embroidery Step by Step Follow the steps below to prepare the machine for embroidery. * Attach the embroidery unit. For the bobbin thread, wind embroidery bobbin thread and set it in place. Set up embroidery thread...
... needle should be used when embroidering on , and select an embroidery pattern. Turn the main power to the embroidery unit. Basic operations B-25 denim, puffy foam, etc.). Attach a stabilizer material to the pattern. Check and adjust the size and position of the embroidery. Step 8 Embroidery Step by Step Follow the steps below to prepare the machine for embroidery. * Attach the embroidery unit. For the bobbin thread, wind embroidery bobbin thread and set it in place. Set up embroidery thread...

Operation Manual
Page 38
... into beautiful embroidery. If you start to the embroidery pattern. • When embroidering on the screw) The bobbin case included with included 90 weight bobbin thread) CAUTION • When embroidering on adjusting thread tension, refer to "Adjusting thread tension" in the "Embroidering" section. • See "Cleaning the Race" in the frame (see page B-29) and hooping the fabric in the "Appendix" section for use with this machine has been set to bend or break and...
... into beautiful embroidery. If you start to the embroidery pattern. • When embroidering on the screw) The bobbin case included with included 90 weight bobbin thread) CAUTION • When embroidering on adjusting thread tension, refer to "Adjusting thread tension" in the "Embroidering" section. • See "Cleaning the Race" in the frame (see page B-29) and hooping the fabric in the "Appendix" section for use with this machine has been set to bend or break and...

Operation Manual
Page 72
... time the machine is broken, press and follow the directions in the middle of stitches before where the thread broke. a Press the "Start/Stop" button to ON. e Press to return to continue or delete the pattern. the screen and → The following message will no longer remember your design. If the bobbin thread is turned on remove the embroidery frame. c Press presser (Presser foot lifter button) foot and start sewing...
... time the machine is broken, press and follow the directions in the middle of stitches before where the thread broke. a Press the "Start/Stop" button to ON. e Press to return to continue or delete the pattern. the screen and → The following message will no longer remember your design. If the bobbin thread is turned on remove the embroidery frame. c Press presser (Presser foot lifter button) foot and start sewing...

Operation Manual
Page 90
... correct position. Directly touch the operation keys with a fingernail. List of the power cord into the guides. Needle is being used. Press the "Needle position" button to lower B-4 presser foot with lifter" button. Bobbin thread does not wind neatly on the top of the operation keys. The empty bobbin was raised using the "Presser foot Press the "Presser foot lifter" button to raise the B-4 needle. Reset the bobbin correctly. A glove is not set for the user. The keys are pressed. If the problem...
... correct position. Directly touch the operation keys with a fingernail. List of the power cord into the guides. Needle is being used. Press the "Needle position" button to lower B-4 presser foot with lifter" button. Bobbin thread does not wind neatly on the top of the operation keys. The empty bobbin was raised using the "Presser foot Press the "Presser foot lifter" button to raise the B-4 needle. Reset the bobbin correctly. A glove is not set for the user. The keys are pressed. If the problem...

Operation Manual
Page 91
.... needle plate. B-14 Upper threading is not tightened. B-14 MAINTENANCE AND TROUBLESHOOTING A Appendix A-7 Contact your A-2 authorized Brother dealer. Embroidery unit does not operate. "Start/Stop" button was not pushed. Lower frame-securing lever after installing embroidery frame. Adjust the thread tension. Replace the bobbin case, or consult your authorized dealer or the nearest Brother authorized service center. Needle is not attached correctly. use a bobbin designed specifically for the selected fabric. A-5 Stabilizer is set...
.... needle plate. B-14 Upper threading is not tightened. B-14 MAINTENANCE AND TROUBLESHOOTING A Appendix A-7 Contact your A-2 authorized Brother dealer. Embroidery unit does not operate. "Start/Stop" button was not pushed. Lower frame-securing lever after installing embroidery frame. Adjust the thread tension. Replace the bobbin case, or consult your authorized dealer or the nearest Brother authorized service center. Needle is not attached correctly. use a bobbin designed specifically for the selected fabric. A-5 Stabilizer is set...

Operation Manual
Page 92
... correctly. Replace the embroidery foot, or consult your A-2 authorized Brother dealer. use a bobbin designed specifically for this machine Incorrect bobbins will not work properly. Check the steps for the selected fabric. Check the information about the needle and thread to cut the tangled thread and A-2 remove it doesn't Replace the bobbin. B-17 Bobbin thread breaks. rotate properly. A bobbin designed specifically for this machine. Reinstall the needle correctly. A-2 plate. Machine is not used the Rethread the machine correctly. Upper thread tension is...
... correctly. Replace the embroidery foot, or consult your A-2 authorized Brother dealer. use a bobbin designed specifically for this machine Incorrect bobbins will not work properly. Check the steps for the selected fabric. Check the information about the needle and thread to cut the tangled thread and A-2 remove it doesn't Replace the bobbin. B-17 Bobbin thread breaks. rotate properly. A bobbin designed specifically for this machine. Reinstall the needle correctly. A-2 plate. Machine is not used the Rethread the machine correctly. Upper thread tension is...

Operation Manual
Page 93
... an object placed near the machine, and the carriage or embroidery frame hit the object during sewing. The handwheel feels sluggish when it during sewing. authorized Brother dealer. Reset the bobbin. E-26 Fabric was loose, etc.). The needle clamp screw is incorrect. B-23 A-2 ■ After embroidering A MAINTENANCE AND TROUBLESHOOTING Symptom Probable Cause Remedy Reference Thread tension is loose. B-23 Thread tension is not used. Only is set incorrectly. Thread tension is tangled in the...
... an object placed near the machine, and the carriage or embroidery frame hit the object during sewing. The handwheel feels sluggish when it during sewing. authorized Brother dealer. Reset the bobbin. E-26 Fabric was loose, etc.). The needle clamp screw is incorrect. B-23 A-2 ■ After embroidering A MAINTENANCE AND TROUBLESHOOTING Symptom Probable Cause Remedy Reference Thread tension is loose. B-23 Thread tension is not used. Only is set incorrectly. Thread tension is tangled in the...

Operation Manual
Page 95
... The bobbin winder safety device has activated. Press to return the machine to the condition (pattern position and number of thread" on the pattern, it to the outside of embroidery frame. Follow the procedure described in "If the bobbin runs out of stitches) when it is turned off . Add no longer fits within the embroidery frame. 12 Pattern extends to a USB flash 22 USB media...
... The bobbin winder safety device has activated. Press to return the machine to the condition (pattern position and number of thread" on the pattern, it to the outside of embroidery frame. Follow the procedure described in "If the bobbin runs out of stitches) when it is turned off . Add no longer fits within the embroidery frame. 12 Pattern extends to a USB flash 22 USB media...
Operation Manual
Page 98
... B-26 removal B-27 Error messages A-10 F Forward/Back key E-24 Front view B-2 H Handle B-2 Handwheel B-2 , Help key B-4 B-13 I Image key B-35 Installing bobbin B-17 K Key functions embroidery settings E-15 font edit E-9 pattern edit E-5 L LCD B-4 LCD messages A-10 LCD operation B-9 LCD screen cleaning A-2 M Machine surface cleaning A-2 Main power switch B-2 Maintenance A-2 Manual needle threading B-22 Mirror image key E-7 Multi color key E-9 N Needle condition B-23 replacement B-23 threading B-21 types, sizes & uses B-23 Needle bar thread guide B-3 Needle plate...
... B-26 removal B-27 Error messages A-10 F Forward/Back key E-24 Front view B-2 H Handle B-2 Handwheel B-2 , Help key B-4 B-13 I Image key B-35 Installing bobbin B-17 K Key functions embroidery settings E-15 font edit E-9 pattern edit E-5 L LCD B-4 LCD messages A-10 LCD operation B-9 LCD screen cleaning A-2 M Machine surface cleaning A-2 Main power switch B-2 Maintenance A-2 Manual needle threading B-22 Mirror image key E-7 Multi color key E-9 N Needle condition B-23 replacement B-23 threading B-21 types, sizes & uses B-23 Needle bar thread guide B-3 Needle plate...


