Operation Manual
Page 7
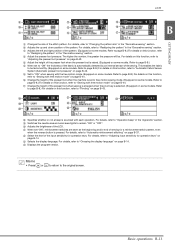
... for operation keys 14 Winding/Installing the Bobbin 15 Winding the bobbin 15 Installing the bobbin 18 Upper Threading 21 Threading the upper thread 21 Threading the needle 23 Threading the needle manually (without using the needle threader 24 Pulling up the bobbin thread 24 Using the twin needle 25 Replacing the Needle 28 Fabric/thread/needle combinations 28 Checking the needle 29 Replacing the needle 29 Replacing the Presser Foot 31 Replacing the presser foot 31 Removing and attaching the presser foot holder 32 Chapter 2 STARTING TO SEW 33 Sewing 33 Stitch selection...
... for operation keys 14 Winding/Installing the Bobbin 15 Winding the bobbin 15 Installing the bobbin 18 Upper Threading 21 Threading the upper thread 21 Threading the needle 23 Threading the needle manually (without using the needle threader 24 Pulling up the bobbin thread 24 Using the twin needle 25 Replacing the Needle 28 Fabric/thread/needle combinations 28 Checking the needle 29 Replacing the needle 29 Replacing the Presser Foot 31 Replacing the presser foot 31 Removing and attaching the presser foot holder 32 Chapter 2 STARTING TO SEW 33 Sewing 33 Stitch selection...
Operation Manual
Page 10
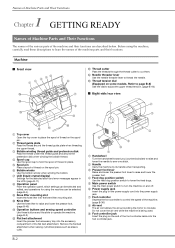
... bobbin winder when winding the bobbin. 7 LCD (liquid crystal display) Settings for using the machine, carefully read these buttons and the slide to operate the machine. (page B-3) B Flat bed attachment Insert the presser foot accessory tray into the accessory compartment of the flat bed attachment. D Needle threader lever Use the needle threader lever to cut them. Do not cover the air vent while the machine is being used. 9 Foot controller jack Insert the plug on some models. Machine ■ Front view a b c de o n m f g h i C Thread cutter...
... bobbin winder when winding the bobbin. 7 LCD (liquid crystal display) Settings for using the machine, carefully read these buttons and the slide to operate the machine. (page B-3) B Flat bed attachment Insert the presser foot accessory tray into the accessory compartment of the flat bed attachment. D Needle threader lever Use the needle threader lever to cut them. Do not cover the air vent while the machine is being used. 9 Foot controller jack Insert the plug on some models. Machine ■ Front view a b c de o n m f g h i C Thread cutter...
Operation Manual
Page 11
...Buttonhole lever Lower the buttonhole lever when sewing buttonholes and bar tacks or when darning. 1 "Start/Stop" button Press the "Start/Stop" button to clean the bobbin case and race. 4 Bobbin cover/bobbin case Remove the bobbin cover, and then insert the bobbin into the bobbin case. 5 Feed dogs The feed dogs feed the fabric in the same spot and stops automatically. (page B-37) 3 Reinforcement stitch button Use this button again to raise the presser foot. 7 Sewing speed controller Slide the sewing speed controller to the machine may become tangled or damage to adjust the sewing speed...
...Buttonhole lever Lower the buttonhole lever when sewing buttonholes and bar tacks or when darning. 1 "Start/Stop" button Press the "Start/Stop" button to clean the bobbin case and race. 4 Bobbin cover/bobbin case Remove the bobbin cover, and then insert the bobbin into the bobbin case. 5 Feed dogs The feed dogs feed the fabric in the same spot and stops automatically. (page B-37) 3 Reinforcement stitch button Use this button again to raise the presser foot. 7 Sewing speed controller Slide the sewing speed controller to the machine may become tangled or damage to adjust the sewing speed...
Operation Manual
Page 21
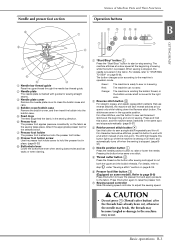
... and down position of the fabric is sounded with free motion mode" on page B-14. Refer to page B-8.) For details on this function, refer to "Changing the pattern size" in the "Decorative sewing" section. H K N I Switches the needle area and work area lights to page B-8.) D When set "ON", reinforcement stitches are sewn at the beginning and/or end of the presser foot when the machine is pressed...
... and down position of the fabric is sounded with free motion mode" on page B-14. Refer to page B-8.) For details on this function, refer to "Changing the pattern size" in the "Decorative sewing" section. H K N I Switches the needle area and work area lights to page B-8.) D When set "ON", reinforcement stitches are sewn at the beginning and/or end of the presser foot when the machine is pressed...
Operation Manual
Page 26
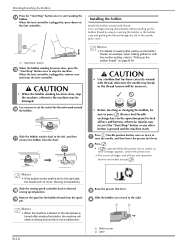
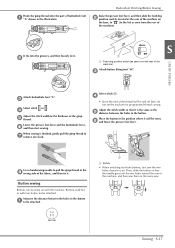
... inserting the bobbin in the bobbin case and guiding the thread through the slit in , press down on the operation panel to press (Presser foot/Needle exchange key) on the foot controller. Press (Needle position button) once or twice to cut the end of the thread wound around p the bobbin. d 1 2 B-18 1 Bobbin cover 2 Latch Use scissors to a raise the needle, and then lower the presser foot lever. Winding/Installing the Bobbin Press the "Start/Stop" button once to stop the machine...
... inserting the bobbin in the bobbin case and guiding the thread through the slit in , press down on the operation panel to press (Presser foot/Needle exchange key) on the foot controller. Press (Needle position button) once or twice to cut the end of the thread wound around p the bobbin. d 1 2 B-18 1 Bobbin cover 2 Latch Use scissors to a raise the needle, and then lower the presser foot lever. Winding/Installing the Bobbin Press the "Start/Stop" button once to stop the machine...
Operation Manual
Page 43
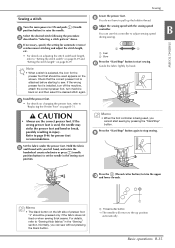
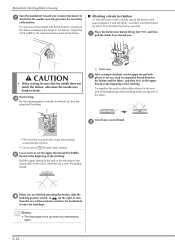
... up the bobbin thread. h Guide the fabric lightly by pressing the "Start/Stop" button. Normally, you cannot start sewing by hand. Check that should be used , the needle may strike the presser foot and bend or break, possibly resulting in "Selecting a stitch pattern" above. Hold the fabric e and thread with the sewing speed g controller. Memo • When the foot controller is attached before starting to adjust sewing speed during sewing. i Press the (Thread cutter button) to start position. Sewing Lower the presser foot. B STARTING TO SEW b a 1 Fast 2 Slow...
... up the bobbin thread. h Guide the fabric lightly by pressing the "Start/Stop" button. Normally, you cannot start sewing by hand. Check that should be used , the needle may strike the presser foot and bend or break, possibly resulting in "Selecting a stitch pattern" above. Hold the fabric e and thread with the sewing speed g controller. Memo • When the foot controller is attached before starting to adjust sewing speed during sewing. i Press the (Thread cutter button) to start position. Sewing Lower the presser foot. B STARTING TO SEW b a 1 Fast 2 Slow...
Operation Manual
Page 44
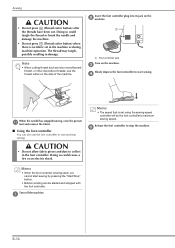
... the thread or break the needle and damage the machine. • Do not press (Thread cutter button) when there is no fabric set using the sewing speed controller will be started and stopped with the foot controller. Turn off the machine. a B-36 c Slowly depress the foot controller to start and stop the machine. d When the needle has stopped moving, raise the presser k foot and remove the fabric. ■ Using the foot controller You can be the foot controller's maximum sewing speed. The thread may...
... the thread or break the needle and damage the machine. • Do not press (Thread cutter button) when there is no fabric set using the sewing speed controller will be started and stopped with the foot controller. Turn off the machine. a B-36 c Slowly depress the foot controller to start and stop the machine. d When the needle has stopped moving, raise the presser k foot and remove the fabric. ■ Using the foot controller You can be the foot controller's maximum sewing speed. The thread may...

Operation Manual
Page 53
... the machine is moved faster than the sewing speed, the needle may break or other damage may be damaged. If the fabric is operating. ■ Using the knee lifter Stop the machine. Release the knee lifter. Useful Functions CAUTION • With free motion quilting, control the feeding speed of the fabric to sew. a Insert the knee lifter into the mounting slot, it may result. ■ Adjusting free motion presser foot height Select a screen. (Free motion foot height...
... the machine is moved faster than the sewing speed, the needle may break or other damage may be damaged. If the fabric is operating. ■ Using the knee lifter Stop the machine. Release the knee lifter. Useful Functions CAUTION • With free motion quilting, control the feeding speed of the fabric to sew. a Insert the knee lifter into the mounting slot, it may result. ■ Adjusting free motion presser foot height Select a screen. (Free motion foot height...
Operation Manual
Page 58
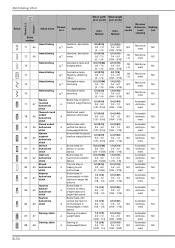
...32) ment Darning stitch Darning of medium A weight fabric 7.0 (1/4) 2.0 (1/16) Automatic 2.5 - 7.0 0.4 - 2.5 NO reinforce- Manual Twin needle Reverse/ Reinforce- NO heavyweight fabrics (1/8 - 3/16) (1/64 - 1/16) ment Narrow squared buttonhole stitch A Buttonholes for larger flat buttons 7.0 (1/4) 0.5 (1/32) Automatic 3.0 - 7.0 0.3 - 1.0 NO reinforce- NO (1/8 - 3/16) (1/64 - 1/16) ment Stretch buttonhole stitch Buttonholes for 7.0 (1/4) 0.5 (1/32) Automatic A reinforcement in A medium to heavy weight fabrics for light to medium weight fabrics 5.0 (3/16...
...32) ment Darning stitch Darning of medium A weight fabric 7.0 (1/4) 2.0 (1/16) Automatic 2.5 - 7.0 0.4 - 2.5 NO reinforce- Manual Twin needle Reverse/ Reinforce- NO heavyweight fabrics (1/8 - 3/16) (1/64 - 1/16) ment Narrow squared buttonhole stitch A Buttonholes for larger flat buttons 7.0 (1/4) 0.5 (1/32) Automatic 3.0 - 7.0 0.3 - 1.0 NO reinforce- NO (1/8 - 3/16) (1/64 - 1/16) ment Stretch buttonhole stitch Buttonholes for 7.0 (1/4) 0.5 (1/32) Automatic A reinforcement in A medium to heavy weight fabrics for light to medium weight fabrics 5.0 (3/16...
Operation Manual
Page 77
... presser foot lever. a 1 Button • When attaching four-hole buttons, first sew the two holes closest to the thickness of the gimp e thread. Then, slide the button so that it . Buttonhole Stitching/Button Sewing Hook the gimp thread onto the part of buttonhole foot a "A" shown in the same way. Use a handsewing needle to pull the gimp thread to the left as seen from the rear of the machine). Raise the presser foot lever, and then slide the feed dog b position...
... presser foot lever. a 1 Button • When attaching four-hole buttons, first sew the two holes closest to the thickness of the gimp e thread. Then, slide the button so that it . Buttonhole Stitching/Button Sewing Hook the gimp thread onto the part of buttonhole foot a "A" shown in the same way. Use a handsewing needle to pull the gimp thread to the left as seen from the rear of the machine). Raise the presser foot lever, and then slide the feed dog b position...
Operation Manual
Page 78
... foot "M", and then a pull the shank lever toward you start sewing again. h Set the sewing speed controller to the wrong side of the fabric. Buttonhole Stitching/Button Sewing Turn the handwheel toward you are finished attaching the button, slide the j feed dog position switch, to (to the right as if the needle will be sure that the needle does not touch the button, otherwise the needle may bend or break. Use scissors to cut the upper thread...
... foot "M", and then a pull the shank lever toward you start sewing again. h Set the sewing speed controller to the wrong side of the fabric. Buttonhole Stitching/Button Sewing Turn the handwheel toward you are finished attaching the button, slide the j feed dog position switch, to (to the right as if the needle will be sure that the needle does not touch the button, otherwise the needle may bend or break. Use scissors to cut the upper thread...
Operation Manual
Page 124
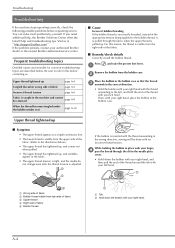
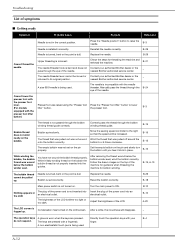
... change even after the thread tension is pulled up , and wrinkles appear in the bobbin case. a Remove the bobbin from the right side of the thread with your authorized Brother dealer or the nearest Brother authorized service center. While holding the bobbin in place with your finger, d pass the thread through the fabric when the upper thread is adjusted. Troubleshooting Troubleshooting If the machine stops operating correctly, check the following possible problems...
... change even after the thread tension is pulled up , and wrinkles appear in the bobbin case. a Remove the bobbin from the right side of the thread with your authorized Brother dealer or the nearest Brother authorized service center. While holding the bobbin in place with your finger, d pass the thread through the fabric when the upper thread is adjusted. Troubleshooting Troubleshooting If the machine stops operating correctly, check the following possible problems...
Operation Manual
Page 130
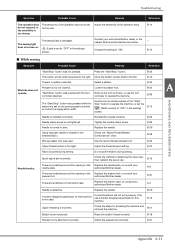
... type of incorrect upper threading. Make sure that the needle falls at the center of the bobbin winder guide post A-10 If the needle contacts the needle plate, remove the needle plate, and then install it again, starting with cotton fabric. Correctly thread the machine. If there are poor results from the machine" on changing the settings, refer to the following procedure. 1 Opening in the "Basic operations" section. b Note • Do not yet install the presser foot...
... type of incorrect upper threading. Make sure that the needle falls at the center of the bobbin winder guide post A-10 If the needle contacts the needle plate, remove the needle plate, and then install it again, starting with cotton fabric. Correctly thread the machine. If there are poor results from the machine" on changing the settings, refer to the following procedure. 1 Opening in the "Basic operations" section. b Note • Do not yet install the presser foot...
Operation Manual
Page 132
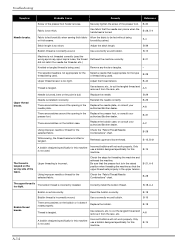
... bobbin. Manually pass the thread through the bobbin winding thread guide. B-3 equipped with the presser foot lifter button) Bobbin thread does not wind neatly on the pin properly. B-15, A-10 The bobbin thread cannot be moved or Contact your authorized Brother dealer or the nearest Brother authorized service center. - Replace the needle. Troubleshooting List of the LCD. The needle threader lever cannot be pulled up . finger. Upper threading is installed incorrectly. B-15 The empty bobbin was wound below the bobbin winder seat, wind...
... bobbin. Manually pass the thread through the bobbin winding thread guide. B-3 equipped with the presser foot lifter button) Bobbin thread does not wind neatly on the pin properly. B-15, A-10 The bobbin thread cannot be moved or Contact your authorized Brother dealer or the nearest Brother authorized service center. - Replace the needle. Troubleshooting List of the LCD. The needle threader lever cannot be pulled up . finger. Upper threading is installed incorrectly. B-15 The empty bobbin was wound below the bobbin winder seat, wind...
Operation Manual
Page 133
... "Start/Stop" button was used . Reinstall the needle correctly. Replace the needle. B-28 Wrong presser foot was pressed while the machine is not set for this machine. B-15 There are scratches on . Reset the bobbin thread correctly. B-29 A bobbin designed specifically for the sewing speed controller to the left. B-14 - B-29 Using improper needle or thread for the user. Adjust the thread tension setting. B-40 Fabric is not lowered. The sensitivity of the operation keys. Move the bobbin winder shaft to control the zigzag stitch width...
... "Start/Stop" button was used . Reinstall the needle correctly. Replace the needle. B-28 Wrong presser foot was pressed while the machine is not set for this machine. B-15 There are scratches on . Reset the bobbin thread correctly. B-29 A bobbin designed specifically for the sewing speed controller to the left. B-14 - B-29 Using improper needle or thread for the user. Adjust the thread tension setting. B-40 Fabric is not lowered. The sensitivity of the operation keys. Move the bobbin winder shaft to control the zigzag stitch width...
Operation Manual
Page 134
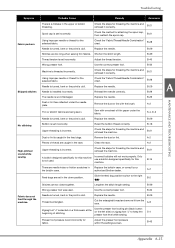
... point is installed incorrectly. Check the "Fabric/Thread/Needle Combinations" chart. Check the steps for the type of the presser foot. Reset the bobbin correctly. B-15 There are scratches around the opening in the upper tension. Use scissors, etc. Remove any knots or tangles. - Select a needle that the upper thread sets properly in the Replace the needle plate, or consult your authorized Brother dealer. B-29 Needle is dull. Troubleshooting Symptom Probable Cause Remedy Reference Needle breaks.
... point is installed incorrectly. Check the "Fabric/Thread/Needle Combinations" chart. Check the steps for the type of the presser foot. Reset the bobbin correctly. B-15 There are scratches around the opening in the upper tension. Use scissors, etc. Remove any knots or tangles. - Select a needle that the upper thread sets properly in the Replace the needle plate, or consult your authorized Brother dealer. B-29 Needle is dull. Troubleshooting Symptom Probable Cause Remedy Reference Needle breaks.
Operation Manual
Page 135
... feed dog position switch to keep the presser foot level while sewing. S-4 Presser foot pressure is set incorrectly. B-21 Spool cap is set in the upper or bobbin threading. B-40 Wrong presser foot. Reinstall the needle correctly. Use the presser foot locking pin (black button on the left side) on a thick seam at the beginning of thread are being sewn. B-32 Machine is incorrect. B-43 MAINTENANCE AND TROUBLESHOOTING A Appendix A-15 Troubleshooting Symptom Fabric puckers. A-2 Thin or stretch fabrics are caught in the bobbin case. Reset the bobbin...
... feed dog position switch to keep the presser foot level while sewing. S-4 Presser foot pressure is set incorrectly. B-21 Spool cap is set in the upper or bobbin threading. B-40 Wrong presser foot. Reinstall the needle correctly. Use the presser foot locking pin (black button on the left side) on a thick seam at the beginning of thread are being sewn. B-32 Machine is incorrect. B-43 MAINTENANCE AND TROUBLESHOOTING A Appendix A-15 Troubleshooting Symptom Fabric puckers. A-2 Thin or stretch fabrics are caught in the bobbin case. Reset the bobbin...
Operation Manual
Page 137
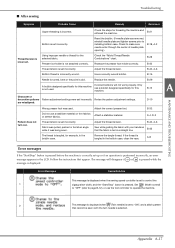
... not use a bobbin designed specifically for this machine is displayed. B-32 Thread tension is set up or if an operation is set incorrectly. Wrong presser foot was removed, reinstall needle plate and tighten screws prior to operate the machine. 2 This message is displayed when (Twin needle) is performed incorrectly, an error message appears in the bobbin case. Appendix A-17 A-8 A MAINTENANCE AND TROUBLESHOOTING Error messages If the "Start/Stop" button is pressed before the machine is tangled in a straight line. Replace the needle...
... not use a bobbin designed specifically for this machine is displayed. B-32 Thread tension is set up or if an operation is set incorrectly. Wrong presser foot was removed, reinstall needle plate and tighten screws prior to operate the machine. 2 This message is displayed when (Twin needle) is performed incorrectly, an error message appears in the bobbin case. Appendix A-17 A-8 A MAINTENANCE AND TROUBLESHOOTING Error messages If the "Start/Stop" button is pressed before the machine is tangled in a straight line. Replace the needle...
Operation Manual
Page 141
...Adjusting thread tension B-40 Air vent B-2 Appliqu S-26 Attaching presser foot holder B-32 Automatic fabric sensor system B-43 Automatic reinforcement stitch key B-37 Automatic thread cutting B-42 B Ball point needle B-28 Bar tack stitch S-35 , Basic sewing B-33 D-4 Basic stitching S-6 Basting stitch S-6 Beep A-20 Blind hem stitch S-8 Bobbin case B-3 bobbin case removal A-2 , Bobbin cover B-3 B-18 Bobbin installation B-18 Bobbin thread pulling up B-24 winding B-15 Bobbin winder B-2 Bobbin winding B-15 , Bobbin winding thread guide B-2 B-15 Button guide plate S-15 Button...
...Adjusting thread tension B-40 Air vent B-2 Appliqu S-26 Attaching presser foot holder B-32 Automatic fabric sensor system B-43 Automatic reinforcement stitch key B-37 Automatic thread cutting B-42 B Ball point needle B-28 Bar tack stitch S-35 , Basic sewing B-33 D-4 Basic stitching S-6 Basting stitch S-6 Beep A-20 Blind hem stitch S-8 Bobbin case B-3 bobbin case removal A-2 , Bobbin cover B-3 B-18 Bobbin installation B-18 Bobbin thread pulling up B-24 winding B-15 Bobbin winder B-2 Bobbin winding B-15 , Bobbin winding thread guide B-2 B-15 Button guide plate S-15 Button...
Operation Manual
Page 142
...33 Sewing direction change S-2 , Sewing speed controller B-3 S-34 Shell tuck stitch S-43 Side cutter S-12 Size D-6 Smocking S-42 Solving operation problems A-4 , Spool cap B-2 B-16 Spool net B-16 , Spool pin B-2 B-15, B-21 "Start/Stop" button B-3 Step stitch pattern D-7 Stippling S-26 Stitch guide foot S-3 Stitch length adjustment B-39 Stitch selection B-34 Stitch settings B-46 Stitch types B-33 Stitch width adjustment B-39 Storing patterns D-9 Straight stitch S-6 S-19, S-27 Stretch fabrics S-5 T Thick fabrics S-4 Thin fabrics S-4 , Thread cutter B-2 B-36 Thread cutter...
...33 Sewing direction change S-2 , Sewing speed controller B-3 S-34 Shell tuck stitch S-43 Side cutter S-12 Size D-6 Smocking S-42 Solving operation problems A-4 , Spool cap B-2 B-16 Spool net B-16 , Spool pin B-2 B-15, B-21 "Start/Stop" button B-3 Step stitch pattern D-7 Stippling S-26 Stitch guide foot S-3 Stitch length adjustment B-39 Stitch selection B-34 Stitch settings B-46 Stitch types B-33 Stitch width adjustment B-39 Storing patterns D-9 Straight stitch S-6 S-19, S-27 Stretch fabrics S-5 T Thick fabrics S-4 Thin fabrics S-4 , Thread cutter B-2 B-36 Thread cutter...


