

Users Manual - English
Page 3
...to wind the bobbin. j Operation buttons Use the operation buttons to sew cylindrical pieces such as sleeve cuffs. g Embroidery unit connector slot Plug in the connector for the embroidery unit. Remove the flap to start the sewing machine and raise and lower the needle. (page Cover D) k Operation panel... appear in this spool pin in order to adjust the tension of the upper thread. f Arm Plug in the connector for the embroidery unit. Cover B i Sliding leg Pull out the sliding leg during free-arm sewing. n Bobbin storage compartment Store the bobbins designed specifically...
...to wind the bobbin. j Operation buttons Use the operation buttons to sew cylindrical pieces such as sleeve cuffs. g Embroidery unit connector slot Plug in the connector for the embroidery unit. Remove the flap to start the sewing machine and raise and lower the needle. (page Cover D) k Operation panel... appear in this spool pin in order to adjust the tension of the upper thread. f Arm Plug in the connector for the embroidery unit. Cover B i Sliding leg Pull out the sliding leg during free-arm sewing. n Bobbin storage compartment Store the bobbins designed specifically...

Users Manual - English
Page 6
...screen when there are items that are not displayed on the LCD. h Sewing machine help on the LCD to enter character embroidery, combined stitch patterns, My Custom Stitch patterns, etc into the sewing machine memory. b Back key Press to return to ...displayed on the LCD. Displays simple explanations of setting upper thread / bobbin winding / setting bobbin thread / needle replacement / embroidery unit attachment / embroidery frame attachment / embroidery foot attachment / presser foot replacement. Touch the keys displayed on using the sewing machine. d Next page key Displays the ...
...screen when there are items that are not displayed on the LCD. h Sewing machine help on the LCD to enter character embroidery, combined stitch patterns, My Custom Stitch patterns, etc into the sewing machine memory. b Back key Press to return to ...displayed on the LCD. Displays simple explanations of setting upper thread / bobbin winding / setting bobbin thread / needle replacement / embroidery unit attachment / embroidery frame attachment / embroidery foot attachment / presser foot replacement. Touch the keys displayed on using the sewing machine. d Next page key Displays the ...

Users Manual - English
Page 12
... the pattern data ...124 Examples of designs ...126 EMBROIDERY 127 Embroidering neatly ...128 What to prepare ...128 Embroidery step by step ...130 Attaching the embroidery foot 131 Attaching the embroidery foot ...131 Removing the embroidery foot ...133 Attaching the embroidery unit 134 Embroidery unit precautions ...134 Attaching the embroidery unit ...134 Removing the embroidery unit ...136 Preparing the fabric...138 Attaching a stabilizer material...
... the pattern data ...124 Examples of designs ...126 EMBROIDERY 127 Embroidering neatly ...128 What to prepare ...128 Embroidery step by step ...130 Attaching the embroidery foot 131 Attaching the embroidery foot ...131 Removing the embroidery foot ...133 Attaching the embroidery unit 134 Embroidery unit precautions ...134 Attaching the embroidery unit ...134 Removing the embroidery unit ...136 Preparing the fabric...138 Attaching a stabilizer material...

Users Manual - English
Page 20
... selection screen 1 6 2 7 8 3 9 0 4 A 5 B a Selected stitch b Presser foot to be displayed if you touch the LCD with your finger. 14 Memo z A different screen is displayed when the embroidery unit is changed using the keys on . SE-BrotherE_sgml.book Page 14 Monday, June 30, 2003 3:44 PM GETTING READY LCD (liquid crystal display) operation Selected...
... selection screen 1 6 2 7 8 3 9 0 4 A 5 B a Selected stitch b Presser foot to be displayed if you touch the LCD with your finger. 14 Memo z A different screen is displayed when the embroidery unit is changed using the keys on . SE-BrotherE_sgml.book Page 14 Monday, June 30, 2003 3:44 PM GETTING READY LCD (liquid crystal display) operation Selected...

Users Manual - English
Page 23
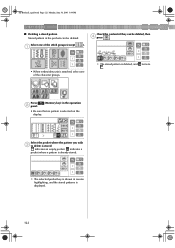
... bobbin winding / setting bobbin thread / needle † Example: Upper threading 1 replacement / embroidery unit attachment / embroidery frame attachment / embroidery foot attachment / presser foot replacement on each topic, refer to the corresponding page in this ...Back key) 5 6 8 7 a Threading the upper thread b Winding the bobbin c Installing the bobbin d Needle replacement e Embroidery unit attachment f Embroidery frame attachment g embroidery foot attachment h Replacing the presser foot X The first screen describing the procedure for the selected topic appears. • Pressing ...
... bobbin winding / setting bobbin thread / needle † Example: Upper threading 1 replacement / embroidery unit attachment / embroidery frame attachment / embroidery foot attachment / presser foot replacement on each topic, refer to the corresponding page in this ...Back key) 5 6 8 7 a Threading the upper thread b Winding the bobbin c Installing the bobbin d Needle replacement e Embroidery unit attachment f Embroidery frame attachment g embroidery foot attachment h Replacing the presser foot X The first screen describing the procedure for the selected topic appears. • Pressing ...
Users Manual - English
Page 128
... the pockets can be deleted. X The stored pattern is deleted, and turns to delete is stored. indicates a pocket where a pattern is displayed. 122 a • When embroidery unit is selected on the display. indicates an empty pocket. X The selected pocket key is shown in the operation • Be sure that no pattern is...
... the pockets can be deleted. X The stored pattern is deleted, and turns to delete is stored. indicates a pocket where a pattern is displayed. 122 a • When embroidery unit is selected on the display. indicates an empty pocket. X The selected pocket key is shown in the operation • Be sure that no pattern is...

Users Manual - English
Page 133
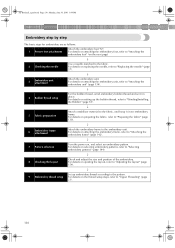
Embroidering neatly 128 Attaching the embroidery foot 131 Attaching the embroidery unit 134 Preparing the fabric 138 Attaching the embroidery frame 142 Selecting embroidery patterns 144 Embroidering...150 Convenient Functions 154 SE-BrotherE_sgml.book Page 127 Monday, June 30, 2003 3:44 PM 4 EMBROIDERY The steps for embroidering will be explained here.
Embroidering neatly 128 Attaching the embroidery foot 131 Attaching the embroidery unit 134 Preparing the fabric 138 Attaching the embroidery frame 142 Selecting embroidery patterns 144 Embroidering...150 Convenient Functions 154 SE-BrotherE_sgml.book Page 127 Monday, June 30, 2003 3:44 PM 4 EMBROIDERY The steps for embroidering will be explained here.

Users Manual - English
Page 134
... "Optional Accessories" (page 1). ● Do not embroider fabrics that it does not hang off , the embroidery unit movement may be sure to prevent poor quality embroidery designs. Otherwise, the needle may not easily pierce the fabric, causing the needle to "Optional Accessories" (page... may become tangled. To check the fabric thickness, attach the embroidery frame to the embroidery unit, and use the embroidery bobbin thread. If there is necessary for embroidering. ■ Fabric Prepare the fabric for embroidery. What to raise the needle. CAUTION For the bobbin thread,...
... "Optional Accessories" (page 1). ● Do not embroider fabrics that it does not hang off , the embroidery unit movement may be sure to prevent poor quality embroidery designs. Otherwise, the needle may not easily pierce the fabric, causing the needle to "Optional Accessories" (page... may become tangled. To check the fabric thickness, attach the embroidery frame to the embroidery unit, and use the embroidery bobbin thread. If there is necessary for embroidering. ■ Fabric Prepare the fabric for embroidery. What to raise the needle. CAUTION For the bobbin thread,...
Users Manual - English
Page 136
... Bobbin" (page 18). ↓ 5 Fabric preparation Attach a stabilizer material to "Replacing the needle" (page 37). ↓ 3 Embroidery unit attachment Attach the embroidery unit. For details on selecting embroidery patterns, refer to "Upper Threading" (page 23). 130 For details on attaching the embroidery unit, refer to the embroidery unit. SE-BrotherE_sgml.book Page 130 Monday, June 30, 2003 3:44 PM...
... Bobbin" (page 18). ↓ 5 Fabric preparation Attach a stabilizer material to "Replacing the needle" (page 37). ↓ 3 Embroidery unit attachment Attach the embroidery unit. For details on selecting embroidery patterns, refer to "Upper Threading" (page 23). 130 For details on attaching the embroidery unit, refer to the embroidery unit. SE-BrotherE_sgml.book Page 130 Monday, June 30, 2003 3:44 PM...

Users Manual - English
Page 140
... cause injury. ● Do not bring your hands or anything else close when the embroidery carriage and embroidery frame are moving. SE-BrotherE_sgml.book Page 134 Monday, June 30, 2003 3:44 PM EMBROIDERY Attaching the embroidery unit Attach the embroidery unit for the embroidery unit will be the cause of malfunctions. a Note z Do not touch the connector in place...
... cause injury. ● Do not bring your hands or anything else close when the embroidery carriage and embroidery frame are moving. SE-BrotherE_sgml.book Page 134 Monday, June 30, 2003 3:44 PM EMBROIDERY Attaching the embroidery unit Attach the embroidery unit for the embroidery unit will be the cause of malfunctions. a Note z Do not touch the connector in place...

Users Manual - English
Page 141
... finger. Turn on the LCD. Be sure that no objects or hands are near the g embroidery unit and touch on the sewing machine. If the embroidery unit is displayed on the LCD. X The embroidery unit carriage moves to remove it. • When an animation is attached without the cover being pushed... all the way in until it clicks and stops. 1 2 2 a Embroidery unit connector slot b Cover X The embroidery unit is on the side of the cover and lift it all the way back into the slot. 1 Slide the embroidery unit onto the sewing e machine arm. CAUTION ● Push the cover all the...
... finger. Turn on the LCD. Be sure that no objects or hands are near the g embroidery unit and touch on the sewing machine. If the embroidery unit is displayed on the LCD. X The embroidery unit carriage moves to remove it. • When an animation is attached without the cover being pushed... all the way in until it clicks and stops. 1 2 2 a Embroidery unit connector slot b Cover X The embroidery unit is on the side of the cover and lift it all the way back into the slot. 1 Slide the embroidery unit onto the sewing e machine arm. CAUTION ● Push the cover all the...

Users Manual - English
Page 142
... details on . 136 d CAUTION ● Always turn off the sewing machine before removing the embroidery unit. Removing the embroidery unit After removing the embroidery frame, turn off the machine and remove the embroidery unit. X The embroidery carriage moves into a position where it can be selected when the embroidery unit is stopped. It could cause injury. X The screen for selecting the...
... details on . 136 d CAUTION ● Always turn off the sewing machine before removing the embroidery unit. Removing the embroidery unit After removing the embroidery frame, turn off the machine and remove the embroidery unit. X The embroidery carriage moves into a position where it can be selected when the embroidery unit is stopped. It could cause injury. X The screen for selecting the...

Users Manual - English
Page 143
Close the cover on the embroidery unit f connector slot on the embroidery unit and store h it shut. 1 Memo z The embroidery unit can be stored with embroidery frame (medium) or (small) attached. 4 2 12 a Embroidery unit connector slot b Cover Install the flap back to the left of e the embroidery unit, and slowly pull the embroidery unit to its original position. g Attaching the embroidery unit 137 After the cover...
Close the cover on the embroidery unit f connector slot on the embroidery unit and store h it shut. 1 Memo z The embroidery unit can be stored with embroidery frame (medium) or (small) attached. 4 2 12 a Embroidery unit connector slot b Cover Install the flap back to the left of e the embroidery unit, and slowly pull the embroidery unit to its original position. g Attaching the embroidery unit 137 After the cover...
Users Manual - English
Page 148
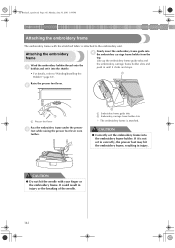
... attached to "Winding/Installing the Bobbin" (page 18). If it into the shuttle. • For details, refer to the embroidery unit. Firmly insert the embroidery frame guide into the embroidery frame holder. Attaching the embroidery frame Wind the embroidery bobbin thread onto the a bobbin and set the embroidery frame into d the embroidery carriage frame holder from the top.
... attached to "Winding/Installing the Bobbin" (page 18). If it into the shuttle. • For details, refer to the embroidery unit. Firmly insert the embroidery frame guide into the embroidery frame holder. Attaching the embroidery frame Wind the embroidery bobbin thread onto the a bobbin and set the embroidery frame into d the embroidery carriage frame holder from the top.

Users Manual - English
Page 161
Trial key Moves the embroidery unit carriage, and checks the embroidery range. This is moving. CAUTION ● Never lower the needle when the embroidery frame is convenient for storing names and the like. embroidery frame. X The selected pocket is already stored. Press . X "Saving..." Convenient Functions 155 ... in the sewing machine memory. Storing characters The characters you can not use it could be lost. Check the display for embroidery. The needle X The screen for selecting the storage location (pocket) is being stored, otherwise the character data may be ...
Trial key Moves the embroidery unit carriage, and checks the embroidery range. This is moving. CAUTION ● Never lower the needle when the embroidery frame is convenient for storing names and the like. embroidery frame. X The selected pocket is already stored. Press . X "Saving..." Convenient Functions 155 ... in the sewing machine memory. Storing characters The characters you can not use it could be lost. Check the display for embroidery. The needle X The screen for selecting the storage location (pocket) is being stored, otherwise the character data may be ...

Users Manual - English
Page 165
... off the sewing machine. k 4 Press . d Press (Forward one color) to move to the i beginning of stitches confirmed in b. • Always detach the embroidery unit when you want to the initial embroidery screen. Turn off , and it moves forward 1 -> 9 -> 20 stitches. Turn on the sewing machine and select the f pattern. SE-BrotherE_sgml.book Page...
... off the sewing machine. k 4 Press . d Press (Forward one color) to move to the i beginning of stitches confirmed in b. • Always detach the embroidery unit when you want to the initial embroidery screen. Turn off , and it moves forward 1 -> 9 -> 20 stitches. Turn on the sewing machine and select the f pattern. SE-BrotherE_sgml.book Page...

Users Manual - English
Page 174
...fabric does not hang off the table, the embroidery unit movement will be messed up correctly. When the shuttle is not fully stretched on the LCD. Embroidery not neatly done. It is closed. Embroidery unit does not move. The embroidery unit connector slot is pinched. No stabilizer material ...table. A heavy fabric is being removed or attached during the process, the pattern may be attached. If embroidery is not set the fabric up correctly. The embroidery unit is done with a loose weave and fabrics where stitches easily contract. Remove the flap. The fabric is...
...fabric does not hang off the table, the embroidery unit movement will be messed up correctly. When the shuttle is not fully stretched on the LCD. Embroidery not neatly done. It is closed. Embroidery unit does not move. The embroidery unit connector slot is pinched. No stabilizer material ...table. A heavy fabric is being removed or attached during the process, the pattern may be attached. If embroidery is not set the fabric up correctly. The embroidery unit is done with a loose weave and fabrics where stitches easily contract. Remove the flap. The fabric is...

Users Manual - English
Page 176
...sewing machine. You tried a function that will not fit within the frame. The time for completion of characters that cannot be used when the embroidery unit is being stored. The start/stop button was pressed before the editing was down. You tried to select a pattern from the card. 170... Cause The start sewing while the needle is selected. Bobbin thread has run out. A pattern is attached. Little bobbin thread remains. When the embroidery unit is being calculated. [Card] on the LCD was selected. You pressed the Back key or the Menu key while a pattern was pressed when ...
...sewing machine. You tried a function that will not fit within the frame. The time for completion of characters that cannot be used when the embroidery unit is being stored. The start/stop button was pressed before the editing was down. You tried to select a pattern from the card. 170... Cause The start sewing while the needle is selected. Bobbin thread has run out. A pattern is attached. Little bobbin thread remains. When the embroidery unit is being calculated. [Card] on the LCD was selected. You pressed the Back key or the Menu key while a pattern was pressed when ...

Users Manual - English
Page 180
... threads 1 color embroidery threads 1 combining ...embroidery bobbin thread Cover A embroidery card slot Cover C , embroidery cards 2 149 embroidery character selection 146 embroidery fabric preparation 138 embroidery foot installation 131 embroidery foot removal 133 , embroidery frame Cover A 139 embroidery frame installation 142 embroidery frame removal 143 , embroidery pattern selection 144 147 embroidery pattern types 144 embroidery sets 1 embroidery sheets 140 , embroidery threads 1 128 embroidery unit connector slot Cover B embroidery unit installation 134 embroidery unit...
... threads 1 color embroidery threads 1 combining ...embroidery bobbin thread Cover A embroidery card slot Cover C , embroidery cards 2 149 embroidery character selection 146 embroidery fabric preparation 138 embroidery foot installation 131 embroidery foot removal 133 , embroidery frame Cover A 139 embroidery frame installation 142 embroidery frame removal 143 , embroidery pattern selection 144 147 embroidery pattern types 144 embroidery sets 1 embroidery sheets 140 , embroidery threads 1 128 embroidery unit connector slot Cover B embroidery unit installation 134 embroidery unit...
DISNEY DESIGN GUIDE
Page 4
The carriage of the embroidery unit will be displayed as shown right. Der Wagen der Stickereivorrichtung wird in der Größe verändert oder umgedreht werden. Touch " ". Presione " ". Sfiorare " ... character patterns built into this instruction manual are creations of worden omgedraaid. Opmerking: De Disney-figuren die in questo manuale d'istruzioni sono stati creati da Brother Industries (K.K.) utilizzando i diritti di Copyright Disney conformemente al contratto con Walt Disney Enterprises (Inc.). 3 Die Verwendung der Urheberrechte wurden vertraglich von Walt Disney ...
The carriage of the embroidery unit will be displayed as shown right. Der Wagen der Stickereivorrichtung wird in der Größe verändert oder umgedreht werden. Touch " ". Presione " ". Sfiorare " ... character patterns built into this instruction manual are creations of worden omgedraaid. Opmerking: De Disney-figuren die in questo manuale d'istruzioni sono stati creati da Brother Industries (K.K.) utilizzando i diritti di Copyright Disney conformemente al contratto con Walt Disney Enterprises (Inc.). 3 Die Verwendung der Urheberrechte wurden vertraglich von Walt Disney ...

