Operation Manual
Page 1
We recommend that you keep this document before using the machine. GETTING READY SEWING BASICS UTILITY STITCHES APPENDIX Operation Manual Computerized Sewing Machine Product Code: 888-V15 Be sure to read this document nearby for future reference.
We recommend that you keep this document before using the machine. GETTING READY SEWING BASICS UTILITY STITCHES APPENDIX Operation Manual Computerized Sewing Machine Product Code: 888-V15 Be sure to read this document nearby for future reference.
Operation Manual
Page 3
...notice anything unusual, such as an odor, heat, discoloration or deformation, stop using , when cleaning, when making any adjustments mentioned in the instruction manual: • To unplug the machine, switch the machine to the symbol "O" position to persons. 2 Always unplug the machine from the electrical outlet ...center for examination, repair, electrical or mechanical adjustment. Do not pull on the unit. While the machine is cut. 3 Never operate this manual, or if you are leaving the machine unattended. Return the machine to make any other part may injure your back or knees. 1 When...
...notice anything unusual, such as an odor, heat, discoloration or deformation, stop using , when cleaning, when making any adjustments mentioned in the instruction manual: • To unplug the machine, switch the machine to the symbol "O" position to persons. 2 Always unplug the machine from the electrical outlet ...center for examination, repair, electrical or mechanical adjustment. Do not pull on the unit. While the machine is cut. 3 Never operate this manual, or if you are leaving the machine unattended. Return the machine to make any other part may injure your back or knees. 1 When...
Operation Manual
Page 4
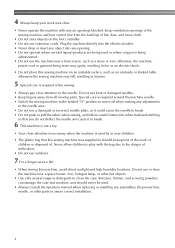
... in injuries. 5 Special care is required when sewing: • Always pay close attention is necessary when the machine is used . • Always consult the operation manual when replacing or installing any assemblies, the presser feet, needle, or other hot objects. • Use only neutral soaps or detergents to clean the case...
... in injuries. 5 Special care is required when sewing: • Always pay close attention is necessary when the machine is used . • Always consult the operation manual when replacing or installing any assemblies, the presser feet, needle, or other hot objects. • Use only neutral soaps or detergents to clean the case...
Operation Manual
Page 5
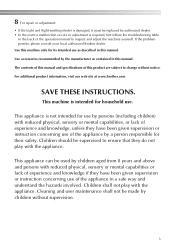
...given supervision or instruction concerning use . This appliance is not intended for their safety. The contents of this manual and specifications of the operation manual to inspect and adjust the machine yourself. This machine is intended for household use of the appliance by a... product information, visit our web site at www.brother.com SAVE THESE INSTRUCTIONS. If the problem persists, please consult your local authorized Brother dealer. Children should be made by the manufacturer as described in this manual. Cleaning and user maintenance shall not be supervised to...
...given supervision or instruction concerning use . This appliance is not intended for their safety. The contents of this manual and specifications of the operation manual to inspect and adjust the machine yourself. This machine is intended for household use of the appliance by a... product information, visit our web site at www.brother.com SAVE THESE INSTRUCTIONS. If the problem persists, please consult your local authorized Brother dealer. Children should be made by the manufacturer as described in this manual. Cleaning and user maintenance shall not be supervised to...
Operation Manual
Page 10
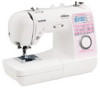
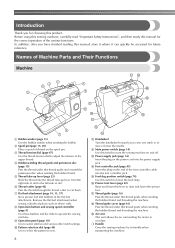
Before using this sewing machine, carefully read "Important Safety Instructions", and then study this manual for future reference. f Thread cutter (page 46) Pass the threads through the thread cutter to select stitches and various other stitch settings. g Flat bed attachment (.... r Thread guide cover (page 16) Pass the thread under this switch to adjust the tension of the upper thread. Introduction Thank you for choosing this manual, store it where it can quickly be accessed for the correct operation of Machine Parts and Their Functions Machine a Bobbin winder (page 15) Use the...
Before using this sewing machine, carefully read "Important Safety Instructions", and then study this manual for future reference. f Thread cutter (page 46) Pass the threads through the thread cutter to select stitches and various other stitch settings. g Flat bed attachment (.... r Thread guide cover (page 16) Pass the thread under this switch to adjust the tension of the upper thread. Introduction Thank you for choosing this manual, store it where it can quickly be accessed for the correct operation of Machine Parts and Their Functions Machine a Bobbin winder (page 15) Use the...
Operation Manual
Page 13
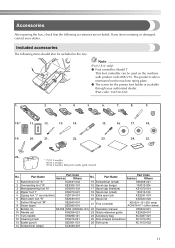
... foot "M" 8 Seam ripper XE2643-001 XZ5082-001 21 Foot controller XD0501-121 (EU area) XC8816-071 (other areas) 9 Bobbin (4) SA156 SFB (XA5539-151) 22 Operation manual XF6232-001 10 Needle set X58358-021 23 Quick reference guide XE2429-001 11 Twin needle X59296-121 24 Accessory bag XC4487-021 12 Cleaning...
... foot "M" 8 Seam ripper XE2643-001 XZ5082-001 21 Foot controller XD0501-121 (EU area) XC8816-071 (other areas) 9 Bobbin (4) SA156 SFB (XA5539-151) 22 Operation manual XF6232-001 10 Needle set X58358-021 23 Quick reference guide XE2429-001 11 Twin needle X59296-121 24 Accessory bag XC4487-021 12 Cleaning...

Operation Manual
Page 22
... is not performed correctly, the thread may become tangled and the needle may bend or break. ● The needle threader can be used , refer to "Manually threading the needle" (page 23). b a Spool pin a b Mark on the sewing machine. a Raise the presser foot lever. Check that the mark on appropriate needle and...
... is not performed correctly, the thread may become tangled and the needle may bend or break. ● The needle threader can be used , refer to "Manually threading the needle" (page 23). b a Spool pin a b Mark on the sewing machine. a Raise the presser foot lever. Check that the mark on appropriate needle and...
Operation Manual
Page 25
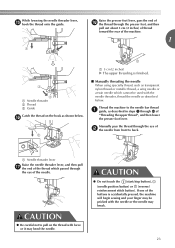
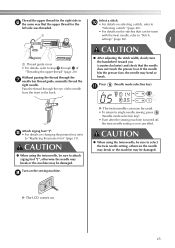
... button) or (reverse/ reinforcement stitch button). If one of "Threading the upper thread", and then lower the presser foot lever. Manually pass the thread through m of the buttons is finished. ■ Manually threading the needle When using specialty thread, such as described below . a Needle threader lever Raise the needle threader lever, and...
... button) or (reverse/ reinforcement stitch button). If one of "Threading the upper thread", and then lower the presser foot lever. Manually pass the thread through m of the buttons is finished. ■ Manually threading the needle When using specialty thread, such as described below . a Needle threader lever Raise the needle threader lever, and...

Operation Manual
Page 26
..." (page 86). a Bobbin winder shaft b Extra spool pin c Thread spool a b a Twin needle b Extra spool pin CAUTION ● Only use the twin needle (part code: X59296121). Manually thread the left needle. If the needle threader is used with the c upper thread. b • For details, refer to "Replacing the needle" (page 29). Install...
..." (page 86). a Bobbin winder shaft b Extra spool pin c Thread spool a b a Twin needle b Extra spool pin CAUTION ● Only use the twin needle (part code: X59296121). Manually thread the left needle. If the needle threader is used with the c upper thread. b • For details, refer to "Replacing the needle" (page 29). Install...
Operation Manual
Page 27
Pass the thread through the g needle bar thread guide, manually thread the right needle. If the needle hits the presser foot, the needle may be damaged. Attach zigzag foot "J". Thread the upper thread for the ...
Pass the thread through the g needle bar thread guide, manually thread the right needle. If the needle hits the presser foot, the needle may be damaged. Attach zigzag foot "J". Thread the upper thread for the ...

Operation Manual
Page 35
... tighten the screw. foot With the optional walking foot, both pieces of the walking foot b onto the needle clamp screw. Note ● Thread the needle manually when using the walking foot, or only attach the walking foot after threading the needle using the needle threader. ■ Attaching the walking foot Remove...
... tighten the screw. foot With the optional walking foot, both pieces of the walking foot b onto the needle clamp screw. Note ● Thread the needle manually when using the walking foot, or only attach the walking foot after threading the needle using the needle threader. ■ Attaching the walking foot Remove...
Operation Manual
Page 54
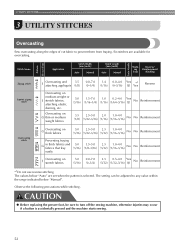
... sure to turn off the sewing machine, otherwise injuries may occur if a button is selected. Stitch Name Application Stitch Width [mm (inch)] Auto Manual Stitch Length [mm (inch)] Auto Manual Walking Foot Reverse/ Reinforcement Stitching Pattern Presser Foot Twin Needle Zigzag stitch 3-point zigzag stitch J Overcasting and attaching appliqués 3.5 (1/8) 0.0-7.0 1.4 0.0-4.0 Yes *1 (0-1/4) (1/16...
... sure to turn off the sewing machine, otherwise injuries may occur if a button is selected. Stitch Name Application Stitch Width [mm (inch)] Auto Manual Stitch Length [mm (inch)] Auto Manual Walking Foot Reverse/ Reinforcement Stitching Pattern Presser Foot Twin Needle Zigzag stitch 3-point zigzag stitch J Overcasting and attaching appliqués 3.5 (1/8) 0.0-7.0 1.4 0.0-4.0 Yes *1 (0-1/4) (1/16...
Operation Manual
Page 56
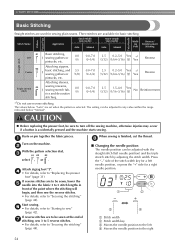
The values below "Manual". a Turn on the machine. Start sewing. f • For details, refer to "Starting to any value within the range indicated below "Auto" are to be ...stitching" (page 44). b With the pattern selection dial, c select , or . When sewing is selected. Stitch Name Application Stitch Width [mm (inch)] Auto Manual Stitch Length [mm (inch)] Auto Manual Walking Foot Reverse/ Reinforcement Stitching Left Center Triple stretch stitch Basic stitching, J sewing gathers or pintucks, etc. 0.0 (0) Attaching zippers, J basic stitching, and ...
The values below "Manual". a Turn on the machine. Start sewing. f • For details, refer to "Starting to any value within the range indicated below "Auto" are to be ...stitching" (page 44). b With the pattern selection dial, c select , or . When sewing is selected. Stitch Name Application Stitch Width [mm (inch)] Auto Manual Stitch Length [mm (inch)] Auto Manual Walking Foot Reverse/ Reinforcement Stitching Left Center Triple stretch stitch Basic stitching, J sewing gathers or pintucks, etc. 0.0 (0) Attaching zippers, J basic stitching, and ...
Operation Manual
Page 57
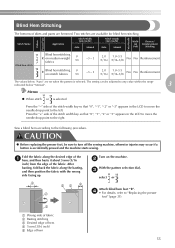
...foot "R". b With the pattern selection dial, c select or . Stitch Name Application Stitch Width [mm (inch)] Auto Manual Stitch Length [mm (inch)] Auto Manual Walking Foot Reverse/ Reinforcement Stitching Blind hem stitch Blind hem stitching R on medium weight fabrics 0 (0) R Blind hem ... a c Turn on stretch fabrics 0 (0) -3 - 3 2.0 (1/16) 1.0-3.5 (1/16-1/8) No No Reinforcement -3 - 3 2.0 (1/16) 1.0-3.5 (1/16-1/8) No No Reinforcement The values below "Manual". 3 Memo ● When stitch or is selected Press the "-" side of skirts and pants are hemmed.
...foot "R". b With the pattern selection dial, c select or . Stitch Name Application Stitch Width [mm (inch)] Auto Manual Stitch Length [mm (inch)] Auto Manual Walking Foot Reverse/ Reinforcement Stitching Blind hem stitch Blind hem stitching R on medium weight fabrics 0 (0) R Blind hem ... a c Turn on stretch fabrics 0 (0) -3 - 3 2.0 (1/16) 1.0-3.5 (1/16-1/8) No No Reinforcement -3 - 3 2.0 (1/16) 1.0-3.5 (1/16-1/8) No No Reinforcement The values below "Manual". 3 Memo ● When stitch or is selected Press the "-" side of skirts and pants are hemmed.
Operation Manual
Page 59
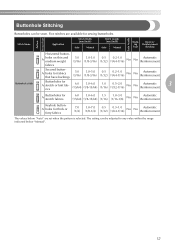
... No Automatic Reinforcement Buttonhole stitch Buttonholes for thick or furry fabrics 7.0 (1/4) 3.0-7.0 (1/8-1/4) 0.5 (1/32) 0.3-1.0 (1/64-1/16) No No Automatic Reinforcement The values below "Manual". 57 rics 6.0 3.0-6.0 (15/64) (1/8-15/64) 1.0 (1/16) 0.5-2.0 (1/32-1/16) No No Automatic Reinforcement 3 A Buttonholes for stretch fabrics 6.0 3.0-6.0 ... can be sewn. Stitch Name Application Stitch Width [mm (inch)] Auto Manual Stitch Length [mm (inch)] Auto Manual Walking Foot Reverse/ Reinforcement Stitching Horizontal button- Five stitches are set when ...
... No Automatic Reinforcement Buttonhole stitch Buttonholes for thick or furry fabrics 7.0 (1/4) 3.0-7.0 (1/8-1/4) 0.5 (1/32) 0.3-1.0 (1/64-1/16) No No Automatic Reinforcement The values below "Manual". 57 rics 6.0 3.0-6.0 (15/64) (1/8-15/64) 1.0 (1/16) 0.5-2.0 (1/32-1/16) No No Automatic Reinforcement 3 A Buttonholes for stretch fabrics 6.0 3.0-6.0 ... can be sewn. Stitch Name Application Stitch Width [mm (inch)] Auto Manual Stitch Length [mm (inch)] Auto Manual Walking Foot Reverse/ Reinforcement Stitching Horizontal button- Five stitches are set when ...
Operation Manual
Page 66
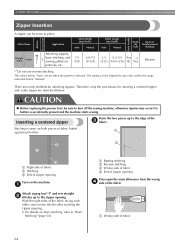
... A zipper can be sewn in place. The setting can be adjusted to any value within the range indicated below "Manual". Inserting a centered zipper Baste the two pieces up to the edge of fabric butted a against each other . Stitching...sure to "Basic Stitching" (page 54). With the right sides of fabric 64 Stitch Name Application Stitch Width [mm (inch)] Auto Manual Stitch Length [mm (inch)] Auto Manual Walking Foot Reverse/ Reinforcement Stitching Straight stitch Center Attaching zippers, J basic stitching, and sewing gathers or 3.5 (1/8) pintucks, etc. ...
... A zipper can be sewn in place. The setting can be adjusted to any value within the range indicated below "Manual". Inserting a centered zipper Baste the two pieces up to the edge of fabric butted a against each other . Stitching...sure to "Basic Stitching" (page 54). With the right sides of fabric 64 Stitch Name Application Stitch Width [mm (inch)] Auto Manual Stitch Length [mm (inch)] Auto Manual Walking Foot Reverse/ Reinforcement Stitching Straight stitch Center Attaching zippers, J basic stitching, and sewing gathers or 3.5 (1/8) pintucks, etc. ...
Operation Manual
Page 70
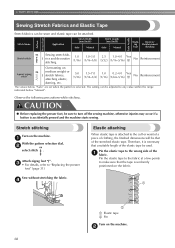
... elastic, darning, etc. 5.0 (3/16) 1.5-7.0 (1/16-1/4) 1.0 (1/16) 0.2-4.0 Yes (1/64-3/16) (J) No Reinforcement The values below "Manual". d a b a Elastic tape b Pin Turn on the machine. UTILITY STITCHES Sewing Stretch Fabrics and Elastic Tape Pattern Presser Foot Twin Needle...that a suitable length of the elastic tape be attached. Stitch Name Application Stitch Width [mm (inch)] Auto Manual Stitch Length [mm (inch)] Auto Manual Walking Foot Reverse/ Reinforcement Stitching Stretch stitch Sewing stretch fabJ rics and decorative stitching 1.0 (1/16) 1.0-3.0 (1/16...
... elastic, darning, etc. 5.0 (3/16) 1.5-7.0 (1/16-1/4) 1.0 (1/16) 0.2-4.0 Yes (1/64-3/16) (J) No Reinforcement The values below "Manual". d a b a Elastic tape b Pin Turn on the machine. UTILITY STITCHES Sewing Stretch Fabrics and Elastic Tape Pattern Presser Foot Twin Needle...that a suitable length of the elastic tape be attached. Stitch Name Application Stitch Width [mm (inch)] Auto Manual Stitch Length [mm (inch)] Auto Manual Walking Foot Reverse/ Reinforcement Stitching Stretch stitch Sewing stretch fabJ rics and decorative stitching 1.0 (1/16) 1.0-3.0 (1/16...
Operation Manual
Page 72
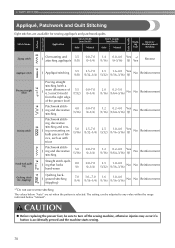
... Eight stitches are set when the pattern is accidentally pressed and the machine starts sewing. 70 The values below "Manual". Stitch Name Application Stitch Width [mm (inch)] Auto Manual Stitch Length [mm (inch)] Auto Manual Walking Foot Reverse/ Reinforcement Stitching Pattern Presser Foot Twin Needle Zigzag stitch J Overcasting and attaching appliqués 3.5 (1/8) 0.0-7.0 1.4 0.0-4.0 Yes...
... Eight stitches are set when the pattern is accidentally pressed and the machine starts sewing. 70 The values below "Manual". Stitch Name Application Stitch Width [mm (inch)] Auto Manual Stitch Length [mm (inch)] Auto Manual Walking Foot Reverse/ Reinforcement Stitching Pattern Presser Foot Twin Needle Zigzag stitch J Overcasting and attaching appliqués 3.5 (1/8) 0.0-7.0 1.4 0.0-4.0 Yes...
Operation Manual
Page 74
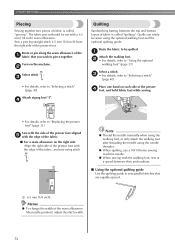
... fabric. ■ For a seam allowance on the right side Align the right side of the fabric, and sew using stitch . 1 Note ● Thread the needle manually when using the walking foot, or only attach the walking foot after threading the needle using the optional walking foot and the optional quilting guide...
... fabric. ■ For a seam allowance on the right side Align the right side of the fabric, and sew using stitch . 1 Note ● Thread the needle manually when using the walking foot, or only attach the walking foot after threading the needle using the optional walking foot and the optional quilting guide...
Operation Manual
Page 75
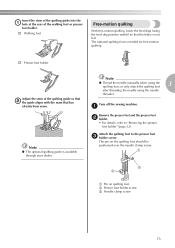
... and the presser foot b holder. • For details, refer to the presser foot c holder screw. Turn off the sewing machine. Note ● Thread the needle manually when using the quilting foot, or only attach the quilting foot 3 after threading the needle using the feed dog position switch) so that has already...
... and the presser foot b holder. • For details, refer to the presser foot c holder screw. Turn off the sewing machine. Note ● Thread the needle manually when using the quilting foot, or only attach the quilting foot 3 after threading the needle using the feed dog position switch) so that has already...


