Users Manual - English
Page 11
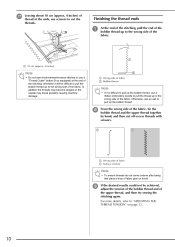
..., pull the end of the bobbin thread up the bobbin thread. In addition the threads may become tangled or the needle may break possibly causing machine damage. For more details, refer to "ADJUSTING THE THREAD TENSION" on knots. b From the wrong side of the fabric, tie the bobbin thread and ... upper thread together by hand, and then cut the threads. a 10 cm (approx. 4 inches) Note • Do not sew reinforcement/reverse stitches or use a ribbon embroidery needle to pull the thread up to the wrong side of the fabric. c If the desired results could not be difficult to pull the bobbin...
..., pull the end of the bobbin thread up the bobbin thread. In addition the threads may become tangled or the needle may break possibly causing machine damage. For more details, refer to "ADJUSTING THE THREAD TENSION" on knots. b From the wrong side of the fabric, tie the bobbin thread and ... upper thread together by hand, and then cut the threads. a 10 cm (approx. 4 inches) Note • Do not sew reinforcement/reverse stitches or use a ribbon embroidery needle to pull the thread up to the wrong side of the fabric. c If the desired results could not be difficult to pull the bobbin...
Users Manual - English
Page 6
...product are subject to inspect and adjust the machine yourself. For repair or adjustment In the event a malfunction occurs or adjustment is the most advanced computerized household embroidery and sewing machine. For a longer service life 1. Always ...consult the operation manual when replacing or installing any other parts to assure correct installation. If the problem persists, please consult your eye on the foot controller. 4. For additional product information and updates, visit our web site at www.brother...
...product are subject to inspect and adjust the machine yourself. For repair or adjustment In the event a malfunction occurs or adjustment is the most advanced computerized household embroidery and sewing machine. For a longer service life 1. Always ...consult the operation manual when replacing or installing any other parts to assure correct installation. If the problem persists, please consult your eye on the foot controller. 4. For additional product information and updates, visit our web site at www.brother...
Users Manual - English
Page 7
... Chapter 3 To sew characters and patterns Continue with chapter 3 to learn how to the first-time user the initial operations for using the machine, you have questions about a specific function, refer to the index (P.217) and the table of contents to find the section of the ... rotate or resize them and utilizing more useful functions or techniques. HOW TO USE THIS MANUAL Chapters 1 and 2 describe to edit more advanced embroidery patterns and combine patterns. Chapter 1 Chapter 2 Chapter 5 Chapter 6 • Parts related to operations described in the procedures are highlighted in ...
... Chapter 3 To sew characters and patterns Continue with chapter 3 to learn how to the first-time user the initial operations for using the machine, you have questions about a specific function, refer to the index (P.217) and the table of contents to find the section of the ... rotate or resize them and utilizing more useful functions or techniques. HOW TO USE THIS MANUAL Chapters 1 and 2 describe to edit more advanced embroidery patterns and combine patterns. Chapter 1 Chapter 2 Chapter 5 Chapter 6 • Parts related to operations described in the procedures are highlighted in ...
Users Manual - English
Page 8
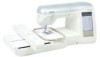
CONTENTS CONTENTS NAMES OF MACHINE PARTS AND THEIR FUNCTIONS 9 Machine 9 Needle and Presser Foot Section 10 Embroidery Unit 10 Operation Buttons 11 Included Accessories 11 Options 14 Top Stitching 74 Smocking 74 Fagoting 75 Tape or Elastic Attaching 76 Heirloom ...Stitching 77 Buttonhole Stitches 79 Bar Tacks 84 Button Sewing 86 Eyelets 87 Chapter 1 Getting Ready 15 TURNING THE MACHINE ON/OFF 16...
CONTENTS CONTENTS NAMES OF MACHINE PARTS AND THEIR FUNCTIONS 9 Machine 9 Needle and Presser Foot Section 10 Embroidery Unit 10 Operation Buttons 11 Included Accessories 11 Options 14 Top Stitching 74 Smocking 74 Fagoting 75 Tape or Elastic Attaching 76 Heirloom ...Stitching 77 Buttonhole Stitches 79 Bar Tacks 84 Button Sewing 86 Eyelets 87 Chapter 1 Getting Ready 15 TURNING THE MACHINE ON/OFF 16...
Users Manual - English
Page 9
... One-point Patterns/Floral Patterns 125 Alphabet Patterns 125 Alphabet Patterns 168 EDITING PATTERNS 170 1 Frame Patterns 126 Moving the Pattern 171 Embroidery Cards 127 Selecting Patterns from the Machine's Memory/ Rotating the Pattern 171 Changing the Size of the Pattern 172 USB Media/Computer 127 VIEWING THE SEWING SCREEN 128 PREPARING...
... One-point Patterns/Floral Patterns 125 Alphabet Patterns 125 Alphabet Patterns 168 EDITING PATTERNS 170 1 Frame Patterns 126 Moving the Pattern 171 Embroidery Cards 127 Selecting Patterns from the Machine's Memory/ Rotating the Pattern 171 Changing the Size of the Pattern 172 USB Media/Computer 127 VIEWING THE SEWING SCREEN 128 PREPARING...
Users Manual - English
Page 11
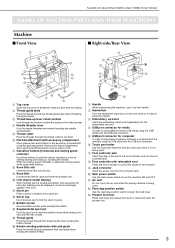
... needle automatically. f Flat bed attachment with retractable cord Press the foot controller to raise and lower the presser foot. 9 c Embroidery card slot Insert the embroidery cards (sold separately) into the connector jack. h Foot controller with accessory compartment Store presser feet and bobbins in the LCD.... i Jack connector Insert the power cord into the embroidery card slot. i Knee lifter Use the knee lifter to thread the machine and wind the bobbin. h Knee lifter slot Insert the knee lifter into the USB port connector....
... needle automatically. f Flat bed attachment with retractable cord Press the foot controller to raise and lower the presser foot. 9 c Embroidery card slot Insert the embroidery cards (sold separately) into the connector jack. h Foot controller with accessory compartment Store presser feet and bobbins in the LCD.... i Jack connector Insert the power cord into the embroidery card slot. i Knee lifter Use the knee lifter to thread the machine and wind the bobbin. h Knee lifter slot Insert the knee lifter into the USB port connector....

Users Manual - English
Page 12
...the presser foot holder in place. g Needle plate cover Remove the needle plate cover to secure the embroidery frame. d Embroidery frame holder Attach the embroidery frame to the embroidery frame holder to help sew straight seams. i Needle bar thread guide Pass the upper thread through the... is correctly lowered. 10 j Needle clamp screw Use the needle clamp screw to remove the embroidery unit. NAMES OF MACHINE PARTS AND THEIR FUNCTIONS Needle and Presser Foot Section Embroidery Unit a Buttonhole lever Lower the buttonhole lever when sewing buttonholes and bar tacks. b Release button...
...the presser foot holder in place. g Needle plate cover Remove the needle plate cover to secure the embroidery frame. d Embroidery frame holder Attach the embroidery frame to the embroidery frame holder to help sew straight seams. i Needle bar thread guide Pass the upper thread through the... is correctly lowered. 10 j Needle clamp screw Use the needle clamp screw to remove the embroidery unit. NAMES OF MACHINE PARTS AND THEIR FUNCTIONS Needle and Presser Foot Section Embroidery Unit a Buttonhole lever Lower the buttonhole lever when sewing buttonholes and bar tacks. b Release button...
Users Manual - English
Page 13
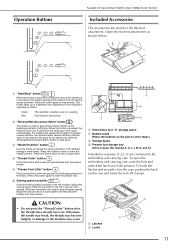
...Beginners should sew at low speed only while the "Reverse/Reinforcement Stitch" button is sewing. b c a d a Embroidery foot "U" storage space b Bobbin stand (Place the bobbins on the machine's operating condition. Press this button to 5 stitches in the same spot, then stops automatically. When this button is pressed... areas. Press this button to stop sewing. Otherwise, the needle may break, the threads may become familiar with the machine. To open the embroidery unit carrying case, raise the lock and unlock the latch out of stitching. Slide the controller to the left or ...
...Beginners should sew at low speed only while the "Reverse/Reinforcement Stitch" button is sewing. b c a d a Embroidery foot "U" storage space b Bobbin stand (Place the bobbins on the machine's operating condition. Press this button to 5 stitches in the same spot, then stops automatically. When this button is pressed... areas. Press this button to stop sewing. Otherwise, the needle may break, the threads may become familiar with the machine. To open the embroidery unit carrying case, raise the lock and unlock the latch out of stitching. Slide the controller to the left or ...
Users Manual - English
Page 15
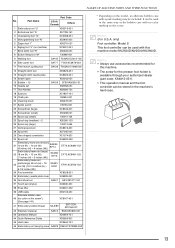
...:XE0806-001 43 Operation Manual XD0954-151 44 Quick Reference Guide XD0956-051 45 Hard case XC9640-151 46 Embroidery unit carrying case SA529 D6EUC:XC9862-052 * Depending on the screw. NAMES OF MACHINE PARTS AND THEIR FUNCTIONS Part Code No. Memo • Always use accessories recommended for the presser foot holder...
...:XE0806-001 43 Operation Manual XD0954-151 44 Quick Reference Guide XD0956-051 45 Hard case XC9640-151 46 Embroidery unit carrying case SA529 D6EUC:XC9862-052 * Depending on the screw. NAMES OF MACHINE PARTS AND THEIR FUNCTIONS Part Code No. Memo • Always use accessories recommended for the presser foot holder...
Users Manual - English
Page 16
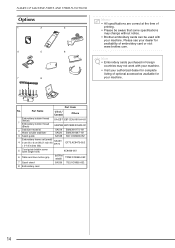
... the time of embroidery card or visit www.brother.com. Please see your dealer for your machine. Note • Embroidery cards purchased in foreign countries may change without notice. • Brother embroidery cards can be aware that some specifications may not work with your machine. • Visit your machine. Part Name U.S.A./ Canada Others Embroidery bobbin thread 1 (White) Embroidery bobbin thread...
... the time of embroidery card or visit www.brother.com. Please see your dealer for your machine. Note • Embroidery cards purchased in foreign countries may change without notice. • Brother embroidery cards can be aware that some specifications may not work with your machine. • Visit your machine. Part Name U.S.A./ Canada Others Embroidery bobbin thread 1 (White) Embroidery bobbin thread...
Users Manual - English
Page 20
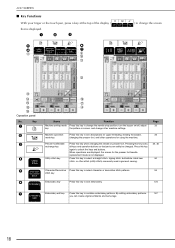
...the pattern or screen, and change the screen l m n o p s Operation panel No. Pressing this key to combine embroidery patterns. Key a b c d e f r q t Name Machine setting mode key Function Press this key locks all keys and operation buttons so that is not displayed. Press this key to select...stitch patterns. 94 stitch key Embroidery key Press this key to unlock the keys and buttons. By editing embroidery patterns, 167 g you can safely be changed. Page 20 Machine operation Press this key again to sew embroidery. 124 Embroidery edit key Press this key ...
...the pattern or screen, and change the screen l m n o p s Operation panel No. Pressing this key to combine embroidery patterns. Key a b c d e f r q t Name Machine setting mode key Function Press this key locks all keys and operation buttons so that is not displayed. Press this key to select...stitch patterns. 94 stitch key Embroidery key Press this key to unlock the keys and buttons. By editing embroidery patterns, 167 g you can safely be changed. Page 20 Machine operation Press this key again to sew embroidery. 124 Embroidery edit key Press this key ...

Users Manual - English
Page 22
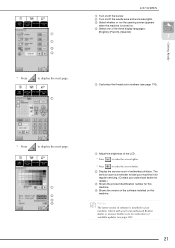
...c Make adjustments to 3 for displaying distances and the sizes of embroidery foot "U" (see page 151). b Select whether to use the sewing speed controller or to display the next page. LCD SCREEN Using the Machine Setting Mode Key Press to display the next page. a b... c d e a Adjust the maximum embroidering speed (see page 149). b Adjust the thread tension for the thread color display in the embroidery screen (see page 129). e Select the initial screen (Embroidery/Embroidery Edit) when the embroidery...
...c Make adjustments to 3 for displaying distances and the sizes of embroidery foot "U" (see page 151). b Select whether to use the sewing speed controller or to display the next page. LCD SCREEN Using the Machine Setting Mode Key Press to display the next page. a b... c d e a Adjust the maximum embroidering speed (see page 149). b Adjust the thread tension for the thread color display in the embroidery screen (see page 129). e Select the initial screen (Embroidery/Embroidery Edit) when the embroidery...
Users Manual - English
Page 23
... thread color numbers (see page 208). 21 The service count is installed in for regular servicing. (Contact your local authorized Brother dealer or at www.brother.com for this machine. d Select one of available updates (see page 176). Getting Ready * Press to display the next page. a b ...c d * Press to display the next page. a LCD SCREEN a Turn on /off the buzzer. Memo The latest version of embroidery stitches....
... thread color numbers (see page 208). 21 The service count is installed in for regular servicing. (Contact your local authorized Brother dealer or at www.brother.com for this machine. d Select one of available updates (see page 176). Getting Ready * Press to display the next page. a b ...c d * Press to display the next page. a LCD SCREEN a Turn on /off the buzzer. Memo The latest version of embroidery stitches....
Users Manual - English
Page 24
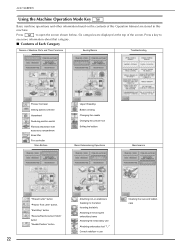
Press a key to see more information about that category. ■ Contents of Each Category Names of Machine Parts and Their Functions Sewing Basics Troubleshooting Presser foot lever Sewing speed controller Handwheel Feed dog position switch Flat... the race and bobbin case LCD SCREEN Using the Machine Operation Mode Key Basic machine operations and other information based on stabilizers (backing) to the fabric Inserting the fabric Attaching & removing the embroidery frame Attaching the embroidery unit Attaching embroidery foot "U" Correct stabilizer to open the screen shown below...
Press a key to see more information about that category. ■ Contents of Each Category Names of Machine Parts and Their Functions Sewing Basics Troubleshooting Presser foot lever Sewing speed controller Handwheel Feed dog position switch Flat... the race and bobbin case LCD SCREEN Using the Machine Operation Mode Key Basic machine operations and other information based on stabilizers (backing) to the fabric Inserting the fabric Attaching & removing the embroidery frame Attaching the embroidery unit Attaching embroidery foot "U" Correct stabilizer to open the screen shown below...
Users Manual - English
Page 26
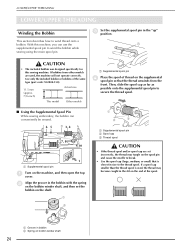
... supplemental spool pin to secure the thread spool. ■ Using the Supplemental Spool Pin While sewing embroidery, the bobbin can conveniently be wound. 65 a 3, 4 2 7, 8 9,10 l o 1 a Supplemental spool pin a Turn on the machine, and then open the top cover. Then, slide the spool cap as far as possible onto ... than the thread spool is closest in the slit on the end of thread on the supplemental spool pin so that is used , the machine will not operate correctly. If bobbins from the front. c Set the supplemental spool pin in bobbin b Spring on the shaft. LOWER/UPPER...
... supplemental spool pin to secure the thread spool. ■ Using the Supplemental Spool Pin While sewing embroidery, the bobbin can conveniently be wound. 65 a 3, 4 2 7, 8 9,10 l o 1 a Supplemental spool pin a Turn on the machine, and then open the top cover. Then, slide the spool cap as far as possible onto ... than the thread spool is closest in the slit on the end of thread on the supplemental spool pin so that is used , the machine will not operate correctly. If bobbins from the front. c Set the supplemental spool pin in bobbin b Spring on the shaft. LOWER/UPPER...
Users Manual - English
Page 39
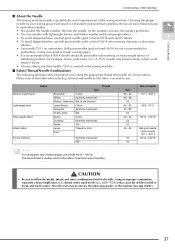
... or break, causing injury. • It is inserted in the sewing machine. ■ Fabric/Thread/Needle Combinations The following table provides information concerning the appropriate thread and needle for embroidery, as they may cause the needle to bend or break, and lead to... Below are not recommended for various fabrics. The same thread is usually used when embroidering on heavyweight fabrics or stabilizing products (for embroidery. Using an improper combination, especially a heavyweight fabric (i.e., denim) with stretch fabrics. 1 • To avoid skipped stitches, use...
... or break, causing injury. • It is inserted in the sewing machine. ■ Fabric/Thread/Needle Combinations The following table provides information concerning the appropriate thread and needle for embroidery, as they may cause the needle to bend or break, and lead to... Below are not recommended for various fabrics. The same thread is usually used when embroidering on heavyweight fabrics or stabilizing products (for embroidery. Using an improper combination, especially a heavyweight fabric (i.e., denim) with stretch fabrics. 1 • To avoid skipped stitches, use...

Users Manual - English
Page 45
...left side of presser foot "J". a a Thin paper 43 CAUTION • Do not forcefully push fabrics more than 6 mm (approx. 1/4 inch) thick through the sewing machine. The default is 7.5mm from the needle plate when the presser foot is too thick to fit under the presser foot, raise the presser foot... lever to be fed. Sewing Lightweight Fabric Iron the fabric with starch or place thin paper or tear away embroidery stabilizer under thin fabrics to sew or when sewing thick seams, press the black button on the setting screen (see page 20). Once the...
...left side of presser foot "J". a a Thin paper 43 CAUTION • Do not forcefully push fabrics more than 6 mm (approx. 1/4 inch) thick through the sewing machine. The default is 7.5mm from the needle plate when the presser foot is too thick to fit under the presser foot, raise the presser foot... lever to be fed. Sewing Lightweight Fabric Iron the fabric with starch or place thin paper or tear away embroidery stabilizer under thin fabrics to sew or when sewing thick seams, press the black button on the setting screen (see page 20). Once the...
Users Manual - English
Page 48
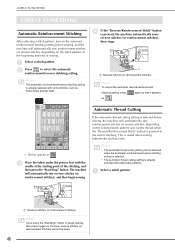
...FUNCTIONS Automatic Reinforcement Stitching After selecting a stitch pattern, turn on the automatic reinforcement stitching setting before sewing, the machine will not be selected when the automatic reinforcement/reverse stitching setting is selected. • The automatic thread cutting ...setting, press again so that it again to select the automatic reinforcement/reverse stitching setting. This is already selected with embroidery patterns. b Press to continue, reverse stitches (or reinforcement stitches) will automatically sew reinforcement stitches (or reverse stitches...
...FUNCTIONS Automatic Reinforcement Stitching After selecting a stitch pattern, turn on the automatic reinforcement stitching setting before sewing, the machine will not be selected when the automatic reinforcement/reverse stitching setting is selected. • The automatic thread cutting ...setting, press again so that it again to select the automatic reinforcement/reverse stitching setting. This is already selected with embroidery patterns. b Press to continue, reverse stitches (or reinforcement stitches) will automatically sew reinforcement stitches (or reverse stitches...
Users Manual - English
Page 58
...Foot The straight stitch needle plate and the straight stitch foot can only be displayed. 56 a a Bobbin case e Use the screwdriver included with the machine to OFF. c Grasp both sides of the fabric with the 16mm (approx. 5/8 inch) mark on lightweight fabrics. h After reinstalling the needle plate ...into the hole of the straight stitches. CAUTION Always use the screwdriver to tighten the plate. b Remove the flat bed attachment or the embroidery unit if either are attached. a Press the "Presser Foot Lifter" button to raise the presser foot and turn the main power to unscrew...
...Foot The straight stitch needle plate and the straight stitch foot can only be displayed. 56 a a Bobbin case e Use the screwdriver included with the machine to OFF. c Grasp both sides of the fabric with the 16mm (approx. 5/8 inch) mark on lightweight fabrics. h After reinstalling the needle plate ...into the hole of the straight stitches. CAUTION Always use the screwdriver to tighten the plate. b Remove the flat bed attachment or the embroidery unit if either are attached. a Press the "Presser Foot Lifter" button to raise the presser foot and turn the main power to unscrew...
Users Manual - English
Page 155
...file names. USING THE MEMORY FUNCTION USING THE MEMORY FUNCTION Embroidery Data Precautions Observe the following precautions when using embroidery data other than that saved using our data design systems or sewing machines may cause the embroidery machine to malfunction. ■ Types of USB Devices/Media ... contains no more details. • USB hubs cannot be used with this machine. CAUTION • When using a USB CD-ROM, CD-R or CD-RW drive. 5 Embroidery You can be saved using embroidery data other than eight characters, the entire file name will differ depending on...
...file names. USING THE MEMORY FUNCTION USING THE MEMORY FUNCTION Embroidery Data Precautions Observe the following precautions when using embroidery data other than that saved using our data design systems or sewing machines may cause the embroidery machine to malfunction. ■ Types of USB Devices/Media ... contains no more details. • USB hubs cannot be used with this machine. CAUTION • When using a USB CD-ROM, CD-R or CD-RW drive. 5 Embroidery You can be saved using embroidery data other than eight characters, the entire file name will differ depending on...


