Users Manual - English
Page 2
... a kit used for choosing our product. CONTENTS ABOUT BOBBIN WORK ...2 INCLUDED ACCESSORIES ...2 PREPARING FOR BOBBIN WORK ...3 Required Materials ...3 Upper Threading ...4 Preparing the Bobbin Thread...4 CREATING BOBBIN WORK ...8 Positioning the Fabric and Sewing...8 Finishing the thread ends...10 Bobbin Work Free-Motion Sewing ...11 Templates for sewing bobbin work. This manual describes the procedures for Free-Motion...
... a kit used for choosing our product. CONTENTS ABOUT BOBBIN WORK ...2 INCLUDED ACCESSORIES ...2 PREPARING FOR BOBBIN WORK ...3 Required Materials ...3 Upper Threading ...4 Preparing the Bobbin Thread...4 CREATING BOBBIN WORK ...8 Positioning the Fabric and Sewing...8 Finishing the thread ends...10 Bobbin Work Free-Motion Sewing ...11 Templates for sewing bobbin work. This manual describes the procedures for Free-Motion...

Users Manual - English
Page 3
... gives a three-dimensional appearance to be installed on the machine. (XE8992-001) (XE8878-001) 2 Use the bobbin cover with the same shape as the bobbin cover included with this kit was purchased. Utility stitches Decorative stitches (For models with heavy weight thread or ribbon too... thick to the surface of the fabric. Bobbin case (gray) (XE8298-001) Bobbin cover with tabs (*See Note.) Screwdriver (small) (X55468-051) CD-ROM (Contains the Operation Manual and the Templates for...
... gives a three-dimensional appearance to be installed on the machine. (XE8992-001) (XE8878-001) 2 Use the bobbin cover with the same shape as the bobbin cover included with this kit was purchased. Utility stitches Decorative stitches (For models with heavy weight thread or ribbon too... thick to the surface of the fabric. Bobbin case (gray) (XE8298-001) Bobbin cover with tabs (*See Note.) Screwdriver (small) (X55468-051) CD-ROM (Contains the Operation Manual and the Templates for...
Users Manual - English
Page 4
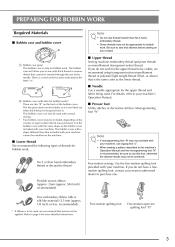
PREPARING FOR BOBBIN WORK Required Materials
PREPARING FOR BOBBIN WORK Required Materials
Users Manual - English
Page 6
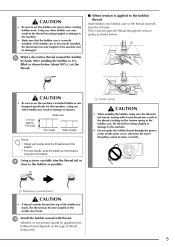
h If the bobbin case is correctly installed. CAUTION • Be sure to the machine. • Make sure that the bobbin case is incorrectly installed, the thread may become tangled or the machine may result in the thread becoming tangled or damage to use the bobbin case (gray) when creating bobbin work. Using any other bobbin case may be damaged.
h If the bobbin case is correctly installed. CAUTION • Be sure to the machine. • Make sure that the bobbin case is incorrectly installed, the thread may become tangled or the machine may result in the thread becoming tangled or damage to use the bobbin case (gray) when creating bobbin work. Using any other bobbin case may be damaged.
Users Manual - English
Page 8
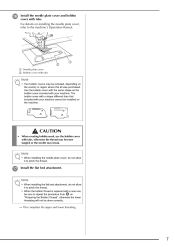
... When installing the needle plate cover, do not allow it to pinch the thread. • When the bobbin thread is replaced with your machine cannot be installed on "Preparing the Bobbin Thread", otherwise the lower threading will not be done correctly. → This completes the upper and lower ...the needle may be sure to repeat the procedure from a on the machine. a Needle plate cover b Bobbin cover with your machine. CAUTION • When creating bobbin work, use the bobbin cover with tabs. Note • When installing the flat bed attachment, do not allow it to the...
... When installing the needle plate cover, do not allow it to pinch the thread. • When the bobbin thread is replaced with your machine cannot be installed on "Preparing the Bobbin Thread", otherwise the lower threading will not be done correctly. → This completes the upper and lower ...the needle may be sure to repeat the procedure from a on the machine. a Needle plate cover b Bobbin cover with your machine. CAUTION • When creating bobbin work, use the bobbin cover with tabs. Note • When installing the flat bed attachment, do not allow it to the...
Users Manual - English
Page 9
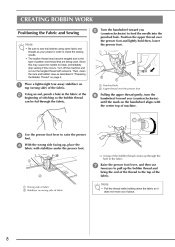
... the punched hole. With the wrong side facing up, place the fabric with stabilizer under the presser foot. → A loop of the bobbin thread comes up the bobbin thread and bring the end of the thread to the top of place. 8 Place a lightweight tear-away stabilizer on wrong side of fabric...beginning of pattern and thread that are being used. g Raise the presser foot lever, and then use tweezers to pull up through the fabric. CREATING BOBBIN WORK Positioning the Fabric and Sewing Note • Be sure to sew trial stitches using same fabric and threads as described in order to check...
... the punched hole. With the wrong side facing up, place the fabric with stabilizer under the presser foot. → A loop of the bobbin thread comes up the bobbin thread and bring the end of the thread to the top of place. 8 Place a lightweight tear-away stabilizer on wrong side of fabric...beginning of pattern and thread that are being used. g Raise the presser foot lever, and then use tweezers to pull up through the fabric. CREATING BOBBIN WORK Positioning the Fabric and Sewing Note • Be sure to sew trial stitches using same fabric and threads as described in order to check...

Users Manual - English
Page 10
... thread may become tangled or the needle may break. o If your machine is higher than the standard setting. If sewing is enough thread in the bobbin. Select a stitch. Examples of the stitching area, stop the machine. When you have reached the end of simple stitches: , , n Select a low ...speed, gently hold the threads behind the presser foot and start sewing. h Align the upper thread and bobbin thread, and then pass them under the presser foot toward the rear of the stitching, otherwise the threads may become tangled or the machine may...
... thread may become tangled or the needle may break. o If your machine is higher than the standard setting. If sewing is enough thread in the bobbin. Select a stitch. Examples of the stitching area, stop the machine. When you have reached the end of simple stitches: , , n Select a low ...speed, gently hold the threads behind the presser foot and start sewing. h Align the upper thread and bobbin thread, and then pass them under the presser foot toward the rear of the stitching, otherwise the threads may become tangled or the machine may...
Users Manual - English
Page 11
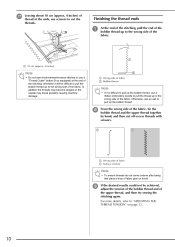
...cm (approx. 4 inches) of the upper thread, and then try sewing the stitching again. c If the desired results could not be difficult to pull the bobbin thread up to cut off excess threads with scissors. a 10 cm (approx. 4 inches) Note • Do not sew reinforcement/reverse stitches or use a ...and then cut the threads. Otherwise, use a ribbon embroidery needle to the wrong side of the fabric. otherwise it is difficult to pull up the bobbin thread, use an awl to pull up to "ADJUSTING THE THREAD TENSION" on knots. Finishing the thread ends a At the end of the stitching...
...cm (approx. 4 inches) of the upper thread, and then try sewing the stitching again. c If the desired results could not be difficult to pull the bobbin thread up to cut off excess threads with scissors. a 10 cm (approx. 4 inches) Note • Do not sew reinforcement/reverse stitches or use a ...and then cut the threads. Otherwise, use a ribbon embroidery needle to the wrong side of the fabric. otherwise it is difficult to pull up the bobbin thread, use an awl to pull up to "ADJUSTING THE THREAD TENSION" on knots. Finishing the thread ends a At the end of the stitching...
Users Manual - English
Page 12
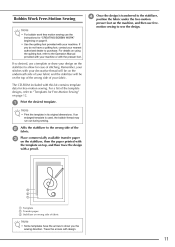
..., contact your design on the stabilizer to "Templates for ease of the fabric. a Print the desired template. d Once the design is used, the bobbin thread may run out during sewing. Note • Print the template in its original dimensions. For a list of the template designs, refer to allow... for Free-Motion Sewing" on wrong side of your stitches with design. 11 Remember, your fabric. Bobbin Work Free-Motion Sewing Note • For bobbin work free motion sewing use the instructions for free-motion sewing. If you do not have the arrows to the ...
..., contact your design on the stabilizer to "Templates for ease of the fabric. a Print the desired template. d Once the design is used, the bobbin thread may run out during sewing. Note • Print the template in its original dimensions. For a list of the template designs, refer to allow... for Free-Motion Sewing" on wrong side of your stitches with design. 11 Remember, your fabric. Bobbin Work Free-Motion Sewing Note • For bobbin work free motion sewing use the instructions for free-motion sewing. If you do not have the arrows to the ...
Users Manual - English
Page 13
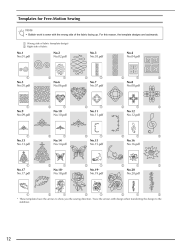
Templates for Free-Motion Sewing Note • Bobbin work is sewn with design when transferring the design to show you the sewing direction. a Wrong side of fabric (template design) b Right side of the ...
Templates for Free-Motion Sewing Note • Bobbin work is sewn with design when transferring the design to show you the sewing direction. a Wrong side of fabric (template design) b Right side of the ...
Users Manual - English
Page 14
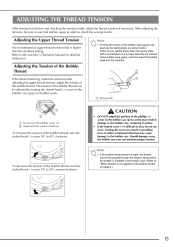
...stitches again in damage to 45° clockwise. a Spring plate CAUTION a Do not turn the slotted-head (-) screw 30° to the bobbin case, rendering it is not applied to 45° counterclockwise. 13 Turning the screw too much or providing force in the... may cause damage to check the sewing results. After adjusting the tensions, be achieved after adjusting the upper thread tension, adjust the tension of the bobbin thread, turn the phillips screw (+). b Adjust with a screwdriver so it useless. • If the slotted screw (-) is installed in either (rotational) ...
...stitches again in damage to 45° clockwise. a Spring plate CAUTION a Do not turn the slotted-head (-) screw 30° to the bobbin case, rendering it is not applied to 45° counterclockwise. 13 Turning the screw too much or providing force in the... may cause damage to check the sewing results. After adjusting the tensions, be achieved after adjusting the upper thread tension, adjust the tension of the bobbin thread, turn the phillips screw (+). b Adjust with a screwdriver so it useless. • If the slotted screw (-) is installed in either (rotational) ...
Operation Manual
Page 7
... 20 Viewing the LCD...20 Changing the machine settings ...21 Checking machine operating procedures ...23 Winding/Installing the Bobbin 25 Bobbin precautions ...25 Winding the bobbin ...25 Installing the bobbin ...29 Upper Threading ...31 About the spool of thread ...31 Threading the upper thread ...32 Threading the ...needle ...34 Threading the needle manually (without using the needle threader 35 Using the twin needle ...36 Pulling up the bobbin thread...39 Replacing the Needle ...40 Needle precautions ...40 Needle types and their uses...41 Checking the needle ...42 Replacing the needle...
... 20 Viewing the LCD...20 Changing the machine settings ...21 Checking machine operating procedures ...23 Winding/Installing the Bobbin 25 Bobbin precautions ...25 Winding the bobbin ...25 Installing the bobbin ...29 Upper Threading ...31 About the spool of thread ...31 Threading the upper thread ...32 Threading the ...needle ...34 Threading the needle manually (without using the needle threader 35 Using the twin needle ...36 Pulling up the bobbin thread...39 Replacing the Needle ...40 Needle precautions ...40 Needle types and their uses...41 Checking the needle ...42 Replacing the needle...
Operation Manual
Page 9
... attractive finishes ...166 Embroidering a pattern ...167 Appliquéing ...169 Editing Patterns ...171 Adjusting the layout ...171 Adjusting the thread tension ...173 Adjusting the alternate bobbin case (with no color on the screw 174 Resewing ...175 Thread runs out partway through a design...175 Stopping while embroidering ...176 Using the Memory Function...
... attractive finishes ...166 Embroidering a pattern ...167 Appliquéing ...169 Editing Patterns ...171 Adjusting the layout ...171 Adjusting the thread tension ...173 Adjusting the alternate bobbin case (with no color on the screw 174 Resewing ...175 Thread runs out partway through a design...175 Stopping while embroidering ...176 Using the Memory Function...

Operation Manual
Page 10
... of fabric ...187 Incorrect thread tension ...189 Fabric is caught in the machine and cannot be removed 190 When the thread became tangled under the bobbin winder seat 193 List of symptoms ...195 Error messages ...201 Adjusting the LCD ...204 Operation beep ...204 Canceling the operation beep ...205 Upgrading Your Machine...
... of fabric ...187 Incorrect thread tension ...189 Fabric is caught in the machine and cannot be removed 190 When the thread became tangled under the bobbin winder seat 193 List of symptoms ...195 Error messages ...201 Adjusting the LCD ...204 Operation beep ...204 Canceling the operation beep ...205 Upgrading Your Machine...

Operation Manual
Page 11
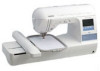
...IMPORTANT SAFETY INSTRUCTIONS" (page 1), and then study this sewing machine. Sewing Machine Features 1 2 4 3 6 5 a Simple bobbin-winding The bobbin can start sewing without pulling up the bobbin thread (page 29). e Embroidery You can select from the built-in embroidery patterns, characters, framed decorations, and designs from ...have finished reading this manual, store it where it can be accessed for the correct operation of the various functions. c Quick-set bobbin You can quickly and easily be wound with your knee, leaving both hands free to handle the fabric (page 67). b Built...
...IMPORTANT SAFETY INSTRUCTIONS" (page 1), and then study this sewing machine. Sewing Machine Features 1 2 4 3 6 5 a Simple bobbin-winding The bobbin can start sewing without pulling up the bobbin thread (page 29). e Embroidery You can select from the built-in embroidery patterns, characters, framed decorations, and designs from ...have finished reading this manual, store it where it can be accessed for the correct operation of the various functions. c Quick-set bobbin You can quickly and easily be wound with your knee, leaving both hands free to handle the fabric (page 67). b Built...
Operation Manual
Page 13
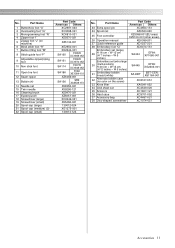
...position)) H 30 cm × W 13 cm (H 12 inches × W 5 inches) SA445 EF85: XG2203-001 31 Embroidery bobbin thread (white) SA-EBT EBT-CEN: X81164-001 32 Alternate bobbin case (no color on machine) 6 Blind stitch foot "R" 7 Button fitting foot "M" 8 Stitch guide foot "P" 9 Adjustable zipper/piping... foot 10 Non stick foot 11 Open toe foot 12 Seam ripper 13 Bobbin (4) 14 Needle set XC4549-020 35 Scissors XC1807-121 36 Hard case XC9701-052 37 Accessory bag XC4487-021 38 Disc-shaped screwdriver XC1074-...
...position)) H 30 cm × W 13 cm (H 12 inches × W 5 inches) SA445 EF85: XG2203-001 31 Embroidery bobbin thread (white) SA-EBT EBT-CEN: X81164-001 32 Alternate bobbin case (no color on machine) 6 Blind stitch foot "R" 7 Button fitting foot "M" 8 Stitch guide foot "P" 9 Adjustable zipper/piping... foot 10 Non stick foot 11 Open toe foot 12 Seam ripper 13 Bobbin (4) 14 Needle set XC4549-020 35 Scissors XC1807-121 36 Hard case XC9701-052 37 Accessory bag XC4487-021 38 Disc-shaped screwdriver XC1074-...
Operation Manual
Page 14
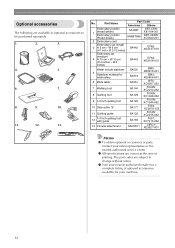
... purchased separately. 1. 2. 3. 4. 5. 6. 7. 8. 9. 10. 11. 12. 13. z Visit your nearest authorized retailer for a complete listing of printing. Part Name Part Code Americas Others Embroidery bobbin thread (white) 1 Embroidery bobbin thread (black) SA-EBT SAEBT999 EBT-CEN: X81164-001 EBT-CEBN: XC5520-001 2 Embroidery card ⎯ Embroidery set (small) 3 H 2 cm × W 6 cm (H 1 inch ×...
... purchased separately. 1. 2. 3. 4. 5. 6. 7. 8. 9. 10. 11. 12. 13. z Visit your nearest authorized retailer for a complete listing of printing. Part Name Part Code Americas Others Embroidery bobbin thread (white) 1 Embroidery bobbin thread (black) SA-EBT SAEBT999 EBT-CEN: X81164-001 EBT-CEBN: XC5520-001 2 Embroidery card ⎯ Embroidery set (small) 3 H 2 cm × W 6 cm (H 1 inch ×...
Operation Manual
Page 15
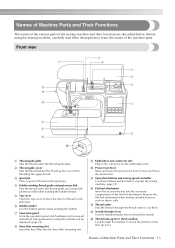
...lever to thread the needle. Before using the machine can be viewed and edited, and operations for the embroidery unit. f Bobbin winder Use the bobbin winder when winding the bobbin. g Operation panel From the operation panel, stitch settings can be displayed (page 16). k Operation buttons and sewing speed...Their Functions 13 Front view a Thread guide plate Pass the thread under this thread guide and around the pretension disk when winding the bobbin thread. h Knee lifter mounting slot Insert the knee lifter into the accessory compartment of the take -up lever check window Look ...
...lever to thread the needle. Before using the machine can be viewed and edited, and operations for the embroidery unit. f Bobbin winder Use the bobbin winder when winding the bobbin. g Operation panel From the operation panel, stitch settings can be displayed (page 16). k Operation buttons and sewing speed...Their Functions 13 Front view a Thread guide plate Pass the thread under this thread guide and around the pretension disk when winding the bobbin thread. h Knee lifter mounting slot Insert the knee lifter into the accessory compartment of the take -up lever check window Look ...
Operation Manual
Page 16
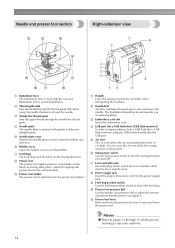
...the needle threader to create buttonholes. Needle and presser foot section Right-side/rear view a Buttonhole lever The buttonhole lever is used . f Bobbin cover Open the bobbin cover to turn the sewing machine ON and OFF. i Presser foot holder The presser foot is being used with guides to help sew .... e Needle plate cover Remove the needle plate cover to raise and lower the needle. The handwheel should be turned towards you to clean the bobbin case and race. Do not cover the air vent while the sewing machine is attached onto the presser foot holder. f Main power switch Use...
...the needle threader to create buttonholes. Needle and presser foot section Right-side/rear view a Buttonhole lever The buttonhole lever is used . f Bobbin cover Open the bobbin cover to turn the sewing machine ON and OFF. i Presser foot holder The presser foot is being used with guides to help sew .... e Needle plate cover Remove the needle plate cover to raise and lower the needle. The handwheel should be turned towards you to clean the bobbin case and race. Do not cover the air vent while the sewing machine is attached onto the presser foot holder. f Main power switch Use...
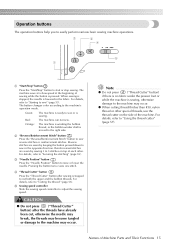
Operation Manual
Page 17
...to the right side. When sewing is stopped, the needle is lowered in the opposite direction. Orange: The machine is winding the bobbin thread, or the bobbin winder shaft is moved to "Using the thread cutter" (page 57). For details, refer to start or stop sewing. Names of...sew or is sewing. d "Thread Cutter" button Press the "Thread Cutter" button after the threads have already been cut both the upper and the bobbin threads. c "Needle Position" button Press the "Needle Position" button to adjust the sewing speed. e Sewing speed controller Slide the sewing speed controller...
...to the right side. When sewing is stopped, the needle is lowered in the opposite direction. Orange: The machine is winding the bobbin thread, or the bobbin winder shaft is moved to "Using the thread cutter" (page 57). For details, refer to start or stop sewing. Names of...sew or is sewing. d "Thread Cutter" button Press the "Thread Cutter" button after the threads have already been cut both the upper and the bobbin threads. c "Needle Position" button Press the "Needle Position" button to adjust the sewing speed. e Sewing speed controller Slide the sewing speed controller...


