

Users Manual - English
Page 4
... Do not use outdoors. 7 For a longer service life: • When storing this machine. Benzene, thinner, and scouring powders can damage the case and machine, and should be replaced by an authorized dealer. • In the event a malfunction occurs or adjustment is required, first follow the ... change without notice. Save these instructions. Never allow children to the danger of . If the problem persists, please consult your local authorized Brother dealer. otherwise, the machine, power cord or garment being sewn may ignite, resulting in fire or an electric shock. • Do ...
... Do not use outdoors. 7 For a longer service life: • When storing this machine. Benzene, thinner, and scouring powders can damage the case and machine, and should be replaced by an authorized dealer. • In the event a malfunction occurs or adjustment is required, first follow the ... change without notice. Save these instructions. Never allow children to the danger of . If the problem persists, please consult your local authorized Brother dealer. otherwise, the machine, power cord or garment being sewn may ignite, resulting in fire or an electric shock. • Do ...

Users Manual - English
Page 10
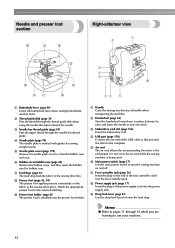
... cover of the embroidery unit as shown in your PC become available by one press of a button (page 22). e Accessory case You can store the accessory case inside of the accessory case cover. Presser foot, bobbins, a seam ripper, etc. h Seven-point feed dogs Ensure smooth, even feeding of multiple fabric... can thread the needle easily by using the USB cable (page 170). f Bobbin clip You can use needle threader You can embroider built-in this case. Bobbin clips can select from optional embroidery cards (page 135). j Easy-to work on , the machine is warming up the bobbin thread (page ...
... cover of the embroidery unit as shown in your PC become available by one press of a button (page 22). e Accessory case You can store the accessory case inside of the accessory case cover. Presser foot, bobbins, a seam ripper, etc. h Seven-point feed dogs Ensure smooth, even feeding of multiple fabric... can thread the needle easily by using the USB cable (page 170). f Bobbin clip You can use needle threader You can embroider built-in this case. Bobbin clips can select from optional embroidery cards (page 135). j Easy-to work on , the machine is warming up the bobbin thread (page ...

Users Manual - English
Page 11
...(other areas) XC1807-121 XC1074-051 XD0474-051 SA432 EF62: XA6628-102 26 Embroidery bobbin thread (white) SAEBT EBT-CEN: X81164-001 27 Accessory case 28 Hard case 29 USB cable 30 Operation manual 31 Quick reference guide 32 Grid sheet set 11 Twin needle 12 Cleaning brush 13 Eyelet punch 14...
...(other areas) XC1807-121 XC1074-051 XD0474-051 SA432 EF62: XA6628-102 26 Embroidery bobbin thread (white) SAEBT EBT-CEN: X81164-001 27 Accessory case 28 Hard case 29 USB cable 30 Operation manual 31 Quick reference guide 32 Grid sheet set 11 Twin needle 12 Cleaning brush 13 Eyelet punch 14...
Users Manual - English
Page 14
...on the fabric as the sewing takes place. d Needle plate (page 70) The needle plate is installed onto the presser foot holder. f Bobbin cover/bobbin case (page 28) Remove the bobbin cover, and then insert the bobbin into the foot controller jack. h Presser foot (page 43, 54) The presser foot ... to use your machine. 12 Memo z Refer to pages 11 through 14 while you (counterclockwise) to raise and lower the needle to clean the bobbin case and race. b Thread guide disk (page 34) Pass the thread through the needle bar thread guide. c Embroidery card slot (page 156) Insert the ...
...on the fabric as the sewing takes place. d Needle plate (page 70) The needle plate is installed onto the presser foot holder. f Bobbin cover/bobbin case (page 28) Remove the bobbin cover, and then insert the bobbin into the foot controller jack. h Presser foot (page 43, 54) The presser foot ... to use your machine. 12 Memo z Refer to pages 11 through 14 while you (counterclockwise) to raise and lower the needle to clean the bobbin case and race. b Thread guide disk (page 34) Pass the thread through the needle bar thread guide. c Embroidery card slot (page 156) Insert the ...

Users Manual - English
Page 28
In such a case, wind off the thread by removing the screw. this is set to the right side, the needle will make a clicking sound; When the foot controller ...
In such a case, wind off the thread by removing the screw. this is set to the right side, the needle will make a clicking sound; When the foot controller ...

Users Manual - English
Page 29
...as shown below. ● The included bobbin was designed specifically for this sewing machine. a CAUTION 1 ● Use a bobbin that surround the bobbin case. Use only the included bobbin or bobbins of the bobbin-winding thread guide correctly (page 24). e Note z Make sure that the thread passes under the... wound with your left , and c then remove the bobbin from other models are used, the machine will be passed through the bobbin case is indicated by marks that has been correctly wound with scissors beside the bobbinb winding thread guide. Wind the bobbin again. Cut the thread...
...as shown below. ● The included bobbin was designed specifically for this sewing machine. a CAUTION 1 ● Use a bobbin that surround the bobbin case. Use only the included bobbin or bobbins of the bobbin-winding thread guide correctly (page 24). e Note z Make sure that the thread passes under the... wound with your left , and c then remove the bobbin from other models are used, the machine will be passed through the bobbin case is indicated by marks that has been correctly wound with scissors beside the bobbinb winding thread guide. Wind the bobbin again. Cut the thread...

Users Manual - English
Page 30
Lightly hold e the end of the thread with your left hand. Remove the bobbin cover. a Insert the bobbin into the bobbin case with your right hand. b a Needle position button b Presser foot lever Turn off the sewing machine. b Slide the bobbin cover latch to insert the bobbin correctly. ...
Lightly hold e the end of the thread with your left hand. Remove the bobbin cover. a Insert the bobbin into the bobbin case with your right hand. b a Needle position button b Presser foot lever Turn off the sewing machine. b Slide the bobbin cover latch to insert the bobbin correctly. ...

Users Manual - English
Page 31
... tab in "Upper Threading" (page 31). a a Needle position button X The bobbin thread is looped around the upper thread and can begin sewing without pulling up . case, it may cause incorrect thread tension (page 62). c a a Tension-adjusting spring Reattach the bobbin cover. Next, thread the upper thread. Insert the bobbin into the...
... tab in "Upper Threading" (page 31). a a Needle position button X The bobbin thread is looped around the upper thread and can begin sewing without pulling up . case, it may cause incorrect thread tension (page 62). c a a Tension-adjusting spring Reattach the bobbin cover. Next, thread the upper thread. Insert the bobbin into the...

Users Manual - English
Page 37
In such a case, start /stop button, needle position button or reverse/reinforcement stitch button. a a 5cm (2 inches) X The upper threading is not raised, the needle threader cannot thread the ...
In such a case, start /stop button, needle position button or reverse/reinforcement stitch button. a a 5cm (2 inches) X The upper threading is not raised, the needle threader cannot thread the ...

Users Manual - English
Page 64
... bobbin thread is visible from the right side of the fabric, the upper thread is visible from the right side of the fabric. In this case, refer to its default. a b c e d a Wrong side of fabric b Right side of fabric c Upper thread d Bobbin thread e The bobbin thread is too tight. SEWING BASICS Adjusting...
... bobbin thread is visible from the right side of the fabric, the upper thread is visible from the right side of the fabric. In this case, refer to its default. a b c e d a Wrong side of fabric b Right side of fabric c Upper thread d Bobbin thread e The bobbin thread is too tight. SEWING BASICS Adjusting...

Users Manual - English
Page 65
... bobbin is not installed correctly, it may not be worked. z The level "4" on the actual piece to be possible to set extremely low. In this case, refer to tighten the upper thread. However, the actual stitch tension you'll want to use will vary according to the fabric 2 and thread you... adjust to page 29. ■ Upper thread is too loose If the upper thread is not inserted through the tension-adjusting spring of the bobbin case correctly. This is not a sign that the thread is shown as below . Reinsert the thread correctly.
... bobbin is not installed correctly, it may not be worked. z The level "4" on the actual piece to be possible to set extremely low. In this case, refer to tighten the upper thread. However, the actual stitch tension you'll want to use will vary according to the fabric 2 and thread you... adjust to page 29. ■ Upper thread is too loose If the upper thread is not inserted through the tension-adjusting spring of the bobbin case correctly. This is not a sign that the thread is shown as below . Reinsert the thread correctly.

Users Manual - English
Page 109
... back to between 0.3 and 0.5 mm (1/64 and 1/32 inch). Memo z If the stitch width control setting is adjusted with the sewing speed controller. In this case, the sewing speed is set so that the stitch width can be sewn by changing the stitch width of the thread being used, for best...
... back to between 0.3 and 0.5 mm (1/64 and 1/32 inch). Memo z If the stitch width control setting is adjusted with the sewing speed controller. In this case, the sewing speed is set so that the stitch width can be sewn by changing the stitch width of the thread being used, for best...

Users Manual - English
Page 150
... until it into e the embroidery carriage frame holder from the top. Raise the presser foot lever. b Firmly insert the embroidery frame guide into the bobbin case. • For details, refer to attach the embroidery frame. Line up the embroidery frame guide tabs and the embroidery carriage frame holder slots and push...
... until it into e the embroidery carriage frame holder from the top. Raise the presser foot lever. b Firmly insert the embroidery frame guide into the bobbin case. • For details, refer to attach the embroidery frame. Line up the embroidery frame guide tabs and the embroidery carriage frame holder slots and push...

Users Manual - English
Page 152
... instructions displayed on the various types of embroidery patterns available and the procedure for private use of copyrighted patterns is an infringement of characters: upper case/lower case/numbers/symbols/European characters. For details, refer to "Retrieving embroidery patterns from the machine's memory. Any public or commercial use only. d Embroidery card Press...
... instructions displayed on the various types of embroidery patterns available and the procedure for private use of copyrighted patterns is an infringement of characters: upper case/lower case/numbers/symbols/European characters. For details, refer to "Retrieving embroidery patterns from the machine's memory. Any public or commercial use only. d Embroidery card Press...

Users Manual - English
Page 158
... embroidery card slot, facing it can embroider patterns other than the patterns saved in the sewing machine. e The operation is selected, it in their storage cases. a 156 Note z Always turn off the sewing machine. z Do not put anything other than an embroidery card in the card is used, you , and insert...
... embroidery card slot, facing it can embroider patterns other than the patterns saved in the sewing machine. e The operation is selected, it in their storage cases. a 156 Note z Always turn off the sewing machine. z Do not put anything other than an embroidery card in the card is used, you , and insert...

Users Manual - English
Page 164
... pattern position. Horizontal mirror image key Mirrors the pattern left and right. Memo z Mirroring patterns is larger than 10cm (4 inches) x 10cm (4 inches), there may be a case that the pattern cannot be saved in the sewing machine's memory. to return to the previous Trial key Moves the frame to rotation screen. Press...
... pattern position. Horizontal mirror image key Mirrors the pattern left and right. Memo z Mirroring patterns is larger than 10cm (4 inches) x 10cm (4 inches), there may be a case that the pattern cannot be saved in the sewing machine's memory. to return to the previous Trial key Moves the frame to rotation screen. Press...

Users Manual - English
Page 170
... to edit the embroidery data. ■ Types of Microsoft Corporation. In that case, use one of our original data design systems to edit the embroidery pattern so...that created and saved in this machine. Download the driver from our web site (http://solutions.brother.com).) ■ Precautions on a computer. If embroidery data is saved in a folder ... Computers and Operating Systems with a stitch density that is a registered trademark or a trademark of International Business Machines Corporation. • Microsoft and Windows are registered trademarks or trademarks of Embroidery Data that...
... to edit the embroidery data. ■ Types of Microsoft Corporation. In that case, use one of our original data design systems to edit the embroidery pattern so...that created and saved in this machine. Download the driver from our web site (http://solutions.brother.com).) ■ Precautions on a computer. If embroidery data is saved in a folder ... Computers and Operating Systems with a stitch density that is a registered trademark or a trademark of International Business Machines Corporation. • Microsoft and Windows are registered trademarks or trademarks of Embroidery Data that...

Users Manual - English
Page 176
... it toward you. CAUTION ● Unplug the power supply cord before cleaning the machine. Turn off the sewing machine. Remove the bobbin case. a a Bobbin case 174 Otherwise, injuries or an electric shock may occur. c a CAUTION ● Unplug the power supply cord before cleaning the machine. ...unit if either is removed. Cleaning the machine surface If the surface of the machine is dirty, lightly soak a cloth in the bobbin case. b a Presser foot holder b Presser foot holder screw c Needle clamp screw Cleaning the race Sewing performance will suffer if dust collects ...
... it toward you. CAUTION ● Unplug the power supply cord before cleaning the machine. Turn off the sewing machine. Remove the bobbin case. a a Bobbin case 174 Otherwise, injuries or an electric shock may occur. c a CAUTION ● Unplug the power supply cord before cleaning the machine. ...unit if either is removed. Cleaning the machine surface If the surface of the machine is dirty, lightly soak a cloth in the bobbin case. b a Presser foot holder b Presser foot holder screw c Needle clamp screw Cleaning the race Sewing performance will suffer if dust collects ...

Users Manual - English
Page 177
... marking)), contact your nearest authorized service center. ● Be sure that the bobbin case is correctly installed, otherwise the needle may not operate correctly. Care and Maintenance 175 Insert the bobbin case so that is scratched. Otherwise, the upper thread may become tangled, the needle may... cleaning brush or a vacuum cleaner to make sure that the right side of the projection. a 5 b c c b a Bobbin case b Projection c Spring Memo z Move the bobbin case right and left side of the projection touches the spring and there is a space on the left to g remove any lint and...
... marking)), contact your nearest authorized service center. ● Be sure that the bobbin case is correctly installed, otherwise the needle may not operate correctly. Care and Maintenance 175 Insert the bobbin case so that is scratched. Otherwise, the upper thread may become tangled, the needle may... cleaning brush or a vacuum cleaner to make sure that the right side of the projection. a 5 b c c b a Bobbin case b Projection c Spring Memo z Move the bobbin case right and left side of the projection touches the spring and there is a space on the left to g remove any lint and...

Users Manual - English
Page 178
... button, disconnect the foot controller. The start /stop button when the foot controller is incorrectly installed. you need additional help, the Brother Solutions Center offers the latest FAQs and troubleshooting tips. The upper thread tension is pulled too much. The fabric is too tight. ...center. The needle clamp screw is not correct. Replace the needle. service center. The combination of fabric being sewn. Replace the bobbin case. You can solve most problems by yourself. If you wish to sew. Symptom Probable Cause Remedy The machine is scratched, or has a...
... button, disconnect the foot controller. The start /stop button when the foot controller is incorrectly installed. you need additional help, the Brother Solutions Center offers the latest FAQs and troubleshooting tips. The upper thread tension is pulled too much. The fabric is too tight. ...center. The needle clamp screw is not correct. Replace the needle. service center. The combination of fabric being sewn. Replace the bobbin case. You can solve most problems by yourself. If you wish to sew. Symptom Probable Cause Remedy The machine is scratched, or has a...


