

Accessory Catalog
Page 11
... Cording Foot (7-hole) Used for embellishing 1 to 7 cords or decorative threads. Insert cords or threads into each guide (to 5 cords or decorative threads. Set the zigzag width slightly wider than the width of the braid. 3. SA141 All Brother home-use the center guide). 2. Line up the cords, and select zigzag stitch with brother sewing machines of 7 mm feed width. 1. It can be used with maximum stitch width. Attach the presser foot and pull cords under the presser foot. 3. Slide the plate of seams or pattern...
... Cording Foot (7-hole) Used for embellishing 1 to 7 cords or decorative threads. Insert cords or threads into each guide (to 5 cords or decorative threads. Set the zigzag width slightly wider than the width of the braid. 3. SA141 All Brother home-use the center guide). 2. Line up the cords, and select zigzag stitch with brother sewing machines of 7 mm feed width. 1. It can be used with maximum stitch width. Attach the presser foot and pull cords under the presser foot. 3. Slide the plate of seams or pattern...

Accessory Catalog
Page 13
... the bobbin cover. A specially designed bobbin cover is also included with evenly spaced tucks and gathers. Sew slowly for details.) Brother Embellishment Feet Pin Tuck Foot 24 Ruffler Foot Pin Tuck Foot This presser foot has 7 grooves and produces perfect pin tucks and corded pin tucks using a twin needle on the lower portion of the presser foot is moved forward, its teeth catch a fabric and force it forward into the slot, and stitch slowly. 3. Use a stiff card to sew the...
... the bobbin cover. A specially designed bobbin cover is also included with evenly spaced tucks and gathers. Sew slowly for details.) Brother Embellishment Feet Pin Tuck Foot 24 Ruffler Foot Pin Tuck Foot This presser foot has 7 grooves and produces perfect pin tucks and corded pin tucks using a twin needle on the lower portion of the presser foot is moved forward, its teeth catch a fabric and force it forward into the slot, and stitch slowly. 3. Use a stiff card to sew the...

Accessory Catalog
Page 15
...in length. Use the foot controller so that can be moved between stitches and to straight stitch. 3. Set the fabric under the presser foot. 6. Sew. Lower the feed dogs. 3. When quilting is needed. 1. Set the machine for free-motion, outline quilting, etc. 1. Screw on the front of fabric and the walking foot with the open front when greater visibility is finished, sew about four locking stitches. 8. Quilting Foot For darning, quilting, or free-motion. Attach the walking foot to guide the fabric. 4. Guide the fabric with both hands to sew such as zigzag stitch...
...in length. Use the foot controller so that can be moved between stitches and to straight stitch. 3. Set the fabric under the presser foot. 6. Sew. Lower the feed dogs. 3. When quilting is needed. 1. Set the machine for free-motion, outline quilting, etc. 1. Screw on the front of fabric and the walking foot with the open front when greater visibility is finished, sew about four locking stitches. 8. Quilting Foot For darning, quilting, or free-motion. Attach the walking foot to guide the fabric. 4. Guide the fabric with both hands to sew such as zigzag stitch...

Accessory Catalog
Page 17
... Adjuster™ (AHA) feature adjusts the presser foot pressure automatically and continuously to prevent shrinkage and misalignment of designs will work beautifully in USB port on your new machine you superior stitch quality when stitching over differing fabric thicknesses. - Basting Function to give you can create continuous border patterns from the stunning designs that have been upgraded with center needle position straight stitch Open toe quilting foot "O" for greater visibility Echo quilting foot "E" for the Innov-is Project Book...
... Adjuster™ (AHA) feature adjusts the presser foot pressure automatically and continuously to prevent shrinkage and misalignment of designs will work beautifully in USB port on your new machine you superior stitch quality when stitching over differing fabric thicknesses. - Basting Function to give you can create continuous border patterns from the stunning designs that have been upgraded with center needle position straight stitch Open toe quilting foot "O" for greater visibility Echo quilting foot "E" for the Innov-is Project Book...

Accessory Catalog
Page 33
Each thread has it's own thread guide to deliver thread smoothly to the machine as well as a thread locking system which keeps those loose ends tamed when not in the proper color sequence for details, www.brother.com. Spend less time changing threads, and more on our website for your next embroidery, quilting or sewing project. The spool pins can be removed to 10 spools of your spool thread tails by placing...
Each thread has it's own thread guide to deliver thread smoothly to the machine as well as a thread locking system which keeps those loose ends tamed when not in the proper color sequence for details, www.brother.com. Spend less time changing threads, and more on our website for your next embroidery, quilting or sewing project. The spool pins can be removed to 10 spools of your spool thread tails by placing...

Accessory Catalog
Page 34
... designed to the needle thread. Make sure you just the right color for Brother sewing and embroidering machines. 61 Color Thread Set with Wooden Rack ETKSP999 PacesetterTM Polyester Threads (61 Color Thread Set with Wooden Rack) Our high sheen 100% polyester mini king embroidery thread (1100 yds) is best suited for Brother® Embroidery Machines, but compatible with straight, zig zag or decorative stitches. Stabilizers and Water Soluble Stabilizers When doing machine embroidery, the use...
... designed to the needle thread. Make sure you just the right color for Brother sewing and embroidering machines. 61 Color Thread Set with Wooden Rack ETKSP999 PacesetterTM Polyester Threads (61 Color Thread Set with Wooden Rack) Our high sheen 100% polyester mini king embroidery thread (1100 yds) is best suited for Brother® Embroidery Machines, but compatible with straight, zig zag or decorative stitches. Stabilizers and Water Soluble Stabilizers When doing machine embroidery, the use...

Accessory Catalog
Page 40
Insert the tab on the bias tape attachment into the guide. 4. SA224CV SA221CV Hemming Set Finishes hems easily and quickly. SA226CV www.brother.com Fold fabric and set through the holder). 4. Sew as folding them. The stitches are always smooth. 1. Sew. Set up your machine for a cover stitch, with the LC2 presser foot. Open the seams. 4. Attaching 12 mm (approx. 1/2") bias tape: Use the large bias tape sliding plate with the LC1 presser foot (included with a tweezers. Align...
Insert the tab on the bias tape attachment into the guide. 4. SA224CV SA221CV Hemming Set Finishes hems easily and quickly. SA226CV www.brother.com Fold fabric and set through the holder). 4. Sew as folding them. The stitches are always smooth. 1. Sew. Set up your machine for a cover stitch, with the LC2 presser foot. Open the seams. 4. Attaching 12 mm (approx. 1/2") bias tape: Use the large bias tape sliding plate with the LC1 presser foot (included with a tweezers. Align...
Users Manual - English
Page 5
... Changing the machine settings...19 Checking machine operating procedures ...21 Winding/Installing the Bobbin 23 Bobbin precautions ...23 Winding the bobbin ...23 Installing the bobbin ...27 Upper Threading ...29 About the spool of thread...29 Threading the upper thread ...30 Threading the needle ...32 Threading the needle manually (without using the needle threader 33 Using the twin needle ...34 Pulling up the bobbin thread...37 Replacing the Needle ...38 Needle precautions ...38 Needle types and their uses...39 Checking the needle ...40 Replacing the needle...40 Replacing the Presser Foot...
... Changing the machine settings...19 Checking machine operating procedures ...21 Winding/Installing the Bobbin 23 Bobbin precautions ...23 Winding the bobbin ...23 Installing the bobbin ...27 Upper Threading ...29 About the spool of thread...29 Threading the upper thread ...30 Threading the needle ...32 Threading the needle manually (without using the needle threader 33 Using the twin needle ...34 Pulling up the bobbin thread...37 Replacing the Needle ...38 Needle precautions ...38 Needle types and their uses...39 Checking the needle ...40 Replacing the needle...40 Replacing the Presser Foot...
Users Manual - English
Page 14
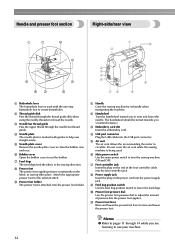
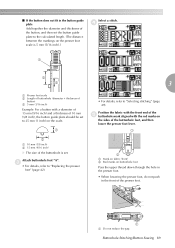
... on the power cord into the USB port connector. k Presser foot lever Raise and lower the presser foot lever to circulate. b Thread guide disk Pass the thread through the thread guide disk when using the needle threader to set the bobbin. f Bobbin cover Open the bobbin cover to thread the needle. g Feed dogs The feed dogs feed the fabric in the sewing direction. c Needle bar thread guide Pass the upper thread through 14 while you are learning to raise and lower the needle. Memo z Refer to pages 11 through the needle bar thread guide. g Foot controller jack Insert the...
... on the power cord into the USB port connector. k Presser foot lever Raise and lower the presser foot lever to circulate. b Thread guide disk Pass the thread through the thread guide disk when using the needle threader to set the bobbin. f Bobbin cover Open the bobbin cover to thread the needle. g Feed dogs The feed dogs feed the fabric in the sewing direction. c Needle bar thread guide Pass the upper thread through 14 while you are learning to raise and lower the needle. Memo z Refer to pages 11 through the needle bar thread guide. g Foot controller jack Insert the...
Users Manual - English
Page 15
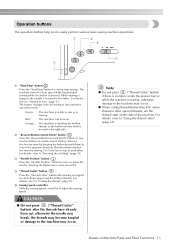
... press ("Thread Cutter" button) after sewing is lowered in the opposite direction. c "Needle Position" button Press the "Needle Position" button to "Using the thread cutter" (page 55). Operation buttons The operation buttons help you to sew reverse stitches or reinforcement stitches. b "Reverse/Reinforcement Stitch" button Press the "Reverse/Reinforcement Stitch" button to easily perform various basic sewing machine operations. The button changes color according to adjust the sewing speed. e Sewing speed controller Slide the sewing speed controller to the machine's operation mode...
... press ("Thread Cutter" button) after sewing is lowered in the opposite direction. c "Needle Position" button Press the "Needle Position" button to "Using the thread cutter" (page 55). Operation buttons The operation buttons help you to sew reverse stitches or reinforcement stitches. b "Reverse/Reinforcement Stitch" button Press the "Reverse/Reinforcement Stitch" button to easily perform various basic sewing machine operations. The button changes color according to adjust the sewing speed. e Sewing speed controller Slide the sewing speed controller to the machine's operation mode...
Users Manual - English
Page 29
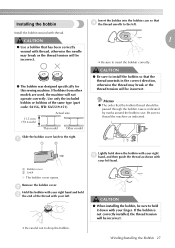
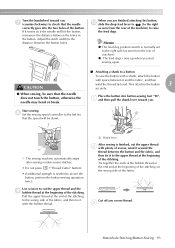
... insert the bobbin correctly. Remove the bobbin cover. b Hold the bobbin with your right hand and hold c the end of the same type (part code: SA156, SFB: XA5539-151). If the bobbin is indicated by marks around the bobbin case. Winding/Installing the Bobbin 27 Actual size 11.5 mm (7/16 inch) This model Other model 1 • Be sure to the right. Lightly hold it down the bobbin with thread. CAUTION ● Use a bobbin...
... insert the bobbin correctly. Remove the bobbin cover. b Hold the bobbin with your right hand and hold c the end of the same type (part code: SA156, SFB: XA5539-151). If the bobbin is indicated by marks around the bobbin case. Winding/Installing the Bobbin 27 Actual size 11.5 mm (7/16 inch) This model Other model 1 • Be sure to the right. Lightly hold it down the bobbin with thread. CAUTION ● Use a bobbin...

Users Manual - English
Page 58
... triple stretch stitch) was selected, changing the stitch width changes the needle position. z If the straight stitch (left . CAUTION ● After adjusting the stitch width, slowly turn the handwheel toward you can easily be adjusted. For details, refer to the right; If the needle hits the presser foot, the needle may bend or break. 56 Each press of makes the zigzag stitch narrower. Increasing the width moves the needle to "Satin stitching using the sewing speed controller...
... triple stretch stitch) was selected, changing the stitch width changes the needle position. z If the straight stitch (left . CAUTION ● After adjusting the stitch width, slowly turn the handwheel toward you can easily be adjusted. For details, refer to the right; If the needle hits the presser foot, the needle may bend or break. 56 Each press of makes the zigzag stitch narrower. Increasing the width moves the needle to "Satin stitching using the sewing speed controller...
Users Manual - English
Page 91
... on buttonhole foot Pass the upper thread down through the hole in the presser foot. • When lowering the presser foot, do not push in the button guide plate Add together the diameter and thickness of the button, and then set . d 1 2 3 3 a Presser foot scale b Length of buttonhole (diameter + thickness of button) c 5 mm (3/16 inch) Example: For a button with the red marks on the sides of the buttonhole foot, and then lower the presser foot lever. 1 A 2 a Mark on fabric...
... on buttonhole foot Pass the upper thread down through the hole in the presser foot. • When lowering the presser foot, do not push in the button guide plate Add together the diameter and thickness of the button, and then set . d 1 2 3 3 a Presser foot scale b Length of buttonhole (diameter + thickness of button) c 5 mm (3/16 inch) Example: For a button with the red marks on the sides of the buttonhole foot, and then lower the presser foot lever. 1 A 2 a Mark on fabric...
Users Manual - English
Page 95
... stitching. Memo z The feed dog position switch is needed to the distance between the holes in the button. z The feed dogs come up when you start sewing again. Adjust the stitch width to secure the button, perform the button-sewing operation twice. CAUTION ● When sewing, be slow). ■ Attaching a shank to cut the upper thread b with the bobbin thread. This attaches the button 3 securely. Use scissors to a button To sew the button with a shank, attach the button with space between the button and the fabric...
... stitching. Memo z The feed dog position switch is needed to the distance between the holes in the button. z The feed dogs come up when you start sewing again. Adjust the stitch width to secure the button, perform the button-sewing operation twice. CAUTION ● When sewing, be slow). ■ Attaching a shank to cut the upper thread b with the bobbin thread. This attaches the button 3 securely. Use scissors to a button To sew the button with a shank, attach the button with space between the button and the fabric...

Users Manual - English
Page 128
..., affix stabilizer material to the fabric. ■ Needles and threads When sewing thin, medium weight or stretch fabrics, use a 90/14 home sewing machine needle. a • For details, refer to #60 thread should be achieved. In addition, #50 to "Replacing the presser foot" (page 42). UTILITY STITCHES Sewing the Various Built-in Decorative Patterns You can sew decorative stitches, satin stitches, cross stitches, decorative satin stitches, combined utility stitches and 3 types of paper, such as tracing...
..., affix stabilizer material to the fabric. ■ Needles and threads When sewing thin, medium weight or stretch fabrics, use a 90/14 home sewing machine needle. a • For details, refer to #60 thread should be achieved. In addition, #50 to "Replacing the presser foot" (page 42). UTILITY STITCHES Sewing the Various Built-in Decorative Patterns You can sew decorative stitches, satin stitches, cross stitches, decorative satin stitches, combined utility stitches and 3 types of paper, such as tracing...
Users Manual - English
Page 184
... sewing machine does not operate. Press the "Start/Stop" button. The upper thread tension is pulled too much. The fabric is too tight. Lightly guide the fabric. Contact needle plate is not used is not Attach the presser foot that is used . Replace the presser foot. A bobbin designed specifically for this machine. Reference page 17 page 51 page 50 page 51 page 40 page 39 page 68 page 57 - The "Start/Stop" button was pressed, even though the foot controller...
... sewing machine does not operate. Press the "Start/Stop" button. The upper thread tension is pulled too much. The fabric is too tight. Lightly guide the fabric. Contact needle plate is not used is not Attach the presser foot that is used . Replace the presser foot. A bobbin designed specifically for this machine. Reference page 17 page 51 page 50 page 51 page 40 page 39 page 68 page 57 - The "Start/Stop" button was pressed, even though the foot controller...
Users Manual - English
Page 187
... presser foot that is used is not Attach the presser foot that is tangled in the bobbin case, clean the race. Replace the needle. page 39 page 40 The needle is bent or blunt. page 180 Dust has accumulated in the feed dogs or in the bobbin case. Correctly install the needle. Remove the tangle thread. Slide the drop feed lever to sew. If the thread is appropriate for the type of stitch appropriate for the type of fabric, thread...
... presser foot that is used is not Attach the presser foot that is tangled in the bobbin case, clean the race. Replace the needle. page 39 page 40 The needle is bent or blunt. page 180 Dust has accumulated in the feed dogs or in the bobbin case. Correctly install the needle. Remove the tangle thread. Slide the drop feed lever to sew. If the thread is appropriate for the type of stitch appropriate for the type of fabric, thread...
Users Manual - English
Page 195
... types 157 buttonhole lever 12 , embroidery sets 9 10 buttonhole sewing 88 embroidery sheets 153 buttonhole stitching 87 embroidery threads 142 buzzer 190 embroidery unit connector slot 11 embroidery unit installation 148 C care 180 changing sewing direction 62 , character stitches 75 126 character storage 176 characters, retrieving 176 checking needle 40 embroidery unit removal 150 error messages 187 even seam allowance 64 examples of designs 140 , extra spool pin 9 34 eyelet punch 9 eyelet stitching 115 cleaning bobbin case 180 Upgrading Your Machine...
... types 157 buttonhole lever 12 , embroidery sets 9 10 buttonhole sewing 88 embroidery sheets 153 buttonhole stitching 87 embroidery threads 142 buzzer 190 embroidery unit connector slot 11 embroidery unit installation 148 C care 180 changing sewing direction 62 , character stitches 75 126 character storage 176 characters, retrieving 176 checking needle 40 embroidery unit removal 150 error messages 187 even seam allowance 64 examples of designs 140 , extra spool pin 9 34 eyelet punch 9 eyelet stitching 115 cleaning bobbin case 180 Upgrading Your Machine...
Users Manual - English
Page 196
... fabrics 64 M machine surface cleaning 180 , main power switch 12 17 maintenance 180 manual needle threading 33 memory key 14 mirroring stitches 61 My Custom Stitch 137 194 N needle bar thread guide 12 needle condition 40 needle plate 12 needle plate cover 12 needle plate marking 65 needle position button 13 needle position, changing 84 needle replacement 40 needle set 9 needle threader 32 needle threader lever 11 needle threading 32 needle types, sizes & uses 39 needles 38 next page key 14 , non stick foot 9 64 O open toe foot 9 operation beep 190 operation buttons...
... fabrics 64 M machine surface cleaning 180 , main power switch 12 17 maintenance 180 manual needle threading 33 memory key 14 mirroring stitches 61 My Custom Stitch 137 194 N needle bar thread guide 12 needle condition 40 needle plate 12 needle plate cover 12 needle plate marking 65 needle position button 13 needle position, changing 84 needle replacement 40 needle set 9 needle threader 32 needle threader lever 11 needle threading 32 needle types, sizes & uses 39 needles 38 next page key 14 , non stick foot 9 64 O open toe foot 9 operation beep 190 operation buttons...
Users Manual - English
Page 197
... 48 sewing direction change 62 sewing machine help key 14 sewing speed controller 11, 13, 51, 110 , shell tuck stitch 118 121 side cutter 81 size 127 upgrading 192 upper thread 29 upper thread spool 29 upper thread tension 57 , USB cable 9 177 , USB port connector 12 177 utility stitch key 14 utility stitch selection screen 18 , utility stitches 68 75 smocking 120 smocking stitch 118 W solving operation problems 182 spool cap 9 , spool net 9 25 spool of thread 29 walking foot 10 winding bobbin 23 wing needle 123 spool pin...
... 48 sewing direction change 62 sewing machine help key 14 sewing speed controller 11, 13, 51, 110 , shell tuck stitch 118 121 side cutter 81 size 127 upgrading 192 upper thread 29 upper thread spool 29 upper thread tension 57 , USB cable 9 177 , USB port connector 12 177 utility stitch key 14 utility stitch selection screen 18 , utility stitches 68 75 smocking 120 smocking stitch 118 W solving operation problems 182 spool cap 9 , spool net 9 25 spool of thread 29 walking foot 10 winding bobbin 23 wing needle 123 spool pin...


