Users Manual - English
Page 4
...in this machine only for household use. 2 If the problem persists, please consult your local authorized Brother dealer. Benzene, thinner, and scouring powders can damage the machine, and should be replaced by or near children. • The plastic bag that this product are subject to change without ...specifications of . Do not use bent or damaged needles. • Keep fingers away from all moving parts. • Do not use the machine near a space heater, iron, halogen lamp, or other parts to assure correct installation. 8 For repair or adjustment: • If the light unit is damaged,...
...in this machine only for household use. 2 If the problem persists, please consult your local authorized Brother dealer. Benzene, thinner, and scouring powders can damage the machine, and should be replaced by or near children. • The plastic bag that this product are subject to change without ...specifications of . Do not use bent or damaged needles. • Keep fingers away from all moving parts. • Do not use the machine near a space heater, iron, halogen lamp, or other parts to assure correct installation. 8 For repair or adjustment: • If the light unit is damaged,...
Users Manual - English
Page 7
...Introduction ...1 IMPORTANT SAFETY INSTRUCTIONS 1 Machine Features ...7 Accessories ...8 Included accessories ...8 Optional accessories ...9 Names of Machine Parts and Their Functions 10 Front view ...10 Needle and embroidery foot section ...11 Right-side/rear view ...11 ... Checking machine operating procedures ...25 Preparing Items for embroidering 26 Preparing the Needle ...27 Needle precautions ...27 Checking the needle ...27 Replacing the needle ...28 Winding/Installing the Bobbin 29 Bobbin precautions ...29 Winding the bobbin ...29 Installing the bobbin ...34 Upper Threading ...
...Introduction ...1 IMPORTANT SAFETY INSTRUCTIONS 1 Machine Features ...7 Accessories ...8 Included accessories ...8 Optional accessories ...9 Names of Machine Parts and Their Functions 10 Front view ...10 Needle and embroidery foot section ...11 Right-side/rear view ...11 ... Checking machine operating procedures ...25 Preparing Items for embroidering 26 Preparing the Needle ...27 Needle precautions ...27 Checking the needle ...27 Replacing the needle ...28 Winding/Installing the Bobbin 29 Bobbin precautions ...29 Winding the bobbin ...29 Installing the bobbin ...34 Upper Threading ...
Users Manual - English
Page 30
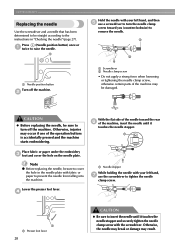
...Screwdriver b Needle clamp screw • Do not apply a strong force when loosening or tightening the needle clamp screw, otherwise certain parts of the machine may occur if one of the operation buttons is accidentally pressed and the machine starts embroidering. Otherwise, injuries may ...of the machine, insert the needle until it touches the needle stopper. a b a Needle position button Turn off the machine. CAUTION z Before replacing the needle, be sure to turn the needle clamp screw toward the rear f of the needle toward you (counterclockwise) to remove the needle. Otherwise...
...Screwdriver b Needle clamp screw • Do not apply a strong force when loosening or tightening the needle clamp screw, otherwise certain parts of the machine may occur if one of the operation buttons is accidentally pressed and the machine starts embroidering. Otherwise, injuries may ...of the machine, insert the needle until it touches the needle stopper. a b a Needle position button Turn off the machine. CAUTION z Before replacing the needle, be sure to turn the needle clamp screw toward the rear f of the needle toward you (counterclockwise) to remove the needle. Otherwise...

