Users Manual - English
Page 7
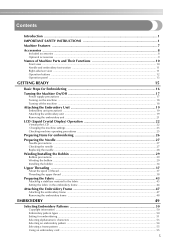
... 16 Turning the Machine On/Off 17 Power supply precautions ...17 Turning on the machine ...18 Turning off the machine ...18 Attaching the Embroidery Unit 19 Embroidery unit precautions ...19 Attaching the embroidery unit ...19 Removing the embroidery unit ...21 LCD...the fabric ...43 Setting the fabric in the embroidery frame ...44 Attaching the Embroidery Frame 47 Attaching the embroidery frame ...47 Removing the embroidery frame ...48 EMBROIDERY 49 Selecting Embroidery Patterns 50 Copyright information ...50 Embroidery pattern types ...50 Setting for embroidering ...51 Selecting ...
... 16 Turning the Machine On/Off 17 Power supply precautions ...17 Turning on the machine ...18 Turning off the machine ...18 Attaching the Embroidery Unit 19 Embroidery unit precautions ...19 Attaching the embroidery unit ...19 Removing the embroidery unit ...21 LCD...the fabric ...43 Setting the fabric in the embroidery frame ...44 Attaching the Embroidery Frame 47 Attaching the embroidery frame ...47 Removing the embroidery frame ...48 EMBROIDERY 49 Selecting Embroidery Patterns 50 Copyright information ...50 Embroidery pattern types ...50 Setting for embroidering ...51 Selecting ...

Users Manual - English
Page 8
... ...67 Stopping while embroidering ...67 Using the Memory Function 69 Embroidery data precautions ...69 Saving patterns ...70 Retrieving embroidery patterns from the computer 71 APPENDIX 73 Care and Maintenance ...74 Cleaning the machine surface ...74 Cleaning the race ...74 Attaching the Embroidery Foot 76 Attaching the embroidery foot ...76 Troubleshooting ...78 Error messages ...82 Adjusting the LCD...
... ...67 Stopping while embroidering ...67 Using the Memory Function 69 Embroidery data precautions ...69 Saving patterns ...70 Retrieving embroidery patterns from the computer 71 APPENDIX 73 Care and Maintenance ...74 Cleaning the machine surface ...74 Cleaning the race ...74 Attaching the Embroidery Foot 76 Attaching the embroidery foot ...76 Troubleshooting ...78 Error messages ...82 Adjusting the LCD...
Users Manual - English
Page 9
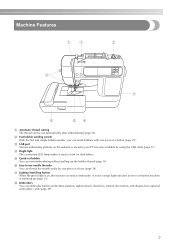
... be cut automatically after embroidering (page 58). g Lighting Start/Stop button When the green light is on, the machine is warming up the bobbin thread (page 34). Machine Features a Automatic thread cutting The thread can thread the needle easily by using the USB cable (page 71). c USB port Various embroidery patterns on dark fabrics.
... be cut automatically after embroidering (page 58). g Lighting Start/Stop button When the green light is on, the machine is warming up the bobbin thread (page 34). Machine Features a Automatic thread cutting The thread can thread the needle easily by using the USB cable (page 71). c USB port Various embroidery patterns on dark fabrics.

Users Manual - English
Page 12
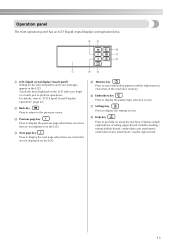
... this panel to select embroidery patterns, or check how to use the machine, etc. e LCD (liquid crystal display) (touch panel) (page 22) Setting for the selected pattern and error messages appear in the connector for the embroidery unit. Before using the machine, carefully read these buttons... to learn the names of the machine and their functions are described below. g Embroidery unit connector slot (page 20) Plug in...
... this panel to select embroidery patterns, or check how to use the machine, etc. e LCD (liquid crystal display) (touch panel) (page 22) Setting for the selected pattern and error messages appear in the connector for the embroidery unit. Before using the machine, carefully read these buttons... to learn the names of the machine and their functions are described below. g Embroidery unit connector slot (page 20) Plug in...
Users Manual - English
Page 15
... Press to return to display the settings screen. f Embroidery key Press to display the next page when there are items that are not displayed on using the machine. a LCD (liquid crystal display) (touch panel) Setting for the selected pattern and error messages appear in the machine's memory. d Next page key Press to display the...
... Press to return to display the settings screen. f Embroidery key Press to display the next page when there are items that are not displayed on using the machine. a LCD (liquid crystal display) (touch panel) Setting for the selected pattern and error messages appear in the machine's memory. d Next page key Press to display the...
Users Manual - English
Page 22
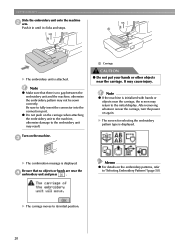
... the carriage. It may not be sewn correctly. X The carriage moves to "Selecting Embroidery Patterns" (page 50). Memo z For details on the machine. Turn on the embroidery patterns, refer to its initial position. 20 GETTING READY Slide the embroidery unit onto the machine b arm. Push it in until it clicks and stops. After removing whatever is displayed...
... the carriage. It may not be sewn correctly. X The carriage moves to "Selecting Embroidery Patterns" (page 50). Memo z For details on the machine. Turn on the embroidery patterns, refer to its initial position. 20 GETTING READY Slide the embroidery unit onto the machine b arm. Push it in until it clicks and stops. After removing whatever is displayed...
Users Manual - English
Page 24
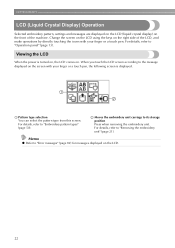
... to its storage position Press when removing the embroidery unit. Viewing the LCD When the power is displayed. b Moves the embroidery unit carriage to "Embroidery pattern types" (page 50). When you touch the...refer to "Operation panel" (page 13). GETTING READY LCD (Liquid Crystal Display) Operation Selected embroidery pattern, settings and messages are displayed on the LCD (liquid crystal display) on the front of...the icons with your finger or a touch pen. For details, refer to "Removing the embroidery unit" (page 21). Memo z Refer to the message displayed on the screen with your ...
... to its storage position Press when removing the embroidery unit. Viewing the LCD When the power is displayed. b Moves the embroidery unit carriage to "Embroidery pattern types" (page 50). When you touch the...refer to "Operation panel" (page 13). GETTING READY LCD (Liquid Crystal Display) Operation Selected embroidery pattern, settings and messages are displayed on the LCD (liquid crystal display) on the front of...the icons with your finger or a touch pen. For details, refer to "Removing the embroidery unit" (page 21). Memo z Refer to the message displayed on the screen with your ...
Users Manual - English
Page 28
... matches the size of fabric a little larger than the embroidery frame that are optional. Otherwise, the needle may become tangled. ■ Needle Use a 75/11 home sewing machine needle. For details, refer to "Setting the fabric in injury. ● Be careful when embroidering overlapping patterns. z Before starting to embroider, be embroidered. z When replacing...
... matches the size of fabric a little larger than the embroidery frame that are optional. Otherwise, the needle may become tangled. ■ Needle Use a 75/11 home sewing machine needle. For details, refer to "Setting the fabric in injury. ● Be careful when embroidering overlapping patterns. z Before starting to embroider, be embroidered. z When replacing...
Users Manual - English
Page 31
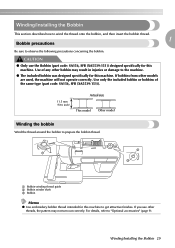
..., refer to observe the following precautions concerning the bobbin. If bobbins from other threads, the pattern may result in injuries or damage to the machine. ● The included bobbin was designed specifically for this machine to prepare the bobbin thread. If you use the Bobbin (part code: SA156, SFB (XA5539... bobbin or bobbins of any other bobbin may not turn out correctly. CAUTION ● Only use other models are used, the machine will not operate correctly. b a c a Bobbin-winding thread guide b Bobbin winder shaft c Bobbin Memo z Use embroidery bobbin thread intended for this...
..., refer to observe the following precautions concerning the bobbin. If bobbins from other threads, the pattern may result in injuries or damage to the machine. ● The included bobbin was designed specifically for this machine to prepare the bobbin thread. If you use the Bobbin (part code: SA156, SFB (XA5539... bobbin or bobbins of any other bobbin may not turn out correctly. CAUTION ● Only use other models are used, the machine will not operate correctly. b a c a Bobbin-winding thread guide b Bobbin winder shaft c Bobbin Memo z Use embroidery bobbin thread intended for this...

Users Manual - English
Page 40
Memo z Use embroidery thread, or country embroidery thread intended for the selected pattern. For details, refer to raise the needle. a a Needle position button Note z The needle is correctly raised when the mark on the spool pin, and then thread the machine. a Spool pin b Spool cap Place the spool of thread on the ...Needle position button) until it is horizontal and the thread unwinds to get attractive finishes. Press (Needle position button) once or c twice to "Selecting Embroidery Patterns" (page 50). b Pick up the spool pin and remove the spool d cap that the spool is .
Memo z Use embroidery thread, or country embroidery thread intended for the selected pattern. For details, refer to raise the needle. a a Needle position button Note z The needle is correctly raised when the mark on the spool pin, and then thread the machine. a Spool pin b Spool cap Place the spool of thread on the ...Needle position button) until it is horizontal and the thread unwinds to get attractive finishes. Press (Needle position button) once or c twice to "Selecting Embroidery Patterns" (page 50). b Pick up the spool pin and remove the spool d cap that the spool is .
Users Manual - English
Page 49
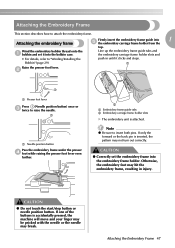
... pressed, the machine will move and your finger may be pricked with the needle or the needle may not turn out correctly. b a a Presser foot lever Press (Needle position button) once or c twice to insert both pins. b a Embroidery frame guide tabs b Embroidery carriage frame holder slots X The embroidery unit is inserted, the pattern may break. CAUTION...
... pressed, the machine will move and your finger may be pricked with the needle or the needle may not turn out correctly. b a a Presser foot lever Press (Needle position button) once or c twice to insert both pins. b a Embroidery frame guide tabs b Embroidery carriage frame holder slots X The embroidery unit is inserted, the pattern may break. CAUTION...

Users Manual - English
Page 52
..., refer to "Selecting alphanumeric characters" (page 53). Copyright information The patterns saved in the machine's memory Press when retrieving patterns from the following types available. c Frame patterns 10 shapes, such as squares and circles, can be selected from the machine's memory. e Patterns saved in the machine and embroidery cards are completed by changing the upper thread according to...
..., refer to "Selecting alphanumeric characters" (page 53). Copyright information The patterns saved in the machine's memory Press when retrieving patterns from the following types available. c Frame patterns 10 shapes, such as squares and circles, can be selected from the machine's memory. e Patterns saved in the machine and embroidery cards are completed by changing the upper thread according to...
Users Manual - English
Page 54
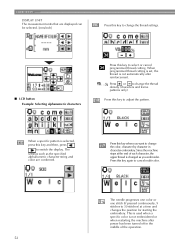
... a specific color is cut automatically after power has been turned off in character embroidery. Press this key and then, press to adjust the pattern. When programmed thread cutting is set, the thread is not embroidered or when restarting the machine after reinforcement. The needle progresses one color or one stitch (if pressed continuously...
... a specific color is cut automatically after power has been turned off in character embroidery. Press this key and then, press to adjust the pattern. When programmed thread cutting is set, the thread is not embroidered or when restarting the machine after reinforcement. The needle progresses one color or one stitch (if pressed continuously...

Users Manual - English
Page 56
... later use. Memo z The character pattern you created can be saved for samples of patterns moves backward/forward 10 patterns. a X The pattern selection screen is displayed. EMBROIDERY Selecting an embroidery pattern There are 70 embroidery patterns, such as flowers and animals, saved in the machine's memory. 70 Embroidery patterns Memo z Refer to "Saving patterns" (page 70). 54 X When a pattern is selected, it can be...
... later use. Memo z The character pattern you created can be saved for samples of patterns moves backward/forward 10 patterns. a X The pattern selection screen is displayed. EMBROIDERY Selecting an embroidery pattern There are 70 embroidery patterns, such as flowers and animals, saved in the machine's memory. 70 Embroidery patterns Memo z Refer to "Saving patterns" (page 70). 54 X When a pattern is selected, it can be...
Users Manual - English
Page 57
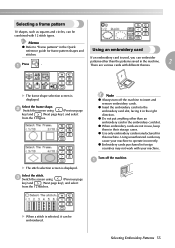
... off the machine to "Frame patterns" in the right direction. Selecting Embroidery Patterns 55 z Use only embroidery cards manufactured for frame pattern shapes and Using an embroidery card stitches. Memo z Refer to insert and remove embroidery cards. a If an embroidery card is ...circles, can be embroidered. Press . Note z Always turn off the machine. z Insert the embroidery card into the embroidery card slot, facing it can embroider patterns other than the patterns saved in their storage cases. Using unauthorized cards may not work with different...
... off the machine to "Frame patterns" in the right direction. Selecting Embroidery Patterns 55 z Use only embroidery cards manufactured for frame pattern shapes and Using an embroidery card stitches. Memo z Refer to insert and remove embroidery cards. a If an embroidery card is ...circles, can be embroidered. Press . Note z Always turn off the machine. z Insert the embroidery card into the embroidery card slot, facing it can embroider patterns other than the patterns saved in their storage cases. Using unauthorized cards may not work with different...

Users Manual - English
Page 58
X This selection screen for the patterns saved in the card is the same as in the direction of the machine. Turn on the screen. e The operation is displayed. c Press d on the machine. Face the arrow on the right side of the arrow. EMBROIDERY Insert the embroidery card in the embroidery b card slot on the embroidery card toward you, and insert it in "Selecting an embroidery pattern" (page 54). 56 Select a pattern.
X This selection screen for the patterns saved in the card is the same as in the direction of the machine. Turn on the screen. e The operation is displayed. c Press d on the machine. Face the arrow on the right side of the arrow. EMBROIDERY Insert the embroidery card in the embroidery b card slot on the embroidery card toward you, and insert it in "Selecting an embroidery pattern" (page 54). 56 Select a pattern.
Users Manual - English
Page 60
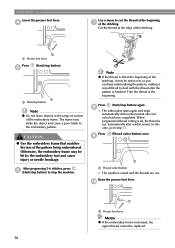
.... a a Start/stop button Note z Do not leave objects in the range of motion of the pattern being embroidered. After progressing 5-6 stitches, press f (Start/stop the machine. h X The embroidery starts again and stops automatically with the thread after the pattern is raised and the threads are cut. a a Thread cutter button X The needle is finished. Otherwise...
.... a a Start/stop button Note z Do not leave objects in the range of motion of the pattern being embroidered. After progressing 5-6 stitches, press f (Start/stop the machine. h X The embroidery starts again and stops automatically with the thread after the pattern is raised and the threads are cut. a a Thread cutter button X The needle is finished. Otherwise...
Users Manual - English
Page 61
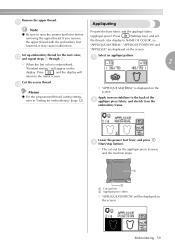
...displayed on the screen. m Memo z For the programmed thread cutting setting, refer to "Setting for the appliqué piece is sewn, and the machine stops. X "APPLIQUE MATERIAL" is embroidered, "Finished sewing." Apply iron-on stabilizer to NAME OF COLOR, so "APPLIQUE MATERIAL", "APPLIQUE POSITION" and ...-out for embroidering" (page 52). Lower the presser foot lever, and press c (Start/stop button). Set up embroidery thread for the next color, Select an appliqué pattern. Cut the excess thread. Press (Settings key), and set the thread color display to the back of the b ...
...displayed on the screen. m Memo z For the programmed thread cutting setting, refer to "Setting for the appliqué piece is sewn, and the machine stops. X "APPLIQUE MATERIAL" is embroidered, "Finished sewing." Apply iron-on stabilizer to NAME OF COLOR, so "APPLIQUE MATERIAL", "APPLIQUE POSITION" and ...-out for embroidering" (page 52). Lower the presser foot lever, and press c (Start/stop button). Set up embroidery thread for the next color, Select an appliqué pattern. Cut the excess thread. Press (Settings key), and set the thread color display to the back of the b ...
Users Manual - English
Page 71
...the pattern list screen by the machine. • Even if the embroidery unit is not attached, the machine will manage embroidery data. ■ Tajima (.dst) Embroidery Data • .dst data is mentioned in "Removable Disk", that is a registered trademark or a trademark of International Business Machines Corporation.... ™ are registered trademarks or trademarks of combined patterns exceeding the specified limits cannot be used with our default thread color sequence. Download the driver from our web site " http://solutions.brother.com ".) ■ Precautions on Using the Computer ...
...the pattern list screen by the machine. • Even if the embroidery unit is not attached, the machine will manage embroidery data. ■ Tajima (.dst) Embroidery Data • .dst data is mentioned in "Removable Disk", that is a registered trademark or a trademark of International Business Machines Corporation.... ™ are registered trademarks or trademarks of combined patterns exceeding the specified limits cannot be used with our default thread color sequence. Download the driver from our web site " http://solutions.brother.com ".) ■ Precautions on Using the Computer ...

Users Manual - English
Page 72
..., and you can save up to 12 patterns or 512KB of pages X The selected pattern is retrieved. appears while the pattern is turned off the machine while the pattern is saved, the initial screen appears again. Select the pattern you wish to be saved, press a (Memory key). EMBROIDERY Saving patterns The embroidery patterns and the alphanumeric characters you have customized...
..., and you can save up to 12 patterns or 512KB of pages X The selected pattern is retrieved. appears while the pattern is turned off the machine while the pattern is saved, the initial screen appears again. Select the pattern you wish to be saved, press a (Memory key). EMBROIDERY Saving patterns The embroidery patterns and the alphanumeric characters you have customized...


