Users Manual - English
Page 1
Computerized Embroidery Machine Operation Manual Product Code 885-V51 GETTING READY EMBROIDERY APPENDIX Please visit us at http://solutions.brother.com where you can get product support and answers to frequently asked questions (FAQs).
Computerized Embroidery Machine Operation Manual Product Code 885-V51 GETTING READY EMBROIDERY APPENDIX Please visit us at http://solutions.brother.com where you can get product support and answers to frequently asked questions (FAQs).
Users Manual - English
Page 3
... sure to carry it out of the electrical outlet. Before using the machine immediately and unplug the power cord. • When transporting the machine, be careful not to make any user servicing adjustments mentioned in this embroidery machine. IMPORTANT SAFETY INSTRUCTIONS Please read the "IMPORTANT SAFETY INSTRUCTIONS", and then study this manual for purchasing...
... sure to carry it out of the electrical outlet. Before using the machine immediately and unplug the power cord. • When transporting the machine, be careful not to make any user servicing adjustments mentioned in this embroidery machine. IMPORTANT SAFETY INSTRUCTIONS Please read the "IMPORTANT SAFETY INSTRUCTIONS", and then study this manual for purchasing...
Users Manual - English
Page 7
... ...13 GETTING READY 15 Basic Steps for Embroidering 16 Turning the Machine On/Off 17 Power supply precautions ...17 Turning on the machine ...18 Turning off the machine ...18 Attaching the Embroidery Unit 19 Embroidery unit precautions ...19 Attaching the embroidery unit ...19 Removing the embroidery unit ...21 LCD (Liquid Crystal Display) Operation 22 Viewing the LCD...
... ...13 GETTING READY 15 Basic Steps for Embroidering 16 Turning the Machine On/Off 17 Power supply precautions ...17 Turning on the machine ...18 Turning off the machine ...18 Attaching the Embroidery Unit 19 Embroidery unit precautions ...19 Attaching the embroidery unit ...19 Removing the embroidery unit ...21 LCD (Liquid Crystal Display) Operation 22 Viewing the LCD...

Users Manual - English
Page 8
... Stopping while embroidering ...67 Using the Memory Function 69 Embroidery data precautions ...69 Saving patterns ...70 Retrieving embroidery patterns from the computer 71 APPENDIX 73 Care and Maintenance ...74 Cleaning the machine surface ...74 Cleaning the race ...74 Attaching the Embroidery Foot 76 Attaching the embroidery foot ...76 Troubleshooting ...78 Error messages ...82 Adjusting the...
... Stopping while embroidering ...67 Using the Memory Function 69 Embroidery data precautions ...69 Saving patterns ...70 Retrieving embroidery patterns from the computer 71 APPENDIX 73 Care and Maintenance ...74 Cleaning the machine surface ...74 Cleaning the race ...74 Attaching the Embroidery Foot 76 Attaching the embroidery foot ...76 Troubleshooting ...78 Error messages ...82 Adjusting the...
Users Manual - English
Page 9
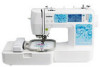
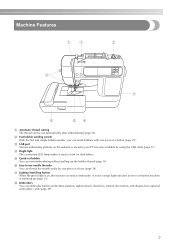
... it easy to work on the website or saved in embroidery patterns, alphanumeric characters, framed decorations, and designs from optional embroidery cards (page 49). 7 g Lighting Start/Stop button When the green light is on, the machine is warming up the bobbin thread (page 34). Machine Features a Automatic thread cutting The thread can start embroidering...
... it easy to work on the website or saved in embroidery patterns, alphanumeric characters, framed decorations, and designs from optional embroidery cards (page 49). 7 g Lighting Start/Stop button When the green light is on, the machine is warming up the bobbin thread (page 34). Machine Features a Automatic thread cutting The thread can start embroidering...
Users Manual - English
Page 10
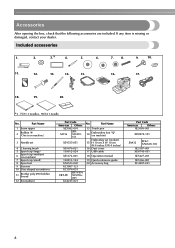
...net 9 Scissors 10 Disc-shaped screwdriver 11 Brother poly #90 bobbin thread 12 Screwdriver Part Code Americas Others XZ5082-001 SFB: SA156 XA5539151 X59535-051 X59476-021 130012-024 No. Part Name 13 Touch pen 14 Embroidery foot "Q" (on machine) Embroidery set 4 Cleaning brush 5 Spool cap (...large) 6 Spool cap (medium) (on machine.) 3 Needle set (medium) 15 H 10 cm X W 10 cm (H 4 inches X W...
...net 9 Scissors 10 Disc-shaped screwdriver 11 Brother poly #90 bobbin thread 12 Screwdriver Part Code Americas Others XZ5082-001 SFB: SA156 XA5539151 X59535-051 X59476-021 130012-024 No. Part Name 13 Touch pen 14 Embroidery foot "Q" (on machine) Embroidery set 4 Cleaning brush 5 Spool cap (...large) 6 Spool cap (medium) (on machine.) 3 Needle set (medium) 15 H 10 cm X W 10 cm (H 4 inches X W...
Users Manual - English
Page 11
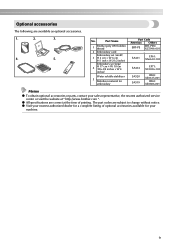
... z To obtain optional accessories or parts, contact your machine. 9 Optional accessories The following are correct at " http://www.brother.com ". The part codes are subject to change without notice. Part Name 1 Brother poly #90 bobbin thread 2 Embroidery card Embroidery set (small) 3 H 2 cm × W 6 cm (H 1 inch × W 2-1/2 inches) Embroidery set (large) 4 H 17 cm × W 10 cm (H 6-3/4 inches...
... z To obtain optional accessories or parts, contact your machine. 9 Optional accessories The following are correct at " http://www.brother.com ". The part codes are subject to change without notice. Part Name 1 Brother poly #90 bobbin thread 2 Embroidery card Embroidery set (small) 3 H 2 cm × W 6 cm (H 1 inch × W 2-1/2 inches) Embroidery set (large) 4 H 17 cm × W 10 cm (H 6-3/4 inches...

Users Manual - English
Page 12
...) (touch panel) (page 22) Setting for the selected pattern and error messages appear in the connector for the embroidery unit. i Operation buttons (page 12) Use these descriptions to learn the names of the machine parts. m Thread tension dial (page 63) Adjust the upper thread tension with this thread guide cover when winding...
...) (touch panel) (page 22) Setting for the selected pattern and error messages appear in the connector for the embroidery unit. i Operation buttons (page 12) Use these descriptions to learn the names of the machine parts. m Thread tension dial (page 63) Adjust the upper thread tension with this thread guide cover when winding...

Users Manual - English
Page 13
e Air vent The air vent allows the air surrounding the motor to use your machine. 11 Memo z Refer to pages 10 through 13 while you (counterclockwise) to raise and lower the needle. Needle and embroidery foot section Right-side/rear view a Thread guide disk (page 40) Pass the thread ... f Main power switch (page 18) Use the main power switch to thread the needle. a Handle Carry the machine by its handle when transporting the machine. c Embroidery card slot (page 55) Insert the embroidery card. d USB port (page 71) Connect the one end of the USB cable to this port and the ...
e Air vent The air vent allows the air surrounding the motor to use your machine. 11 Memo z Refer to pages 10 through 13 while you (counterclockwise) to raise and lower the needle. Needle and embroidery foot section Right-side/rear view a Thread guide disk (page 40) Pass the thread ... f Main power switch (page 18) Use the main power switch to thread the needle. a Handle Carry the machine by its handle when transporting the machine. c Embroidery card slot (page 55) Insert the embroidery card. d USB port (page 71) Connect the one end of the USB cable to this port and the ...
Users Manual - English
Page 14
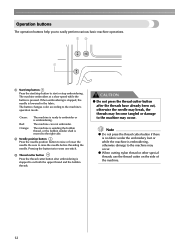
..., otherwise damage to raise the needle before threading the needle. Note z Do not press the thread cutter button if there is no fabric under the embroidery foot or while the machine is stopped to cut , otherwise the needle may break, the threads may become tangled or damage to the... occur. a Start/stop button Press the start/stop button to embroider or is ready to start or stop embroidering. The machine embroiders at a slow speed while the button is lowered in the fabric. c Thread cutter button Press the thread cutter button after the threads have already ...
..., otherwise damage to raise the needle before threading the needle. Note z Do not press the thread cutter button if there is no fabric under the embroidery foot or while the machine is stopped to cut , otherwise the needle may break, the threads may become tangled or damage to the... occur. a Start/stop button Press the start/stop button to embroider or is ready to start or stop embroidering. The machine embroiders at a slow speed while the button is lowered in the fabric. c Thread cutter button Press the thread cutter button after the threads have already ...
Users Manual - English
Page 15
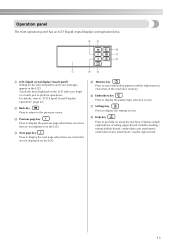
... (liquid crystal display) (touch panel) Setting for the selected pattern and error messages appear in the machine's memory. b Back key Press to return to save embroidery patterns and the alphanumeric characters in the LCD. e Memory key Press to the previous screen. Displays ...simple explanations of setting upper thread / bobbin winding / setting bobbin thread / embroidery unit attachment / embroidery frame attachment / needle replacement. 13 Operation panel The front operation panel has an LCD (liquid crystal display) and operation ...
... (liquid crystal display) (touch panel) Setting for the selected pattern and error messages appear in the machine's memory. b Back key Press to return to save embroidery patterns and the alphanumeric characters in the LCD. e Memory key Press to the previous screen. Displays ...simple explanations of setting upper thread / bobbin winding / setting bobbin thread / embroidery unit attachment / embroidery frame attachment / needle replacement. 13 Operation panel The front operation panel has an LCD (liquid crystal display) and operation ...
Users Manual - English
Page 17
1 GETTING READY The various preparations to start embroidering are described in this chapter. Basic Steps for Embroidering 16 Turning the Machine On/Off 17 Attaching the Embroidery Unit 19 LCD (Liquid Crystal Display) Operation 22 Preparing Items for Embroidering 26 Preparing the Needle 27 Winding/Installing the Bobbin 29 Upper Threading ...37 Preparing the Fabric 43 Attaching the Embroidery Frame 47
1 GETTING READY The various preparations to start embroidering are described in this chapter. Basic Steps for Embroidering 16 Turning the Machine On/Off 17 Attaching the Embroidery Unit 19 LCD (Liquid Crystal Display) Operation 22 Preparing Items for Embroidering 26 Preparing the Needle 27 Winding/Installing the Bobbin 29 Upper Threading ...37 Preparing the Fabric 43 Attaching the Embroidery Frame 47

Users Manual - English
Page 20
...the needle will make sound when it off. Unplug the power supply cord from the power supply d jack. When restarting the machine, follow the necessary procedure to "Attaching the Embroidery Unit" (page 19).) Prepare the included power supply cord. Do not modify the plug in the outlet, reverse the plug.... Turning off . In addition, before transporting the machine to another location, be sure to attach the embroidery unit to it to " "). Grasp the plug when unplugging the power supply cord. If the plug does not fit fully...
...the needle will make sound when it off. Unplug the power supply cord from the power supply d jack. When restarting the machine, follow the necessary procedure to "Attaching the Embroidery Unit" (page 19).) Prepare the included power supply cord. Do not modify the plug in the outlet, reverse the plug.... Turning off . In addition, before transporting the machine to another location, be sure to attach the embroidery unit to it to " "). Grasp the plug when unplugging the power supply cord. If the plug does not fit fully...
Users Manual - English
Page 21
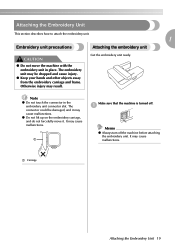
... be dropped and cause injury. ● Keep your hands and other objects away from the embroidery carriage and frame. a Make sure that the machine is turned off the machine before attaching the embroidery unit. It may result. Get the embroidery unit ready. Note z Do not touch the connector in place. z Do not lift up on...
... be dropped and cause injury. ● Keep your hands and other objects away from the embroidery carriage and frame. a Make sure that the machine is turned off the machine before attaching the embroidery unit. It may result. Get the embroidery unit ready. Note z Do not touch the connector in place. z Do not lift up on...
Users Manual - English
Page 22
... is displayed. X The confirmation message is near the d embroidery unit and press . Turn on the embroidery patterns, refer to fully insert the connector into the connection port. Memo z For details on the machine. a X The embroidery unit is no objects or hands are near the carriage, turn.... Be sure that there is attached. Note z Make sure that no gap between the embroidery unit and the machine, otherwise the embroidery pattern may not be sewn correctly. Be sure to "Selecting Embroidery Patterns" (page 50). X The carriage moves to its initial position. 20 X The ...
... is displayed. X The confirmation message is near the d embroidery unit and press . Turn on the embroidery patterns, refer to fully insert the connector into the connection port. Memo z For details on the machine. a X The embroidery unit is no objects or hands are near the carriage, turn.... Be sure that there is attached. Note z Make sure that no gap between the embroidery unit and the machine, otherwise the embroidery pattern may not be sewn correctly. Be sure to "Selecting Embroidery Patterns" (page 50). X The carriage moves to its initial position. 20 X The ...

Users Manual - English
Page 23
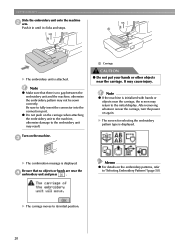
.... a • For details on the bottom left of d the embroidery unit, and slowly pull the embroidery unit to "Removing the embroidery frame" (page 48). c CAUTION ● Always turn off the machine. Turn off the machine before removing the embroidery unit. a Release button X The embroidery unit separates from the machine. Press , and then press . It may cause malfunctions. CAUTION...
.... a • For details on the bottom left of d the embroidery unit, and slowly pull the embroidery unit to "Removing the embroidery frame" (page 48). c CAUTION ● Always turn off the machine. Turn off the machine before removing the embroidery unit. a Release button X The embroidery unit separates from the machine. Press , and then press . It may cause malfunctions. CAUTION...
Users Manual - English
Page 24
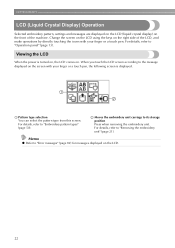
...power is displayed. b Moves the embroidery unit carriage to "Embroidery pattern types" (page 50). Memo ...finger or a touch pen. For details, refer to its storage position Press when removing the embroidery unit. When you touch the LCD screen according to "Error messages" (page 82) for...to "Operation panel" (page 13). GETTING READY LCD (Liquid Crystal Display) Operation Selected embroidery pattern, settings and messages are displayed on the LCD (liquid crystal display) on the...For details, refer to "Removing the embroidery unit" (page 21). Change the screen on the LCD using the keys on ...
...power is displayed. b Moves the embroidery unit carriage to "Embroidery pattern types" (page 50). Memo ...finger or a touch pen. For details, refer to its storage position Press when removing the embroidery unit. When you touch the LCD screen according to "Error messages" (page 82) for...to "Operation panel" (page 13). GETTING READY LCD (Liquid Crystal Display) Operation Selected embroidery pattern, settings and messages are displayed on the LCD (liquid crystal display) on the...For details, refer to "Removing the embroidery unit" (page 21). Change the screen on the LCD using the keys on ...
Users Manual - English
Page 25
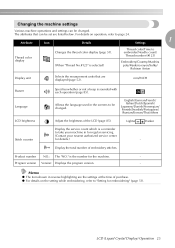
Allows the language used in the screens to embroider/Needle count/ Thread number (#123) Embroidery/Country/Madeira poly/Madeira rayon/Sulky/ Robison Anton Display unit Selects the measurement units that can be changed . Product number NO.: The "NO... authorized service center for details.) - mm/INCH Buzzer Language LCD brightness Stitch counter Specifies whether or not a beep is a reminder to "Setting for the machine. - z For details on operation, refer to page 24. 1 Attribute Icon Details Settings Thread color display Changes the thread color display (page 51). (When...
Allows the language used in the screens to embroider/Needle count/ Thread number (#123) Embroidery/Country/Madeira poly/Madeira rayon/Sulky/ Robison Anton Display unit Selects the measurement units that can be changed . Product number NO.: The "NO... authorized service center for details.) - mm/INCH Buzzer Language LCD brightness Stitch counter Specifies whether or not a beep is a reminder to "Setting for the machine. - z For details on operation, refer to page 24. 1 Attribute Icon Details Settings Thread color display Changes the thread color display (page 51). (When...
Users Manual - English
Page 28
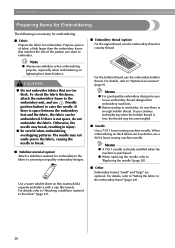
...9632; Fabric Prepare the fabric for embroidery. Use a water soluble sheet on thick fabrics such as denim, use embroidery thread designed for embroidery machines. To check the fabric thickness, attach the embroidery frame to the embroidery unit, and use the embroidery thread or country thread. CAUTION &#...sure to the fabric" (page 43). ■ Embroidery thread (option) For the upper thread, use (Needle position button) to embroider. Otherwise, the needle may become tangled. ■ Needle Use a 75/11 home sewing machine needle. For details, refer to "Attaching a stabilizer ...
...9632; Fabric Prepare the fabric for embroidery. Use a water soluble sheet on thick fabrics such as denim, use embroidery thread designed for embroidery machines. To check the fabric thickness, attach the embroidery frame to the embroidery unit, and use the embroidery thread or country thread. CAUTION &#...sure to the fabric" (page 43). ■ Embroidery thread (option) For the upper thread, use (Needle position button) to embroider. Otherwise, the needle may become tangled. ■ Needle Use a 75/11 home sewing machine needle. For details, refer to "Attaching a stabilizer ...
Users Manual - English
Page 71
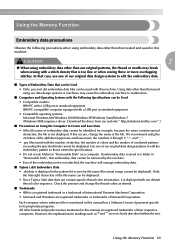
... name can be used with this machine. Using the Memory Function Embroidery data precautions Observe the following precautions when using embroidery data other than that saved using our data design systems or machines may break when sewing with a stitch density that is a registered trademark or a trademark of International Business Machines Corporation. • Microsoft and Windows are...
... name can be used with this machine. Using the Memory Function Embroidery data precautions Observe the following precautions when using embroidery data other than that saved using our data design systems or machines may break when sewing with a stitch density that is a registered trademark or a trademark of International Business Machines Corporation. • Microsoft and Windows are...


