Users Manual - English
Page 32
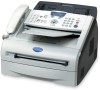
2 Open the top cover of the FAX/MFC. 3 Holding the drum unit by its handles, insert it into the FAX/MFC. 4 Close the top cover. 2-4 ASSEMBLY AND CONNECTIONS
2 Open the top cover of the FAX/MFC. 3 Holding the drum unit by its handles, insert it into the FAX/MFC. 4 Close the top cover. 2-4 ASSEMBLY AND CONNECTIONS
Users Manual - English
Page 106
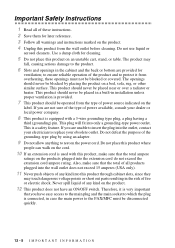
...are unable to insert the plug into the outlet, contact your electrician to the FAX/MFC must not be placed near or over a radiator or heater. This product... where people can walk on an unstable cart, stand, or table. The openings should never be blocked or covered. If you are not sure of the type of power source indicated on the... or aerosol cleaners. This is used with a 3-wire grounding type plug, a plug having a third (grounding) pin. Do not defeat the purpose of these openings must be disconnected quickly. 12 - 5 I M P O R T A N T I N F O R M A T I O N Also, make...
...are unable to insert the plug into the outlet, contact your electrician to the FAX/MFC must not be placed near or over a radiator or heater. This product... where people can walk on an unstable cart, stand, or table. The openings should never be blocked or covered. If you are not sure of the type of power source indicated on the... or aerosol cleaners. This is used with a 3-wire grounding type plug, a plug having a third (grounding) pin. Do not defeat the purpose of these openings must be disconnected quickly. 12 - 5 I M P O R T A N T I N F O R M A T I O N Also, make...
Users Manual - English
Page 107
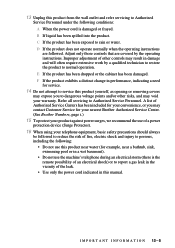
... the product exhibits a distinct change in performance, indicating a need for service. 14 Do not attempt to service this product yourself, as opening or removing covers may expose you may result in this manual. A list of the leak. • Use only the power cord indicated in damage and...and may void your convenience, or you to dangerous voltage points and/or other controls may contact Customer Service for your nearest Brother Authorized Service Center. (See Brother Numbers, page i.) 15 To protect your product against power surges, we recommend the use of a power protection device (Surge...
... the product exhibits a distinct change in performance, indicating a need for service. 14 Do not attempt to service this product yourself, as opening or removing covers may expose you may result in this manual. A list of the leak. • Use only the power cord indicated in damage and...and may void your convenience, or you to dangerous voltage points and/or other controls may contact Customer Service for your nearest Brother Authorized Service Center. (See Brother Numbers, page i.) 15 To protect your product against power surges, we recommend the use of a power protection device (Surge...
Users Manual - English
Page 110
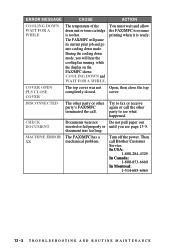
...'s FAX/MFC terminated the call Brother Customer Service: In USA: 1-800-284-4329 In Canada: 1-800-853-6660 In Montreal: 1-514-685-6464 13 - 2 T R O U B L E S H O O T I N G A N D R O U T I N E M A I N T E N A N C E MACHINE ERROR The FAX/MFC has a XX mechanical problem. Turn off the power. Then call . During the cooling down mode, you see what happened. COVER OPEN PLS CLOSE COVER The top cover was...
...'s FAX/MFC terminated the call Brother Customer Service: In USA: 1-800-284-4329 In Canada: 1-800-853-6660 In Montreal: 1-514-685-6464 13 - 2 T R O U B L E S H O O T I N G A N D R O U T I N E M A I N T E N A N C E MACHINE ERROR The FAX/MFC has a XX mechanical problem. Turn off the power. Then call . During the cooling down mode, you see what happened. COVER OPEN PLS CLOSE COVER The top cover was...
Users Manual - English
Page 112
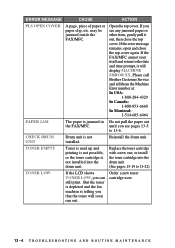
ERROR MESSAGE CAUSE ACTION PLS OPEN COVER A page, piece of paper or paper clip, etc. Please call Brother Customer Service and tell them the Machine Error number at: In USA: 1-800-284-4329 In Canada: 1-800-853-6660 In Montreal: 1-514-685-6464 ... can still print. Replace the toner cartridge with a new one, or install the toner cartridge into the drum unit. Open the top cover. Reinstall the drum unit. may be jammed inside the FAX/MFC. TONER EMPTY Toner is used up and printing is not possible, or the toner cartridge is telling you see...
ERROR MESSAGE CAUSE ACTION PLS OPEN COVER A page, piece of paper or paper clip, etc. Please call Brother Customer Service and tell them the Machine Error number at: In USA: 1-800-284-4329 In Canada: 1-800-853-6660 In Montreal: 1-514-685-6464 ... can still print. Replace the toner cartridge with a new one, or install the toner cartridge into the drum unit. Open the top cover. Reinstall the drum unit. may be jammed inside the FAX/MFC. TONER EMPTY Toner is used up and printing is not possible, or the toner cartridge is telling you see...
Users Manual - English
Page 113
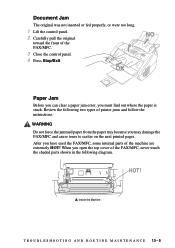
... error, you open the top cover of the FAX/MFC, never touch the shaded parts shown in the following two types of printer jams and follow the instructions. When you must find out where the paper is stuck. After you may damage the FAX/MFC and cause... scatter on the next printed pages. HOT! WARNING Do not force the jammed paper from the paper tray because you have used the FAX/MFC, some internal parts of the FAX/MFC. 3 Close the control panel. 4 Press Stop/Exit. Review the following diagram. Inside the Machine T R O U B L E S H O O T I N G A N D R O U T I N E M A I N T E N A N C E ...
... error, you open the top cover of the FAX/MFC, never touch the shaded parts shown in the following two types of printer jams and follow the instructions. When you must find out where the paper is stuck. After you may damage the FAX/MFC and cause... scatter on the next printed pages. HOT! WARNING Do not force the jammed paper from the paper tray because you have used the FAX/MFC, some internal parts of the FAX/MFC. 3 Close the control panel. 4 Press Stop/Exit. Review the following diagram. Inside the Machine T R O U B L E S H O O T I N G A N D R O U T I N E M A I N T E N A N C E ...
Users Manual - English
Page 114
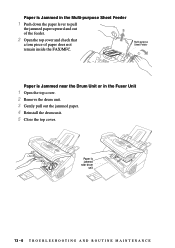
Paper is jammed near the Drum Unit or in the Multi-purpose Sheet Feeder 1 Push down the paper lever to pull the jammed paper upward and out of the feeder. 2 Open the top cover and check that a torn piece of paper does not remain inside the FAX/MFC. Paper is Jammed in the Fuser Unit 1 Open the top cover. 2 Remove the drum unit. 3 Gently pull out the jammed paper. 4 Reinstall the drum unit. 5 Close the top cover. Multi-purpose Sheet Feeder Paper is Jammed near drum unit 13 - 6 T R O U B L E S H O O T I N G A N D R O U T I N E M A I N T E N A N C E
Paper is jammed near the Drum Unit or in the Multi-purpose Sheet Feeder 1 Push down the paper lever to pull the jammed paper upward and out of the feeder. 2 Open the top cover and check that a torn piece of paper does not remain inside the FAX/MFC. Paper is Jammed in the Fuser Unit 1 Open the top cover. 2 Remove the drum unit. 3 Gently pull out the jammed paper. 4 Reinstall the drum unit. 5 Close the top cover. Multi-purpose Sheet Feeder Paper is Jammed near drum unit 13 - 6 T R O U B L E S H O O T I N G A N D R O U T I N E M A I N T E N A N C E
Users Manual - English
Page 122
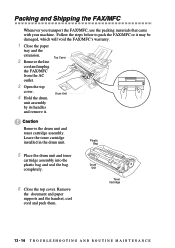
Top Cover 3 Open the top cover. 4 Hold the drum unit assembly by its handles and remove it may be damaged, which will void the FAX/MFC's warranty. 1 Close the paper tray and the extension. 2 Remove the line cord and unplug the FAX/MFC from the AC outlet. Leave the ...O U B L E S H O O T I N G A N D R O U T I N E M A I N T E N A N C E Plastic Bag 5 Place the drum unit and toner cartridge assembly into the plastic bag and seal the bag completely. 6 Close the top cover. Remove the document and paper supports and the handset, curl cord and pack them. Follow the steps below to pack the...
Top Cover 3 Open the top cover. 4 Hold the drum unit assembly by its handles and remove it may be damaged, which will void the FAX/MFC's warranty. 1 Close the paper tray and the extension. 2 Remove the line cord and unplug the FAX/MFC from the AC outlet. Leave the ...O U B L E S H O O T I N G A N D R O U T I N E M A I N T E N A N C E Plastic Bag 5 Place the drum unit and toner cartridge assembly into the plastic bag and seal the bag completely. 6 Close the top cover. Remove the document and paper supports and the handset, curl cord and pack them. Follow the steps below to pack the...
Users Manual - English
Page 124
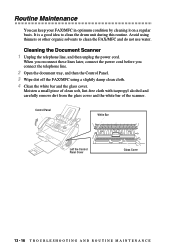
... these lines later, connect the power cord before you connect the telephone line. 2 Open the document tray, and then the Control Panel. 3 Wipe dirt off the FAX/MFC using thinners or other organic solvents to clean the drum unit during this routine.... Control Panel White Bar Left the Control Panel Cover Glass Cover 13 - 16 T R O U B L E S H O O T I N G A N D R O U T I N E M A I N T E N A N C E Avoid using a slightly damp clean cloth. 4 Clean the white bar and the glass cover. Routine Maintenance You can keep your FAX/MFC in optimum condition by cleaning it on a regular basis...
... these lines later, connect the power cord before you connect the telephone line. 2 Open the document tray, and then the Control Panel. 3 Wipe dirt off the FAX/MFC using thinners or other organic solvents to clean the drum unit during this routine.... Control Panel White Bar Left the Control Panel Cover Glass Cover 13 - 16 T R O U B L E S H O O T I N G A N D R O U T I N E M A I N T E N A N C E Avoid using a slightly damp clean cloth. 4 Clean the white bar and the glass cover. Routine Maintenance You can keep your FAX/MFC in optimum condition by cleaning it on a regular basis...
Users Manual - English
Page 125
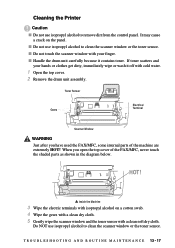
Toner Sensor Gears Electrical Terminal Scanner Window WARNING Just after you open the top cover of the machine are extremely HOT! HOT! I Do not use isopropyl alcohol to remove dirt from the control panel. It may cause a crack on a cotton ... cloth. If toner scatters and your hands or clothes get dirty, immediately wipe or wash it contains toner. When you have used the FAX/MFC, some internal parts of the FAX/MFC, never touch the shaded parts as shown in the diagram below. I Do not use isopropyl alcohol to clean the scanner window...
Toner Sensor Gears Electrical Terminal Scanner Window WARNING Just after you open the top cover of the machine are extremely HOT! HOT! I Do not use isopropyl alcohol to remove dirt from the control panel. It may cause a crack on a cotton ... cloth. If toner scatters and your hands or clothes get dirty, immediately wipe or wash it contains toner. When you have used the FAX/MFC, some internal parts of the FAX/MFC, never touch the shaded parts as shown in the diagram below. I Do not use isopropyl alcohol to clean the scanner window...

Users Manual - English
Page 128
... Note Place the drum unit on the toner Cartridge cartridge counterclockwise until it out. 13 - 20 T R O U B L E S H O O T I N G A N D R O U T I N E M A I N T E N A N C E Top Cover 2 Remove the drum unit by holding each side of disposable paper to the front. 4 Remove the used toner cartridge from the drum unit by its... handles and gently lift the drum forward toward you. 1 Open the top cover. The toner cartridge cannot be removed unless the shutter Drum is completely open. Drum Unit 3 Gently turn the Toner lever on a drop cloth or large piece ...
... Note Place the drum unit on the toner Cartridge cartridge counterclockwise until it out. 13 - 20 T R O U B L E S H O O T I N G A N D R O U T I N E M A I N T E N A N C E Top Cover 2 Remove the drum unit by holding each side of disposable paper to the front. 4 Remove the used toner cartridge from the drum unit by its... handles and gently lift the drum forward toward you. 1 Open the top cover. The toner cartridge cannot be removed unless the shutter Drum is completely open. Drum Unit 3 Gently turn the Toner lever on a drop cloth or large piece ...
Users Manual - English
Page 130
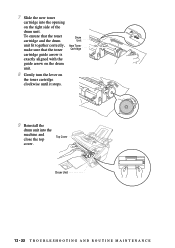
Drum Unit 13 - 22 T R O U B L E S H O O T I N G A N D R O U T I N E M A I N T E N A N C E 7 Slide the new toner cartridge into the machine and close the top Top Cover cover. To ensure that the toner cartridge and the drum unit fit together correctly, make sure that the toner cartridge guide arrow is exactly aligned with the guide arrow on the drum unit. 8 Gently turn the lever on the right side of the drum unit. Drum Unit New Toner Cartridge 9 Reinstall the drum unit into the opening on the toner cartridge clockwise until it stops.
Drum Unit 13 - 22 T R O U B L E S H O O T I N G A N D R O U T I N E M A I N T E N A N C E 7 Slide the new toner cartridge into the machine and close the top Top Cover cover. To ensure that the toner cartridge and the drum unit fit together correctly, make sure that the toner cartridge guide arrow is exactly aligned with the guide arrow on the drum unit. 8 Gently turn the lever on the right side of the drum unit. Drum Unit New Toner Cartridge 9 Reinstall the drum unit into the opening on the toner cartridge clockwise until it stops.

Users Manual - English
Page 132
...does not spill out of disposable paper to avoid spilling and scattering the toner. Used Drum Unit Toner Cartridge Note Discard the used Top Cover drum unit. Place the drum unit on a drop cloth or large piece of the unit. If you close the document tray and the extension.... 2 Open the top cover. 3 Remove the used drum unit according to local regulations. When discarding used drum unit and keep them , call your local Sanitation Department. Follow ...
...does not spill out of disposable paper to avoid spilling and scattering the toner. Used Drum Unit Toner Cartridge Note Discard the used Top Cover drum unit. Place the drum unit on a drop cloth or large piece of the unit. If you close the document tray and the extension.... 2 Open the top cover. 3 Remove the used drum unit according to local regulations. When discarding used drum unit and keep them , call your local Sanitation Department. Follow ...


