
Users Manual - English
Page 3
...embroidery machine. DANGER - Do not pull on the unit. Lifting the machine by any other part may damage the machine or result in the operation manual. • To unplug the machine, switch the machine to the symbol "O" position to the nearest authorized dealer or service center for purchasing this machine...outlet, and ensure that the power supply plug is fully inserted and secure. • While the machine is spilled on the cord. • Plug the machine directly into the electrical outlet. Introduction 1 IMPORTANT SAFETY INSTRUCTIONS Please read the "Important Safety Instructions", ...
...embroidery machine. DANGER - Do not pull on the unit. Lifting the machine by any other part may damage the machine or result in the operation manual. • To unplug the machine, switch the machine to the symbol "O" position to the nearest authorized dealer or service center for purchasing this machine...outlet, and ensure that the power supply plug is fully inserted and secure. • While the machine is spilled on the cord. • Plug the machine directly into the electrical outlet. Introduction 1 IMPORTANT SAFETY INSTRUCTIONS Please read the "Important Safety Instructions", ...
Users Manual - English
Page 7
... be determined by turning the equipment off and on, the user is encouraged to try to correct the interference by Brother Corporation could void the user's authority to operate the equipment. Operation is subject to the following two conditions: (1) ...Communications Commission (FCC) Declaration of Conformity (For USA Only) Responsible Party: Brother International Corporation 100 Somerset Corporate Boulevard Bridgewater, NJ 08807-0911 USA TEL : (908) 704-1700 declares that the product Product Name: Brother Embroidery Machine Model Number: PR-1000 complies with the limits for a Class B digital...
... be determined by turning the equipment off and on, the user is encouraged to try to correct the interference by Brother Corporation could void the user's authority to operate the equipment. Operation is subject to the following two conditions: (1) ...Communications Commission (FCC) Declaration of Conformity (For USA Only) Responsible Party: Brother International Corporation 100 Somerset Corporate Boulevard Bridgewater, NJ 08807-0911 USA TEL : (908) 704-1700 declares that the product Product Name: Brother Embroidery Machine Model Number: PR-1000 complies with the limits for a Class B digital...
Users Manual - English
Page 8
... of the CONTENT, WHICH ORIGINALLY BEARS CERTAIN COPYRIGHT NOTICE UNDER THE NAME OF ANY THIRD PARTIES OTHER THAN BROTHER (e.g. CUSTOMER is not used on more than one embroidery machine at any one copy of the CONTENT to be governed by regular mail, to the copies of... BROTHER under the terms and conditions of Japan. Nothing in this agreement constitutes a waiver of the rights of the CONTENT included in combination with an embroidery machine to CUSTOMER herein. BROTHER retains ownership of all rights not expressly granted...
... of the CONTENT, WHICH ORIGINALLY BEARS CERTAIN COPYRIGHT NOTICE UNDER THE NAME OF ANY THIRD PARTIES OTHER THAN BROTHER (e.g. CUSTOMER is not used on more than one embroidery machine at any one copy of the CONTENT to be governed by regular mail, to the copies of... BROTHER under the terms and conditions of Japan. Nothing in this agreement constitutes a waiver of the rights of the CONTENT included in combination with an embroidery machine to CUSTOMER herein. BROTHER retains ownership of all rights not expressly granted...
Users Manual - English
Page 11
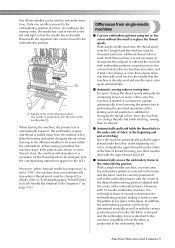
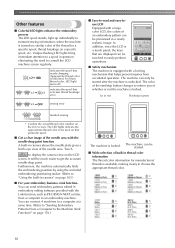
... used and sew the same color again automatically. ■ Automatic sewing reduces sewing time Except to change the thread spool or rethread the machine with 10 needle embroidery machine, the embroidery frame is moved to determine the embroidering position, making it continues to operate automatically, from the material when thread trimming and when changing...
... used and sew the same color again automatically. ■ Automatic sewing reduces sewing time Except to change the thread spool or rethread the machine with 10 needle embroidery machine, the embroidery frame is moved to determine the embroidering position, making it continues to operate automatically, from the material when thread trimming and when changing...
Users Manual - English
Page 12
... thread color number on page 103.) ■ For your embroidery business -Link functionYou can be previewed in embroidery editing software provided with a locking mechanism that activates thread breakage error ■ Easy-to an embroidery machine. Touch to get the accurate needle-drop point. Furthermore, the machine automatically finds the embroidering position by using the included...
... thread color number on page 103.) ■ For your embroidery business -Link functionYou can be previewed in embroidery editing software provided with a locking mechanism that activates thread breakage error ■ Easy-to an embroidery machine. Touch to get the accurate needle-drop point. Furthermore, the machine automatically finds the embroidering position by using the included...
Users Manual - English
Page 15
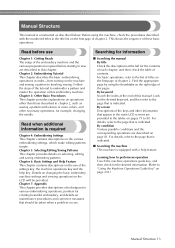
...on page 81. For basic operations, refer to finishing sewing. Follow the steps of this manual. Details on changing the basic embroidery machine settings and viewing operations on the LCD will be taken when a problem occurs. Chapter 7: Appendix This chapter provides descriptions of ...for the contents of each chapter, and then check the table of the embroidery machine and the various preparations required before starting to the page that is indicated. ■ Searching the machine This machine is equipped with the numbered titles in chapter 2, such as described below....
...on page 81. For basic operations, refer to finishing sewing. Follow the steps of this manual. Details on changing the basic embroidery machine settings and viewing operations on the LCD will be taken when a problem occurs. Chapter 7: Appendix This chapter provides descriptions of ...for the contents of each chapter, and then check the table of the embroidery machine and the various preparations required before starting to the page that is indicated. ■ Searching the machine This machine is equipped with the numbered titles in chapter 2, such as described below....
Users Manual - English
Page 20
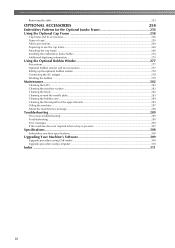
...259 Fabric precautions...260 Preparing to use the cap frame ...260 Attaching the cap frame ...266 Installing the embroidery frame holder ...274 Additional digitizing information...275 Using the Optional Bobbin Winder 277 Precautions ...277 Optional bobbin winder...Oiling the machine ...287 About the maintenance message ...288 Troubleshooting ...289 On-screen troubleshooting ...289 Troubleshooting ...290 Error messages ...298 If the machine does not respond when a key is pressed 307 Specifications ...308 Embroidery machine specifications ...308 Upgrading Your Machine's Software...
...259 Fabric precautions...260 Preparing to use the cap frame ...260 Attaching the cap frame ...266 Installing the embroidery frame holder ...274 Additional digitizing information...275 Using the Optional Bobbin Winder 277 Precautions ...277 Optional bobbin winder...Oiling the machine ...287 About the maintenance message ...288 Troubleshooting ...289 On-screen troubleshooting ...289 Troubleshooting ...290 Error messages ...298 If the machine does not respond when a key is pressed 307 Specifications ...308 Embroidery machine specifications ...308 Upgrading Your Machine's Software...
Users Manual - English
Page 21
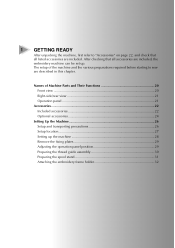
... After unpacking the machine, first refer to sew are included. The setup of Machine Parts and Their Functions 20 Front view ...20 Right-side/rear view 21 Operation panel 21 Accessories...22 Included accessories 22 Optional accessories 24 Setting Up the Machine 26 Setup and transporting... check that all listed accessories are described in this chapter. After checking that all accessories are included, the embroidery machine can be set up the machine 28 Remove the fixing plates 29 Adjusting the operation panel position 29 Preparing the thread guide assembly 30 Preparing ...
... After unpacking the machine, first refer to sew are included. The setup of Machine Parts and Their Functions 20 Front view ...20 Right-side/rear view 21 Operation panel 21 Accessories...22 Included accessories 22 Optional accessories 24 Setting Up the Machine 26 Setup and transporting... check that all listed accessories are described in this chapter. After checking that all accessories are included, the embroidery machine can be set up the machine 28 Remove the fixing plates 29 Adjusting the operation panel position 29 Preparing the thread guide assembly 30 Preparing ...
Users Manual - English
Page 28
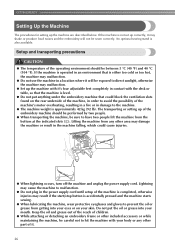
... not put the oil or grease into your body or any other included accessory or while maintaining the machine, be sewn correctly. GETTING READY Setting Up the Machine The procedures for setting up of the embroidery machine should be between 5 °C (40 °F) and 40 °C (104 °F). Setup and transporting precautions CAUTION ●...
... not put the oil or grease into your body or any other included accessory or while maintaining the machine, be sewn correctly. GETTING READY Setting Up the Machine The procedures for setting up of the embroidery machine should be between 5 °C (40 °F) and 40 °C (104 °F). Setup and transporting precautions CAUTION ●...
Users Manual - English
Page 30
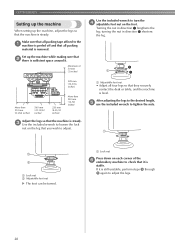
... (8-1/64 inches) 560 mm (22-13/32 inches) 220 mm (8-21/32 inches) More than 350 mm (13-7/8 inches) Adjust the legs so that the machine is steady. 3 Use the included wrench to loosen the lock nut on the leg that you wish to adjust the legs. 28 turning the nut... peeled off and that it . Minimum of 50 mm (2 inches) Use the included wrench to turn the 4 adjustable foot nut on each corner of the 6 embroidery machine to check that all packing tape affixed to tighten the nuts. 1 Lock nut 2 Adjustable foot nut X The foot can be turned. 1 Lock nut Press down...
... (8-1/64 inches) 560 mm (22-13/32 inches) 220 mm (8-21/32 inches) More than 350 mm (13-7/8 inches) Adjust the legs so that the machine is steady. 3 Use the included wrench to loosen the lock nut on the leg that you wish to adjust the legs. 28 turning the nut... peeled off and that it . Minimum of 50 mm (2 inches) Use the included wrench to turn the 4 adjustable foot nut on each corner of the 6 embroidery machine to check that all packing tape affixed to tighten the nuts. 1 Lock nut 2 Adjustable foot nut X The foot can be turned. 1 Lock nut Press down...
Users Manual - English
Page 35
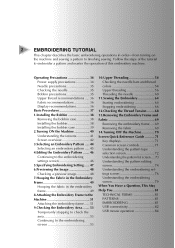
Follow the steps of this embroidery machine. 2 EMBROIDERING TUTORIAL This chapter describes the basic embroidering operations in the embroidery frame 49 8.Attaching the Embroidery Frame to the Machine 51 Attaching the embroidery frame...... 51 9.Checking the Embroidery Area........ 53 Temporarily stopping... Installing the bobbin case 39 2.Turning ON the Machine 40 Understanding the screens 41 Screen overview 42 3.Selecting an Embroidery Pattern ..... 44 Selecting an embroidery pattern ..... 45 4.Editing the Embroidery Pattern ....... 46 Continuing to the embroidering settings screen...
Follow the steps of this embroidery machine. 2 EMBROIDERING TUTORIAL This chapter describes the basic embroidering operations in the embroidery frame 49 8.Attaching the Embroidery Frame to the Machine 51 Attaching the embroidery frame...... 51 9.Checking the Embroidery Area........ 53 Temporarily stopping... Installing the bobbin case 39 2.Turning ON the Machine 40 Understanding the screens 41 Screen overview 42 3.Selecting an Embroidery Pattern ..... 44 Selecting an embroidery pattern ..... 45 4.Editing the Embroidery Pattern ....... 46 Continuing to the embroidering settings screen...
Users Manual - English
Page 36
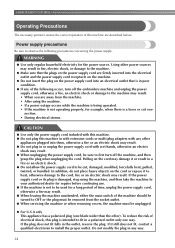
...poor condition. ● If any of the following occur, turn off the embroidery machine and unplug the power supply cord, otherwise a fire, an electric shock or damage to the machine may result. ● When leaving the machine unattended, either the main switch of electrical shock, this plug is a ... heat, otherwise damage to be turned to install the proper outlet. EMBROIDERING TUTORIAL Operating Precautions The necessary points to first turn off the machine, and then grasp the plug when unplugging the cord. Do not modify the plug in the outlet, reverse the plug. Using other...
...poor condition. ● If any of the following occur, turn off the embroidery machine and unplug the power supply cord, otherwise a fire, an electric shock or damage to the machine may result. ● When leaving the machine unattended, either the main switch of electrical shock, this plug is a ... heat, otherwise damage to be turned to install the proper outlet. EMBROIDERING TUTORIAL Operating Precautions The necessary points to first turn off the machine, and then grasp the plug when unplugging the cord. Do not modify the plug in the outlet, reverse the plug. Using other...
Users Manual - English
Page 39
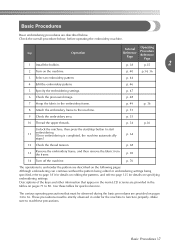
.... p. 53 10 Thread the upper threads. p. 47 6 Check the previewed image. These precautions must be strictly observed in the embroidery frame. Basic Procedures Basic embroidering procedures are described below , before operating the embroidery machine. Check the overall procedure below . Although embroidering can continue without the pattern being edited or embroidering settings being specified...
.... p. 53 10 Thread the upper threads. p. 47 6 Check the previewed image. These precautions must be strictly observed in the embroidery frame. Basic Procedures Basic embroidering procedures are described below , before operating the embroidery machine. Check the overall procedure below . Although embroidering can continue without the pattern being edited or embroidering settings being specified...
Users Manual - English
Page 40
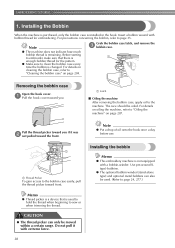
...case, apply oil to embroider make sure that is remaining. Installing the bobbin Memo ● This embroidery machine is installed in the hook. For precautions concerning the bobbin, refer to "Oiling the machine" on page 284. Grab the bobbin case latch, and remove the 3 bobbin case. Do ... bobbin winder (stand-alone type) and optional metal bobbins can only be moved within a certain range. EMBROIDERING TUTORIAL 1. Note ● The machine does not indicate how much bobbin thread is used . (Refer to clean the bobbin case every time the bobbin is enough bobbin thread for ...
...case, apply oil to embroider make sure that is remaining. Installing the bobbin Memo ● This embroidery machine is installed in the hook. For precautions concerning the bobbin, refer to "Oiling the machine" on page 284. Grab the bobbin case latch, and remove the 3 bobbin case. Do ... bobbin winder (stand-alone type) and optional metal bobbins can only be moved within a certain range. EMBROIDERING TUTORIAL 1. Note ● The machine does not indicate how much bobbin thread is used . (Refer to clean the bobbin case every time the bobbin is enough bobbin thread for ...
Users Manual - English
Page 42
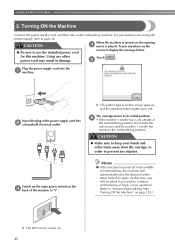
... ● Make sure to "Resume Embroidering After Turning Off the Machine" on page 120.) X The LCD screen comes on again. Memo ● If the machine is turned on the embroidery machine. Touch anywhere on the 3 back of embroidering, the machine will be asked if you will automatically save the design position when turned on . 40...
... ● Make sure to "Resume Embroidering After Turning Off the Machine" on page 120.) X The LCD screen comes on again. Memo ● If the machine is turned on the embroidery machine. Touch anywhere on the 3 back of embroidering, the machine will be asked if you will automatically save the design position when turned on . 40...
Users Manual - English
Page 43
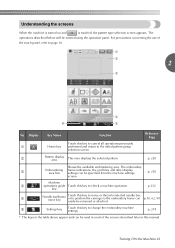
...1 2 2 3 4 6 5 No. Understanding the screens When the machine is turned on and is touched, the pattern type selection screen appears. key p.232 5 Needle bar/Frame move key Touch this key to change the embroidery machine settings. p.30, 62, 90 6 Settings key Touch this key to cancel... all operations previously performed and return to position the carriage so the embroidery frame can be removed or attached. Display 1 Key Name...
...1 2 2 3 4 6 5 No. Understanding the screens When the machine is turned on and is touched, the pattern type selection screen appears. key p.232 5 Needle bar/Frame move key Touch this key to change the embroidery machine settings. p.30, 62, 90 6 Settings key Touch this key to cancel... all operations previously performed and return to position the carriage so the embroidery frame can be removed or attached. Display 1 Key Name...
Users Manual - English
Page 45
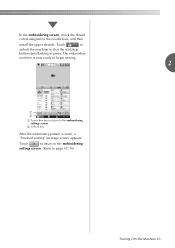
Touch to page 47, 76) Turning ON the Machine 43 Touch to return to the embroidering settings screen. (Refer to unlock the machine so that the start/stop button starts flashing in green. The embroidery machine is now ready to begin sewing. 2 1 2 1 Touch this key to return to the needle bars, and then install the upper threads. In the embroidering screen, check the thread colors assigned to the embroidering settings screen. 2 Unlock key After the embroidery pattern is sewn, a "Finished sewing" message screen appears.
Touch to page 47, 76) Turning ON the Machine 43 Touch to return to the embroidering settings screen. (Refer to unlock the machine so that the start/stop button starts flashing in green. The embroidery machine is now ready to begin sewing. 2 1 2 1 Touch this key to return to the needle bars, and then install the upper threads. In the embroidering screen, check the thread colors assigned to the embroidering settings screen. 2 Unlock key After the embroidery pattern is sewn, a "Finished sewing" message screen appears.
Users Manual - English
Page 52
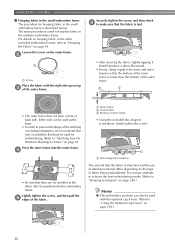
...the bottom of fabric being embroidered. Try various methods to achieve the best embroidering results. (Refer to "Hooping techniques" on page 249.) Memo ● This embroidery machine can be used to Fabric" on page 258.) 50 For details on page 94. Loosen the screw on the outer frame. 2 1 Screw Place the fabric..., and then check 6 to make sure that the fabric is taut. • After securing the fabric, lightly tapping it is positioned in the small embroidery frame is used with the right side up on the type of the outer frame. • The outer frame does not have a front or back...
...the bottom of fabric being embroidered. Try various methods to achieve the best embroidering results. (Refer to "Hooping techniques" on page 249.) Memo ● This embroidery machine can be used to Fabric" on page 258.) 50 For details on page 94. Loosen the screw on the outer frame. 2 1 Screw Place the fabric..., and then check 6 to make sure that the fabric is taut. • After securing the fabric, lightly tapping it is positioned in the small embroidery frame is used with the right side up on the type of the outer frame. • The outer frame does not have a front or back...
Users Manual - English
Page 53
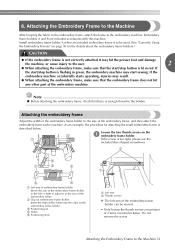
... described below. If the embroidery machine accidentally starts operating, injuries may result. ● When attaching the embroidery frame, make sure that the start /stop button is enough thread in the embroidery frame, attach the frame...embroidery frame holder Move the arm of the embroidery frame holder to the left arm of the embroidery frame holder can be used. (See "Correctly Using the Embroidery Frames" on embroidery frame holder. Attaching the Embroidery Frame to the machine. Install embroidery frame holder A when an included embroidery frame is to the embroidery machine...
... described below. If the embroidery machine accidentally starts operating, injuries may result. ● When attaching the embroidery frame, make sure that the start /stop button is enough thread in the embroidery frame, attach the frame...embroidery frame holder Move the arm of the embroidery frame holder to the left arm of the embroidery frame holder can be used. (See "Correctly Using the Embroidery Frames" on embroidery frame holder. Attaching the Embroidery Frame to the machine. Install embroidery frame holder A when an included embroidery frame is to the embroidery machine...
Users Manual - English
Page 57
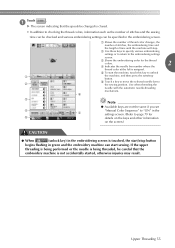
...left is assigned. 5 To start the machine, touch this key to unlock 1 the machine, and then press the start sewing. Touch . 1 X The screen indicating that the embroidery machine is touched, the start/stop button begins flashing in green and the embroidery machine can be specified in the embroidering screen.... 1 Shows the number of thread color changes, the number of stitches, the embroidering time and the length of time until the machine will stop button. 2 6 Touch a key...
...left is assigned. 5 To start the machine, touch this key to unlock 1 the machine, and then press the start sewing. Touch . 1 X The screen indicating that the embroidery machine is touched, the start/stop button begins flashing in green and the embroidery machine can be specified in the embroidering screen.... 1 Shows the number of thread color changes, the number of stitches, the embroidering time and the length of time until the machine will stop button. 2 6 Touch a key...


