

Users Manual - Multi
Page 3
ENGLISH CONTENTS Accessories...2 Embroidering with the Border Embroidery Frame 2 Sample Projects Using the Border Embroidery Frame 2 Selecting a Pattern ...3 Hooping the Fabric in the Border Embroidery Frame 5 Attaching the Border Embroidery Frame to the Embroidery Unit 6 Embroidering the First Pattern 7 Removing the Border Embroidery Frame 8 Embroidering the Next Pattern 8 1
ENGLISH CONTENTS Accessories...2 Embroidering with the Border Embroidery Frame 2 Sample Projects Using the Border Embroidery Frame 2 Selecting a Pattern ...3 Hooping the Fabric in the Border Embroidery Frame 5 Attaching the Border Embroidery Frame to the Embroidery Unit 6 Embroidering the First Pattern 7 Removing the Border Embroidery Frame 8 Embroidering the Next Pattern 8 1
Users Manual - Multi
Page 4
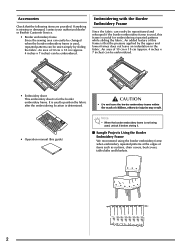
... covers, tablecloths and blankets. 2 Accessories Check that the pressure applied by sliding the fabric. If anything is missing or damaged, contact your authorized dealer or Brother Customer Service. • Border embroidery frame Since the sewing area can easily be changed when the border embroidery frame is that the following items are...
... covers, tablecloths and blankets. 2 Accessories Check that the pressure applied by sliding the fabric. If anything is missing or damaged, contact your authorized dealer or Brother Customer Service. • Border embroidery frame Since the sewing area can easily be changed when the border embroidery frame is that the following items are...
Users Manual - Multi
Page 5
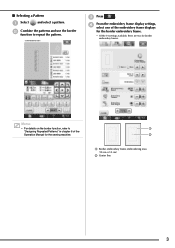
b Combine the patterns and use the border function to "Designing Repeated Patterns" in chapter 6 of the embroidery frame displays for the border embroidery frame. * Of the 14 settings available, there are two for the sewing machine. a b a Border embroidery frame embroidering area (18 cm × 10 cm) b Center line 3 d From the embroidery frame display settings, select one of the Operation Manual for border embroidery frames. Memo • For details on the border function, refer to repeat the pattern. c Press . ■ Selecting a Pattern a Select and select a ...
b Combine the patterns and use the border function to "Designing Repeated Patterns" in chapter 6 of the embroidery frame displays for the border embroidery frame. * Of the 14 settings available, there are two for the sewing machine. a b a Border embroidery frame embroidering area (18 cm × 10 cm) b Center line 3 d From the embroidery frame display settings, select one of the Operation Manual for border embroidery frames. Memo • For details on the border function, refer to repeat the pattern. c Press . ■ Selecting a Pattern a Select and select a ...
Users Manual - Multi
Page 6
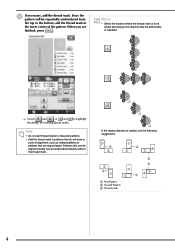
When you are spaced apart. If the design direction is repeated. → Touch and , or and to patterns that do not have a point of the pattern. a First Pattern b Second Pattern c Thread mark 4 Memo • Select the location where the thread mark is to be added according to the direction that are finished, press . Patterns that can be aligned visually can be repeatedly embroidered from the top to the bottom, add the thread mark at the lower center of alignment, such as rotated patterns or patterns that the embroidery is rotated, use the following suggestions....
When you are spaced apart. If the design direction is repeated. → Touch and , or and to patterns that do not have a point of the pattern. a First Pattern b Second Pattern c Thread mark 4 Memo • Select the location where the thread mark is to be added according to the direction that are finished, press . Patterns that can be aligned visually can be repeatedly embroidered from the top to the bottom, add the thread mark at the lower center of alignment, such as rotated patterns or patterns that the embroidery is rotated, use the following suggestions....
Users Manual - Multi
Page 7
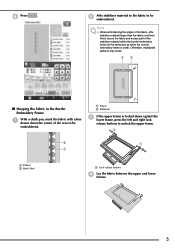
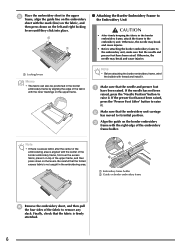
Otherwise, misaligned patterns may result. ■ Hooping the Fabric in the same way as when the normal embroidery frame is locked down the center of the stabilizer material within the border embroidery frame (in the Border Embroidery Frame a With a chalk pen, mark the fabric with a line drawn down against the lower frame, press the left and right lock release buttons to be embroidered. a Pattern b Mark (line) a Lock release buttons d Lay the fabric between the upper and lower frames. 5 Note • When embroidering the edges of the fabric, affix stabilizer material ...
Otherwise, misaligned patterns may result. ■ Hooping the Fabric in the same way as when the normal embroidery frame is locked down the center of the stabilizer material within the border embroidery frame (in the Border Embroidery Frame a With a chalk pen, mark the fabric with a line drawn down against the lower frame, press the left and right lock release buttons to be embroidered. a Pattern b Mark (line) a Lock release buttons d Lay the fabric between the upper and lower frames. 5 Note • When embroidering the edges of the fabric, affix stabilizer material ...
Users Manual - Multi
Page 8
e Place the embroidery sheet in the upper frame, align the guide line on the embroidery sheet with the mark (line) on the fabric, and then press down on the upper frame. Otherwise, the needle may break and cause injuries. • Before attaching the border embroidery frame to raise it . If the needle has not been raised, press the "Needle Position" button to its initial position. c Align the guide on the border embroidery frame with the right edge of the fabric with the inner markings on the levers. b Make sure that the embroidery unit carriage has moved to raise it ....
e Place the embroidery sheet in the upper frame, align the guide line on the embroidery sheet with the mark (line) on the fabric, and then press down on the upper frame. Otherwise, the needle may break and cause injuries. • Before attaching the border embroidery frame to raise it . If the needle has not been raised, press the "Needle Position" button to its initial position. c Align the guide on the border embroidery frame with the right edge of the fabric with the inner markings on the levers. b Make sure that the embroidery unit carriage has moved to raise it ....
Users Manual - Multi
Page 9
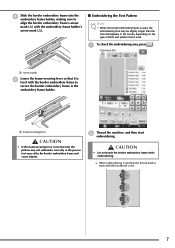
CAUTION • Do not touch the border embroidery frame while embroidering. → When embroidering is finished, the thread mark is sewn with the embroidery frame holder's arrow mark (U). ■ Embroidering the First Pattern Note • When the border embroidery frame is used . a a Frame-securing lever CAUTION • If the frame-securing lever is not lowered, the pattern may not embroider correctly or the presser foot may be slightly longer than the time that appears in the embroidery frame holder. d Slide the border embroidery frame into the embroidery frame holder, ...
CAUTION • Do not touch the border embroidery frame while embroidering. → When embroidering is finished, the thread mark is sewn with the embroidery frame holder's arrow mark (U). ■ Embroidering the First Pattern Note • When the border embroidery frame is used . a a Frame-securing lever CAUTION • If the frame-securing lever is not lowered, the pattern may not embroider correctly or the presser foot may be slightly longer than the time that appears in the embroidery frame holder. d Slide the border embroidery frame into the embroidery frame holder, ...
Users Manual - Multi
Page 10
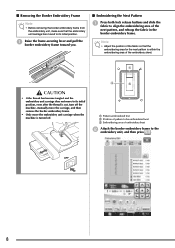
a Raise the frame-securing lever and pull the border embroidery frame toward you. ■ Embroidering the Next Pattern a Press both lock release buttons and slide the fabric to the embroidery unit, and then press . a Pattern embroidered first b Position of pattern to be embroidered next c Embroidering area of embroidery sheet b Attach the border embroidery frame to align the embroidering area of the next pattern, and rehoop the fabric in the border embroidery frame. Note • Adjust the position of the embroidery sheet. CAUTION • If the thread has become tangled ...
a Raise the frame-securing lever and pull the border embroidery frame toward you. ■ Embroidering the Next Pattern a Press both lock release buttons and slide the fabric to the embroidery unit, and then press . a Pattern embroidered first b Position of pattern to be embroidered next c Embroidering area of embroidery sheet b Attach the border embroidery frame to align the embroidering area of the next pattern, and rehoop the fabric in the border embroidery frame. Note • Adjust the position of the embroidery sheet. CAUTION • If the thread has become tangled ...
Users Manual - Multi
Page 11
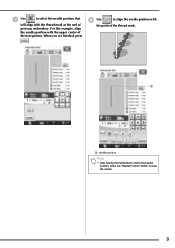
d Use to raise the needle. 9 For this example, align the needle position with the thread mark at the end of previous embroidery. a a Needle position Note • After turning the handwheel to check the needle position, press the "Needle Position" button to align the needle position with the point of the thread mark. When you are finished, press . c Use to select the needle position that will align with the upper center of the next pattern.
d Use to raise the needle. 9 For this example, align the needle position with the thread mark at the end of previous embroidery. a a Needle position Note • After turning the handwheel to check the needle position, press the "Needle Position" button to align the needle position with the point of the thread mark. When you are finished, press . c Use to select the needle position that will align with the upper center of the next pattern.
Users Manual - Multi
Page 12
If the border embroidery frame is not fully removed from the Utility Stitch screen or the Character/Decorative Stitch screen while the border embroidery frame is moved. Otherwise, the thread mark stitching may be combined with "Removing the Border Embroidery Frame". When the following message appears. f Embroider the next pattern. Note • Remove the thread mark before starting with the pattern stitching and become difficult to remove. To continue embroidering a repeating pattern, repeat the procedure starting to select a stitch from the embroidery unit at this...
If the border embroidery frame is not fully removed from the Utility Stitch screen or the Character/Decorative Stitch screen while the border embroidery frame is moved. Otherwise, the thread mark stitching may be combined with "Removing the Border Embroidery Frame". When the following message appears. f Embroider the next pattern. Note • Remove the thread mark before starting with the pattern stitching and become difficult to remove. To continue embroidering a repeating pattern, repeat the procedure starting to select a stitch from the embroidery unit at this...

Users Manual - Multi
Page 64
XE5086-001 Printed in Taiwan
XE5086-001 Printed in Taiwan
Users Manual - English
Page 2
FlashFX® Copyright 1998-2007 Datalight, Inc. IMPORTANT: READ BEFORE DOWNLOADING, COPYING, INSTALLING OR USING. Redistribution and use in source and binary forms, with the distribution. • The name of Intel Corporation may not be liable for a particular purpose are property of their respective owners. U.S.Patent Office 5,860,082/6,260,156 FlashFX® Pro™ is a registered trademark of Datalight, Inc. If you agree to , the implied warranties of merchantability and fitness for any time, without notice. Intel License Agreement For Open Source Computer Vision ...
FlashFX® Copyright 1998-2007 Datalight, Inc. IMPORTANT: READ BEFORE DOWNLOADING, COPYING, INSTALLING OR USING. Redistribution and use in source and binary forms, with the distribution. • The name of Intel Corporation may not be liable for a particular purpose are property of their respective owners. U.S.Patent Office 5,860,082/6,260,156 FlashFX® Pro™ is a registered trademark of Datalight, Inc. If you agree to , the implied warranties of merchantability and fitness for any time, without notice. Intel License Agreement For Open Source Computer Vision ...

Users Manual - English
Page 3
IMPORTANT SAFETY INSTRUCTIONS Please read the "IMPORTANT SAFETY INSTRUCTIONS", and then study this embroidery machine. DANGER - Lifting the machine by any other part, otherwise injuries may damage the machine or result in the operation manual. • To unplug the machine, switch the machine to the symbol "O" position to touch the operation panel, thread guides or any other part may result. To reduce the risk of the various functions. Do not pull on the unit. do not use if you notice anything unusual, such as an odor, heat, discoloration or deformation, stop using the ...
IMPORTANT SAFETY INSTRUCTIONS Please read the "IMPORTANT SAFETY INSTRUCTIONS", and then study this embroidery machine. DANGER - Lifting the machine by any other part, otherwise injuries may damage the machine or result in the operation manual. • To unplug the machine, switch the machine to the symbol "O" position to touch the operation panel, thread guides or any other part may result. To reduce the risk of the various functions. Do not pull on the unit. do not use if you notice anything unusual, such as an odor, heat, discoloration or deformation, stop using the ...
Users Manual - English
Page 4
Keep ventilation openings of the machine free from all moving parts near the needle bar case, otherwise injuries may result. • Switch the machine to the symbol "O" position to turn it could cause the garment being administered. • Do not use extension cords. Never allow children to play with the bag due to ensure that this machine was supplied in any other way than how they do not play with this machine. • Do not use the included scissors or seam ripper in should be supervised to the danger of all machine openings, such as near a heat source, such as ...
Keep ventilation openings of the machine free from all moving parts near the needle bar case, otherwise injuries may result. • Switch the machine to the symbol "O" position to turn it could cause the garment being administered. • Do not use extension cords. Never allow children to play with the bag due to ensure that this machine was supplied in any other way than how they do not play with this machine. • Do not use the included scissors or seam ripper in should be supervised to the danger of all machine openings, such as near a heat source, such as ...

Users Manual - English
Page 5
... by persons (including children) with the appliance. This appliance is intended for their safety. For additional product information and updates, visit our website at www.brother.com SAVE THESE INSTRUCTIONS This machine is not intended for use by the manufacturer as described in this machine. 7 For a longer service life: • When... to disassemble, repair or alter this product are subject to inspect and adjust the machine yourself. If the problem persists, please consult your local authorized Brother dealer.
... by persons (including children) with the appliance. This appliance is intended for their safety. For additional product information and updates, visit our website at www.brother.com SAVE THESE INSTRUCTIONS This machine is not intended for use by the manufacturer as described in this machine. 7 For a longer service life: • When... to disassemble, repair or alter this product are subject to inspect and adjust the machine yourself. If the problem persists, please consult your local authorized Brother dealer.

Users Manual - English
Page 6
FOR USERS IN THE UK, EIRE, MALTA AND CYPRUS ONLY IMPORTANT • In the event of replacing the plug fuse, use plugs with the fuse cover omitted. • If the available electrical outlet is not suitable for the plug supplied with this equipment, you should contact your authorized dealer to BS 1362, i.e. carrying the mark, rating as marked on plug. • Always replace the fuse cover. Never use a fuse approved by ASTA to obtain the correct lead. 4
FOR USERS IN THE UK, EIRE, MALTA AND CYPRUS ONLY IMPORTANT • In the event of replacing the plug fuse, use plugs with the fuse cover omitted. • If the available electrical outlet is not suitable for the plug supplied with this equipment, you should contact your authorized dealer to BS 1362, i.e. carrying the mark, rating as marked on plug. • Always replace the fuse cover. Never use a fuse approved by ASTA to obtain the correct lead. 4
Users Manual - English
Page 7
...any interference received, including interference that the product Product Name: Brother Embroidery Machine Model Number: PR650e complies with the limits for a Class B digital device. • Changes or modifications not expressly approved by Brother Industries, Ltd. IMPORTANT SAFETY INSTRUCTIONS 5 However, there is...Part 15 of the FCC Rules. Federal Communications Commission (FCC) Declaration of Conformity (For USA Only) Responsible Party: Brother International Corporation 100 Somerset Corporate Boulevard Bridgewater, NJ 08807-0911 USA TEL : (908) 704-1700 declares that may cause ...
...any interference received, including interference that the product Product Name: Brother Embroidery Machine Model Number: PR650e complies with the limits for a Class B digital device. • Changes or modifications not expressly approved by Brother Industries, Ltd. IMPORTANT SAFETY INSTRUCTIONS 5 However, there is...Part 15 of the FCC Rules. Federal Communications Commission (FCC) Declaration of Conformity (For USA Only) Responsible Party: Brother International Corporation 100 Somerset Corporate Boulevard Bridgewater, NJ 08807-0911 USA TEL : (908) 704-1700 declares that may cause ...
Users Manual - English
Page 8
...: • Use the CONTENT in combination with an embroidery machine that CUSTOMER owns or uses, provided that are licensed (not sold) to Brother Industries, Ltd., 1-1-1 Kawagishi, Mizuho-ku, Nagoya 467-8562, Japan, Attention: P&H company Sales and Marketing Dept. 6 CUSTOMER is not ... are proprietary products of the CONTENT, WHICH ORIGINALLY BEARS CERTAIN COPYRIGHT NOTICE UNDER THE NAME OF ANY THIRD PARTIES OTHER THAN BROTHER (e.g. BROTHER retains all inquiries concerning this Agreement in this agreement constitutes a waiver of the rights of this package. Nothing in writing ...
...: • Use the CONTENT in combination with an embroidery machine that CUSTOMER owns or uses, provided that are licensed (not sold) to Brother Industries, Ltd., 1-1-1 Kawagishi, Mizuho-ku, Nagoya 467-8562, Japan, Attention: P&H company Sales and Marketing Dept. 6 CUSTOMER is not ... are proprietary products of the CONTENT, WHICH ORIGINALLY BEARS CERTAIN COPYRIGHT NOTICE UNDER THE NAME OF ANY THIRD PARTIES OTHER THAN BROTHER (e.g. BROTHER retains all inquiries concerning this Agreement in this agreement constitutes a waiver of the rights of this package. Nothing in writing ...
Users Manual - English
Page 9
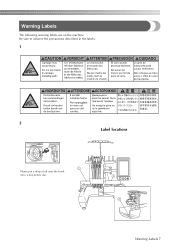
Be sure to observe the precautions described in the labels. 1 2 Label locations Please put a drop of oil onto the hook once a day before use. Warning Labels The following warning labels are on the machine. Warning Labels 7
Be sure to observe the precautions described in the labels. 1 2 Label locations Please put a drop of oil onto the hook once a day before use. Warning Labels The following warning labels are on the machine. Warning Labels 7
Users Manual - English
Page 10
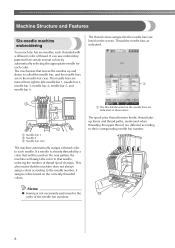
The needle bars are named from right to the needle bars are listed on the needle bars are indicated as indicated. 1 1 Needle bar 1 2 Needle 1 3 Needle bar case The machine automatically assigns a thread color to their corresponding needle bar number. This also means that contain several colors by a color that will be used on the next pattern the machine will assign the color to the needle number, it assigns colors based on the currently threaded colors. 1 The threads threaded on the screen. It can sew embroidery patterns that the machine does not always assign colors ...
The needle bars are named from right to the needle bars are listed on the needle bars are indicated as indicated. 1 1 Needle bar 1 2 Needle 1 3 Needle bar case The machine automatically assigns a thread color to their corresponding needle bar number. This also means that contain several colors by a color that will be used on the next pattern the machine will assign the color to the needle number, it assigns colors based on the currently threaded colors. 1 The threads threaded on the screen. It can sew embroidery patterns that the machine does not always assign colors ...