

Users Manual - Multi
Page 3
ENGLISH CONTENTS Accessories...2 Embroidering with the Border Embroidery Frame 2 Sample Projects Using the Border Embroidery Frame 2 Selecting a Pattern ...3 Hooping the Fabric in the Border Embroidery Frame 5 Attaching the Border Embroidery Frame to the Embroidery Unit 6 Embroidering the First Pattern 7 Removing the Border Embroidery Frame 8 Embroidering the Next Pattern 8 1
ENGLISH CONTENTS Accessories...2 Embroidering with the Border Embroidery Frame 2 Sample Projects Using the Border Embroidery Frame 2 Selecting a Pattern ...3 Hooping the Fabric in the Border Embroidery Frame 5 Attaching the Border Embroidery Frame to the Embroidery Unit 6 Embroidering the First Pattern 7 Removing the Border Embroidery Frame 8 Embroidering the Next Pattern 8 1
Users Manual - Multi
Page 4
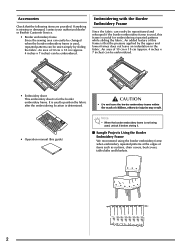
If anything is missing or damaged, contact your authorized dealer or Brother Customer Service. • Border embroidery frame Since the sewing area can easily be sewn simply by the upper and lower frames does not leave an indentation in the fabric. An ... the fabric after the embroidering location is not being used, unlock it before storing it. ■ Sample Projects Using the Border Embroidery Frame We recommend using the border embroidery frame when embroidery repeated patterns at the edges of 10 cm × 18 cm (approx. 4 inches × 7 inches) can easily be repositioned and rehooped...
If anything is missing or damaged, contact your authorized dealer or Brother Customer Service. • Border embroidery frame Since the sewing area can easily be sewn simply by the upper and lower frames does not leave an indentation in the fabric. An ... the fabric after the embroidering location is not being used, unlock it before storing it. ■ Sample Projects Using the Border Embroidery Frame We recommend using the border embroidery frame when embroidery repeated patterns at the edges of 10 cm × 18 cm (approx. 4 inches × 7 inches) can easily be repositioned and rehooped...
Users Manual - Multi
Page 5
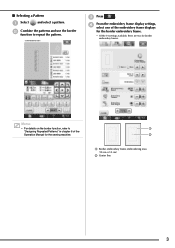
...; Selecting a Pattern a Select and select a pattern. b Combine the patterns and use the border function to "Designing Repeated Patterns" in chapter 6 of the embroidery frame displays for the border embroidery frame. * Of the 14 settings available, there are two for the sewing machine. Memo • For details on the border function, refer to...
...; Selecting a Pattern a Select and select a pattern. b Combine the patterns and use the border function to "Designing Repeated Patterns" in chapter 6 of the embroidery frame displays for the border embroidery frame. * Of the 14 settings available, there are two for the sewing machine. Memo • For details on the border function, refer to...
Users Manual - Multi
Page 6
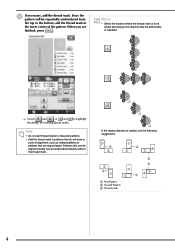
...; Add the thread mark to the bottom, add the thread mark at the lower center of alignment, such as rotated patterns or patterns that the embroidery is rotated, use the following suggestions. If the design direction is repeated. → Touch and , or and to highlight the design for inserting thread marks...
...; Add the thread mark to the bottom, add the thread mark at the lower center of alignment, such as rotated patterns or patterns that the embroidery is rotated, use the following suggestions. If the design direction is repeated. → Touch and , or and to highlight the design for inserting thread marks...
Users Manual - Multi
Page 7
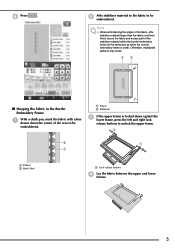
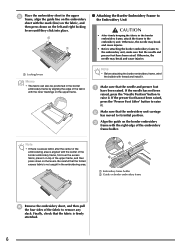
... c If the upper frame is used). Otherwise, misaligned patterns may result. ■ Hooping the Fabric in the same way as when the normal embroidery frame is locked down the center of the area to be embroidered. b Affix stabilizer material to the fabric to unlock the upper frame. a Pattern...stabilizer material larger than the fabric, and then firmly secure the fabric and excess part of the stabilizer material within the border embroidery frame (in the Border Embroidery Frame a With a chalk pen, mark the fabric with a line drawn down against the lower frame, press the left...
... c If the upper frame is used). Otherwise, misaligned patterns may result. ■ Hooping the Fabric in the same way as when the normal embroidery frame is locked down the center of the area to be embroidered. b Affix stabilizer material to the fabric to unlock the upper frame. a Pattern...stabilizer material larger than the fabric, and then firmly secure the fabric and excess part of the stabilizer material within the border embroidery frame (in the Border Embroidery Frame a With a chalk pen, mark the fabric with a line drawn down against the lower frame, press the left...
Users Manual - Multi
Page 8
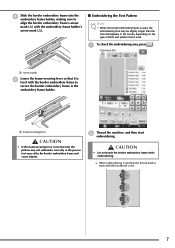
... the presser foot has not been raised, press the "Presser Foot Lifter" button to the embroidery unit. Be careful that the fabric is firmly stretched. 6 c Align the guide on the border embroidery frame with thread and install it . Finally, check that the folded excess fabric is aligned with...in the embroidering area. Note • If there is excess fabric after the center of the embroidering area is not caught in the border embroidery frame by aligning the edge of the fabric to its initial position. b Make sure that the needle and presser foot have been raised. ...
... the presser foot has not been raised, press the "Presser Foot Lifter" button to the embroidery unit. Be careful that the fabric is firmly stretched. 6 c Align the guide on the border embroidery frame with thread and install it . Finally, check that the folded excess fabric is aligned with...in the embroidering area. Note • If there is excess fabric after the center of the embroidering area is not caught in the border embroidery frame by aligning the edge of the fabric to its initial position. b Make sure that the needle and presser foot have been raised. ...
Users Manual - Multi
Page 9
... in the screen, depending on the type of fabric and pattern that is used , the embroidering time may strike the border embroidery frame and cause injuries. a a Frame-securing lever CAUTION • If the frame-securing lever is not lowered, the pattern may not embroider correctly or ... foot may be slightly longer than the time that it is used . a a Arrow marks e Lower the frame-securing lever so that appears in the embroidery frame holder. a To check the embroidering area, press . b Thread the machine, and then start embroidering. CAUTION • Do not touch the border...
... in the screen, depending on the type of fabric and pattern that is used , the embroidering time may strike the border embroidery frame and cause injuries. a a Frame-securing lever CAUTION • If the frame-securing lever is not lowered, the pattern may not embroider correctly or ... foot may be slightly longer than the time that it is used . a a Arrow marks e Lower the frame-securing lever so that appears in the embroidery frame holder. a To check the embroidering area, press . b Thread the machine, and then start embroidering. CAUTION • Do not touch the border...
Users Manual - Multi
Page 10
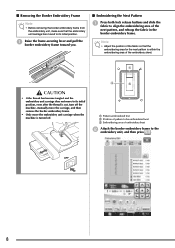
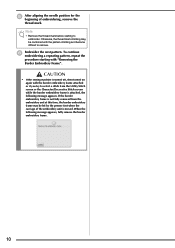
... the embroidering area of the next pattern, and rehoop the fabric in the border embroidery frame. ■ Removing the Border Embroidery Frame Note • Before removing the border embroidery frame from the embroidery unit, make sure that the embroidering area for the next pattern is turned off the... machine, manually move the carriage, and then remove the border embroidery frame. • Only move to its initial position, even after the thread is cut, turn off . a Pattern embroidered first b Position...
... the embroidering area of the next pattern, and rehoop the fabric in the border embroidery frame. ■ Removing the Border Embroidery Frame Note • Before removing the border embroidery frame from the embroidery unit, make sure that the embroidering area for the next pattern is turned off the... machine, manually move the carriage, and then remove the border embroidery frame. • Only move to its initial position, even after the thread is cut, turn off . a Pattern embroidered first b Position...
Users Manual - Multi
Page 11
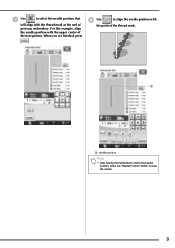
d Use to raise the needle. 9 When you are finished, press . a a Needle position Note • After turning the handwheel to check the needle position, press the "Needle Position" button to align the needle position with the point of the thread mark. c Use to select the needle position that will align with the upper center of the next pattern. For this example, align the needle position with the thread mark at the end of previous embroidery.
d Use to raise the needle. 9 When you are finished, press . a a Needle position Note • After turning the handwheel to check the needle position, press the "Needle Position" button to align the needle position with the point of the thread mark. c Use to select the needle position that will align with the upper center of the next pattern. For this example, align the needle position with the thread mark at the end of previous embroidery.
Users Manual - Multi
Page 12
... is not fully removed from the Utility Stitch screen or the Character/Decorative Stitch screen while the border embroidery frame is moved. CAUTION • If the sewing machine is turned off, then turned on again with the pattern stitching and become difficult to ...When the following message appears. Otherwise, the thread mark stitching may be combined with the border embroidery frame attached or if you try to select a stitch from the embroidery unit at this time, the border embroidery frame may be hit by the presser foot when the carriage of embroidering, remove the thread mark...
... is not fully removed from the Utility Stitch screen or the Character/Decorative Stitch screen while the border embroidery frame is moved. CAUTION • If the sewing machine is turned off, then turned on again with the pattern stitching and become difficult to ...When the following message appears. Otherwise, the thread mark stitching may be combined with the border embroidery frame attached or if you try to select a stitch from the embroidery unit at this time, the border embroidery frame may be hit by the presser foot when the carriage of embroidering, remove the thread mark...

Users Manual - English
Page 3
... not to the nearest authorized dealer or service center for future reference. IMPORTANT SAFETY INSTRUCTIONS Please read the "IMPORTANT SAFETY INSTRUCTIONS", and then study this embroidery machine. do not use an extension cord. • Always unplug your back or knees. • While the machine is stored or in this manual, or...
... not to the nearest authorized dealer or service center for future reference. IMPORTANT SAFETY INSTRUCTIONS Please read the "IMPORTANT SAFETY INSTRUCTIONS", and then study this embroidery machine. do not use an extension cord. • Always unplug your back or knees. • While the machine is stored or in this manual, or...
Users Manual - English
Page 4
...; While the machine is in operation, keep your work area clear: • Never operate the machine with the bag due to the danger of the embroidery frame could cause the needle to break. 6 This machine is not a toy: • Your close attention to catch fire. • Do not place this machine...
...; While the machine is in operation, keep your work area clear: • Never operate the machine with the bag due to the danger of the embroidery frame could cause the needle to break. 6 This machine is not a toy: • Your close attention to catch fire. • Do not place this machine...
Users Manual - English
Page 7
... SAFETY INSTRUCTIONS 5 If this device must accept any interference received, including interference that the product Product Name: Brother Embroidery Machine Model Number: PR650e complies with the limits for help. • The included interface cable should be determined by turning the equipment... and found to operate the equipment. Federal Communications Commission (FCC) Declaration of Conformity (For USA Only) Responsible Party: Brother International Corporation 100 Somerset Corporate Boulevard Bridgewater, NJ 08807-0911 USA TEL : (908) 704-1700 declares that may cause undesired...
... SAFETY INSTRUCTIONS 5 If this device must accept any interference received, including interference that the product Product Name: Brother Embroidery Machine Model Number: PR650e complies with the limits for help. • The included interface cable should be determined by turning the equipment... and found to operate the equipment. Federal Communications Commission (FCC) Declaration of Conformity (For USA Only) Responsible Party: Brother International Corporation 100 Somerset Corporate Boulevard Bridgewater, NJ 08807-0911 USA TEL : (908) 704-1700 declares that may cause undesired...
Users Manual - English
Page 8
... AND CONDITIONS OF THIS AGREEMENT. This agreement shall be available for business, commercial or industrial purposes. • Sell or otherwise distribute the EMBROIDERY created by use at a time. BROTHER retains ownership of all inquiries concerning this Agreement in writing by regular mail, to the copies of the CONTENT included in this package...
... AND CONDITIONS OF THIS AGREEMENT. This agreement shall be available for business, commercial or industrial purposes. • Sell or otherwise distribute the EMBROIDERY created by use at a time. BROTHER retains ownership of all inquiries concerning this Agreement in writing by regular mail, to the copies of the CONTENT included in this package...
Users Manual - English
Page 10
... also means that will assign the color to left: needle bar 1, needle bar 2, needle bar 3, needle bar 4, needle bar 5, and needle bar 6. It can sew embroidery patterns that contain several colors by a color that the machine does not always assign colors according to the needle number, it assigns colors based on...
... also means that will assign the color to left: needle bar 1, needle bar 2, needle bar 3, needle bar 4, needle bar 5, and needle bar 6. It can sew embroidery patterns that contain several colors by a color that the machine does not always assign colors according to the needle number, it assigns colors based on...
Users Manual - English
Page 11
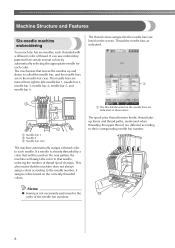
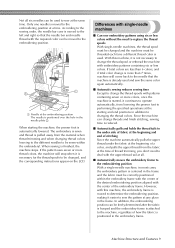
... the required color can be moved to the embroidering position. 1 Needle at a time. However, with single-needle machines ■ Can sew embroidery patterns using six or less colors without the need to deal with the upper thread tail at all six needles can be freely determined after...spools With single-needle machines, the thread spool must be changed , and the corresponding instructions appear on the LCD. With this machine, the embroidery frame is moved to determine the embroidering position, making it easier to changing the thread colors. Since the machine can change the thread spools...
... the required color can be moved to the embroidering position. 1 Needle at a time. However, with single-needle machines ■ Can sew embroidery patterns using six or less colors without the need to deal with the upper thread tail at all six needles can be freely determined after...spools With single-needle machines, the thread spool must be changed , and the corresponding instructions appear on the LCD. With this machine, the embroidery frame is moved to determine the embroidering position, making it easier to changing the thread colors. Since the machine can change the thread spools...
Users Manual - English
Page 12
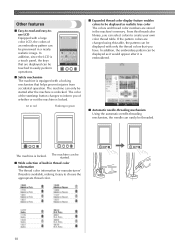
From this table, the pattern can be displayed with a large color LCD, the colors of an embroidery pattern can be previewed in green ■ Expanded thread color display feature enables colors to choose the appropriate thread color. 10 In addition, since the ... can be touched to create your own color thread table. Lit in red Flashing in a nearly realistic image. The machine is locked. In addition, the embroidery pattern can be displayed as realistic true color The colors and thread color numbers are changed using this thread color library, you can easily be...
From this table, the pattern can be displayed with a large color LCD, the colors of an embroidery pattern can be previewed in green ■ Expanded thread color display feature enables colors to choose the appropriate thread color. 10 In addition, since the ... can be touched to create your own color thread table. Lit in red Flashing in a nearly realistic image. The machine is locked. In addition, the embroidery pattern can be displayed as realistic true color The colors and thread color numbers are changed using this thread color library, you can easily be...
Users Manual - English
Page 13
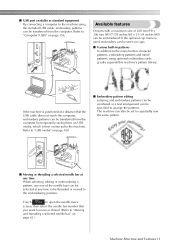
... (7-7/8 inches (H) × 11-3/4 inches (W)) can be transferred from the computer by temporarily saving them on page 160. ■ Embroidery pattern editing Lettering and embroidery patterns can be combined or a text arrangement can be specified to the machine. If the optional cap frame is then connected to arrange...Touch to open the needle move screen, then select the needle bar number that the USB cable does not reach the computer, embroidery patterns can be transferred from the computer. Available features Designs with a maximum size of the needle bars can be selected at...
... (7-7/8 inches (H) × 11-3/4 inches (W)) can be transferred from the computer by temporarily saving them on page 160. ■ Embroidery pattern editing Lettering and embroidery patterns can be combined or a text arrangement can be specified to the machine. If the optional cap frame is then connected to arrange...Touch to open the needle move screen, then select the needle bar number that the USB cable does not reach the computer, embroidery patterns can be transferred from the computer. Available features Designs with a maximum size of the needle bars can be selected at...
Users Manual - English
Page 14
...those described in the tables on pages 70 to perform an operation Touch the machine operations guide key, and then check for creating beautiful embroidery, and details on the use Chapter 1: Getting Ready The setup of the pages. Chapter 6: Basic Settings and Help Feature This chapter...the thumbtabs on the machine and sewing a pattern to embroider a pattern and master the operation of chapter 2. By screen Descriptions of this embroidery machine. Read when additional information is indicated. By keyword Search the index at the left for the contents of each chapter, and then ...
...those described in the tables on pages 70 to perform an operation Touch the machine operations guide key, and then check for creating beautiful embroidery, and details on the use Chapter 1: Getting Ready The setup of the pages. Chapter 6: Basic Settings and Help Feature This chapter...the thumbtabs on the machine and sewing a pattern to embroider a pattern and master the operation of chapter 2. By screen Descriptions of this embroidery machine. Read when additional information is indicated. By keyword Search the index at the left for the contents of each chapter, and then ...
Users Manual - English
Page 15
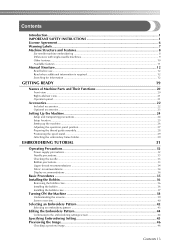
... Adjusting the operation panel position...27 Preparing the thread guide assembly...28 Positioning the spool stand ...29 Attaching the embroidery frame holder...29 EMBROIDERING TUTORIAL 31 Operating Precautions...32 Power supply precautions ...32 Needle precautions...33 Checking the needle ......37 Turning ON the Machine 38 Understanding the screens ...39 Screen overview ...40 Selecting an Embroidery Pattern 42 Selecting an embroidery pattern ...43 Editing the Embroidery Pattern 44 Continuing to the embroidering settings screen 44 Specifying Embroidering Setting 45 Previewing the Image ......
... Adjusting the operation panel position...27 Preparing the thread guide assembly...28 Positioning the spool stand ...29 Attaching the embroidery frame holder...29 EMBROIDERING TUTORIAL 31 Operating Precautions...32 Power supply precautions ...32 Needle precautions...33 Checking the needle ......37 Turning ON the Machine 38 Understanding the screens ...39 Screen overview ...40 Selecting an Embroidery Pattern 42 Selecting an embroidery pattern ...43 Editing the Embroidery Pattern 44 Continuing to the embroidering settings screen 44 Specifying Embroidering Setting 45 Previewing the Image ......


