Users Manual - English
Page 2
... grasp the plug, not the cord. 10. Do not pull or push fabric while stitching. SAVE THESE INSTRUCTIONS This machine is used by or near children. 2. Always unplug the machine from the accumulation of burns, fire, electric shock, or injury to the nearest authorized ... of the machine and foot control free from the electrical outlet immediately after using and before using this machine, basic safety precautions should always be supervised to ensure that they do not play with any other user servicing adjustments mentioned in this manual. 3. This sewing machine is not ...
... grasp the plug, not the cord. 10. Do not pull or push fabric while stitching. SAVE THESE INSTRUCTIONS This machine is used by or near children. 2. Always unplug the machine from the accumulation of burns, fire, electric shock, or injury to the nearest authorized ... of the machine and foot control free from the electrical outlet immediately after using and before using this machine, basic safety precautions should always be supervised to ensure that they do not play with any other user servicing adjustments mentioned in this manual. 3. This sewing machine is not ...
Users Manual - English
Page 4
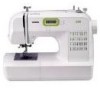
... persists, please consult your eye on the foot controller. 4. To fully enjoy all the features, we suggest that you study the manual before using the machine. Be sure to keep your local authorized Brother dealer. Do not use or store the machine near a space heater, iron, halogen lamp...2 For repair or adjustment In the event a malfunction occurs or adjustment is one of the most advanced computerized household sewing machines. CONGRATULATIONS ON CHOOSING OUR MACHINE Your machine is required, first follow the troubleshooting table in the back of the operation manual to inspect and adjust ...
... persists, please consult your eye on the foot controller. 4. To fully enjoy all the features, we suggest that you study the manual before using the machine. Be sure to keep your local authorized Brother dealer. Do not use or store the machine near a space heater, iron, halogen lamp...2 For repair or adjustment In the event a malfunction occurs or adjustment is one of the most advanced computerized household sewing machines. CONGRATULATIONS ON CHOOSING OUR MACHINE Your machine is required, first follow the troubleshooting table in the back of the operation manual to inspect and adjust ...
Users Manual - English
Page 5
... YOUR SEWING MACHINE 5 NAMES OF MACHINE PARTS AND THEIR FUNCTIONS 5 The main parts ...5 Needle and presser foot section ...6 Operation buttons ...6 Operation panel ...7 Flat bed attachment ...7 ACCESSORIES ...8 Optional accessories ...8 USING YOUR SEWING MACHINE 9 Power supply precautions ...9 Power supply ...9 Foot controller ...10 Sewing speed controller (for models equipped with the start/stop button 10 Changing the needle stop position ...10 THREADING THE MACHINE 11...
... YOUR SEWING MACHINE 5 NAMES OF MACHINE PARTS AND THEIR FUNCTIONS 5 The main parts ...5 Needle and presser foot section ...6 Operation buttons ...6 Operation panel ...7 Flat bed attachment ...7 ACCESSORIES ...8 Optional accessories ...8 USING YOUR SEWING MACHINE 9 Power supply precautions ...9 Power supply ...9 Foot controller ...10 Sewing speed controller (for models equipped with the start/stop button 10 Changing the needle stop position ...10 THREADING THE MACHINE 11...
Users Manual - English
Page 7
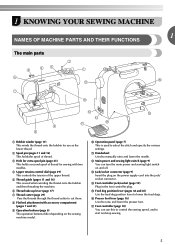
... dogs. 1 KNOWING YOUR SEWING MACHINE 1 NAMES OF MACHINE PARTS AND THEIR FUNCTIONS The main parts a Bobbin winder (page 11) This winds the thread onto the bobbin for sewing with accessory compartment (pages 7 and 31) i Operation buttons (page 6) The operation buttons differ depending on the power supply cord into the jack/ socket connector. q Foot controller (page 10) You...
... dogs. 1 KNOWING YOUR SEWING MACHINE 1 NAMES OF MACHINE PARTS AND THEIR FUNCTIONS The main parts a Bobbin winder (page 11) This winds the thread onto the bobbin for sewing with accessory compartment (pages 7 and 31) i Operation buttons (page 6) The operation buttons differ depending on the power supply cord into the jack/ socket connector. q Foot controller (page 10) You...
Users Manual - English
Page 8
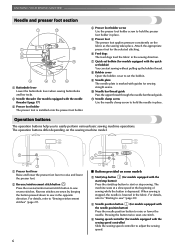
... pressure consistently on the sewing machine model. Operation buttons The operation buttons help you to sew" (page 28). For details, refer to "Starting to easily perform various basic sewing machine operations. e Sewing speed controller (for models equipped with the sewing speed controller) Slide the sewing speed controller to hold the presser foot holder in the opposite direction. Reverse stitches are sewn by keeping...
... pressure consistently on the sewing machine model. Operation buttons The operation buttons help you to sew" (page 28). For details, refer to "Starting to easily perform various basic sewing machine operations. e Sewing speed controller (for models equipped with the sewing speed controller) Slide the sewing speed controller to hold the presser foot holder in the opposite direction. Reverse stitches are sewn by keeping...
Users Manual - English
Page 10
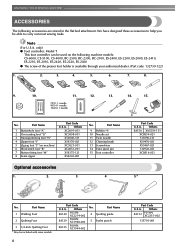
... be able to help you be included with some models. We have designed these accessories to carry out most sewing tasks. only) ● Foot controller: Model T This foot controller can be used on machine) 6 Blind stitch foot "R" 7 Button fitting foot "M" 8 Seam ripper Part Code U.S.A. Part Code U.S.A. Others SA140 F033N: XC2214-002 SA129 F005N: XC1948-002 SA125 F001N: XC1944-002...
... be able to help you be included with some models. We have designed these accessories to carry out most sewing tasks. only) ● Foot controller: Model T This foot controller can be used on machine) 6 Blind stitch foot "R" 7 Button fitting foot "M" 8 Seam ripper Part Code U.S.A. Part Code U.S.A. Others SA140 F033N: XC2214-002 SA129 F005N: XC1948-002 SA125 F001N: XC1944-002...
Users Manual - English
Page 12
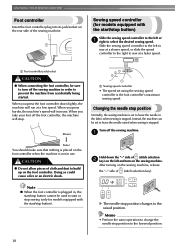
.... CAUTION ● Do not allow pieces of cloth and dust to start or stop sewing (only for models equipped with the start /stop . KNOWING YOUR SEWING MACHINE Foot controller Insert the foot controller plug into its jack/socket on the sewing machine, release the "-" side of (stitch selection key). Memo • Perform the same operation to change the needle stop...
.... CAUTION ● Do not allow pieces of cloth and dust to start or stop sewing (only for models equipped with the start /stop . KNOWING YOUR SEWING MACHINE Foot controller Insert the foot controller plug into its jack/socket on the sewing machine, release the "-" side of (stitch selection key). Memo • Perform the same operation to change the needle stop...
Users Manual - English
Page 14
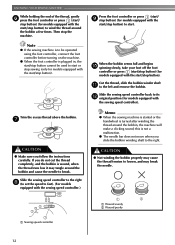
...tangle around the bobbin and cause the needle to break. Note ● If the sewing machine is to be operated using the foot controller, connect the foot controller before turning on the machine. ● When the foot controller is not a malfunction. ● The needle bar does not move when you slide... the start/stop button) to wind the thread around the bobbin, the machine will make a clicking sound; Then stop the machine. KNOWING YOUR SEWING MACHINE While holding the end of the thread, gently f press the foot controller or press (start/ stop button) (for models equipped with the start/...
...tangle around the bobbin and cause the needle to break. Note ● If the sewing machine is to be operated using the foot controller, connect the foot controller before turning on the machine. ● When the foot controller is not a malfunction. ● The needle bar does not move when you slide... the start/stop button) to wind the thread around the bobbin, the machine will make a clicking sound; Then stop the machine. KNOWING YOUR SEWING MACHINE While holding the end of the thread, gently f press the foot controller or press (start/ stop button) (for models equipped with the start/...
Users Manual - English
Page 15
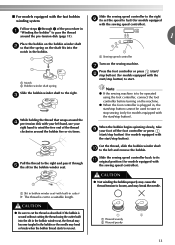
...the bobbin on the sewing machine. Slide the sewing speed controller back to cut to loosen, and may bend or break when the bobbin thread starts to the left hand, use your foot off the foot controller or press (start /stop button) (for models equipped with the sewing speed controller). CAUTION ● Be... / h stop button) to the right. a Sewing speed controller a Notch b Bobbin winder shaft spring Slide the bobbin winder shaft to start /stop button). When the bobbin begins spinning slowly, take i your right hand to wind the free end of the procedure in the bobbin winder seat....
...the bobbin on the sewing machine. Slide the sewing speed controller back to cut to loosen, and may bend or break when the bobbin thread starts to the left hand, use your foot off the foot controller or press (start /stop button) (for models equipped with the sewing speed controller). CAUTION ● Be... / h stop button) to the right. a Sewing speed controller a Notch b Bobbin winder shaft spring Slide the bobbin winder shaft to start /stop button). When the bobbin begins spinning slowly, take i your right hand to wind the free end of the procedure in the bobbin winder seat....

Users Manual - English
Page 16
... shown. • Make sure that were designed to its highest position by the arrow. If you accidentally step on the foot controller and the machine starts to sew, you slide the bobbin winding shaft to loosen, breaking the needle and resulting in e place (see page 15. Hold the... position button), and raise the presser foot lever. 14 1 a Tension-adjusting spring Replace the bobbin cover. Slide the button and open the cover. If the thread unrolls in the right direction. KNOWING YOUR SEWING MACHINE Memo ● When the sewing machine is started or the handwheel is turned...
... shown. • Make sure that were designed to its highest position by the arrow. If you accidentally step on the foot controller and the machine starts to sew, you slide the bobbin winding shaft to loosen, breaking the needle and resulting in e place (see page 15. Hold the... position button), and raise the presser foot lever. 14 1 a Tension-adjusting spring Replace the bobbin cover. Slide the button and open the cover. If the thread unrolls in the right direction. KNOWING YOUR SEWING MACHINE Memo ● When the sewing machine is started or the handwheel is turned...

Users Manual - English
Page 23
...sure to turn off the sewing machine. Use the screwdriver and a needle that has been determined to be straight according to 75/11), the needle may bend or break. CAUTION ● Before replacing the needle, be skipped stitches. Lower the presser foot lever. c 1 a Flat surface a Presser foot lever 21 Checking the ...distance between the needle and the flat surface is not even, the needle is even. 1 2 a Mark b Needle position button Turn off the sewing machine, otherwise injuries may occur if the foot controller or the start/ stop button is accidentally pressed and the...
...sure to turn off the sewing machine. Use the screwdriver and a needle that has been determined to be straight according to 75/11), the needle may bend or break. CAUTION ● Before replacing the needle, be skipped stitches. Lower the presser foot lever. c 1 a Flat surface a Presser foot lever 21 Checking the ...distance between the needle and the flat surface is not even, the needle is even. 1 2 a Mark b Needle position button Turn off the sewing machine, otherwise injuries may occur if the foot controller or the start/ stop button is accidentally pressed and the...

Users Manual - English
Page 26
... been designed to "Selecting stitching" (page 27). Raise the presser foot lever. Raise the needle by pressing once or twice.) or a Mark b Needle position button If the sewing machine has been turned on the controller, the machine will start /stop button is accidentally pressed and the machine starts sewing. KNOWING YOUR SEWING MACHINE REPLACING THE PRESSER FOOT CAUTION ● Always turn...
... been designed to "Selecting stitching" (page 27). Raise the presser foot lever. Raise the needle by pressing once or twice.) or a Mark b Needle position button If the sewing machine has been turned on the controller, the machine will start /stop button is accidentally pressed and the machine starts sewing. KNOWING YOUR SEWING MACHINE REPLACING THE PRESSER FOOT CAUTION ● Always turn...
Users Manual - English
Page 30
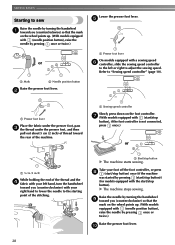
... the handwheel toward you (counterclockwise) with your foot off the foot controller, or press h (start/stop button) once (if the machine was started by pressing (start/stop button)) (for models equipped with your left or right to the starting point of the stitching. X The machine stops sewing. SEWING BASICS Starting to "Sewing speed controller" (page 10). a Mark b Needle position button...
... the handwheel toward you (counterclockwise) with your foot off the foot controller, or press h (start/stop button) once (if the machine was started by pressing (start/stop button)) (for models equipped with your left or right to the starting point of the stitching. X The machine stops sewing. SEWING BASICS Starting to "Sewing speed controller" (page 10). a Mark b Needle position button...
Users Manual - English
Page 31
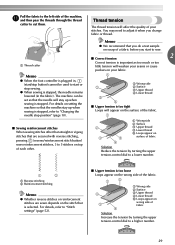
...foot controller is plugged in the fabric). Memo ● We recommend that you do a test sample on scrap of a fabric before you start or stop position" (page 10). ■ Sewing reinforcement stitches When sewing stitches other than straight or zigzag stitches that are secured with reverse stitching, pressing (reverse/reinforcement stitch button) sews reinforcement stitches, 3 to 5 stitches...tight Loops will affect the quality of your stitches. Pull the fabric to the left side of the machine, k and then pass the threads through the thread cutter to "Stitch settings" (page 52). You may need ...
...foot controller is plugged in the fabric). Memo ● We recommend that you do a test sample on scrap of a fabric before you start or stop position" (page 10). ■ Sewing reinforcement stitches When sewing stitches other than straight or zigzag stitches that are secured with reverse stitching, pressing (reverse/reinforcement stitch button) sews reinforcement stitches, 3 to 5 stitches...tight Loops will affect the quality of your stitches. Pull the fabric to the left side of the machine, k and then pass the threads through the thread cutter to "Stitch settings" (page 52). You may need ...
Users Manual - English
Page 61
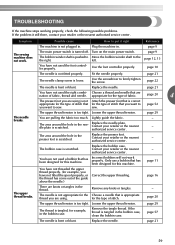
...been designed for the type of stitch. - sew. authorized service center. Only use a bobbin that has been designed for the type of fabric. Choose a needle that you want to sew. page 21 59 appropriate for this machine. Replace the presser foot. You have not used the ...upper thread tension is pushed to Move the bobbin winder shaft to you have not used the foot controller properly. page 29 The needle You are nation of stitch that is turned off. Contact your retailer or the nearest authorized service center. - page 16 ...
...been designed for the type of stitch. - sew. authorized service center. Only use a bobbin that has been designed for the type of fabric. Choose a needle that you want to sew. page 21 59 appropriate for this machine. Replace the presser foot. You have not used the ...upper thread tension is pushed to Move the bobbin winder shaft to you have not used the foot controller properly. page 29 The needle You are nation of stitch that is turned off. Contact your retailer or the nearest authorized service center. - page 16 ...

Users Manual - English
Page 64
... is performed or a non-functioning key is pressed Two or four beeps sound. ■ If the machine locks up because the thread is tangled. The reverse/reinforcement stitch button or needle position button was pressed if the foot controller is not connected) while the...before continuing the operation. Otherwise, operate the machine by using the foot controller. Contact your nearest authorized service center. Follow the instructions indicated in the LCD while the sewing machine is displayed, the message disappears. Disconnect the foot controller, and then press the start /stop button ...
... is performed or a non-functioning key is pressed Two or four beeps sound. ■ If the machine locks up because the thread is tangled. The reverse/reinforcement stitch button or needle position button was pressed if the foot controller is not connected) while the...before continuing the operation. Otherwise, operate the machine by using the foot controller. Contact your nearest authorized service center. Follow the instructions indicated in the LCD while the sewing machine is displayed, the message disappears. Disconnect the foot controller, and then press the start /stop button ...
Users Manual - English
Page 65
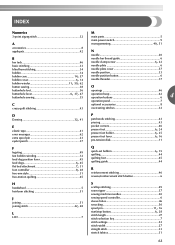
... sewing 35 operation beep 62 operation buttons 6 4 operation panel 7 C crazy quilt stitching 43 optional accessories 8 overcasting stitches 32 D Darning 32, 41 E elastic tape 41 error messages 62 extra spool pin 23 eyelet punch 37 F fagoting 49 fast bobbin winding 12 feed dog position lever 45 feed dogs 6, 45 flat bed attachment 7, 31 foot controller 8, 28 free-arm...
... sewing 35 operation beep 62 operation buttons 6 4 operation panel 7 C crazy quilt stitching 43 optional accessories 8 overcasting stitches 32 D Darning 32, 41 E elastic tape 41 error messages 62 extra spool pin 23 eyelet punch 37 F fagoting 49 fast bobbin winding 12 feed dog position lever 45 feed dogs 6, 45 flat bed attachment 7, 31 foot controller 8, 28 free-arm...
Users Manual - English
Page 66
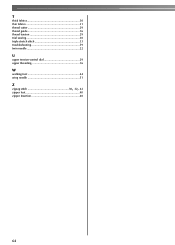
T thick fabrics 30 thin fabrics 31 thread cutter 29 thread guide 16 thread tension 29 trial sewing 30 triple stretch stitch 33 troubleshooting 59 twin needle 22 U upper tension-control dial 29 upper threading 16 W walking foot 44 wing needle 51 Z zigzag stitch 30, 32, 42 zipper foot 40 zipper Insertion 40 64
T thick fabrics 30 thin fabrics 31 thread cutter 29 thread guide 16 thread tension 29 trial sewing 30 triple stretch stitch 33 troubleshooting 59 twin needle 22 U upper tension-control dial 29 upper threading 16 W walking foot 44 wing needle 51 Z zigzag stitch 30, 32, 42 zipper foot 40 zipper Insertion 40 64


