
Mass Deployment Tool Users Guide
Page 9
...the relative path is correct. 2.3.1 Import Deployment Profiles Advanced users can import customized deployments and use them to import settings from multiple Brother devices and then send them to manage multiple devices. 1. Click in the upper left and select Import profile... 2. 2.3 Use Deployment... paths to settings files, such as JSON files, and let you want . Export and save deployment profiles to multiple Brother devices. Select the CSV file or the encrypted ZIP archive you assign specific settings files to let others , you want . 3. This feature allows you to restore...
...the relative path is correct. 2.3.1 Import Deployment Profiles Advanced users can import customized deployments and use them to import settings from multiple Brother devices and then send them to manage multiple devices. 1. Click in the upper left and select Import profile... 2. 2.3 Use Deployment... paths to settings files, such as JSON files, and let you want . Export and save deployment profiles to multiple Brother devices. Select the CSV file or the encrypted ZIP archive you assign specific settings files to let others , you want . 3. This feature allows you to restore...

Mass Deployment Tool Users Guide
Page 10
...)... If you can use them to manage multiple devices. 1. Click the Send button in the File name column. Insert the USB flash drive into the Brother device's USB port. 4. 2.3.2 Export Deployment Profiles Advanced users can create and export customized deployments and use a USB flash drive to deploy settings to a ...device. 1. Copy it in CSV format. 2.4 Send Files To send specific files (PJL, DJF, PRN files) or to the target devices: a) Click the Set file button, or right-click one of the file appears in ...
...)... If you can use them to manage multiple devices. 1. Click the Send button in the File name column. Insert the USB flash drive into the Brother device's USB port. 4. 2.3.2 Export Deployment Profiles Advanced users can create and export customized deployments and use a USB flash drive to deploy settings to a ...device. 1. Copy it in CSV format. 2.4 Send Files To send specific files (PJL, DJF, PRN files) or to the target devices: a) Click the Set file button, or right-click one of the file appears in ...
Mass Deployment Tool Users Guide
Page 17
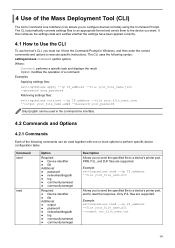
... response. Only PJL files are supported. The CLI uses the following syntax: settingcmd.exe command option option Where: Command: performs a specific task and displays the result Option: modifies the operation of a command Examples Applying settings files: settingcmd.exe apply --ip IP_address --file...your_file_name.edpk --password your_password Only English can be used in Windows, and then enter the correct commands and options to perform specific device configuration tasks. It then retrieves the settings data and verifies whether the settings have been applied correctly. 4.1 How to...
... response. Only PJL files are supported. The CLI uses the following syntax: settingcmd.exe command option option Where: Command: performs a specific task and displays the result Option: modifies the operation of a command Examples Applying settings files: settingcmd.exe apply --ip IP_address --file...your_file_name.edpk --password your_password Only English can be used in Windows, and then enter the correct commands and options to perform specific device configuration tasks. It then retrieves the settings data and verifies whether the settings have been applied correctly. 4.1 How to...
Mass Deployment Tool Users Guide
Page 19
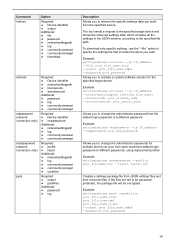
...communitynameget ● csvdelim Required: ● output ● packfiles Additional: ● password ● log Description Allows you to retrieve the specific settings data you to change the administrator passwords for the specified target device. If the files are set to the specified file path. Example...exe msetpassword --profile your_filename.csv --result result.csv Creates a settings package file from the specified device. To download only specific settings, use the "--file" option to specify the settings file that includes the items you want from JSON settings files ...
...communitynameget ● csvdelim Required: ● output ● packfiles Additional: ● password ● log Description Allows you to retrieve the specific settings data you to change the administrator passwords for the specified target device. If the files are set to the specified file path. Example...exe msetpassword --profile your_filename.csv --result result.csv Creates a settings package file from the specified device. To download only specific settings, use the "--file" option to specify the settings file that includes the items you want from JSON settings files ...

Secure Print Users Guide
Page 4
... of stored print jobs - Microsoft Active Directory database (Active Directory Mode) To use Secure Print+ with the machine's internal database, see section 3. To activate this solution, you need to target machines. Works as a standalone solution (no...specific documents if there are multiple print jobs in a user database. Configuration (Standalone Mode). - 1. Introduction Brother's Secure Print+ solution improves print security and protects confidential documents. Allows users to a Brother machine, it will not be integrated into Microsoft Active Directory - The Brother machine's internal...
... of stored print jobs - Microsoft Active Directory database (Active Directory Mode) To use Secure Print+ with the machine's internal database, see section 3. To activate this solution, you need to target machines. Works as a standalone solution (no...specific documents if there are multiple print jobs in a user database. Configuration (Standalone Mode). - 1. Introduction Brother's Secure Print+ solution improves print security and protects confidential documents. Allows users to a Brother machine, it will not be integrated into Microsoft Active Directory - The Brother machine's internal...

Barcode Utility Users Guide
Page 3
... A: Barcode Recognition Requirements 30 Appendix B: Custom Naming Rules...32 Naming Rules for [BARCODE L(A,B)] and [BARCODE R(A,B 33 Appendix C: Supported Barcode Types and Options 35 Appendix D: XML Specification for Barcodes 36 Definition of an XML File ...36 Example of Contents 1. Introduction ...1 1.1 Overview ...1 1.2 System Requirements ...2 1.3 Supported Input/Output File Formats...2 1.4 Supported Scan Color Settings...
... A: Barcode Recognition Requirements 30 Appendix B: Custom Naming Rules...32 Naming Rules for [BARCODE L(A,B)] and [BARCODE R(A,B 33 Appendix C: Supported Barcode Types and Options 35 Appendix D: XML Specification for Barcodes 36 Definition of an XML File ...36 Example of Contents 1. Introduction ...1 1.1 Overview ...1 1.2 System Requirements ...2 1.3 Supported Input/Output File Formats...2 1.4 Supported Scan Color Settings...
Barcode Utility Users Guide
Page 5
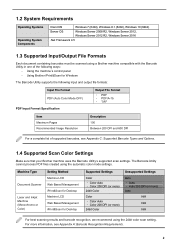
... Barcode Utility supports the following input and output file formats: Input File Format PDF (Auto Color Mode OFF) PDF Input Format Specification Output File Format ・ PDF ・ PDF/A-1b ・ TIFF Item Maximum Pages Recommended Image Resolution Description 100 Between 200...Auto 200 DPI (or more information, see Appendix C: Supported Barcode Types and Options. 1.4 Supported Scan Color Settings Make sure that your Brother machine uses the Barcode Utility's supported scan settings. The Barcode Utility cannot process PDF files created using the 24bit color scan setting. 1.2...
... Barcode Utility supports the following input and output file formats: Input File Format PDF (Auto Color Mode OFF) PDF Input Format Specification Output File Format ・ PDF ・ PDF/A-1b ・ TIFF Item Maximum Pages Recommended Image Resolution Description 100 Between 200...Auto 200 DPI (or more information, see Appendix C: Supported Barcode Types and Options. 1.4 Supported Scan Color Settings Make sure that your Brother machine uses the Barcode Utility's supported scan settings. The Barcode Utility cannot process PDF files created using the 24bit color scan setting. 1.2...

Barcode Utility Users Guide
Page 6
Save documents in a hot folder. 3. 2. The Barcode Utility continuously polls the hot folder. 4. Data is routed to the barcode recognition and document separation rules. 1. Scan documents containing barcodes. 2. Monitor Folders and Process Files The Barcode Utility runs as a background service and can continuously monitor specific folders (hot folders) for newly scanned files and then process them according to a specific output folder. 3
Save documents in a hot folder. 3. 2. The Barcode Utility continuously polls the hot folder. 4. Data is routed to the barcode recognition and document separation rules. 1. Scan documents containing barcodes. 2. Monitor Folders and Process Files The Barcode Utility runs as a background service and can continuously monitor specific folders (hot folders) for newly scanned files and then process them according to a specific output folder. 3

Barcode Utility Users Guide
Page 8
Specify the Target file type so you must type the specific file name here. 5 When the Create/Edit a rule dialog box appears, type a name for your requirements. The processing rule will apply only to files with ... file name: you can process scanned documents based on your new rule in the Rule name field. 3. The scanned file is processed according to this specific hot folder. Target File Type All files Specify exact file name Description All scanned files are processed according to rules assigned to its file name...
Specify the Target file type so you must type the specific file name here. 5 When the Create/Edit a rule dialog box appears, type a name for your requirements. The processing rule will apply only to files with ... file name: you can process scanned documents based on your new rule in the Rule name field. 3. The scanned file is processed according to this specific hot folder. Target File Type All files Specify exact file name Description All scanned files are processed according to rules assigned to its file name...

Barcode Utility Users Guide
Page 14
... the Barcode to use drop-down list, select the barcode to the specified barcode radio button. d. If necessary, add more information, see the examples on specific barcodes a. 4. b. e. Select the Separate files by page count radio button.
... the Barcode to use drop-down list, select the barcode to the specified barcode radio button. d. If necessary, add more information, see the examples on specific barcodes a. 4. b. e. Select the Separate files by page count radio button.

Barcode Utility Users Guide
Page 17
Click Add a setting. 5. Select the Rename file check box. 4. Specify the file name rules: To rename files based on specific barcodes a. Select the Rename files according to the specified barcode check box. 14 Click File rename rule in the left navigation bar. 3. 2.
Click Add a setting. 5. Select the Rename file check box. 4. Specify the file name rules: To rename files based on specific barcodes a. Select the Rename files according to the specified barcode check box. 14 Click File rename rule in the left navigation bar. 3. 2.

Barcode Utility Users Guide
Page 18
... file overwriting, select the Add a file to use the [ ] and [ ] buttons. 2.7 Configure File Save Settings The Barcode Utility can save newly separated document files in specific folders. 15 b. Select any warning icons [ ] appear, fix the settings as indicated. Confirm the sample file name preview. If any additional information you want from...
... file overwriting, select the Add a file to use the [ ] and [ ] buttons. 2.7 Configure File Save Settings The Barcode Utility can save newly separated document files in specific folders. 15 b. Select any warning icons [ ] appear, fix the settings as indicated. Confirm the sample file name preview. If any additional information you want from...

Barcode Utility Users Guide
Page 20
... by clicking the Add a new barcode setting option. 7. Type the folder path you want from the Input info. drop-down list, select the barcode to a specific barcode check box. 6. 5.
... by clicking the Add a new barcode setting option. 7. Type the folder path you want from the Input info. drop-down list, select the barcode to a specific barcode check box. 6. 5.

Barcode Utility Users Guide
Page 21
... [ ] and [ ] buttons. 2.8 Configure Common Settings Configure these settings before you start monitoring hot folders. Click the Common Settings tab in target folder Delete Move to a specific folder. Setting Keep in the main screen. 2. Automatically rename any warning icons [ ] appear, fix the settings as input filename Change filename Description Do not change...
... [ ] and [ ] buttons. 2.8 Configure Common Settings Configure these settings before you start monitoring hot folders. Click the Common Settings tab in target folder Delete Move to a specific folder. Setting Keep in the main screen. 2. Automatically rename any warning icons [ ] appear, fix the settings as input filename Change filename Description Do not change...

Barcode Utility Users Guide
Page 22
At the top right of the screen, select the hot folder you want to restore specific barcode and rule settings. To stop monitoring incoming scan jobs, clear the Target Folder Monitoring check box, and then click Apply. ・ To monitor multiple ...
At the top right of the screen, select the hot folder you want to restore specific barcode and rule settings. To stop monitoring incoming scan jobs, clear the Target Folder Monitoring check box, and then click Apply. ・ To monitor multiple ...

Barcode Utility Users Guide
Page 23
... 3.1 Change the [COUNTER] Naming Rules When you use the "document_[COUNTER]" format and apply this rule, the next file is 1 more information, see Appendix D: XML Specification for Barcodes. 4. Example Three files are in the application's main screen. 20
... 3.1 Change the [COUNTER] Naming Rules When you use the "document_[COUNTER]" format and apply this rule, the next file is 1 more information, see Appendix D: XML Specification for Barcodes. 4. Example Three files are in the application's main screen. 20

Barcode Utility Users Guide
Page 24
... the left navigation bar. 3. Click Import/Export in the left navigation bar. 3. Click Application settings in the main screen. 2. 3.2 Export and Import Configuration To save specific barcode and rule settings, export the current settings as an XML file. When the confirmation message appears, click OK. 5. You can import and reapply them...
... the left navigation bar. 3. Click Import/Export in the left navigation bar. 3. Click Application settings in the main screen. 2. 3.2 Export and Import Configuration To save specific barcode and rule settings, export the current settings as an XML file. When the confirmation message appears, click OK. 5. You can import and reapply them...

Barcode Utility Users Guide
Page 30
... more information, see 2.7 Configure File Save Settings. The processed files are processed. I want to specify more information, see 2.5 Configure File Split Settings. ・ Check for specific errors in Common Settings. Check the post-processing settings in the Application Log. Make sure that match the specified file name exactly will be processed...
... more information, see 2.7 Configure File Save Settings. The processed files are processed. I want to specify more information, see 2.5 Configure File Split Settings. ・ Check for specific errors in Common Settings. Check the post-processing settings in the Application Log. Make sure that match the specified file name exactly will be processed...

Barcode Utility Users Guide
Page 33
... thinnest cell line Black White ... 30 Appendix A: Barcode Recognition Requirements The requirements listed in this section are for best scan results and barcode recognition. Item Specification Details Angle Barcode rotation angle Tolerance angle 0° 90° 180° 270° ± 5° 0° 180° 90° 270° General Condition...
... thinnest cell line Black White ... 30 Appendix A: Barcode Recognition Requirements The requirements listed in this section are for best scan results and barcode recognition. Item Specification Details Angle Barcode rotation angle Tolerance angle 0° 90° 180° 270° ± 5° 0° 180° 90° 270° General Condition...

Barcode Utility Users Guide
Page 34
Item PDF417 Recommended scan resolution Specification 200 DPI or more Details Minimum size of each line when using the recommended scan resolution (black line/white line) 0.5 mm Minimum margin around barcode ...
Item PDF417 Recommended scan resolution Specification 200 DPI or more Details Minimum size of each line when using the recommended scan resolution (black line/white line) 0.5 mm Minimum margin around barcode ...