
Owners Manual - English
Page 1
MODELS OPERATION MANUAL VACUUM CLEANER CONTENTS PAGE • IMPORTANT SAFETY INSTRUCTIONS .... 2 • PARTS IDENTIFICATION 4 • SPECIFICATIONS 4 • OPERATING INSTRUCTIONS 6 • MAINTENANCE INSTRUCTIONS 11 • REPLACEMENT INSTRUCTIONS 13 • BEFORE REQUESTING SERVICE 19 • DESCRIPTION OF ACCESSORIES .......... 20 • SPANISH DIGEST 21 Thank you very much for buying another quality by Brother. Before using your Brother vacuum cleaner, please read this operation manual carefully to obtain the best use from your vacuum cleaner.
MODELS OPERATION MANUAL VACUUM CLEANER CONTENTS PAGE • IMPORTANT SAFETY INSTRUCTIONS .... 2 • PARTS IDENTIFICATION 4 • SPECIFICATIONS 4 • OPERATING INSTRUCTIONS 6 • MAINTENANCE INSTRUCTIONS 11 • REPLACEMENT INSTRUCTIONS 13 • BEFORE REQUESTING SERVICE 19 • DESCRIPTION OF ACCESSORIES .......... 20 • SPANISH DIGEST 21 Thank you very much for buying another quality by Brother. Before using your Brother vacuum cleaner, please read this operation manual carefully to obtain the best use from your vacuum cleaner.
Owners Manual - English
Page 2
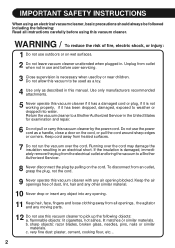
... water. b. WARNING / To reduce the risk of dust, lint, hair and any other similar material. 10 Never drop or insert any air opening . 11 Keep hair, face, fingers and loose clothing away from all instructions carefully before user-servicing. 3 Close supervision is damaged, immediately remove the plug from an outlet, grasp the plug, not the cord. 9 Never operate this vacuum cleaner by the power cord. very fine dust...
... water. b. WARNING / To reduce the risk of dust, lint, hair and any other similar material. 10 Never drop or insert any air opening . 11 Keep hair, face, fingers and loose clothing away from all instructions carefully before user-servicing. 3 Close supervision is damaged, immediately remove the plug from an outlet, grasp the plug, not the cord. 9 Never operate this vacuum cleaner by the power cord. very fine dust...

Owners Manual - English
Page 3
... handle plug, cord or vacuum cleaner with water and check the main filter. Do not change the plug in the outlet, reverse the plug. It is wider than the other). If this happens, turn all parts to use only. 3 Operating this vacuum with clogged or dirty filters may clog the hose and filters. This may clog the filters and rapidly reduce the performance of electric shock, this vacuum cleaner has a polarized plug (one way. Please empty the dirt...
... handle plug, cord or vacuum cleaner with water and check the main filter. Do not change the plug in the outlet, reverse the plug. It is wider than the other). If this happens, turn all parts to use only. 3 Operating this vacuum with clogged or dirty filters may clog the hose and filters. This may clog the filters and rapidly reduce the performance of electric shock, this vacuum cleaner has a polarized plug (one way. Please empty the dirt...
Owners Manual - English
Page 4
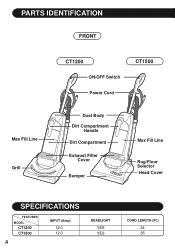
PARTS IDENTIFICATION FRONT Max Fill Line Grill CT1200 ON/OFF Switch Power Cord CT1500 Dust Body Dirt Compartment Handle Dirt Compartment Exhaust Filter Cover Bumper Max Fill Line Rug/Floor Selector Head Cover SPECIFICATIONS FEATURES MODEL CT1200 CT1500 4 INPUT (Amp) 12.0 12.0 HEADLIGHT YES YES CORD LENGTH (Ft.) 24 35
PARTS IDENTIFICATION FRONT Max Fill Line Grill CT1200 ON/OFF Switch Power Cord CT1500 Dust Body Dirt Compartment Handle Dirt Compartment Exhaust Filter Cover Bumper Max Fill Line Rug/Floor Selector Head Cover SPECIFICATIONS FEATURES MODEL CT1200 CT1500 4 INPUT (Amp) 12.0 12.0 HEADLIGHT YES YES CORD LENGTH (Ft.) 24 35

Owners Manual - English
Page 5
PARTS IDENTIFICATION REAR Power Cord Cord Storage Hooks Upholstery Tool with Detachable Brush Telescopic Wand Rug/Floor Selector (CT1500only) Handle Screw Carrying Handle Floor/Tools Selector Valve System Suction Hose Crevice Tool Foot Pedal Release Name Plate Extension Hose WARNING: Operate vacuum cleaner only at the voltage specified on the nameplate. 5
PARTS IDENTIFICATION REAR Power Cord Cord Storage Hooks Upholstery Tool with Detachable Brush Telescopic Wand Rug/Floor Selector (CT1500only) Handle Screw Carrying Handle Floor/Tools Selector Valve System Suction Hose Crevice Tool Foot Pedal Release Name Plate Extension Hose WARNING: Operate vacuum cleaner only at the voltage specified on the nameplate. 5
Owners Manual - English
Page 6
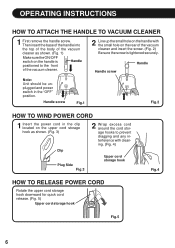
... cleaning. (Fig. 4) Upper cord storage hook Fig.4 HOW TO RELEASE POWER CORD Rotate the upper cord storage hook downward for quick cord release. (Fig. 5) Upper cord storage hook Fig.5 6 Handle screw Fig.1 Fig.2 HOW TO WIND POWER CORD 1 Insert the power cord in the "OFF" position. OPERATING INSTRUCTIONS HOW TO ATTACH THE HANDLE TO VACUUM CLEANER 1 First remove the handle screw. Handle screw Handle Note: Unit should be unplugged and power switch in the clip located on the upper cord...
... cleaning. (Fig. 4) Upper cord storage hook Fig.4 HOW TO RELEASE POWER CORD Rotate the upper cord storage hook downward for quick cord release. (Fig. 5) Upper cord storage hook Fig.5 6 Handle screw Fig.1 Fig.2 HOW TO WIND POWER CORD 1 Insert the power cord in the "OFF" position. OPERATING INSTRUCTIONS HOW TO ATTACH THE HANDLE TO VACUUM CLEANER 1 First remove the handle screw. Handle screw Handle Note: Unit should be unplugged and power switch in the clip located on the upper cord...
Owners Manual - English
Page 7
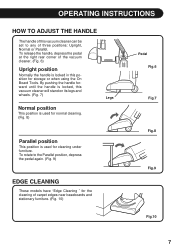
To release the handle, depress the pedal at the right rear corner of the vacuum cleaner. (Fig. 6) Upright position Normally the handle is used for the cleaning of carpet edges near baseboards and stationary furniture. (Fig. 10) Pedal Fig.6 Fig.7 Fig.8 Fig.9 Fig.10 7 OPERATING INSTRUCTIONS HOW TO ADJUST THE HANDLE The handle of this position for storage or when using the On Board Tools. To...
To release the handle, depress the pedal at the right rear corner of the vacuum cleaner. (Fig. 6) Upright position Normally the handle is used for the cleaning of carpet edges near baseboards and stationary furniture. (Fig. 10) Pedal Fig.6 Fig.7 Fig.8 Fig.9 Fig.10 7 OPERATING INSTRUCTIONS HOW TO ADJUST THE HANDLE The handle of this position for storage or when using the On Board Tools. To...
Owners Manual - English
Page 8
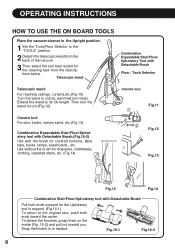
... replace. Fig.16-1 Fig.16-2 8 OPERATING INSTRUCTIONS HOW TO USE THE ON BOARD TOOLS Place the vacuum cleaner in to the original size, push both ends toward you. Telescopic wand Combination Expandable Stair/Floor/ Upholstery Tool with the brush for the cleaning task from the back of the vacuum. 3 Then select the tool best suited for covered furniture, table tops, books, lamps, baseboards , etc. wand will turn the wand...
... replace. Fig.16-1 Fig.16-2 8 OPERATING INSTRUCTIONS HOW TO USE THE ON BOARD TOOLS Place the vacuum cleaner in to the original size, push both ends toward you. Telescopic wand Combination Expandable Stair/Floor/ Upholstery Tool with the brush for the cleaning task from the back of the vacuum. 3 Then select the tool best suited for covered furniture, table tops, books, lamps, baseboards , etc. wand will turn the wand...
Owners Manual - English
Page 10
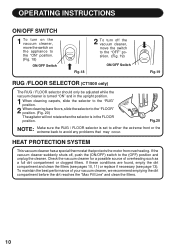
... the dirt compartment and clean the filters (see pages 10, 11) or replace if necessary (see page 13). OPERATING INSTRUCTIONS ON/OFF SWITCH 1 To turn on the vacuum cleaner, move the switch on the appliance to the "ON" position. (Fig. 18) ON/OFF Switch ON Fig.18 2 To turn off , push the (ON/OFF) switch to avoid any problems that protects the motor from overheating. Check the vacuum cleaner for...
... the dirt compartment and clean the filters (see pages 10, 11) or replace if necessary (see page 13). OPERATING INSTRUCTIONS ON/OFF SWITCH 1 To turn on the vacuum cleaner, move the switch on the appliance to the "ON" position. (Fig. 18) ON/OFF Switch ON Fig.18 2 To turn off , push the (ON/OFF) switch to avoid any problems that protects the motor from overheating. Check the vacuum cleaner for...
Owners Manual - English
Page 11
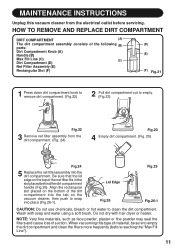
.... (Fig.23) Fig.22 3 Remove net filter assembly from the electrical outlet before reaching the "Max Fill Line"). 11 Do not dry with soap and water using a soft brush. Lid Edge Fig.26 Fig.25 Fig.26-1 CAUTION: Do not use chemicals, bleach or hot water to snap into the dirt compartment. When vacuuming this vacuum cleaner from the dirt compartment. (Fig. 24) Fig.23...
.... (Fig.23) Fig.22 3 Remove net filter assembly from the electrical outlet before reaching the "Max Fill Line"). 11 Do not dry with soap and water using a soft brush. Lid Edge Fig.26 Fig.25 Fig.26-1 CAUTION: Do not use chemicals, bleach or hot water to snap into the dirt compartment. When vacuuming this vacuum cleaner from the dirt compartment. (Fig. 24) Fig.23...

Owners Manual - English
Page 12
... tools Valve TOOLS FLOOR Cover Cover To nozzle head Fig.29 Be sure the filter is located on the back of dust from the case and scrub the filter. 4 Wash the filter with soap and water. 5 Allow the filter to completely dry before replacing it, then insert it into the dust body. If you empty the dirt compartment. Fig.27 HOW TO CLEAN THE MAIN FILTER 1 Release dirt compartment from the vacuum cleaner...
... tools Valve TOOLS FLOOR Cover Cover To nozzle head Fig.29 Be sure the filter is located on the back of dust from the case and scrub the filter. 4 Wash the filter with soap and water. 5 Allow the filter to completely dry before replacing it, then insert it into the dust body. If you empty the dirt compartment. Fig.27 HOW TO CLEAN THE MAIN FILTER 1 Release dirt compartment from the vacuum cleaner...
Owners Manual - English
Page 13
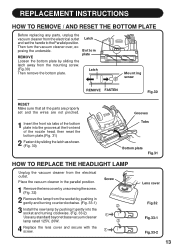
... from the electrical outlet and set and the wires are not pinched. 1 Insert the front six tabs of the bottom plate into the grooves at the front end of the nozzle head, then reset the bottom plate.(Fig. 31) 2 Fasten it gently into the socket and turning clockwise. (Fig. 33-2) Use any standard bayonet base vacuum cleaner lamp rated 125V, 20W. 4 Replace the...
... from the electrical outlet and set and the wires are not pinched. 1 Insert the front six tabs of the bottom plate into the grooves at the front end of the nozzle head, then reset the bottom plate.(Fig. 31) 2 Fasten it gently into the socket and turning clockwise. (Fig. 33-2) Use any standard bayonet base vacuum cleaner lamp rated 125V, 20W. 4 Replace the...
Owners Manual - English
Page 14
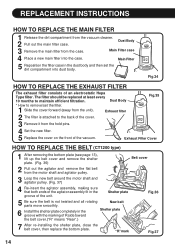
REPLACEMENT INSTRUCTIONS HOW TO REPLACE THE MAIN FILTER 1 Release the dirt compartment from the motor shaft and agitator pulley. 3 Loop the new belt around the motor shaft and agitator pulley. (Fig. 37) 4 Re-insert the agitator assembly, making sure that both ends of the agitator assembly fit in the groove of the unit. Fig.34 HOW TO REPLACE THE EXHAUST FILTER The exhaust filter consists of the vacuum. New belt 6 Install the shelter plate completely...
REPLACEMENT INSTRUCTIONS HOW TO REPLACE THE MAIN FILTER 1 Release the dirt compartment from the motor shaft and agitator pulley. 3 Loop the new belt around the motor shaft and agitator pulley. (Fig. 37) 4 Re-insert the agitator assembly, making sure that both ends of the agitator assembly fit in the groove of the unit. Fig.34 HOW TO REPLACE THE EXHAUST FILTER The exhaust filter consists of the vacuum. New belt 6 Install the shelter plate completely...
Owners Manual - English
Page 15
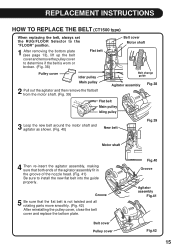
... all rotating parts move smoothly. (Fig. 42) After reinstalling the pulley cover, close the belt cover and replace the bottom plate. REPLACEMENT INSTRUCTIONS HOW TO REPLACE THE BELT (CT1500 type) When replacing the belt, always set the RUG/FLOOR Selector to the "FLOOR" position. 1 After removing the bottom plate (see page 13), lift up the belt cover and remove the pulley cover to install the new flat belt into the guide properly.
... all rotating parts move smoothly. (Fig. 42) After reinstalling the pulley cover, close the belt cover and replace the bottom plate. REPLACEMENT INSTRUCTIONS HOW TO REPLACE THE BELT (CT1500 type) When replacing the belt, always set the RUG/FLOOR Selector to the "FLOOR" position. 1 After removing the bottom plate (see page 13), lift up the belt cover and remove the pulley cover to install the new flat belt into the guide properly.
Owners Manual - English
Page 16
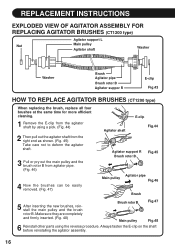
REPLACEMENT INSTRUCTIONS EXPLODED VIEW OF AGITATOR ASSEMBLY FOR REPLACING AGITATOR BRUSHES (CT1200 type) Agitator support L Nut Main pulley Agitator shaft Washer Washer Brush Agitator pipe Brush rotor B Agitator suppor R E-clip Fig.43 HOW TO REPLACE AGITATOR BRUSHES (CT1200 type) When replacing the brush, replace all four brushes at the same time for more efficient cleaning. 1 Remove the E-clip from the agitator shaft by using the reverse procedure. Make sure they are completely and firmly inserted. (Fig. 48) Brush rotor B Fig.47...
REPLACEMENT INSTRUCTIONS EXPLODED VIEW OF AGITATOR ASSEMBLY FOR REPLACING AGITATOR BRUSHES (CT1200 type) Agitator support L Nut Main pulley Agitator shaft Washer Washer Brush Agitator pipe Brush rotor B Agitator suppor R E-clip Fig.43 HOW TO REPLACE AGITATOR BRUSHES (CT1200 type) When replacing the brush, replace all four brushes at the same time for more efficient cleaning. 1 Remove the E-clip from the agitator shaft by using the reverse procedure. Make sure they are completely and firmly inserted. (Fig. 48) Brush rotor B Fig.47...
Owners Manual - English
Page 17
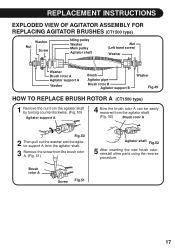
... 17 REPLACEMENT INSTRUCTIONS EXPLODED VIEW OF AGITATOR ASSEMBLY FOR REPLACING AGITATOR BRUSHES (CT1500 type) Washer Nut Screw Idling pulley Washer Main pulley Agitator shaft Nut (Left hand screw) Washer Washer Brush rotor A Agitator support A Washer Brush Agitator pipe Brush rotor B Agitator support B Washer Fig.49 HOW TO REPLACE BRUSH ROTOR A (CT1500 type) 1 Remove the nut from the agitator shaft by turning counterclockwise. (Fig. 50) Agitator support A 4 Now the brush rotor A can be easily removed from the agitator shaft. (Fig. 52) Brush rotor...
... 17 REPLACEMENT INSTRUCTIONS EXPLODED VIEW OF AGITATOR ASSEMBLY FOR REPLACING AGITATOR BRUSHES (CT1500 type) Washer Nut Screw Idling pulley Washer Main pulley Agitator shaft Nut (Left hand screw) Washer Washer Brush rotor A Agitator support A Washer Brush Agitator pipe Brush rotor B Agitator support B Washer Fig.49 HOW TO REPLACE BRUSH ROTOR A (CT1500 type) 1 Remove the nut from the agitator shaft by turning counterclockwise. (Fig. 50) Agitator support A 4 Now the brush rotor A can be easily removed from the agitator shaft. (Fig. 52) Brush rotor...
Owners Manual - English
Page 18
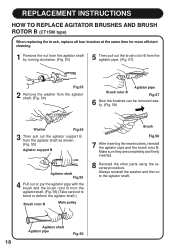
... other parts using the reverse procedure. REPLACEMENT INSTRUCTIONS HOW TO REPLACE AGITATOR BRUSHES AND BRUSH ROTOR B (CT1500 type) When replacing the brush, replace all four brushes at the same time for more efficient cleaning. 1 Remove the nut from the agitator shaft by turning clockwise. (Fig. 53) 5 Then pull out the brush rotor B from the agitator pipe. (Fig. 57) Fig.53 2 Remove the washer from the agitator shaft. (Fig. 54) Brush rotor B Agitator pipe...
... other parts using the reverse procedure. REPLACEMENT INSTRUCTIONS HOW TO REPLACE AGITATOR BRUSHES AND BRUSH ROTOR B (CT1500 type) When replacing the brush, replace all four brushes at the same time for more efficient cleaning. 1 Remove the nut from the agitator shaft by turning clockwise. (Fig. 53) 5 Then pull out the brush rotor B from the agitator pipe. (Fig. 57) Fig.53 2 Remove the washer from the agitator shaft. (Fig. 54) Brush rotor B Agitator pipe...
Owners Manual - English
Page 19
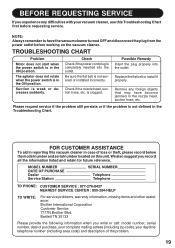
... power switch is in the nozzle head, suction hose, etc. MODEL NUMBER DATE OF PURCHASE Dealer Service Station SERIAL NUMBER Telephone Telephone TO PHONE: CUSTOMER SERVICE : 877-276-8437 NEAREST SERVICE CENTER : 800-284-HELP TO WRITE: For service problems, warranty information, missing items and other assistance: Brother International Corporation Customer Service 7777N.Brother Blvd. BEFORE REQUESTING SERVICE If you experience any foreign objects that may have the vacuum cleaner turned OFF and disconnect the plug...
... power switch is in the nozzle head, suction hose, etc. MODEL NUMBER DATE OF PURCHASE Dealer Service Station SERIAL NUMBER Telephone Telephone TO PHONE: CUSTOMER SERVICE : 877-276-8437 NEAREST SERVICE CENTER : 800-284-HELP TO WRITE: For service problems, warranty information, missing items and other assistance: Brother International Corporation Customer Service 7777N.Brother Blvd. BEFORE REQUESTING SERVICE If you experience any foreign objects that may have the vacuum cleaner turned OFF and disconnect the plug...
Owners Manual - English
Page 20
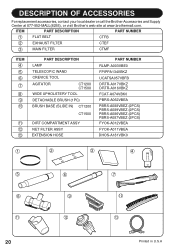
...PART DESCRIPTION PART NUMBER 1 FLAT BELT CTFB 2 EXHAUST FILTER CTEF 3 MAIN FILTER CTMF ITEM 4 5 6 7 8 9 10 11 12 13 PART DESCRIPTION LAMP TELESCOPIC WAND CREVICE TOOL AGITATOR CT1200 CT1500 WIDE UPHOLSTERY TOOL DETACHABLE BRUSH (1PC) BRUSH BASE (SLIDE IN) CT1200 CT1500 DIRT COMPARTMENT ASSY NET FILTER ASSY EXTENSION HOSE PART NUMBER...11 12 13 20 Printed in U.S.A DESCRIPTION OF ACCESSORIES For replacement accessories, contact your local dealer or call the Brother Accessories and Supply Center at 877-552-MALL(6255), or visit Brother's web site at www.brothermall.com.
...PART DESCRIPTION PART NUMBER 1 FLAT BELT CTFB 2 EXHAUST FILTER CTEF 3 MAIN FILTER CTMF ITEM 4 5 6 7 8 9 10 11 12 13 PART DESCRIPTION LAMP TELESCOPIC WAND CREVICE TOOL AGITATOR CT1200 CT1500 WIDE UPHOLSTERY TOOL DETACHABLE BRUSH (1PC) BRUSH BASE (SLIDE IN) CT1200 CT1500 DIRT COMPARTMENT ASSY NET FILTER ASSY EXTENSION HOSE PART NUMBER...11 12 13 20 Printed in U.S.A DESCRIPTION OF ACCESSORIES For replacement accessories, contact your local dealer or call the Brother Accessories and Supply Center at 877-552-MALL(6255), or visit Brother's web site at www.brothermall.com.

Owners Manual - English
Page 24
Brother International Corporation 100 Somerset Corporate BIvd., Bridgewater, New Jersey 08807-0911 24 Printed in U.S.A
Brother International Corporation 100 Somerset Corporate BIvd., Bridgewater, New Jersey 08807-0911 24 Printed in U.S.A
