
Accessory Catalog
Page 34
... Threads are also available (sold in Japan for Brother® Embroidery Machines, but compatible with other sewing and embroidery machine brands. C (White only): The 1,000-meter (approx. 1,100-yds) spun thread is ideal for details.) www.brother.com Consult your instruction manual for advice on your sewing counter or can illustrate more of thread per spool. SA519...
... Threads are also available (sold in Japan for Brother® Embroidery Machines, but compatible with other sewing and embroidery machine brands. C (White only): The 1,000-meter (approx. 1,100-yds) spun thread is ideal for details.) www.brother.com Consult your instruction manual for advice on your sewing counter or can illustrate more of thread per spool. SA519...
Users Manual - English
Page 2
..., lubricating, or when making any other user servicing adjustments mentioned in this manual. 3. Use this machine only for examination, repair, electrical or mechanical adjustment. 4. Never operate this machine, basic safety precautions should never be used as described in the instruction manual. 16.This sewing machine is not intended for household use as a toy. WARNING - To disconnect...
..., lubricating, or when making any other user servicing adjustments mentioned in this manual. 3. Use this machine only for examination, repair, electrical or mechanical adjustment. 4. Never operate this machine, basic safety precautions should never be used as described in the instruction manual. 16.This sewing machine is not intended for household use as a toy. WARNING - To disconnect...
Users Manual - English
Page 4
... to keep your local authorized Brother dealer. Be sure to assure correct installation. Plug the machine directly into the wall. To fully enjoy all the features incorporated, we suggest that you study the manual. Do not use or store the machine near a space heater, iron..., halogen lamp, or other moving parts. 2. Do not store anything on the needle while sewing. For repair or adjustment In the event a malfunction occurs or adjustment is the most advanced computerized household sewing machine. When storing this machine...
... to keep your local authorized Brother dealer. Be sure to assure correct installation. Plug the machine directly into the wall. To fully enjoy all the features incorporated, we suggest that you study the manual. Do not use or store the machine near a space heater, iron..., halogen lamp, or other moving parts. 2. Do not store anything on the needle while sewing. For repair or adjustment In the event a malfunction occurs or adjustment is the most advanced computerized household sewing machine. When storing this machine...
Users Manual - English
Page 10
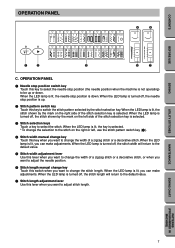
... mark on the left , use the stitch pattern switch key (2). 4 Stitch width manual change the width of the stitch selection key is lit, you can make adjustments. UTILITY STITCHES MAINTENANCE SEWING CHART PATTERNS (PROGRAMMED IN MACHINE) 7 CONTENTS BEFORE USE SEWING OPERATION PANEL 1 2 3 4 5 6 7 8 9 10 11 12 13 ... of the stitch selection key is lit, you can make adjustments. OPERATION PANEL 1 Needle stop position (the needle position when the machine is turned off , the stitch length will return to the default value. 5 Stitch width adjustment lever Use this lever when you ...
... mark on the left , use the stitch pattern switch key (2). 4 Stitch width manual change the width of the stitch selection key is lit, you can make adjustments. UTILITY STITCHES MAINTENANCE SEWING CHART PATTERNS (PROGRAMMED IN MACHINE) 7 CONTENTS BEFORE USE SEWING OPERATION PANEL 1 2 3 4 5 6 7 8 9 10 11 12 13 ... of the stitch selection key is lit, you can make adjustments. OPERATION PANEL 1 Needle stop position (the needle position when the machine is turned off , the stitch length will return to the default value. 5 Stitch width adjustment lever Use this lever when you ...
Users Manual - English
Page 14
... Then, push the bobbin winder shaft to follow the process described. Slide the sewing speed controller to its maximum (as far to break. 6. The bobbin will stop the machine. 9. CONTENTS 3. Align the groove in the illustration. Wind the thread clockwise around... of the thread through the thread guide as possible). 7. BEFORE USE SEWING UTILITY STITCHES MAINTENANCE 2 1 1 2 1 2 3 1 4. Use the cutter to sew or manually turning the balance wheel. 11 SEWING CHART PATTERNS (PROGRAMMED IN MACHINE) Note Immediately after winding the bobbin, it may tangle around the bobbin...
... Then, push the bobbin winder shaft to follow the process described. Slide the sewing speed controller to its maximum (as far to break. 6. The bobbin will stop the machine. 9. CONTENTS 3. Align the groove in the illustration. Wind the thread clockwise around... of the thread through the thread guide as possible). 7. BEFORE USE SEWING UTILITY STITCHES MAINTENANCE 2 1 1 2 1 2 3 1 4. Use the cutter to sew or manually turning the balance wheel. 11 SEWING CHART PATTERNS (PROGRAMMED IN MACHINE) Note Immediately after winding the bobbin, it may tangle around the bobbin...
Users Manual - English
Page 16
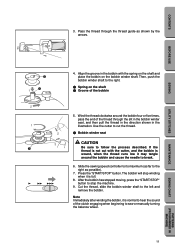
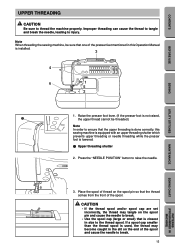
Note When threading the sewing machine, be threaded.) Note In order to thread the machine properly. CONTENTS BEFORE USE SEWING UPPER THREADING CAUTION Be sure to ensure that the upper threading is done correctly, this Operation Manual is installed. 3 4 6 1 5 2 1. Place the spool of the spool. CAUTION •...the presser feet mentioned in size to break. 13 If a spool cap smaller than the thread spool is closest in this sewing machine is equipped with an upper threading shutter which prevents upper threading or needle threading while the presser foot is lowered. 1 ...
Note When threading the sewing machine, be threaded.) Note In order to thread the machine properly. CONTENTS BEFORE USE SEWING UPPER THREADING CAUTION Be sure to ensure that the upper threading is done correctly, this Operation Manual is installed. 3 4 6 1 5 2 1. Place the spool of the spool. CAUTION •...the presser feet mentioned in size to break. 13 If a spool cap smaller than the thread spool is closest in this sewing machine is equipped with an upper threading shutter which prevents upper threading or needle threading while the presser foot is lowered. 1 ...
Users Manual - English
Page 18
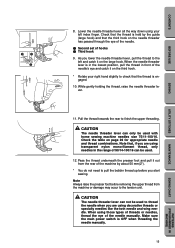
...and wing needle. When using those types of threads or needles, thread the eye of 90/14-100/16 can not be used with home sewing machine needles size 75/11-100/16. When the needle threader lever is held by about 50 mm(2"). * You do not need to check ... your left and catch it on the needle threader has passed through the eye of the needle. 1 Second set of the machine by the guide (large hook) and that the thread is OFF when threading the needle manually. 15 PATTERNS (PROGRAMMED IN MACHINE) SEWING CHART MAINTENANCE UTILITY STITCHES SEWING BEFORE USE CONTENTS 5 11 2 5 5 8.
...and wing needle. When using those types of threads or needles, thread the eye of 90/14-100/16 can not be used with home sewing machine needles size 75/11-100/16. When the needle threader lever is held by about 50 mm(2"). * You do not need to check ... your left and catch it on the needle threader has passed through the eye of the needle. 1 Second set of the machine by the guide (large hook) and that the thread is OFF when threading the needle manually. 15 PATTERNS (PROGRAMMED IN MACHINE) SEWING CHART MAINTENANCE UTILITY STITCHES SEWING BEFORE USE CONTENTS 5 11 2 5 5 8.
Users Manual - English
Page 22
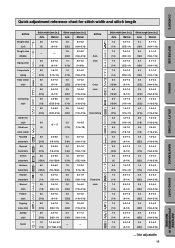
... Fagoting 18 cross stitch Scallop 19 stitch 20 Eyelet Stitch width [mm (in.)] Auto Manual 0.0 0.0-7.0 (0) (0-1/4) - - 3.5 (1/8) 5.0 (3/16) 0.0 (0) 5.0 (3/16) 3.5 (1/8) 5.0 (3/16) 0.0-7.0 (0-1/4) 1.5-7.0 (1/16-1/4) 0.0-7.0 (0-1/4) 0.0-7.0 (0-1/4) 2.5-5.0 (3/32-3/16) 2.5-5.0 (3/32-3/16) Stitch length [mm (in .)] Auto Manual 0.4 0.1-1.0 (1/64) (1/64-1/16) 0.4 0.1-1.0 (1/64) (1/64-1/16) 0.4 0.1-1.0... (3/32) (1/64-3/16) 2.5 0.2-4.0 (3/32) (1/64-3/16) 2.5 0.2-4.0 (3/32) (1/64-3/16) -: Not adjustable 19 MAINTENANCE SEWING CHART PATTERNS (PROGRAMMED IN MACHINE)
... Fagoting 18 cross stitch Scallop 19 stitch 20 Eyelet Stitch width [mm (in.)] Auto Manual 0.0 0.0-7.0 (0) (0-1/4) - - 3.5 (1/8) 5.0 (3/16) 0.0 (0) 5.0 (3/16) 3.5 (1/8) 5.0 (3/16) 0.0-7.0 (0-1/4) 1.5-7.0 (1/16-1/4) 0.0-7.0 (0-1/4) 0.0-7.0 (0-1/4) 2.5-5.0 (3/32-3/16) 2.5-5.0 (3/32-3/16) Stitch length [mm (in .)] Auto Manual 0.4 0.1-1.0 (1/64) (1/64-1/16) 0.4 0.1-1.0 (1/64) (1/64-1/16) 0.4 0.1-1.0... (3/32) (1/64-3/16) 2.5 0.2-4.0 (3/32) (1/64-3/16) 2.5 0.2-4.0 (3/32) (1/64-3/16) -: Not adjustable 19 MAINTENANCE SEWING CHART PATTERNS (PROGRAMMED IN MACHINE)
Users Manual - English
Page 33
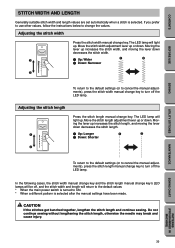
...down . Adjusting the stitch length 1 2 Press the stitch length manual change key. CAUTION If the stitches get bunched together, lengthen the stitch length and continue sewing. MAINTENANCE SEWING CHART PATTERNS (PROGRAMMED IN MACHINE) 30 The LED lamp will return to the default values * When... the main power switch is turned to cancel the manual adjustments), press the stitch width manual change the values. Adjusting the...
...down . Adjusting the stitch length 1 2 Press the stitch length manual change key. CAUTION If the stitches get bunched together, lengthen the stitch length and continue sewing. MAINTENANCE SEWING CHART PATTERNS (PROGRAMMED IN MACHINE) 30 The LED lamp will return to the default values * When... the main power switch is turned to cancel the manual adjustments), press the stitch width manual change the values. Adjusting the...
Users Manual - English
Page 38
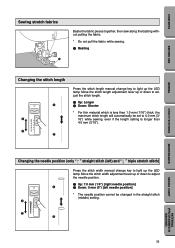
...the maximum stitch length will automatically be changed in the straight stitch (middle) setting. 1 2 2 PATTERNS (PROGRAMMED IN MACHINE) 35 SEWING UTILITY STITCHES MAINTENANCE SEWING CHART Changing the needle position (only " 1 " straight stitch (left needle position] * The needle position cannot be...lamp. CONTENTS BEFORE USE Sewing stretch fabrics 5 6 1 Baste the fabric pieces together, then sew along the basting without pulling the fabric. * Do not pull the fabric while sewing. 1 Basting Changing the stitch length 1 1 2 2 Press the stitch length manual change key to adjust ...
...the maximum stitch length will automatically be changed in the straight stitch (middle) setting. 1 2 2 PATTERNS (PROGRAMMED IN MACHINE) 35 SEWING UTILITY STITCHES MAINTENANCE SEWING CHART Changing the needle position (only " 1 " straight stitch (left needle position] * The needle position cannot be...lamp. CONTENTS BEFORE USE Sewing stretch fabrics 5 6 1 Baste the fabric pieces together, then sew along the basting without pulling the fabric. * Do not pull the fabric while sewing. 1 Basting Changing the stitch length 1 1 2 2 Press the stitch length manual change key to adjust ...
Users Manual - English
Page 44
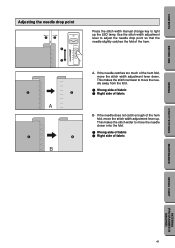
... wider to move the needle closer onto the fold. 1 Wrong side of fabric 2 Right side of fabric UTILITY STITCHES MAINTENANCE SEWING CHART PATTERNS (PROGRAMMED IN MACHINE) 41 Use the stitch width adjustment lever to light up . A- If the needle does not catch enough of fabric B- CONTENTS... BEFORE USE SEWING Adjusting the needle drop point 12 1 2 A B Press the stitch width manual change key to adjust the needle drop point so...
... wider to move the needle closer onto the fold. 1 Wrong side of fabric 2 Right side of fabric UTILITY STITCHES MAINTENANCE SEWING CHART PATTERNS (PROGRAMMED IN MACHINE) 41 Use the stitch width adjustment lever to light up . A- If the needle does not catch enough of fabric B- CONTENTS... BEFORE USE SEWING Adjusting the needle drop point 12 1 2 A B Press the stitch width manual change key to adjust the needle drop point so...
Users Manual - English
Page 49
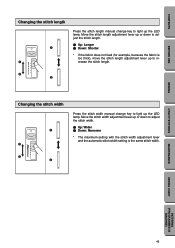
CONTENTS BEFORE USE SEWING Changing the stitch length 1 1 Press the stitch length manual change key to light up the LED lamp. Move the stitch length adjustment lever up or down to adjust the stitch width. 1 Up: Wider 2 Down: ... width setting is too thick), move the stitch length adjustment lever up to increase the stitch length. 2 2 Changing the stitch width 1 1 Press the stitch width manual change key to adjust the stitch length. 1 Up: Longer 2 Down: Shorter * If the fabric does not feed (for example, because the fabric is the same...
CONTENTS BEFORE USE SEWING Changing the stitch length 1 1 Press the stitch length manual change key to light up the LED lamp. Move the stitch length adjustment lever up or down to adjust the stitch width. 1 Up: Wider 2 Down: ... width setting is too thick), move the stitch length adjustment lever up to increase the stitch length. 2 2 Changing the stitch width 1 1 Press the stitch width manual change key to adjust the stitch length. 1 Up: Longer 2 Down: Shorter * If the fabric does not feed (for example, because the fabric is the same...
Users Manual - English
Page 50
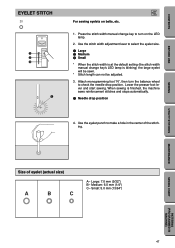
Lower the presser foot lever and start sewing. Press the stitch width manual change key's LED lamp is finished, the machine sews reinforcement stitches and stops automatically. 1 Needle drop position 4. Attach monogramming foot "N", then turn on belts, etc. 1. Use the ...default setting (the stitch width manual change key to turn the balance wheel to make a hole in the center of eyelet (actual size) A B C A- Size of the stitching. Small: 5.0 mm (13/64") UTILITY STITCHES MAINTENANCE SEWING CHART PATTERNS (PROGRAMMED IN MACHINE) 47 When sewing is blinking) the large ...
Lower the presser foot lever and start sewing. Press the stitch width manual change key's LED lamp is finished, the machine sews reinforcement stitches and stops automatically. 1 Needle drop position 4. Attach monogramming foot "N", then turn on belts, etc. 1. Use the ...default setting (the stitch width manual change key to turn the balance wheel to make a hole in the center of eyelet (actual size) A B C A- Size of the stitching. Small: 5.0 mm (13/64") UTILITY STITCHES MAINTENANCE SEWING CHART PATTERNS (PROGRAMMED IN MACHINE) 47 When sewing is blinking) the large ...
Users Manual - English
Page 55
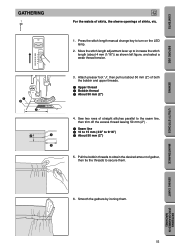
... off the excess thread leaving 50 mm (2") . 1 Seam line 2 10 to 15 mm (3/8" to secure them . UTILITY STITCHES MAINTENANCE SEWING CHART PATTERNS (PROGRAMMED IN MACHINE) 52 Attach presser foot "J", then pull out about 4 mm (1/16")) as shown left figure, and select a weak thread tension. 3....lamp. 2. CONTENTS BEFORE USE SEWING GATHERING 1 1 2 3 J For the waists of skirts, the sleeve openings of both the bobbin and upper threads. 1 Upper thread 2 Bobbin thread 3 About 50 mm (2") 4. Smooth the gathers by ironing them . 6. Press the stitch length manual change key to increase the ...
... off the excess thread leaving 50 mm (2") . 1 Seam line 2 10 to 15 mm (3/8" to secure them . UTILITY STITCHES MAINTENANCE SEWING CHART PATTERNS (PROGRAMMED IN MACHINE) 52 Attach presser foot "J", then pull out about 4 mm (1/16")) as shown left figure, and select a weak thread tension. 3....lamp. 2. CONTENTS BEFORE USE SEWING GATHERING 1 1 2 3 J For the waists of skirts, the sleeve openings of both the bobbin and upper threads. 1 Upper thread 2 Bobbin thread 3 About 50 mm (2") 4. Smooth the gathers by ironing them . 6. Press the stitch length manual change key to increase the ...
Users Manual - English
Page 62
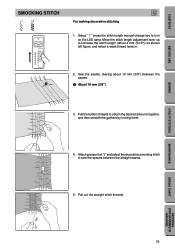
Move the stitch length adjustment lever up to obtain the desired amount of gather, and then smooth the gathers by ironing them. 4. Sew the seams, leaving about 4 mm (3/16")) as shown left figure, and select a weak thread tension. 2. Pull out the straight ...stitch threads. Pull the bobbin threads to increase the stitch length (about 10 mm (3/8'') between the straight seams. J 5. UTILITY STITCHES MAINTENANCE SEWING CHART PATTERNS (PROGRAMMED IN MACHINE) 59 Attach presser foot "J" and select the decorative smocking stitch to turn on the LED lamp. CONTENTS BEFORE USE...
Move the stitch length adjustment lever up to obtain the desired amount of gather, and then smooth the gathers by ironing them. 4. Sew the seams, leaving about 4 mm (3/16")) as shown left figure, and select a weak thread tension. 2. Pull out the straight ...stitch threads. Pull the bobbin threads to increase the stitch length (about 10 mm (3/8'') between the straight seams. J 5. UTILITY STITCHES MAINTENANCE SEWING CHART PATTERNS (PROGRAMMED IN MACHINE) 59 Attach presser foot "J" and select the decorative smocking stitch to turn on the LED lamp. CONTENTS BEFORE USE...
Users Manual - English
Page 65
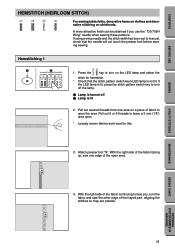
...parallel. Attach presser foot "N". Hemstitching 1 1 2 27 28 29 30 31 32 29 30 1. If the LED lamp is not lit. UTILITY STITCHES MAINTENANCE SEWING CHART PATTERNS (PROGRAMMED IN MACHINE) 62 Pull out 5 or 6 threads to leave a 3 mm (1/8'') area open. * Loosely woven fabrics work best for hemstitch. * Check that the ...3. Pull out several threads from one edge of the open the area. If using a wing needle and the stitch width has been set to manual, check that the stitch pattern switch key's LED lamp is lit, press the stitch pattern switch key to face you use the "130/705H...
...parallel. Attach presser foot "N". Hemstitching 1 1 2 27 28 29 30 31 32 29 30 1. If the LED lamp is not lit. UTILITY STITCHES MAINTENANCE SEWING CHART PATTERNS (PROGRAMMED IN MACHINE) 62 Pull out 5 or 6 threads to leave a 3 mm (1/8'') area open. * Loosely woven fabrics work best for hemstitch. * Check that the ...3. Pull out several threads from one edge of the open the area. If using a wing needle and the stitch width has been set to manual, check that the stitch pattern switch key's LED lamp is lit, press the stitch pattern switch key to face you use the "130/705H...
Users Manual - English
Page 67
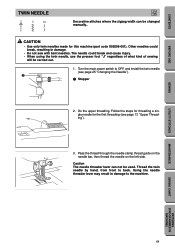
... break and cause injury. • When using the twin needle, use the presser foot "J" regardless of what kind of sewing will be used. Follow the steps for threading a single needle for this machine (part code X59296-001). Turn the main power switch to OFF, and install the twin needle (see page 13... the needle clamp thread guide on the 5 needle bar, then thread the needle on the left side. 6 Caution The needle threader lever can be changed manually.. CONTENTS BEFORE USE SEWING TWIN NEEDLE 2 3 19 J Decorative stitches where the zigzag width can not be carried out. 1.
... break and cause injury. • When using the twin needle, use the presser foot "J" regardless of what kind of sewing will be used. Follow the steps for threading a single needle for this machine (part code X59296-001). Turn the main power switch to OFF, and install the twin needle (see page 13... the needle clamp thread guide on the 5 needle bar, then thread the needle on the left side. 6 Caution The needle threader lever can be changed manually.. CONTENTS BEFORE USE SEWING TWIN NEEDLE 2 3 19 J Decorative stitches where the zigzag width can not be carried out. 1.


