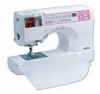

Accessory Catalog
Page 34
...wrapped polyester embroidery thread spools 300 meters (328 yards). This metallic thread can be used on a wide range of colors specifically designed for Brother Embroidery machines, but compatible with a high nap such as a useful and decorative wooden thread rack that no stabilizer remains after the embroidery...-is 4000D, 2500D, 1500D, 1200 series, PC and ULT series machines and the PE-400D and Innov-is best suited for your instruction manual for advice on the wall for greater utility and space saving. Consult your machine. Out metallic thread maintains its color, heat resistance...
...wrapped polyester embroidery thread spools 300 meters (328 yards). This metallic thread can be used on a wide range of colors specifically designed for Brother Embroidery machines, but compatible with a high nap such as a useful and decorative wooden thread rack that no stabilizer remains after the embroidery...-is 4000D, 2500D, 1500D, 1200 series, PC and ULT series machines and the PE-400D and Innov-is best suited for your instruction manual for advice on the wall for greater utility and space saving. Consult your machine. Out metallic thread maintains its color, heat resistance...
Users Manual - English
Page 8
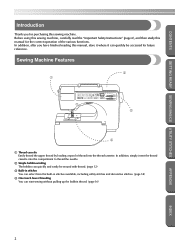
... GETTING READY SEWING BASICS UTILITY STITCHES Introduction Thank you have finished reading this sewing machine. Before using this sewing machine, carefully read the "Important Safety Instructions" (page 6), and then study this manual for purchasing this manual, store it where it can start sewing without pulling up the bobbin thread. (page 16...
... GETTING READY SEWING BASICS UTILITY STITCHES Introduction Thank you have finished reading this sewing machine. Before using this sewing machine, carefully read the "Important Safety Instructions" (page 6), and then study this manual for purchasing this manual, store it where it can start sewing without pulling up the bobbin thread. (page 16...
Users Manual - English
Page 9
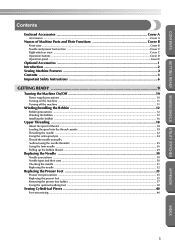
... and presser foot section ...Cover C Right-side/rear view ...Cover C Operation buttons ...Cover D Operation panel ...Cover E Optional Accessories ...1 Introduction ...2 Sewing Machine Features ...2 Contents ...3 Important Safety Instructions 6 GETTING READY 9 Turning the Machine On/Off 10 Power supply precautions ...10 Turning on the machine ...11 Turning off the machine ...11 Winding/Installing the...
... and presser foot section ...Cover C Right-side/rear view ...Cover C Operation buttons ...Cover D Operation panel ...Cover E Optional Accessories ...1 Introduction ...2 Sewing Machine Features ...2 Contents ...3 Important Safety Instructions 6 GETTING READY 9 Turning the Machine On/Off 10 Power supply precautions ...10 Turning on the machine ...11 Turning off the machine ...11 Winding/Installing the...
Users Manual - English
Page 12
..."{" position when making any air openings blocked. Always use bent needles. 13. SAVE THESE INSTRUCTIONS This machine is being used by the manufacturer as a toy. DANGER - Keep fingers away from all instructions before cleaning. Do not use the proper needle plate. Switch the machine to the symbol ...intended for use . 6 APPENDIX INDEX Never drop or insert any adjustments in the needle area, such as described in the instruction manual. 16. If the Light unit is required around the machine needle. 11. CONTENTS GETTING READY SEWING BASICS UTILITY STITCHES Important Safety...
..."{" position when making any air openings blocked. Always use bent needles. 13. SAVE THESE INSTRUCTIONS This machine is being used by the manufacturer as a toy. DANGER - Keep fingers away from all instructions before cleaning. Do not use the proper needle plate. Switch the machine to the symbol ...intended for use . 6 APPENDIX INDEX Never drop or insert any adjustments in the needle area, such as described in the instruction manual. 16. If the Light unit is required around the machine needle. 11. CONTENTS GETTING READY SEWING BASICS UTILITY STITCHES Important Safety...

Users Manual - English
Page 24
... needle may bend or break. Memo ● For details on the size of the spool. CAUTION ● When threading the upper thread, carefully follow the instructions. GETTING READY CONTENTS GETTING READY SEWING BASICS UTILITY STITCHES Upper Threading In this sewing machine, a spool of thread can be loaded into the enclosed thread...
... needle may bend or break. Memo ● For details on the size of the spool. CAUTION ● When threading the upper thread, carefully follow the instructions. GETTING READY CONTENTS GETTING READY SEWING BASICS UTILITY STITCHES Upper Threading In this sewing machine, a spool of thread can be loaded into the enclosed thread...

Users Manual - English
Page 36
...; Never use home sewing machine needles. Bent needles can easily break, possibly resulting in injuries. Refer to sew. Failure to read and carefully follow the instructions below. GETTING READY CONTENTS GETTING READY SEWING BASICS UTILITY STITCHES Replacing the Needle This section provides information on the fabric and thread thickness.
...; Never use home sewing machine needles. Bent needles can easily break, possibly resulting in injuries. Refer to sew. Failure to read and carefully follow the instructions below. GETTING READY CONTENTS GETTING READY SEWING BASICS UTILITY STITCHES Replacing the Needle This section provides information on the fabric and thread thickness.

Users Manual - English
Page 38
... button Turn off the sewing machine, otherwise injuries may be straight according to raise the needle. Press (needle position button) once or 1 twice to the instructions in "Checking the needle". Lower the presser foot lever. 3 1 1 Needle stopper APPENDIX INDEX 1 1 Presser foot lever 32 GETTING READY CONTENTS Replacing the needle Replace the...
... button Turn off the sewing machine, otherwise injuries may be straight according to raise the needle. Press (needle position button) once or 1 twice to the instructions in "Checking the needle". Lower the presser foot lever. 3 1 1 Needle stopper APPENDIX INDEX 1 1 Presser foot lever 32 GETTING READY CONTENTS Replacing the needle Replace the...
Users Manual - English
Page 112
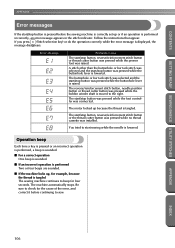
.... The start /stop button was pressed while the foot controller was raised. Be sure to check for four seconds. The machine automatically stops. Follow the instructions that appear. If you press (Stitch selection key) or do the operation correctly while the error message is tangled. The start /stop button, reverse/reinforcement...
.... The start /stop button was pressed while the foot controller was raised. Be sure to check for four seconds. The machine automatically stops. Follow the instructions that appear. If you press (Stitch selection key) or do the operation correctly while the error message is tangled. The start /stop button, reverse/reinforcement...

