Users Manual - English
Page 1
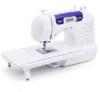
KNOWING YOUR SEWING MACHINE SEWING BASICS UTILITY STITCHES APPENDIX Computerized Sewing Machine Operation Manual
KNOWING YOUR SEWING MACHINE SEWING BASICS UTILITY STITCHES APPENDIX Computerized Sewing Machine Operation Manual
Users Manual - English
Page 2
Always unplug the machine from the electrical outlet immediately after using and before using this machine, basic safety precautions should always be supervised to ensure that they do not play with any opening. 6. Close attention is necessary when the machine is being used or where oxygen is used as described in this manual. 3. Use only accessories recommended by pulling on cord. Return the machine to the nearest authorized dealer or service center for household use as a toy. Do not unplug by the manufacturer as threading needle, changing needle, threading bobbin, or ...
Always unplug the machine from the electrical outlet immediately after using and before using this machine, basic safety precautions should always be supervised to ensure that they do not play with any opening. 6. Close attention is necessary when the machine is being used or where oxygen is used as described in this manual. 3. Use only accessories recommended by pulling on cord. Return the machine to the nearest authorized dealer or service center for household use as a toy. Do not unplug by the manufacturer as threading needle, changing needle, threading bobbin, or ...
Users Manual - English
Page 3
In the event of this equipment, it should be cut off and an appropriate three-pin plug fitted. Always replace the fuse cover, never use a fuse approved by ASTA to the terminal which is coloured brown must be connected to BS 1362, i.e. The wire which is coloured blue must be connected to the terminal which is marked with bared flexible cords is hazardous if engaged in accordance with the following . The wire which is marked with the letter 'L' or coloured red or brown. 1 NOTE The plug served from the main lead must be destroyed as marked on plug. carrying the ...
In the event of this equipment, it should be cut off and an appropriate three-pin plug fitted. Always replace the fuse cover, never use a fuse approved by ASTA to the terminal which is coloured brown must be connected to BS 1362, i.e. The wire which is coloured blue must be connected to the terminal which is marked with bared flexible cords is hazardous if engaged in accordance with the following . The wire which is marked with the letter 'L' or coloured red or brown. 1 NOTE The plug served from the main lead must be destroyed as marked on plug. carrying the ...
Users Manual - English
Page 4
... longer service life 1. If the problem persists, please consult your eye on the foot controller. 4. Be sure to keep your local authorized Brother dealer. Remember to turn off the power switch and unplug the cord when: • Operation is completed • Replacing or removing the ...use • Maintaining the machine • Leaving the machine unattended 3. For additional product information and updates, visit our web site at www.brother.com The contents of this manual and specifications of this machine, avoid direct sunlight and high humidity locations. up lever, needle, or other...
... longer service life 1. If the problem persists, please consult your eye on the foot controller. 4. Be sure to keep your local authorized Brother dealer. Remember to turn off the power switch and unplug the cord when: • Operation is completed • Replacing or removing the ...use • Maintaining the machine • Leaving the machine unattended 3. For additional product information and updates, visit our web site at www.brother.com The contents of this manual and specifications of this machine, avoid direct sunlight and high humidity locations. up lever, needle, or other...
Users Manual - English
Page 5
KNOWING YOUR SEWING MACHINE 5 NAMES OF MACHINE PARTS AND THEIR FUNCTIONS 5 The main parts ...5 Needle and presser foot section ...6 Operation buttons ...6 Operation panel ...7 Flat bed attachment ...7 ACCESSORIES ...8 Optional accessories ...8 USING YOUR SEWING MACHINE 9 Power supply precautions ...9 Power supply ...9 Foot controller ...10 Sewing speed controller (for models equipped with the start/stop button 10 Changing the needle stop position ...10 THREADING THE MACHINE 11 Winding the bobbin ...11 Lower threading ...14 Upper threading ...16 Drawing up the lower thread ...19 REPLACING ...
KNOWING YOUR SEWING MACHINE 5 NAMES OF MACHINE PARTS AND THEIR FUNCTIONS 5 The main parts ...5 Needle and presser foot section ...6 Operation buttons ...6 Operation panel ...7 Flat bed attachment ...7 ACCESSORIES ...8 Optional accessories ...8 USING YOUR SEWING MACHINE 9 Power supply precautions ...9 Power supply ...9 Foot controller ...10 Sewing speed controller (for models equipped with the start/stop button 10 Changing the needle stop position ...10 THREADING THE MACHINE 11 Winding the bobbin ...11 Lower threading ...14 Upper threading ...16 Drawing up the lower thread ...19 REPLACING ...
Users Manual - English
Page 6
3. APPENDIX ...52 STITCH SETTINGS ...52 Utility stitches ...52 MAINTENANCE ...57 Cleaning the machine surface ...57 Cleaning the bobbin case ...57 TROUBLESHOOTING ...59 ERROR MESSAGES ...62 Operation beep (for models equipped with the operation beep 62 INDEX ...63 4 UTILITY STITCHES 32 OVERCASTING STITCHES 32 BASIC STITCHING ...33 Basic stitching ...33 BLIND HEM STITCHING 34 BUTTONHOLE SEWING 35 Button sewing ...38 ZIPPER INSERTION ...40 SEWING STRETCH FABRICS AND ELASTIC TAPE 41 Stretch stitching ...41 Elastic attaching ...41 APPLIQUÉ, PATCHWORK AND QUILT STITCHING 42 Appliqu...
3. APPENDIX ...52 STITCH SETTINGS ...52 Utility stitches ...52 MAINTENANCE ...57 Cleaning the machine surface ...57 Cleaning the bobbin case ...57 TROUBLESHOOTING ...59 ERROR MESSAGES ...62 Operation beep (for models equipped with the operation beep 62 INDEX ...63 4 UTILITY STITCHES 32 OVERCASTING STITCHES 32 BASIC STITCHING ...33 Basic stitching ...33 BLIND HEM STITCHING 34 BUTTONHOLE SEWING 35 Button sewing ...38 ZIPPER INSERTION ...40 SEWING STRETCH FABRICS AND ELASTIC TAPE 41 Stretch stitching ...41 Elastic attaching ...41 APPLIQUÉ, PATCHWORK AND QUILT STITCHING 42 Appliqu...
Users Manual - English
Page 7
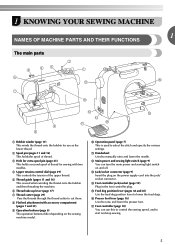
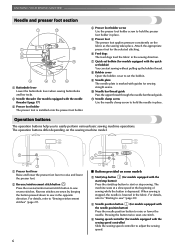
l Main power and sewing light switch (page 9) You can use as the lower thread. q Foot controller (page 10) You can turn the main power and sewing light switch on and off. d Upper tension-control dial (page 29) This controls the tension of thread. o Feed dog position lever (pages 38 and 45) Use the feed dog position lever to manually raise and lower the needle. h Flat bed attachment with two needles. m Jack/socket connector (page 9) Insert the plug on the power supply cord into the jack/ socket connector. b Spool pin (pages 11 and 16) This holds the spool of the upper ...
l Main power and sewing light switch (page 9) You can use as the lower thread. q Foot controller (page 10) You can turn the main power and sewing light switch on and off. d Upper tension-control dial (page 29) This controls the tension of thread. o Feed dog position lever (pages 38 and 45) Use the feed dog position lever to manually raise and lower the needle. h Flat bed attachment with two needles. m Jack/socket connector (page 9) Insert the plug on the power supply cord into the jack/ socket connector. b Spool pin (pages 11 and 16) This holds the spool of the upper ...
Users Manual - English
Page 8
e Presser foot The presser foot applies pressure consistently on the sewing machine model. h Bobbin cover Open the bobbin cover to easily perform various basic sewing machine operations. Operation buttons The operation buttons help you to set bobbin (for the selected stitching. a Presser foot lever Raise and lower the presser foot lever to sew" (page 28). Pressing the button twice sews one stitch. The machine sews at a slow speed at the beginning of sewing while the button is installed onto the presser foot holder. d Needle position button (for models equipped with guides ...
e Presser foot The presser foot applies pressure consistently on the sewing machine model. h Bobbin cover Open the bobbin cover to easily perform various basic sewing machine operations. Operation buttons The operation buttons help you to set bobbin (for the selected stitching. a Presser foot lever Raise and lower the presser foot lever to sew" (page 28). Pressing the button twice sews one stitch. The machine sews at a slow speed at the beginning of sewing while the button is installed onto the presser foot holder. d Needle position button (for models equipped with guides ...
Users Manual - English
Page 9
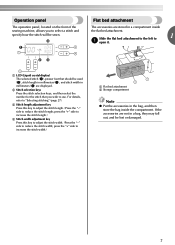
a LCD (Liquid crystal display) The selected stitch (1), presser foot that you to select a stitch and specify how the stitch will be lost or damaged. 7 press the "+" side to increase the stitch length.) d Stitch width adjustment key Press this key to adjust the stitch length. (Press the "-" side to reduce the stitch length; c Stitch length adjustment key Press this key to adjust the stitch width. (Press the "-" side to reduce the stitch width; b Stitch selection keys Press the stitch selection keys, and then select the number for the stitch that should be used (2), stitch length in ...
a LCD (Liquid crystal display) The selected stitch (1), presser foot that you to select a stitch and specify how the stitch will be lost or damaged. 7 press the "+" side to increase the stitch length.) d Stitch width adjustment key Press this key to adjust the stitch length. (Press the "-" side to reduce the stitch length; c Stitch length adjustment key Press this key to adjust the stitch width. (Press the "-" side to reduce the stitch width; b Stitch selection keys Press the stitch selection keys, and then select the number for the stitch that should be used (2), stitch length in ...
Users Manual - English
Page 10
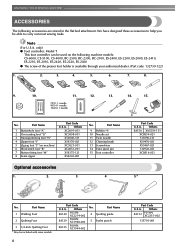
... No. Part Code U.S.A. We have designed these accessories to help you be included with some models. KNOWING YOUR SEWING MACHINE ACCESSORIES The following machine models: CS-6000, CS-5100, CS-4000, BC-2500, BC-2300, BC-2100, ES-2400, ES-2200, ES-2000, ES-2410, ES-2210, ES-2010, ES-2420, ES-2220, ES...
... No. Part Code U.S.A. We have designed these accessories to help you be included with some models. KNOWING YOUR SEWING MACHINE ACCESSORIES The following machine models: CS-6000, CS-5100, CS-4000, BC-2500, BC-2300, BC-2100, ES-2400, ES-2200, ES-2000, ES-2410, ES-2210, ES-2010, ES-2420, ES-2220, ES...
Users Manual - English
Page 11
Fire or electric shock may result. Do not place heavy objects on . a To turn off the sewing machine and unplug the power supply cord. b X The sewing lamp comes on when the machine is being operated, turn off the main power first. Note ● If a power outage occurs while the sewing machine is turned on the cord. If the plug does not fit fully in any way. 9 Do not modify the plug in the outlet, reverse the plug. If the cord or plug is not to install the proper outlet. Otherwise a fire may result. ● Do not touch the plug with many other appliances plugged in to...
Fire or electric shock may result. Do not place heavy objects on . a To turn off the sewing machine and unplug the power supply cord. b X The sewing lamp comes on when the machine is being operated, turn off the main power first. Note ● If a power outage occurs while the sewing machine is turned on the cord. If the plug does not fit fully in any way. 9 Do not modify the plug in the outlet, reverse the plug. If the cord or plug is not to install the proper outlet. Otherwise a fire may result. ● Do not touch the plug with many other appliances plugged in to...
Users Manual - English
Page 12
Instead, the machine can be sure to the lowered position. 10 Turn off the foot controller, the machine will stop position to turn on the sewing machine. Hold down lightly, the machine will increase. When you press harder, the machine's speed will run at a faster speed. When you take your foot off the sewing machine. Memo • Perform the same operation to prevent the machine from accidentally being started. Doing so could cause a fire or an electric shock. Note ● When the foot controller is plugged in the fabric when sewing is stopped. Changing the ...
Instead, the machine can be sure to the lowered position. 10 Turn off the foot controller, the machine will stop position to turn on the sewing machine. Hold down lightly, the machine will increase. When you press harder, the machine's speed will run at a faster speed. When you take your foot off the sewing machine. Memo • Perform the same operation to prevent the machine from accidentally being started. Doing so could cause a fire or an electric shock. Note ● When the foot controller is plugged in the fabric when sewing is stopped. Changing the ...

Users Manual - English
Page 13
Using other models, the machine will not work properly. Actual size 11.5 mm (7/16 inch) This model Other models Pull up the spool pin as far as possible, and a then put a spool of thread on the spool pin. b CAUTION ● If the spool of the bobbin. Turn the bobbin clockwise, by hand, until the spring on the shaft slides into the groove of the bobbin. 1 2 a Spring on the shaft b Groove of the bobbin Turn on c the bobbin from other bobbins may tangle on this sewing machine. Only use the bobbin that have been designed for this pin. If you use bobbins (part code: SA156, ...
Using other models, the machine will not work properly. Actual size 11.5 mm (7/16 inch) This model Other models Pull up the spool pin as far as possible, and a then put a spool of thread on the spool pin. b CAUTION ● If the spool of the bobbin. Turn the bobbin clockwise, by hand, until the spring on the shaft slides into the groove of the bobbin. 1 2 a Spring on the shaft b Groove of the bobbin Turn on c the bobbin from other bobbins may tangle on this sewing machine. Only use the bobbin that have been designed for this pin. If you use bobbins (part code: SA156, ...
Users Manual - English
Page 14
Cut the thread, slide the bobbin winder shaft k to wind the thread around the bobbin a few times. g CAUTION ● Make sure you slide the bobbin winding shaft to loosen, and may tangle around the bobbin, the machine will make a clicking sound; If you do not cut the thread completely, and the bobbin is plugged in, the start/stop button cannot be used to start or stop sewing (only for models equipped with the sewing speed controller). Press the foot controller or press (start/ i stop button) (for models equipped with the start/stop button). When the bobbin seems full and begins...
Cut the thread, slide the bobbin winder shaft k to wind the thread around the bobbin a few times. g CAUTION ● Make sure you slide the bobbin winding shaft to loosen, and may tangle around the bobbin, the machine will make a clicking sound; If you do not cut the thread completely, and the bobbin is plugged in, the start/stop button cannot be used to start or stop sewing (only for models equipped with the sewing speed controller). Press the foot controller or press (start/ i stop button) (for models equipped with the start/stop button). When the bobbin seems full and begins...
Users Manual - English
Page 15
c While holding the thread that the spring on the bobbin winder shaft b so that wraps around the bobbin five or six times. Note ● If the sewing machine is to be operated using the cutter built into the notch in the bobbin or the needle may break the needle. Pull the thread to the right and pass it through 2 of the thread clockwise around the d pre-tension disk with your foot off the foot controller or press (start/stop button) (for models equipped with the start/stop button). If the bobbin is wound without cutting the thread using the foot controller, connect the foot ...
c While holding the thread that the spring on the bobbin winder shaft b so that wraps around the bobbin five or six times. Note ● If the sewing machine is to be operated using the cutter built into the notch in the bobbin or the needle may break the needle. Pull the thread to the right and pass it through 2 of the thread clockwise around the d pre-tension disk with your foot off the foot controller or press (start/stop button) (for models equipped with the start/stop button). If the bobbin is wound without cutting the thread using the foot controller, connect the foot ...

Users Manual - English
Page 16
b 1 2 a Cover b Slide button Put the bobbin in so the thread comes out in the wrong direction, it is not inserted, reinsert the thread. CAUTION ● Winding the bobbin improperly may cause the thread tension to be used , the machine will make a clicking sound; If bobbins from other models are used with this machine. Put the left tab in e place (see page 15. Lower threading Install the bobbin wound with thread. • For more details on quick-set the bobbin so the thread unrolls in injury. 1 2 a Wound evenly b Wound poorly ● The bobbin was designed ...
b 1 2 a Cover b Slide button Put the bobbin in so the thread comes out in the wrong direction, it is not inserted, reinsert the thread. CAUTION ● Winding the bobbin improperly may cause the thread tension to be used , the machine will make a clicking sound; If bobbins from other models are used with this machine. Put the left tab in e place (see page 15. Lower threading Install the bobbin wound with thread. • For more details on quick-set the bobbin so the thread unrolls in injury. 1 2 a Wound evenly b Wound poorly ● The bobbin was designed ...
Users Manual - English
Page 17
If it . Slide the button and open the cover. If you want to draw up the bobbin thread before you start to sew, follow to thread the machine as shown by the line in the diagram). ■ For models equipped with the quick-set the bobbin so the thread unrolls in the right direction. Be sure to the procedure in d place (see arrow a), and then press lightly on the right side (see arrow b) until the cover clicks into place. • Replace the cover so that the end of the thread comes out from the left tab in "Drawing up the bobbin thread. Put the left side of the cover (...
If it . Slide the button and open the cover. If you want to draw up the bobbin thread before you start to sew, follow to thread the machine as shown by the line in the diagram). ■ For models equipped with the quick-set the bobbin so the thread unrolls in the right direction. Be sure to the procedure in d place (see arrow a), and then press lightly on the right side (see arrow b) until the cover clicks into place. • Replace the cover so that the end of the thread comes out from the left tab in "Drawing up the bobbin thread. Put the left side of the cover (...
Users Manual - English
Page 18
Be sure to raise the needle. a Spool pin b Thread guide c Mark on the wheel points up , or press (needle position button) (for models equipped with the needle position button) once or twice to turn the handwheel so that the mark on the needle threader, see page 17. Raise the needle by turning the handwheel b toward you (counterclockwise) so that the mark on the handwheel CAUTION ● Make sure you thread the machine properly. a Presser foot lever or a Mark b Needle position button • If the needle is not correctly raised, the sewing machine can not be threaded. ...
Be sure to raise the needle. a Spool pin b Thread guide c Mark on the wheel points up , or press (needle position button) (for models equipped with the needle position button) once or twice to turn the handwheel so that the mark on the needle threader, see page 17. Raise the needle by turning the handwheel b toward you (counterclockwise) so that the mark on the handwheel CAUTION ● Make sure you thread the machine properly. a Presser foot lever or a Mark b Needle position button • If the needle is not correctly raised, the sewing machine can not be threaded. ...

Users Manual - English
Page 19
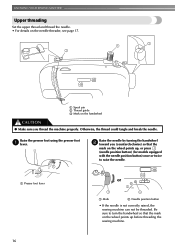
Feed the upper thread as shown in the range of 90/14-100/16. ● You cannot use the needle threader if you are using decorative threads or special needles, such as the twin needle and wing needle. Follow steps 1 through the e thread take-up lever from front to back and pull g out about 5 cm (2 inch) of thread. Lower the presser foot lever. b While lowering the needle threader lever, c hook the thread onto the guide. If you are using those types of threads or needles, thread the eye of the needle by hand. a 5 cm (2 inch) a Needle holder b Needle threader lever c Guide 17 The...
Feed the upper thread as shown in the range of 90/14-100/16. ● You cannot use the needle threader if you are using decorative threads or special needles, such as the twin needle and wing needle. Follow steps 1 through the e thread take-up lever from front to back and pull g out about 5 cm (2 inch) of thread. Lower the presser foot lever. b While lowering the needle threader lever, c hook the thread onto the guide. If you are using those types of threads or needles, thread the eye of the needle by hand. a 5 cm (2 inch) a Needle holder b Needle threader lever c Guide 17 The...
Users Manual - English
Page 20
Catch the thread on the hook as shown below. d Pull out about 5 cm (2 inch) of thread through the eye of the sewing machine. X The end of the needle threader rotates toward you may cause sewing problems. 18 The hook will pull the thread through the needle. a 5 cm (2 inch) Note ● If you incorrectly feed the thread you and the hook passes through g the needle toward the back of the needle. e a Hook b Thread While lightly holding the thread, release the f needle threader lever. KNOWING YOUR SEWING MACHINE Fully lower the needle threader lever.
Catch the thread on the hook as shown below. d Pull out about 5 cm (2 inch) of thread through the eye of the sewing machine. X The end of the needle threader rotates toward you may cause sewing problems. 18 The hook will pull the thread through the needle. a 5 cm (2 inch) Note ● If you incorrectly feed the thread you and the hook passes through g the needle toward the back of the needle. e a Hook b Thread While lightly holding the thread, release the f needle threader lever. KNOWING YOUR SEWING MACHINE Fully lower the needle threader lever.
