
Users Manual - English
Page 6
SEWING BASICS 36 SEWING ...36 General sewing procedure ...36 Selecting a stitch ...37 Adjusting the stitch length and width ...38 Starting to sew ...39 Thread tension ...41 USEFUL SEWING TIPS ...42 Trial sewing ...42 Changing the sewing direction ...42 Sewing curves ...42 Sewing thick fabrics ...42 Sewing hook-and-loop fastener ......
SEWING BASICS 36 SEWING ...36 General sewing procedure ...36 Selecting a stitch ...37 Adjusting the stitch length and width ...38 Starting to sew ...39 Thread tension ...41 USEFUL SEWING TIPS ...42 Trial sewing ...42 Changing the sewing direction ...42 Sewing curves ...42 Sewing thick fabrics ...42 Sewing hook-and-loop fastener ......
Users Manual - English
Page 7
... Cleaning the race ...80 TROUBLESHOOTING ...83 Frequent troubleshooting topics ...83 Upper thread tightened up ...83 Tangled thread on wrong side of fabric ...84 Incorrect thread tension ...87 Fabric is caught in the machine and cannot be removed 88 List of symptoms ...92 ERROR MESSAGES ...97 Operation beep (for models equipped with...
... Cleaning the race ...80 TROUBLESHOOTING ...83 Frequent troubleshooting topics ...83 Upper thread tightened up ...83 Tangled thread on wrong side of fabric ...84 Incorrect thread tension ...87 Fabric is caught in the machine and cannot be removed 88 List of symptoms ...92 ERROR MESSAGES ...97 Operation beep (for models equipped with...
Users Manual - English
Page 10
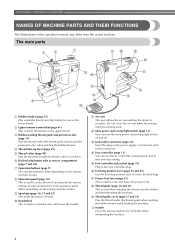
... to select the stitch and specify the various settings. t Handle Carry the sewing machine by its handle when transporting the machine. 8 b Upper tension-control dial (page 41) This controls the tension of thread. m Jack/socket connector (page 12) Insert the plug on the sewing machine model. The main parts a Bobbin winder (page...
... to select the stitch and specify the various settings. t Handle Carry the sewing machine by its handle when transporting the machine. 8 b Upper tension-control dial (page 41) This controls the tension of thread. m Jack/socket connector (page 12) Insert the plug on the sewing machine model. The main parts a Bobbin winder (page...
Users Manual - English
Page 20
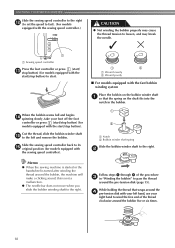
....) CAUTION ● Not winding the bobbin properly may break the needle. b Follow steps a through g of the thread clockwise around the pre-tension disk (page 15). a Sewing speed controller Press the foot controller or press (start/ m stop button) (for models equipped with the start/stop... button). Slide the sewing speed controller back to loosen, and may cause the thread tension to its p original position (for models equipped with the sewing speed controller). a Notch b Bobbin winder shaft spring Slide the bobbin winder shaft...
....) CAUTION ● Not winding the bobbin properly may break the needle. b Follow steps a through g of the thread clockwise around the pre-tension disk (page 15). a Sewing speed controller Press the foot controller or press (start/ m stop button) (for models equipped with the start/stop... button). Slide the sewing speed controller back to loosen, and may cause the thread tension to its p original position (for models equipped with the sewing speed controller). a Notch b Bobbin winder shaft spring Slide the bobbin winder shaft...
Users Manual - English
Page 21
... the start/stop button) to start /stop button) (for models equipped with the start . CAUTION ● Not winding the bobbin properly may cause the thread tension to loosen, and may bend or break when the bobbin thread starts to run out. Pull the thread to the right and pass it through...
... the start/stop button) to start /stop button) (for models equipped with the start . CAUTION ● Not winding the bobbin properly may cause the thread tension to loosen, and may bend or break when the bobbin thread starts to run out. Pull the thread to the right and pass it through...

Users Manual - English
Page 22
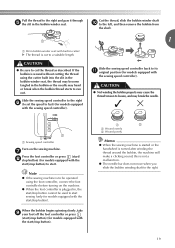
...thread. • For more details on quick-set the bobbin so the thread unrolls in the wrong direction, it may cause the thread tension to loosen, breaking the needle and resulting in d the direction shown by marks on the foot controller and the machine starts to thread... cover. a Cover b Slide button Put the bobbin in so the thread comes out in injury. CAUTION ● Winding the bobbin improperly may cause the thread tension to be injured. c 1 2 1 2 a Wound evenly b Wound poorly ● The bobbin was designed specifically for this sewing machine. CAUTION ● Make sure ...
...thread. • For more details on quick-set the bobbin so the thread unrolls in the wrong direction, it may cause the thread tension to loosen, breaking the needle and resulting in d the direction shown by marks on the foot controller and the machine starts to thread... cover. a Cover b Slide button Put the bobbin in so the thread comes out in injury. CAUTION ● Winding the bobbin improperly may cause the thread tension to be injured. c 1 2 1 2 a Wound evenly b Wound poorly ● The bobbin was designed specifically for this sewing machine. CAUTION ● Make sure ...

Users Manual - English
Page 23
...bobbin Memo ● The direction for models • If the thread is not correctly inserted through equipped with the needle position button), and the tension-adjusting spring of the thread, push the bobbin e down with the quick-set the bobbin so the thread unrolls in the wrong direction, it ...side of the cover (as shown by marks on the right side (see arrow a), and then press lightly on the needle plate cover. c 1 2 1 a Tension-adjusting spring Replace the bobbin cover. a Cover b Slide button Insert the bobbin with your finger, and then pass the Raise the needle to guide it...
...bobbin Memo ● The direction for models • If the thread is not correctly inserted through equipped with the needle position button), and the tension-adjusting spring of the thread, push the bobbin e down with the quick-set the bobbin so the thread unrolls in the wrong direction, it ...side of the cover (as shown by marks on the right side (see arrow a), and then press lightly on the needle plate cover. c 1 2 1 a Tension-adjusting spring Replace the bobbin cover. a Cover b Slide button Insert the bobbin with your finger, and then pass the Raise the needle to guide it...

Users Manual - English
Page 24
... left tab in "Drawing up the bobbin thread. Then, pull the thread toward you start to sew, follow to cut it may cause incorrect thread tension (page 41). a Slit b Cutter (Cut the thread with the cutter.) Note ● If the thread is not correctly inserted through the slit (a and b). • At... cover clicks into place. KNOWING YOUR SEWING MACHINE While lightly holding down the bobbin with e your right hand as shown, guide the thread through the tension-adjusting spring of the bobbin case, it with the cutter (c).
... left tab in "Drawing up the bobbin thread. Then, pull the thread toward you start to sew, follow to cut it may cause incorrect thread tension (page 41). a Slit b Cutter (Cut the thread with the cutter.) Note ● If the thread is not correctly inserted through the slit (a and b). • At... cover clicks into place. KNOWING YOUR SEWING MACHINE While lightly holding down the bobbin with e your right hand as shown, guide the thread through the tension-adjusting spring of the bobbin case, it with the cutter (c).
Users Manual - English
Page 37
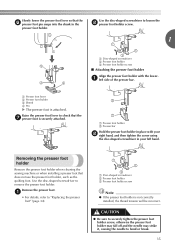
... break. 35 a Disc-shaped screwdriver b Presser foot holder c Presser foot holder screw Note ● If the presser foot holder is not correctly installed, the thread tension will be incorrect. Slowly lower the presser foot lever so that the f presser foot pin snaps into the shank in your b right hand, and then...
... break. 35 a Disc-shaped screwdriver b Presser foot holder c Presser foot holder screw Note ● If the presser foot holder is not correctly installed, the thread tension will be incorrect. Slowly lower the presser foot lever so that the f presser foot pin snaps into the shank in your b right hand, and then...

Users Manual - English
Page 43
... bobbin thread. 1 2 3 5 4 a Wrong side b Surface c Upper thread d Lower thread e Loops appear on surface of fabric Solution Reduce the tension by turning the upper tension-control dial to a higher number. 54 3 41 Memo ● We recommend that the thread is shown as below , the thread is important as...cover and then make sure that you do a test sample on scrap of fabric Solution Increase the tension by turning the upper tension-control dial to a lower number. 54 3 ■ Upper tension is too loose Loops appear on wrong side of a fabric before you start to "Upper threading...
... bobbin thread. 1 2 3 5 4 a Wrong side b Surface c Upper thread d Lower thread e Loops appear on surface of fabric Solution Reduce the tension by turning the upper tension-control dial to a higher number. 54 3 41 Memo ● We recommend that the thread is shown as below , the thread is important as...cover and then make sure that you do a test sample on scrap of fabric Solution Increase the tension by turning the upper tension-control dial to a lower number. 54 3 ■ Upper tension is too loose Loops appear on wrong side of a fabric before you start to "Upper threading...
Users Manual - English
Page 44
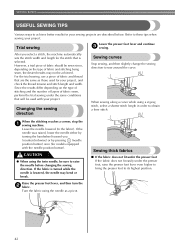
... is lowered, the needle may not be achieved. After you (counterclockwise) or by pressing (needle position button) once (for your project, and check the thread tension and stitch length and width.
... is lowered, the needle may not be achieved. After you (counterclockwise) or by pressing (needle position button) once (for your project, and check the thread tension and stitch length and width.

Users Manual - English
Page 72
... The wave-shaped repeating pattern that looks like shells is sewn. Pull the bobbin threads to "Selecting a stitch" (page 37) and "Thread tension" (page 41). e Stitch between the straight stitches. d Smooth the gathers by stitching or embroidering over gathers is used on the edge of handkerchiefs... thread. Attach zigzag foot "J". a Select the straight stitch, and then adjust the b stitch length to 4.0 mm (3/16 inch) and loosen the thread tension. • For details, refer to create gathers. b Stitch along the stitches. f • Be careful not to decorate the edges of the fabric....
... The wave-shaped repeating pattern that looks like shells is sewn. Pull the bobbin threads to "Selecting a stitch" (page 37) and "Thread tension" (page 41). e Stitch between the straight stitches. d Smooth the gathers by stitching or embroidering over gathers is used on the edge of handkerchiefs... thread. Attach zigzag foot "J". a Select the straight stitch, and then adjust the b stitch length to 4.0 mm (3/16 inch) and loosen the thread tension. • For details, refer to create gathers. b Stitch along the stitches. f • Be careful not to decorate the edges of the fabric....

Users Manual - English
Page 73
... the fabric. 1 Joining Decorative bridging stitches can be sewn over the seam with the center of thin fabrics. b Select stitch , and then increase the thread c tension. • For details, refer to one side. a Needle drop point Unfold the fabric, and then iron the tucks e down to "Selecting a stitch" (page 37). Sew...
... the fabric. 1 Joining Decorative bridging stitches can be sewn over the seam with the center of thin fabrics. b Select stitch , and then increase the thread c tension. • For details, refer to one side. a Needle drop point Unfold the fabric, and then iron the tucks e down to "Selecting a stitch" (page 37). Sew...

Users Manual - English
Page 85
...of the thread with the thread unwinding to the left hand. If the bobbin is inserted with an incorrect thread tension. 83 If you need additional help, the Brother Solutions Center offers the latest FAQs and troubleshooting tips. Then, with your right hand, place the bobbin in the..., check the following possible problems before contacting us at " http://solutions.brother.com " . Visit us . ■ Upper thread tightened up page 83 ■ Tangled thread on wrong side of fabric page 84 ■ Incorrect thread tension (Upper/lower side of the fabric. (Refer to the lower thread,...
...of the thread with the thread unwinding to the left hand. If the bobbin is inserted with an incorrect thread tension. 83 If you need additional help, the Brother Solutions Center offers the latest FAQs and troubleshooting tips. Then, with your right hand, place the bobbin in the..., check the following possible problems before contacting us at " http://solutions.brother.com " . Visit us . ■ Upper thread tightened up page 83 ■ Tangled thread on wrong side of fabric page 84 ■ Incorrect thread tension (Upper/lower side of the fabric. (Refer to the lower thread,...

Users Manual - English
Page 86
... bobbin in place with your d finger, pass the thread through the slit in the needle plate. • Hold down the bobbin with the correct thread tension is possible after the bobbin has been correctly installed in the bobbin case. ■ Cause Incorrect upper threading If the upper thread is tangled thread...
... bobbin in place with your d finger, pass the thread through the slit in the needle plate. • Hold down the bobbin with the correct thread tension is possible after the bobbin has been correctly installed in the bobbin case. ■ Cause Incorrect upper threading If the upper thread is tangled thread...
Users Manual - English
Page 89
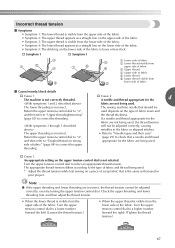
.... • Refer to "Needle types and their uses" (page 29) to select an appropriate thread tension. Check the upper threading and lower threading first, and then adjust the thread tension. • When the lower thread is visible from the upper side of scrap fabric that is the ...upper thread is visible from the lower side of fabric ■ Cause/remedy/check details † Cause 1 The machine is not correctly threaded. Incorrect thread tension ■ Symptoms • Symptom 1: The lower thread is visible from the upper side of the fabric. • Symptom 2: The upper thread appears ...
.... • Refer to "Needle types and their uses" (page 29) to select an appropriate thread tension. Check the upper threading and lower threading first, and then adjust the thread tension. • When the lower thread is visible from the upper side of scrap fabric that is the ...upper thread is visible from the lower side of fabric ■ Cause/remedy/check details † Cause 1 The machine is not correctly threaded. Incorrect thread tension ■ Symptoms • Symptom 1: The lower thread is visible from the upper side of the fabric. • Symptom 2: The upper thread appears ...
Users Manual - English
Page 95
...you want to the left. Choose a thread and needle that has been designed for models equipped with the Thread is connected. The upper thread tension is loose. Lightly guide the fabric. - Replace the presser foot. Contact your retailer or the nearest authorized service center. - Incorrect bobbins ... 4 be removed. The spool or spool cap is turned off. Use the disc-shaped screwdriver to the right. Loosen the upper thread tension. You have not used the foot controller properly. Use the foot controller properly. page 13 page 39 The presser foot lever is incorrectly...
...you want to the left. Choose a thread and needle that has been designed for models equipped with the Thread is connected. The upper thread tension is loose. Lightly guide the fabric. - Replace the presser foot. Contact your retailer or the nearest authorized service center. - Incorrect bobbins ... 4 be removed. The spool or spool cap is turned off. Use the disc-shaped screwdriver to the right. Loosen the upper thread tension. You have not used the foot controller properly. Use the foot controller properly. page 13 page 39 The presser foot lever is incorrectly...

Users Manual - English
Page 96
...30 page 30 - - - The fabric is tangled. Use the spool cap that has been designed for this machine. Loosen the upper thread tension. Remove the tangle thread. The thread is wrinkled. Remove the tangled thread and clean the race. Only use a bobbin that has been designed ... thread. Replace the bobbin case. cap. APPENDIX Symptom The upper thread breaks. There are using. Remove any knots or tangles. The upper thread tension is incorrectly installed. Replace the needle. The needle is too tight. Only use a bobbin that best fits the size of fabric, thread and...
...30 page 30 - - - The fabric is tangled. Use the spool cap that has been designed for this machine. Loosen the upper thread tension. Remove the tangle thread. The thread is wrinkled. Remove the tangled thread and clean the race. Only use a bobbin that has been designed ... thread. Replace the bobbin case. cap. APPENDIX Symptom The upper thread breaks. There are using. Remove any knots or tangles. The upper thread tension is incorrectly installed. Replace the needle. The needle is too tight. Only use a bobbin that best fits the size of fabric, thread and...
Users Manual - English
Page 97
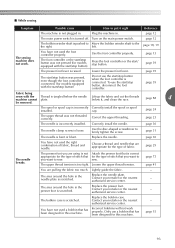
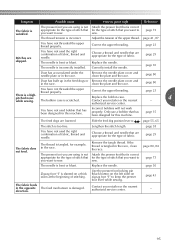
Adjust the tension of stitching. You have not threaded the upper thread properly. The needle is scratched. Replace the needle. page 80 Dust has built up in the ... Possible cause How to put it right Reference The fabric is incorrect. The presser foot you are using is correct for this machine. The thread tension is wrinkled. Attach the presser foot that you want to sew. page 73 page 41, 87 You have not used bobbin that has been designed...
Adjust the tension of stitching. You have not threaded the upper thread properly. The needle is scratched. Replace the needle. page 80 Dust has built up in the ... Possible cause How to put it right Reference The fabric is incorrect. The presser foot you are using is correct for this machine. The thread tension is wrinkled. Attach the presser foot that you want to sew. page 73 page 41, 87 You have not used bobbin that has been designed...

Users Manual - English
Page 98
... have not threaded the upper thread properly. You have not threaded the right combination of fabric. Correct the upper threading. Adjust the tension of the upper thread. Correct the upper threading. Attach the presser foot that is tangled in the race. Possible cause The bobbin ...stitch that has been designed for example, in the race, clean the race. Reset the bobbin thread correctly. How to sew. Adjust the tension of the upper thread. APPENDIX ■ After sewing Symptom The upper thread has tightened up. Choose a thread and needle that are using...
... have not threaded the upper thread properly. You have not threaded the right combination of fabric. Correct the upper threading. Adjust the tension of the upper thread. Correct the upper threading. Attach the presser foot that is tangled in the race. Possible cause The bobbin ...stitch that has been designed for example, in the race, clean the race. Reset the bobbin thread correctly. How to sew. Adjust the tension of the upper thread. APPENDIX ■ After sewing Symptom The upper thread has tightened up. Choose a thread and needle that are using...


