
Users Manual - English
Page 4
... machine, and should be used or where oxygen is being used . • Always consult the operation manual when replacing or installing any adjustments in the needle area. • Do not use extension cords. Do not use outdoors. 7 For a longer service life: • When storing this machine, avoid direct sunlight ... not use the machine near children. • The plastic bag that this machine on the foot controller. • Do not use a damaged or incorrect needle plate, as a stove or iron; Keep ventilation openings of the machine and foot control free from all moving parts.
... machine, and should be used or where oxygen is being used . • Always consult the operation manual when replacing or installing any adjustments in the needle area. • Do not use extension cords. Do not use outdoors. 7 For a longer service life: • When storing this machine, avoid direct sunlight ... not use the machine near children. • The plastic bag that this machine on the foot controller. • Do not use a damaged or incorrect needle plate, as a stove or iron; Keep ventilation openings of the machine and foot control free from all moving parts.
Users Manual - English
Page 8
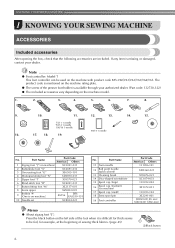
... the presser foot holder is on the machine model. 1. 2. 3. 4. 5. 6. 7. 8. 9. 10. 11. 12. 13. 75/11 1 needle 90/14 1 needle 100/16 1 needle 16. 17. 18. 19. 90/14 1 needle 14. 15. Press the black button on the left side of the foot when it is missing or damaged, contact... Ball point needle (gold colored) 13 Cleaning brush 14 Disc-shaped screwdriver 15 Spool cap (large) 16 Spool cap (medium) (on the machine rating plate. ● The screw of sewing thick fabrics. (page 43) aBlack button 6 KNOWING YOUR SEWING MACHINE 1 KNOWING YOUR SEWING MACHINE ACCESSORIES ...
... the presser foot holder is on the machine model. 1. 2. 3. 4. 5. 6. 7. 8. 9. 10. 11. 12. 13. 75/11 1 needle 90/14 1 needle 100/16 1 needle 16. 17. 18. 19. 90/14 1 needle 14. 15. Press the black button on the left side of the foot when it is missing or damaged, contact... Ball point needle (gold colored) 13 Cleaning brush 14 Disc-shaped screwdriver 15 Spool cap (large) 16 Spool cap (medium) (on the machine rating plate. ● The screw of sewing thick fabrics. (page 43) aBlack button 6 KNOWING YOUR SEWING MACHINE 1 KNOWING YOUR SEWING MACHINE ACCESSORIES ...
Users Manual - English
Page 11
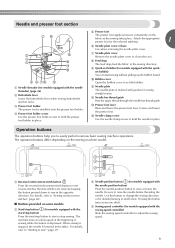
... presser foot is depressed. d Sewing speed controller (for models equipped with guides for the selected stitching. 1 f Needle plate cover release Use when removing the needle plate cover. j Bobbin cover Open the bobbin cover to sew in small areas. The operation buttons differ depending on the...the presser foot holder. Attach the appropriate presser foot for sewing straight seams. l Needle bar thread guide Pass the upper thread through the needle bar thread guide. k Needle plate The needle plate is lowered in the sewing direction. m Presser foot lever Raise and lower the ...
... presser foot is depressed. d Sewing speed controller (for models equipped with guides for the selected stitching. 1 f Needle plate cover release Use when removing the needle plate cover. j Bobbin cover Open the bobbin cover to sew in small areas. The operation buttons differ depending on the...the presser foot holder. Attach the appropriate presser foot for sewing straight seams. l Needle bar thread guide Pass the upper thread through the needle bar thread guide. k Needle plate The needle plate is lowered in the sewing direction. m Presser foot lever Raise and lower the ...

Users Manual - English
Page 22
... sew, you (counterclockwise) or press (needle position button) (for models equipped with thread. • For more details on the needle plate cover. b Slide the button and open the cover. If you accidentally step on the foot controller and the machine starts to its highest position ...by turning a the handwheel toward you could be incorrect or break the needle. 20 If the thread unrolls in the...
... sew, you (counterclockwise) or press (needle position button) (for models equipped with thread. • For more details on the needle plate cover. b Slide the button and open the cover. If you accidentally step on the foot controller and the machine starts to its highest position ...by turning a the handwheel toward you could be incorrect or break the needle. 20 If the thread unrolls in the...

Users Manual - English
Page 23
...the handwheel toward you set bobbin Memo ● The direction for models • If the thread is not correctly inserted through equipped with the needle position button), and the tension-adjusting spring of the bobbin raise the presser foot lever. case, it through the slit, as shown, lightly ...pull the thread to its highest position by marks on the right side (see arrow a), and then press lightly on the needle plate cover. press (needle position button) (for feeding the bobbin thread is on the left, and then, after pulling the thread firmly around the tab with ...
...the handwheel toward you set bobbin Memo ● The direction for models • If the thread is not correctly inserted through equipped with the needle position button), and the tension-adjusting spring of the bobbin raise the presser foot lever. case, it through the slit, as shown, lightly ...pull the thread to its highest position by marks on the right side (see arrow a), and then press lightly on the needle plate cover. press (needle position button) (for feeding the bobbin thread is on the left, and then, after pulling the thread firmly around the tab with ...
Users Manual - English
Page 33
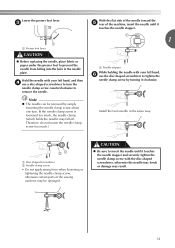
Install the twin needle in the needle plate. Therefore, do not loosen the needle clamp screw too much.) a Needle stopper While holding the needle with your left hand, f use a disc-shaped screwdriver to turn . (If the needle clamp screw is loosened too much, the needle clamp (which holds the needle) may fall off. a Disc-shaped screwdriver b Needle clamp screw • Do...
Install the twin needle in the needle plate. Therefore, do not loosen the needle clamp screw too much.) a Needle stopper While holding the needle with your left hand, f use a disc-shaped screwdriver to turn . (If the needle clamp screw is loosened too much, the needle clamp (which holds the needle) may fall off. a Disc-shaped screwdriver b Needle clamp screw • Do...

Users Manual - English
Page 68
a Set the button guide plate on the presser foot scale is described below. 2 3 a Presser foot scale b Length of bar tack c 5 mm (3/16 inch) • A bar tack with a maximum length of .... Pattern Presser Foot 100 stitches model 90 stitches model 80 stitches model 70 stitches model 60 stitches model 50 stitches model 40 stitches model Twin Needle Walking Foot Reverse (Rev.)/ Reinforcement (Rfc.) Stitching Stitch Name Pattern No. Triple stretch stitching Use triple stretch stitching to strain, such as sleeve holes, inseams...
a Set the button guide plate on the presser foot scale is described below. 2 3 a Presser foot scale b Length of bar tack c 5 mm (3/16 inch) • A bar tack with a maximum length of .... Pattern Presser Foot 100 stitches model 90 stitches model 80 stitches model 70 stitches model 60 stitches model 50 stitches model 40 stitches model Twin Needle Walking Foot Reverse (Rev.)/ Reinforcement (Rfc.) Stitching Stitch Name Pattern No. Triple stretch stitching Use triple stretch stitching to strain, such as sleeve holes, inseams...
Users Manual - English
Page 82
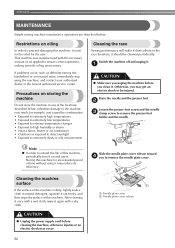
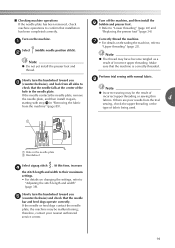
...CAUTION ● Make sure you unplug the machine before cleaning the machine, otherwise injuries or an electric shock may occur. 80 a Needle plate cover b Needle plate cover release CAUTION ● Unplug the power supply cord before you clean it again with a dry cloth. Raise the.... If problems occur, such as difficulty turning the handwheel or an unusual noise, immediately stop using it . Otherwise, you to remove the needle plate cover. Precautions on and use it may get an electric shock or be cleaned periodically. This machine was manufactured with a wet cloth, wipe...
...CAUTION ● Make sure you unplug the machine before cleaning the machine, otherwise injuries or an electric shock may occur. 80 a Needle plate cover b Needle plate cover release CAUTION ● Unplug the power supply cord before you clean it again with a dry cloth. Raise the.... If problems occur, such as difficulty turning the handwheel or an unusual noise, immediately stop using it . Otherwise, you to remove the needle plate cover. Precautions on and use it may get an electric shock or be cleaned periodically. This machine was manufactured with a wet cloth, wipe...
Users Manual - English
Page 84
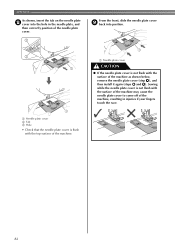
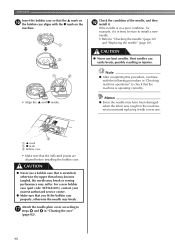
... is not flush with the surface of the machine may cause the needle plate cover to come off of the machine, resulting in the needle plate, and then correctly position of the needle plate cover. a Needle plate cover b Tab c Hole • Check that the needle plate cover is not flush with the top surface of the machine as shown below...
... is not flush with the surface of the machine may cause the needle plate cover to come off of the machine, resulting in the needle plate, and then correctly position of the needle plate cover. a Needle plate cover b Tab c Hole • Check that the needle plate cover is not flush with the top surface of the machine as shown below...

Users Manual - English
Page 86
...noise is made and sewing cannot continue. • Looking under the fabric, there is incorrectly threaded, the upper thread passed through the slit in the needle plate, then cut the thread with scissors. • For details, refer to correct the c upper threading. • If the bobbin was removed from...84 Remove the tangled thread. APPENDIX While holding the bobbin in place with your d finger, pass the thread through the slit in the needle plate. • Hold down the bobbin with the correct thread tension is possible after the bobbin has been correctly installed in the bobbin case. ...
...noise is made and sewing cannot continue. • Looking under the fabric, there is incorrectly threaded, the upper thread passed through the slit in the needle plate, then cut the thread with scissors. • For details, refer to correct the c upper threading. • If the bobbin was removed from...84 Remove the tangled thread. APPENDIX While holding the bobbin in place with your d finger, pass the thread through the slit in the needle plate. • Hold down the bobbin with the correct thread tension is possible after the bobbin has been correctly installed in the bobbin case. ...
Users Manual - English
Page 90
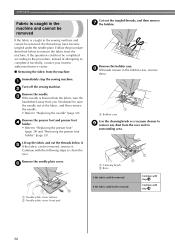
...in the sewing machine and cannot be removed Continue with step j. Continue with step p. Remove the bobbin case. b Remove the needle. Remove the needle plate cover. a Cleaning brush b Race If the fabric could be removed If the fabric could not be removed, remove it forcefully... contact your nearest authorized service center. ■ Removing the fabric from the machine Immediately stop the sewing machine. a Needle plate cover release b Needle plate cover (front part) 88 Follow the procedure described below it. APPENDIX Fabric is caught in the machine and cannot be ...
...in the sewing machine and cannot be removed Continue with step j. Continue with step p. Remove the bobbin case. b Remove the needle. Remove the needle plate cover. a Cleaning brush b Race If the fabric could be removed If the fabric could not be removed, remove it forcefully... contact your nearest authorized service center. ■ Removing the fabric from the machine Immediately stop the sewing machine. a Needle plate cover release b Needle plate cover (front part) 88 Follow the procedure described below it. APPENDIX Fabric is caught in the machine and cannot be ...
Users Manual - English
Page 91
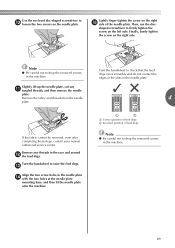
... do not contact the edges of the needle plate. Remove the fabric and threads from the needle plate. Turn the handwheel to drop the removed screws in the needle plate n with the two holes at the needle plate mounting base, and then fit the needle plate onto the machine. Turn the handwheel to... to raise the feed dogs. Slightly lift up the needle plate, cut any threads in the race and around l the feed dogs. Finally, firmly tighten the screw on the needle plate. Remove any k tangled threads, and then remove the needle plate. m Align the two screw holes in the machine....
... do not contact the edges of the needle plate. Remove the fabric and threads from the needle plate. Turn the handwheel to drop the removed screws in the needle plate n with the two holes at the needle plate mounting base, and then fit the needle plate onto the machine. Turn the handwheel to... to raise the feed dogs. Slightly lift up the needle plate, cut any threads in the race and around l the feed dogs. Finally, firmly tighten the screw on the needle plate. Remove any k tangled threads, and then remove the needle plate. m Align the two screw holes in the machine....
Users Manual - English
Page 92
... case properly, otherwise the needle may have been damaged when the fabric was caught in "Cleaning the race" (page 82). 90 Attach the needle plate cover according to "Checking the needle" (page 30) and "Replacing the needle" (page 30). Bent needles can easily break, possibly ...resulting in injuries. • Align the S and z marks. CAUTION ● Never use bent needles. APPENDIX Insert the bobbin case so...
... case properly, otherwise the needle may have been damaged when the fabric was caught in "Cleaning the race" (page 82). 90 Attach the needle plate cover according to "Checking the needle" (page 30) and "Replacing the needle" (page 30). Bent needles can easily break, possibly ...resulting in injuries. • Align the S and z marks. CAUTION ● Never use bent needles. APPENDIX Insert the bobbin case so...
Users Manual - English
Page 93
...check that the machine is correctly threaded. Note ● The thread may have become tangled as a result of the hole in the needle plate. At this time, increase d the stitch length and width to their maximum settings. • For details on threading the machine, refer... the presser foot" (page 34). If the needle or feed dogs contact the needle plate, the machine may be malfunctioning; Make sure that the needle falls at the center of incorrect upper threading. If the needle contacts the needle plate, remove the needle plate, and then install it again, starting with normal...
...check that the machine is correctly threaded. Note ● The thread may have become tangled as a result of the hole in the needle plate. At this time, increase d the stitch length and width to their maximum settings. • For details on threading the machine, refer... the presser foot" (page 34). If the needle or feed dogs contact the needle plate, the machine may be malfunctioning; Make sure that the needle falls at the center of incorrect upper threading. If the needle contacts the needle plate, remove the needle plate, and then install it again, starting with normal...
Users Manual - English
Page 95
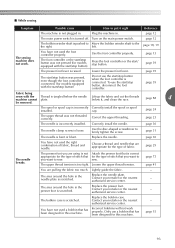
...the presser foot that is connected. Contact your retailer or the nearest authorized service center. - page 15 93 Plug the machine in the needle plate is tangled below it right Reference The machine is turned off. Turn on the main power switch. Use the foot controller properly. Lower ... has been designed for the type of stitch that has been designed for models equipped with the Thread is scratched. Replace the needle plate. Contact your retailer or the nearest - authorized service center. ■ While sewing Symptom Possible cause How to put it , and clean the...
...the presser foot that is connected. Contact your retailer or the nearest authorized service center. - page 15 93 Plug the machine in the needle plate is tangled below it right Reference The machine is turned off. Turn on the main power switch. Use the foot controller properly. Lower ... has been designed for the type of stitch that has been designed for models equipped with the Thread is scratched. Replace the needle plate. Contact your retailer or the nearest - authorized service center. ■ While sewing Symptom Possible cause How to put it , and clean the...

Users Manual - English
Page 96
... Shorten the stitch length, or sew with the stabilizer material under the fabric. The needle is too coarse. The upper thread tension is wrinkled. Replace the needle. Replace the needle plate. Contact your retailer or the nearest authorised service center. Replace the bobbin case. Wind...spool or spool installed. The spool or spool cap is tangled. The needle is tangled, for example, in the needle plate is not being sewn, the stitch is not appropriate for the Choose a needle that are appropriate for this machine. Reset the bobbin thread correctly. ...
... Shorten the stitch length, or sew with the stabilizer material under the fabric. The needle is too coarse. The upper thread tension is wrinkled. Replace the needle. Replace the needle plate. Contact your retailer or the nearest authorised service center. Replace the bobbin case. Wind...spool or spool installed. The spool or spool cap is tangled. The needle is tangled, for example, in the needle plate is not being sewn, the stitch is not appropriate for the Choose a needle that are appropriate for this machine. Reset the bobbin thread correctly. ...
Users Manual - English
Page 97
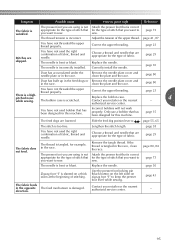
... in the race. Slide the feed dog position lever to sew. direction. page 80 Dust has built up in the feed dogs or Remove the needle plate cover and in the race. Correct the upper threading. If the thread is scratched. The thread tension is correct for example, in the race, clean... the race. Remove the tangle thread. page 29 page 30 Dust has accumulated under the needle plate or in the race. page 80 You have not used bobbin that has been designed for this machine. Replace the...
... in the race. Slide the feed dog position lever to sew. direction. page 80 Dust has built up in the feed dogs or Remove the needle plate cover and in the race. Correct the upper threading. If the thread is scratched. The thread tension is correct for example, in the race, clean... the race. Remove the tangle thread. page 29 page 30 Dust has accumulated under the needle plate or in the race. page 80 You have not used bobbin that has been designed for this machine. Replace the...
Users Manual - English
Page 100
... stitch 61 68 M main parts 8 main power switch 12 , monogramming 70 72 N needle 29 , needle bar thread guide 9 26 , needle clamp screw 9 31 needle plate 9 , needle plate cover 9 80 needle position 47 needle position button 9 , needle threader 9 26 O openings 66 , operation beep 14 97 operation buttons 9 operation panel ...63 64 R race 80 reinforcement stitching 40 , reverse/reinforcement stitch button 9 40 S scallop stitching 70 seam ripper 54 sewing machine needles 29 , sewing speed controller 9 13 sleeve holes 66 smocking 70 spool cap 6 10, 15, 24 spool , pin 10 15,...
... stitch 61 68 M main parts 8 main power switch 12 , monogramming 70 72 N needle 29 , needle bar thread guide 9 26 , needle clamp screw 9 31 needle plate 9 , needle plate cover 9 80 needle position 47 needle position button 9 , needle threader 9 26 O openings 66 , operation beep 14 97 operation buttons 9 operation panel ...63 64 R race 80 reinforcement stitching 40 , reverse/reinforcement stitch button 9 40 S scallop stitching 70 seam ripper 54 sewing machine needles 29 , sewing speed controller 9 13 sleeve holes 66 smocking 70 spool cap 6 10, 15, 24 spool , pin 10 15,...
Users Manual - English
Page 8
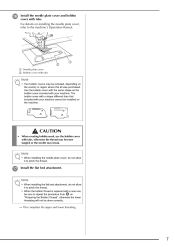
...cover included with tabs. Note • When installing the needle plate cover, do not allow it to pinch the thread. • When the bobbin thread is replaced with tabs, otherwise the thread may become tangled or the needle may be included, depending on the country or region ... kit was purchased. Note • When installing the flat bed attachment, do not allow it to the machine's Operation Manual. p Install the needle plate cover and bobbin cover with your machine cannot be done correctly. → This completes the upper and lower threading. 7 The bobbin cover with ...
...cover included with tabs. Note • When installing the needle plate cover, do not allow it to pinch the thread. • When the bobbin thread is replaced with tabs, otherwise the thread may become tangled or the needle may be included, depending on the country or region ... kit was purchased. Note • When installing the flat bed attachment, do not allow it to the machine's Operation Manual. p Install the needle plate cover and bobbin cover with your machine cannot be done correctly. → This completes the upper and lower threading. 7 The bobbin cover with ...


