
Users Manual - English
Page 1
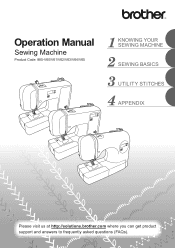
Operation Manual Sewing Machine Product Code: 885-V60/V61/V62/V63/V64/V65 KNOWING YOUR SEWING MACHINE SEWING BASICS UTILITY STITCHES APPENDIX Please visit us at http://solutions.brother.com where you can get product support and answers to frequently asked questions (FAQs).
Operation Manual Sewing Machine Product Code: 885-V60/V61/V62/V63/V64/V65 KNOWING YOUR SEWING MACHINE SEWING BASICS UTILITY STITCHES APPENDIX Please visit us at http://solutions.brother.com where you can get product support and answers to frequently asked questions (FAQs).
Users Manual - English
Page 4
..., such as it could cause the needle to break. • Do not push or pull the fabric when sewing, and follow careful instruction when freehand stitching so that you do not deflect the needle and cause it off when making any opening. • Do not operate where aerosol (spray) products are...
..., such as it could cause the needle to break. • Do not push or pull the fabric when sewing, and follow careful instruction when freehand stitching so that you do not deflect the needle and cause it off when making any opening. • Do not operate where aerosol (spray) products are...
Users Manual - English
Page 6
... FOOT 34 Replacing the presser foot ...34 Removing the presser foot holder ...35 2. SEWING BASICS 36 SEWING ...36 General sewing procedure ...36 Selecting a stitch ...37 Adjusting the stitch length and width ...38 Starting to sew ...39 Thread tension ...41 USEFUL SEWING TIPS ...42 Trial sewing ...42 Changing the sewing direction ...42 Sewing...
... FOOT 34 Replacing the presser foot ...34 Removing the presser foot holder ...35 2. SEWING BASICS 36 SEWING ...36 General sewing procedure ...36 Selecting a stitch ...37 Adjusting the stitch length and width ...38 Starting to sew ...39 Thread tension ...41 USEFUL SEWING TIPS ...42 Trial sewing ...42 Changing the sewing direction ...42 Sewing...
Users Manual - English
Page 7
... ERROR MESSAGES ...97 Operation beep (for models equipped with the operation beep 97 INDEX ...98 5 3. UTILITY STITCHES 45 OVERCASTING STITCHES 45 Using zigzag foot ...45 Using overcasting foot ...46 BASIC STITCHING ...47 Basic stitching ...47 BLIND HEM STITCHING 48 BUTTONHOLE SEWING 51 Button sewing ...55 ZIPPER INSERTION ...57 SEWING STRETCH FABRICS AND ELASTIC TAPE 59...
... ERROR MESSAGES ...97 Operation beep (for models equipped with the operation beep 97 INDEX ...98 5 3. UTILITY STITCHES 45 OVERCASTING STITCHES 45 Using zigzag foot ...45 Using overcasting foot ...46 BASIC STITCHING ...47 Basic stitching ...47 BLIND HEM STITCHING 48 BUTTONHOLE SEWING 51 Button sewing ...55 ZIPPER INSERTION ...57 SEWING STRETCH FABRICS AND ELASTIC TAPE 59...
Users Manual - English
Page 8
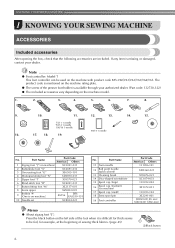
... included accessories vary depending on machine) XC3021-031 2 Buttonhole foot "A" XC2691-033 3 Overcasting foot "G" XE6305-101 4 Monogramming foot "N" XD0810-031 5 Zipper foot "I" X59370-021 6 Blind stitch foot "R" XC4051-031 7 Button fitting foot "M" XE2137-001 8 Seam ripper XZ5082-001 9 Bobbin (4) (One is available through your dealer. The product code is mentioned on...
... included accessories vary depending on machine) XC3021-031 2 Buttonhole foot "A" XC2691-033 3 Overcasting foot "G" XE6305-101 4 Monogramming foot "N" XD0810-031 5 Zipper foot "I" X59370-021 6 Blind stitch foot "R" XC4051-031 7 Button fitting foot "M" XE2137-001 8 Seam ripper XZ5082-001 9 Bobbin (4) (One is available through your dealer. The product code is mentioned on...
Users Manual - English
Page 10
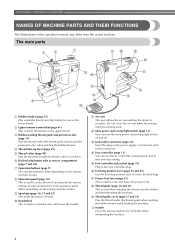
... onto the bobbin for use this operation manual may differ from the actual machine. q Presser foot lever (page 23) This is used to select the stitch and specify the various settings. m Jack/socket connector (page 12) Insert the plug on the sewing machine model. h Operation panel (page 10) This is used...
... onto the bobbin for use this operation manual may differ from the actual machine. q Presser foot lever (page 23) This is used to select the stitch and specify the various settings. m Jack/socket connector (page 12) Insert the plug on the sewing machine model. h Operation panel (page 10) This is used...
Users Manual - English
Page 11
...adjust the sewing speed. 9 The operation buttons differ depending on the fabric as the sewing takes place. Pressing the button twice sews one stitch. i Quick-set bobbin) You can start sewing without pulling up the bobbin thread. set bobbin (for sewing straight seams. l Needle bar... (for models equipped with the sewing speed controller) Slide the sewing speed controller to set the bobbin. a Needle threader (for the selected stitching. 1 f Needle plate cover release Use when removing the needle plate cover. Operation buttons The operation buttons help you to raise and lower the...
...adjust the sewing speed. 9 The operation buttons differ depending on the fabric as the sewing takes place. Pressing the button twice sews one stitch. i Quick-set bobbin) You can start sewing without pulling up the bobbin thread. set bobbin (for sewing straight seams. l Needle bar... (for models equipped with the sewing speed controller) Slide the sewing speed controller to set the bobbin. a Needle threader (for the selected stitching. 1 f Needle plate cover release Use when removing the needle plate cover. Operation buttons The operation buttons help you to raise and lower the...

Users Manual - English
Page 12
...may bend or break. ■ Storing the spool cap The enclosed spool cap (large, medium, small) can be used (2), the stitch length (mm) (3), and the stitch width (mm) (4) are displayed here. KNOWING YOUR SEWING MACHINE Operation panel The operation panel, located on the spool pin lever with ... toward the spool pin. This manual shows, as shown in the illustration. press the "+" side to increase the stitch length.) d Stitch width adjustment key Press this key to adjust the stitch length. (Press the "-" side to raise the spool pin. a LCD (liquid crystal display) The number of ...
...may bend or break. ■ Storing the spool cap The enclosed spool cap (large, medium, small) can be used (2), the stitch length (mm) (3), and the stitch width (mm) (4) are displayed here. KNOWING YOUR SEWING MACHINE Operation panel The operation panel, located on the spool pin lever with ... toward the spool pin. This manual shows, as shown in the illustration. press the "+" side to increase the stitch length.) d Stitch width adjustment key Press this key to adjust the stitch length. (Press the "-" side to raise the spool pin. a LCD (liquid crystal display) The number of ...
Users Manual - English
Page 15
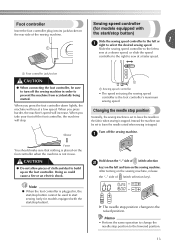
... the desired sewing speed. Foot controller Insert the foot controller plug into its jack/socket on the sewing machine, release the "-" side of (stitch selection key). Sewing speed controller (for models equipped with the start /stop position Normally, the sewing machine is placed on the sewing machine.... ● When the foot controller is stopped. Doing so could cause a fire or an electric shock. CAUTION ● Do not allow pieces of (stitch selection b key) on the left or 1 a right to the lowered position. 13 Instead, the machine can be used to start sewing (only for...
... the desired sewing speed. Foot controller Insert the foot controller plug into its jack/socket on the sewing machine, release the "-" side of (stitch selection key). Sewing speed controller (for models equipped with the start /stop position Normally, the sewing machine is placed on the sewing machine.... ● When the foot controller is stopped. Doing so could cause a fire or an electric shock. CAUTION ● Do not allow pieces of (stitch selection b key) on the left or 1 a right to the lowered position. 13 Instead, the machine can be used to start sewing (only for...

Users Manual - English
Page 16
... same operation to change the initial needle position to beep each time a key is turned on the sewing machine, release the "-" side of (stitch selection key). Memo ● The specified initial needle position is maintained even after the machine is automatically selected when it will not beep. The ...machine can be set to the left and turn on the sewing machine, release the "+" side of (stitch width adjustment key). a Cancelling the operation beep (for models equipped with the operation beep) When the sewing machine is purchased, it is set...
... same operation to change the initial needle position to beep each time a key is turned on the sewing machine, release the "-" side of (stitch selection key). Memo ● The specified initial needle position is maintained even after the machine is automatically selected when it will not beep. The ...machine can be set to the left and turn on the sewing machine, release the "+" side of (stitch width adjustment key). a Cancelling the operation beep (for models equipped with the operation beep) When the sewing machine is purchased, it is set...

Users Manual - English
Page 31
... fabrics Thin fabrics Broadcloth Taffeta Flannel, Gabardine Lawn Georgette Challis, Satin Thick fabrics Stretch fabrics Denim Corduroy Tweed Jersey Tricot Easily frayed fabrics For top-stitching Thread Type Cotton thread Synthetic thread Silk thread Cotton thread Synthetic thread Silk thread Cotton thread Synthetic thread Silk thread Thread for the fabric that...
... fabrics Thin fabrics Broadcloth Taffeta Flannel, Gabardine Lawn Georgette Challis, Satin Thick fabrics Stretch fabrics Denim Corduroy Tweed Jersey Tricot Easily frayed fabrics For top-stitching Thread Type Cotton thread Synthetic thread Silk thread Cotton thread Synthetic thread Silk thread Cotton thread Synthetic thread Silk thread Thread for the fabric that...
Users Manual - English
Page 32
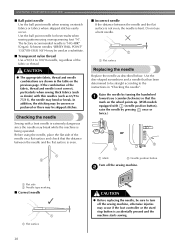
...(such as a substitute. ■ Transparent nylon thread Use a 90/14 to the instructions in the table on stretch fabrics or fabrics where skipped stitches easily occur. Raise the needle by pressing once or twice.) or 1 2 a Mark b Needle position button Turn off the sewing machine, otherwise .... b a Flat side b Needle type marking ■ Correct needle 1 a Flat surface 30 CAUTION ● Before replacing the needle, be skipped stitches. Use the ball point needle for best results when sewing patterns using the needle, place the flat side of the fabric or thread. CAUTION ●...
...(such as a substitute. ■ Transparent nylon thread Use a 90/14 to the instructions in the table on stretch fabrics or fabrics where skipped stitches easily occur. Raise the needle by pressing once or twice.) or 1 2 a Mark b Needle position button Turn off the sewing machine, otherwise .... b a Flat side b Needle type marking ■ Correct needle 1 a Flat surface 30 CAUTION ● Before replacing the needle, be skipped stitches. Use the ball point needle for best results when sewing patterns using the needle, place the flat side of the fabric or thread. CAUTION ●...
Users Manual - English
Page 34
Other needles could break and injure you can not use the same color or two different colors of thread for making decorative stitches. The needle could break, and damage the machine. ● Do not sew with bent needles. Using the needle threader may damage the machine. ●... the upper thread for the left needle with the c upper thread. You can be damaged. a • For details on the stitches that the thread winds off from the front to "STITCH SETTINGS" (page 73). b • For details, refer to steps a through the eye of the needle from the front of the...
Other needles could break and injure you can not use the same color or two different colors of thread for making decorative stitches. The needle could break, and damage the machine. ● Do not sew with bent needles. Using the needle threader may damage the machine. ●... the upper thread for the left needle with the c upper thread. You can be damaged. a • For details on the stitches that the thread winds off from the front to "STITCH SETTINGS" (page 73). b • For details, refer to steps a through the eye of the needle from the front of the...
Users Manual - English
Page 35
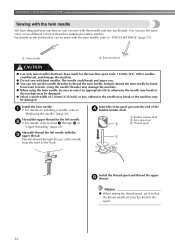
... the right needle. For details on changing the presser foot, refer to each other. Attach zigzag foot "J". h • For details on adjusting the stitch length, refer to attach zigzag foot "J", otherwise the needle may break or the machine may be damaged. Start sewing. Using the needle threader may bend... or break. i Note ● When using the twin needle, be sure to "Adjusting the stitch length and width" (page 38). Pass the thread through the eye of thread and fabric that the upper thread for the right side in the...
... the right needle. For details on changing the presser foot, refer to each other. Attach zigzag foot "J". h • For details on adjusting the stitch length, refer to attach zigzag foot "J", otherwise the needle may break or the machine may be damaged. Start sewing. Using the needle threader may bend... or break. i Note ● When using the twin needle, be sure to "Adjusting the stitch length and width" (page 38). Pass the thread through the eye of thread and fabric that the upper thread for the right side in the...
Users Manual - English
Page 36
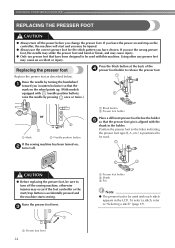
... different presser foot below . Position the presser foot so the letter indicating the presser foot type (J, A, etc.) is aligned with each stitch appears in the holder. To select a stitch, refer to release the presser foot. Replacing the presser foot Press the black button at the back of the d presser foot holder... the needle may strike the presser foot and bend or break, and may cause injury. ● Only use the correct presser foot for the stitch pattern you change the presser foot. Using other any presser feet may occur if the foot controller or the start and you may be read...
... different presser foot below . Position the presser foot so the letter indicating the presser foot type (J, A, etc.) is aligned with each stitch appears in the holder. To select a stitch, refer to release the presser foot. Replacing the presser foot Press the black button at the back of the d presser foot holder... the needle may strike the presser foot and bend or break, and may cause injury. ● Only use the correct presser foot for the stitch pattern you change the presser foot. Using other any presser feet may occur if the foot controller or the start and you may be read...
Users Manual - English
Page 38
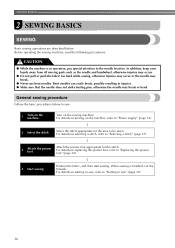
... break or bend. For details on turning on starting to sew, refer to "Starting to "Power supply" (page 12). ↓ 2 Select the stitch. For details on the machine, refer to sew" (page 39). 36 Before operating the sewing machine, read the following precautions. Attach the presser foot... BASICS 2 SEWING BASICS SEWING Basic sewing operations are described below to sew. 1 Turn on replacing the presser foot, refer to "Selecting a stitch" (page 37). ↓ 3 Attach the presser foot. CAUTION ● While the machine is finished, cut the threads. Turn on selecting...
... break or bend. For details on turning on starting to sew, refer to "Starting to "Power supply" (page 12). ↓ 2 Select the stitch. For details on the machine, refer to sew" (page 39). 36 Before operating the sewing machine, read the following precautions. Attach the presser foot... BASICS 2 SEWING BASICS SEWING Basic sewing operations are described below to sew. 1 Turn on replacing the presser foot, refer to "Selecting a stitch" (page 37). ↓ 3 Attach the presser foot. CAUTION ● While the machine is finished, cut the threads. Turn on selecting...
Users Manual - English
Page 39
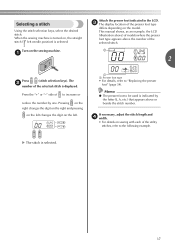
... keys). a Presser foot type • For details, refer to the following example. If necessary, adjust the stitch length and d width. • For details on , the straight stitch ( left . X The stitch is displayed. Pressing on the right changes the digit on the right and pressing on the left changes the digit on ...the left needle position) is turned on sewing with each of the selected stitch. When the sewing machine is selected. Turn on the model. This manual shows, as an example, the LCD (illustration above) of the selected...
... keys). a Presser foot type • For details, refer to the following example. If necessary, adjust the stitch length and d width. • For details on , the straight stitch ( left . X The stitch is displayed. Pressing on the right changes the digit on the right and pressing on the left changes the digit on ...the left needle position) is turned on sewing with each of the selected stitch. When the sewing machine is selected. Turn on the model. This manual shows, as an example, the LCD (illustration above) of the selected...

Users Manual - English
Page 40
... with on the left, select "0". Note ● When the stitch length or stitch width is reset back to select stitch 04. a With on the right, select "4", and with the stitches bunched together may bend or break. ● If the stitches are bunched together, increase the stitch length. a Stitch width b Stitch width adjustment key c Narrow d Wide Press the "+" or...
... with on the left, select "0". Note ● When the stitch length or stitch width is reset back to select stitch 04. a With on the right, select "4", and with the stitches bunched together may bend or break. ● If the stitches are bunched together, increase the stitch length. a Stitch width b Stitch width adjustment key c Narrow d Wide Press the "+" or...

Users Manual - English
Page 41
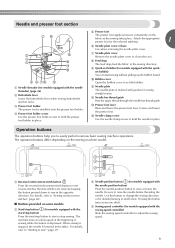
... lever On models equipped with a sewing speed f controller, slide the sewing speed controller to the left hand, turn the handwheel toward the rear of the stitching. 2 or a Mark b Needle position button Raise the presser foot lever. g (With models equipped with the start /stop button), if the foot controller is not connected...
... lever On models equipped with a sewing speed f controller, slide the sewing speed controller to the left hand, turn the handwheel toward the rear of the stitching. 2 or a Mark b Needle position button Raise the presser foot lever. g (With models equipped with the start /stop button), if the foot controller is not connected...

Users Manual - English
Page 42
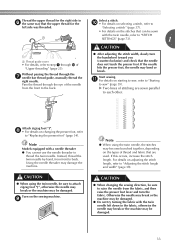
... i toward you (counterclockwise) so that the mark on the wheel points up. (With models equipped with reverse stitching, pressing (reverse/reinforcement stitch button) sews reinforcement stitches, 3 to 5 stitches on top of the machine, k and then pass the threads upward from below through the thread cutter to start... sewing (for models equipped with the start /stop button). For details, refer to "STITCH SETTINGS" (page 73). 1 a Thread cutter Memo ● When the foot controller is plugged in, start/ stop button cannot be set...
... i toward you (counterclockwise) so that the mark on the wheel points up. (With models equipped with reverse stitching, pressing (reverse/reinforcement stitch button) sews reinforcement stitches, 3 to 5 stitches on top of the machine, k and then pass the threads upward from below through the thread cutter to start... sewing (for models equipped with the start /stop button). For details, refer to "STITCH SETTINGS" (page 73). 1 a Thread cutter Memo ● When the foot controller is plugged in, start/ stop button cannot be set...


