
Users Manual - English
Page 4
...can damage the case and machine, and should be used by or near a space heater, iron, halogen lamp, or other parts to assure correct installation. 2 otherwise, the machine, power cord or garment being administered. • Do not use the machine... of children or disposed of. Keep ventilation openings of the machine and foot control free from all moving parts. Do not use or store the machine near children. • The plastic bag that you do not... locations. Special care is used . • Always consult the operation manual when replacing or installing any air openings blocked.
...can damage the case and machine, and should be used by or near a space heater, iron, halogen lamp, or other parts to assure correct installation. 2 otherwise, the machine, power cord or garment being administered. • Do not use the machine... of children or disposed of. Keep ventilation openings of the machine and foot control free from all moving parts. Do not use or store the machine near children. • The plastic bag that you do not... locations. Special care is used . • Always consult the operation manual when replacing or installing any air openings blocked.
Users Manual - English
Page 6
... 1 1. KNOWING YOUR SEWING MACHINE 6 ACCESSORIES ...6 Included accessories ...6 Optional accessories ...7 Accessory compartment ...7 NAMES OF MACHINE PARTS AND THEIR FUNCTIONS 8 The main parts ...8 Needle and presser foot section ...9 Operation buttons ...9 Operation panel ...10 Spool pin ...10 USING YOUR SEWING MACHINE ...29 Needle precautions ...29 Needle types and their uses ...29 Checking the needle ...30 Replacing the needle ...30 Sewing with the twin needle ...32 REPLACING THE PRESSER FOOT 34 Replacing the presser foot ...34 Removing the presser foot holder ...35 2. SEWING BASICS 36 ...
... 1 1. KNOWING YOUR SEWING MACHINE 6 ACCESSORIES ...6 Included accessories ...6 Optional accessories ...7 Accessory compartment ...7 NAMES OF MACHINE PARTS AND THEIR FUNCTIONS 8 The main parts ...8 Needle and presser foot section ...9 Operation buttons ...9 Operation panel ...10 Spool pin ...10 USING YOUR SEWING MACHINE ...29 Needle precautions ...29 Needle types and their uses ...29 Checking the needle ...30 Replacing the needle ...30 Sewing with the twin needle ...32 REPLACING THE PRESSER FOOT 34 Replacing the presser foot ...34 Removing the presser foot holder ...35 2. SEWING BASICS 36 ...
Users Manual - English
Page 33
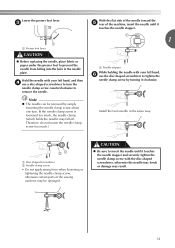
... • Do not apply strong force when loosening or tightening the needle clamp screw, otherwise certain parts of the machine, insert the needle until it touches the needle stopper. 1 a Presser foot lever CAUTION ● Before replacing the needle, place fabric or paper under the presser foot to insert the needle until it...
... • Do not apply strong force when loosening or tightening the needle clamp screw, otherwise certain parts of the machine, insert the needle until it touches the needle stopper. 1 a Presser foot lever CAUTION ● Before replacing the needle, place fabric or paper under the presser foot to insert the needle until it...
Users Manual - English
Page 34
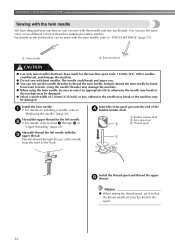
... that the thread winds off from the front of the d bobbin winder shaft. Other needles could break and injure you can sew with this machine (part code: 131096-121). a Bobbin winder shaft b Extra spool pin c Thread spool Install the thread spool and thread the upper e thread. Memo ● When setting the... MACHINE Sewing with the twin needle We have been made for the left needle with the c upper thread. You can use the needle threader to "Replacing the needle" (page 30). Manually thread the left needle. b • For details, refer to "STITCH SETTINGS" (page 73).
... that the thread winds off from the front of the d bobbin winder shaft. Other needles could break and injure you can sew with this machine (part code: 131096-121). a Bobbin winder shaft b Extra spool pin c Thread spool Install the thread spool and thread the upper e thread. Memo ● When setting the... MACHINE Sewing with the twin needle We have been made for the left needle with the c upper thread. You can use the needle threader to "Replacing the needle" (page 30). Manually thread the left needle. b • For details, refer to "STITCH SETTINGS" (page 73).
Users Manual - English
Page 38
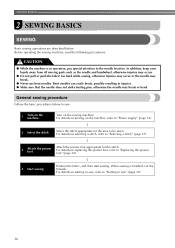
... pay special attention to "Selecting a stitch" (page 37). ↓ 3 Attach the presser foot. In addition, keep your hands away from all moving parts such as the needle and handwheel, otherwise injuries may occur. ● Do not pull or push the fabric too hard while sewing, otherwise injuries may... the presser foot appropriate for the area to sew" (page 39). 36 Select the stitch appropriate for the stitch. For details on replacing the presser foot, refer to "Power supply" (page 12). ↓ 2 Select the stitch. General sewing procedure Follow the basic procedures below .
... pay special attention to "Selecting a stitch" (page 37). ↓ 3 Attach the presser foot. In addition, keep your hands away from all moving parts such as the needle and handwheel, otherwise injuries may occur. ● Do not pull or push the fabric too hard while sewing, otherwise injuries may... the presser foot appropriate for the area to sew" (page 39). 36 Select the stitch appropriate for the stitch. For details on replacing the presser foot, refer to "Power supply" (page 12). ↓ 2 Select the stitch. General sewing procedure Follow the basic procedures below .
Users Manual - English
Page 90
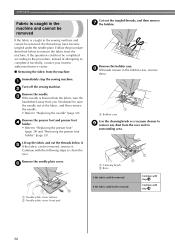
... removed If the fabric could not be completed according to the procedure, instead of the fabric, and then remove the needle. • Refer to "Replacing the needle" (page 30). If the operation could not be removed, remove it. Remove the needle plate cover. a Needle plate cover release b ...Needle plate cover (front part) 88 Lift up the fabric and cut the threads below to remove the fabric from the machine. f Cut out the tangled threads, and then remove...
... removed If the fabric could not be completed according to the procedure, instead of the fabric, and then remove the needle. • Refer to "Replacing the needle" (page 30). If the operation could not be removed, remove it. Remove the needle plate cover. a Needle plate cover release b ...Needle plate cover (front part) 88 Lift up the fabric and cut the threads below to remove the fabric from the machine. f Cut out the tangled threads, and then remove...
Users Manual - English
Page 92
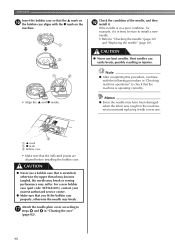
... points are aligned before installing the bobbin case. Memo ● Since the needle may suffer. For a new bobbin case (part code: XE7560-001), contact your nearest authorized service center. ● Make sure that the machine is operating correctly. Attach the...in injuries. • Align the S and z marks. Note ● After completing this procedure, continue with the following procedure in the machine, we recommend replacing it . CAUTION ● Never use bent needles. Bent needles can easily break, possibly resulting in "Cleaning the race" (page 82). 90 a S mark...
... points are aligned before installing the bobbin case. Memo ● Since the needle may suffer. For a new bobbin case (part code: XE7560-001), contact your nearest authorized service center. ● Make sure that the machine is operating correctly. Attach the...in injuries. • Align the S and z marks. Note ● After completing this procedure, continue with the following procedure in the machine, we recommend replacing it . CAUTION ● Never use bent needles. Bent needles can easily break, possibly resulting in "Cleaning the race" (page 82). 90 a S mark...


