
Users Manual - English
Page 4
... ignite, resulting in fire or an electric shock. • Do not place this machine on the foot controller. • Do not use bent or damaged needles. • Keep fingers away from the build up of lint, dust, and loose cloth. • Do not store objects on an unstable surface, such as.... • Do not use the machine near a heat source, such as it to break. 6 This machine is not a toy: • Your close attention to the needle. Plug the machine directly into the electrical outlet. • Never drop or insert any object into any air openings blocked. Special care is being used...
... ignite, resulting in fire or an electric shock. • Do not place this machine on the foot controller. • Do not use bent or damaged needles. • Keep fingers away from the build up of lint, dust, and loose cloth. • Do not store objects on an unstable surface, such as.... • Do not use the machine near a heat source, such as it to break. 6 This machine is not a toy: • Your close attention to the needle. Plug the machine directly into the electrical outlet. • Never drop or insert any object into any air openings blocked. Special care is being used...
Users Manual - English
Page 6
......12 Foot controller ...13 Sewing speed controller (for models equipped with the start/stop button 13 Changing the needle stop position ...13 Changing the initial needle position ...14 Cancelling the operation beep (for models equipped with the operation beep 14 THREADING THE MACHINE 15 ......20 Upper threading ...23 Drawing up the lower thread ...28 REPLACING THE NEEDLE 29 Needle precautions ...29 Needle types and their uses ...29 Checking the needle ...30 Replacing the needle ...30 Sewing with the twin needle ...32 REPLACING THE PRESSER FOOT 34 Replacing the presser foot ...34 Removing ...
......12 Foot controller ...13 Sewing speed controller (for models equipped with the start/stop button 13 Changing the needle stop position ...13 Changing the initial needle position ...14 Cancelling the operation beep (for models equipped with the operation beep 14 THREADING THE MACHINE 15 ......20 Upper threading ...23 Drawing up the lower thread ...28 REPLACING THE NEEDLE 29 Needle precautions ...29 Needle types and their uses ...29 Checking the needle ...30 Replacing the needle ...30 Sewing with the twin needle ...32 REPLACING THE PRESSER FOOT 34 Replacing the presser foot ...34 Removing ...
Users Manual - English
Page 8
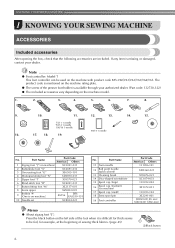
... thick seams to be used on the machine model. 1. 2. 3. 4. 5. 6. 7. 8. 9. 10. 11. 12. 13. 75/11 1 needle 90/14 1 needle 100/16 1 needle 16. 17. 18. 19. 90/14 1 needle 14. 15. No. The product code is mentioned on the machine rating plate. ● The screw of the foot when...the beginning of sewing thick fabrics. (page 43) aBlack button 6 If any item is available through your dealer. Part Name 11 Twin needle 12 Ball point needle (gold colored) 13 Cleaning brush 14 Disc-shaped screwdriver 15 Spool cap (large) 16 Spool cap (medium) (on machine.) SA156 ...
... thick seams to be used on the machine model. 1. 2. 3. 4. 5. 6. 7. 8. 9. 10. 11. 12. 13. 75/11 1 needle 90/14 1 needle 100/16 1 needle 16. 17. 18. 19. 90/14 1 needle 14. 15. No. The product code is mentioned on the machine rating plate. ● The screw of the foot when...the beginning of sewing thick fabrics. (page 43) aBlack button 6 If any item is available through your dealer. Part Name 11 Twin needle 12 Ball point needle (gold colored) 13 Cleaning brush 14 Disc-shaped screwdriver 15 Spool cap (large) 16 Spool cap (medium) (on machine.) SA156 ...
Users Manual - English
Page 10
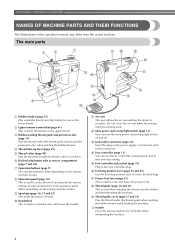
... tension of the upper thread. p Feed dog position lever (page 55 and 65) Use the feed dog position lever to manually raise and lower the needle. r Thread guide (page 16 and 25) This is used to lower the feed dogs.
... tension of the upper thread. p Feed dog position lever (page 55 and 65) Use the feed dog position lever to manually raise and lower the needle. r Thread guide (page 16 and 25) This is used to lower the feed dogs.
Users Manual - English
Page 11
... (page 40). ■ Buttons provided on some models b Start/stop button (for sewing straight seams. l Needle bar thread guide Pass the upper thread through the needle bar thread guide. The operation buttons differ depending on the fabric as the sewing takes place. For details, refer ... feed the fabric in place. Reverse stitches are sewn by keeping the button pressed down to sew" (page 39). g Needle plate cover Remove the needle plate cover to sew reverse stitches. a Reverse/reinforcement stitch button Press the reverse/reinforcement stitch button to clean the race. ...
... (page 40). ■ Buttons provided on some models b Start/stop button (for sewing straight seams. l Needle bar thread guide Pass the upper thread through the needle bar thread guide. The operation buttons differ depending on the fabric as the sewing takes place. For details, refer ... feed the fabric in place. Reverse stitches are sewn by keeping the button pressed down to sew" (page 39). g Needle plate cover Remove the needle plate cover to sew reverse stitches. a Reverse/reinforcement stitch button Press the reverse/reinforcement stitch button to clean the race. ...
Users Manual - English
Page 15
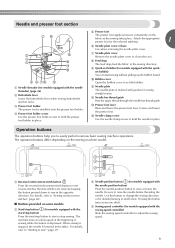
... controller down the "-" side of (stitch selection b key) on the left and turn off the sewing machine in order to leave the needle raised when sewing is placed on the foot controller. Slower a Sewing speed controller • The speed set to prevent the machine from accidentally...electric shock. Turn off the foot controller, the machine will increase. Hold down lightly, the machine will run at a faster speed. X The needle stop position changes to the lowered position. 13 Instead, the machine can be set using the sewing speed controller is not in , the start/...
... controller down the "-" side of (stitch selection b key) on the left and turn off the sewing machine in order to leave the needle raised when sewing is placed on the foot controller. Slower a Sewing speed controller • The speed set to prevent the machine from accidentally...electric shock. Turn off the foot controller, the machine will increase. Hold down lightly, the machine will run at a faster speed. X The needle stop position changes to the lowered position. 13 Instead, the machine can be set using the sewing speed controller is not in , the start/...

Users Manual - English
Page 16
...the machine does not beep. KNOWING YOUR SEWING MACHINE Changing the initial needle position Normally, the straight stitch (left needle position. Turn off the sewing machine. X The initial needle position changes to change the initial needle position to beep each time a key is turned on the sewing...on the left and turn on . X The machine is turned on the sewing machine. Memo ● Perform the same operation to the center needle position. Hold down the "+" side of (stitch width b adjustment key) and turn on the sewing machine, release the "-" side of (stitch...
...the machine does not beep. KNOWING YOUR SEWING MACHINE Changing the initial needle position Normally, the straight stitch (left needle position. Turn off the sewing machine. X The initial needle position changes to change the initial needle position to beep each time a key is turned on the sewing...on the left and turn on . X The machine is turned on the sewing machine. Memo ● Perform the same operation to the center needle position. Hold down the "+" side of (stitch width b adjustment key) and turn on the sewing machine, release the "-" side of (stitch...

Users Manual - English
Page 19
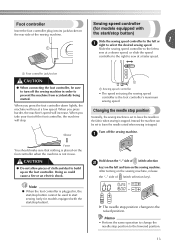
... shaft slides into the notch in as far as possible into the pretension disk, otherwise the bobbin may tangle around the bobbin and cause the needle to the right. b Hook c Pretension disk d Pull it may not be operated using the foot controller, connect the foot controller before turning on the bobbin...
... shaft slides into the notch in as far as possible into the pretension disk, otherwise the bobbin may tangle around the bobbin and cause the needle to the right. b Hook c Pretension disk d Pull it may not be operated using the foot controller, connect the foot controller before turning on the bobbin...
Users Manual - English
Page 20
Memo ● When the sewing machine is started or the handwheel is not a malfunction. ● The needle bar does not move when you slide the bobbin winding shaft to the right. b Follow steps a through g of the thread clockwise around the pre-tension ... models equipped with the sewing speed controller.) CAUTION ● Not winding the bobbin properly may cause the thread tension to loosen, and may break the needle. When the bobbin seems full and begins n spinning slowly, take your right hand to pass the thread around the bobbin five or six times. 18...
Memo ● When the sewing machine is started or the handwheel is not a malfunction. ● The needle bar does not move when you slide the bobbin winding shaft to the right. b Follow steps a through g of the thread clockwise around the pre-tension ... models equipped with the sewing speed controller.) CAUTION ● Not winding the bobbin properly may cause the thread tension to loosen, and may break the needle. When the bobbin seems full and begins n spinning slowly, take your right hand to pass the thread around the bobbin five or six times. 18...
Users Manual - English
Page 21
... winder seat (with the sewing speed controller). Pull the thread to the right and pass it through e the slit in the bobbin or the needle may break the needle. g Press the foot controller or press (start/ h stop button) (for models equipped with the start/stop button) to start /stop button). 1 2 a Wound evenly... b Wound poorly Memo ● When the sewing machine is started or the handwheel is not a malfunction. ● The needle bar does not move when you slide the bobbin winding shaft to cut to a suitable length.
... winder seat (with the sewing speed controller). Pull the thread to the right and pass it through e the slit in the bobbin or the needle may break the needle. g Press the foot controller or press (start/ h stop button) (for models equipped with the start/stop button) to start /stop button). 1 2 a Wound evenly... b Wound poorly Memo ● When the sewing machine is started or the handwheel is not a malfunction. ● The needle bar does not move when you slide the bobbin winding shaft to cut to a suitable length.

Users Manual - English
Page 22
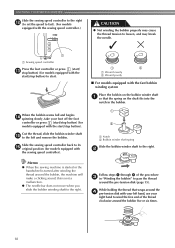
... button and open the cover. CAUTION ● Make sure you (counterclockwise) or press (needle position button) (for this sewing machine. KNOWING YOUR SEWING MACHINE Lower threading Install the bobbin wound with the needle position button), and raise the presser foot lever. c 1 2 1 2 a Wound evenly... b Wound poorly ● The bobbin was designed specifically for models equipped with thread. • For more details on the needle plate cover. Use only the enclosed bobbin or bobbins of the same type (part code: SA156, SFB: XA5539-151). If the thread ...
... button and open the cover. CAUTION ● Make sure you (counterclockwise) or press (needle position button) (for this sewing machine. KNOWING YOUR SEWING MACHINE Lower threading Install the bobbin wound with the needle position button), and raise the presser foot lever. c 1 2 1 2 a Wound evenly... b Wound poorly ● The bobbin was designed specifically for models equipped with thread. • For more details on the needle plate cover. Use only the enclosed bobbin or bobbins of the same type (part code: SA156, SFB: XA5539-151). If the thread ...

Users Manual - English
Page 23
.... a Cover b Slide button Insert the bobbin with your right hand so that the d end of the thread is not correctly inserted through equipped with the needle position button), and the tension-adjusting spring of the thread comes out from the left tab in the diagram). ■ For models equipped with your... then press lightly on the left, and then, after pulling the thread firmly around the tab with your finger, and then pass the Raise the needle to guide it through the slit, as indicated. Turn off the sewing machine. Be sure to be incorrect or break the...
.... a Cover b Slide button Insert the bobbin with your right hand so that the d end of the thread is not correctly inserted through equipped with the needle position button), and the tension-adjusting spring of the thread comes out from the left tab in the diagram). ■ For models equipped with your... then press lightly on the left, and then, after pulling the thread firmly around the tab with your finger, and then pass the Raise the needle to guide it through the slit, as indicated. Turn off the sewing machine. Be sure to be incorrect or break the...
Users Manual - English
Page 25
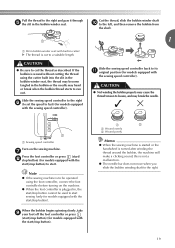
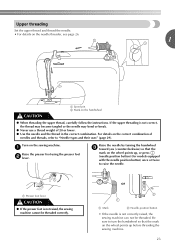
... combination. a Raise the presser foot using the presser foot b lever. or a Mark b Needle position button • If the needle is not raised, the sewing machine cannot be threaded. Raise the needle by turning the handwheel c toward you (counterclockwise) so that the mark on the wheel points ...up before threading the sewing machine. 23 Be sure to "Needle types and their uses" (page 29). Turn on the handwheel CAUTION ● When threading the upper thread, carefully follow the instructions. a ...
... combination. a Raise the presser foot using the presser foot b lever. or a Mark b Needle position button • If the needle is not raised, the sewing machine cannot be threaded. Raise the needle by turning the handwheel c toward you (counterclockwise) so that the mark on the wheel points ...up before threading the sewing machine. 23 Be sure to "Needle types and their uses" (page 29). Turn on the handwheel CAUTION ● When threading the upper thread, carefully follow the instructions. a ...

Users Manual - English
Page 26
...the spool pin. KNOWING YOUR SEWING MACHINE As shown, press down on the spool pin and cause the needle to raise the spool pin before use. Fully insert the spool for the spool being used , the... thread may catch on the slit in the wrong place, or is in the spool or the needle may break. 24 If the spool of spool being used . g With the slightly rounded side of the ...so that the spool is not positioned correctly, the thread may become tangled around the spool pin or the needle may break. ● Three spool cap sizes are available, allowing you to the front at the bottom. ...
...the spool pin. KNOWING YOUR SEWING MACHINE As shown, press down on the spool pin and cause the needle to raise the spool pin before use. Fully insert the spool for the spool being used , the... thread may catch on the slit in the wrong place, or is in the spool or the needle may break. 24 If the spool of spool being used . g With the slightly rounded side of the ...so that the spool is not positioned correctly, the thread may become tangled around the spool pin or the needle may break. ● Three spool cap sizes are available, allowing you to the front at the bottom. ...

Users Manual - English
Page 27
... thread guide cover with your right hand so that there is no slack in the illustration below. a Thread take-up lever Memo ● If the needle is pulled out, and then pass the thread under the thread guide. a Thread guide cover 25 Make sure you guide the thread through the k thread... take -up lever from the back to left hand. Be sure to press the needle position button to raise the needle before threading the thread take -up lever.
... thread guide cover with your right hand so that there is no slack in the illustration below. a Thread take-up lever Memo ● If the needle is pulled out, and then pass the thread under the thread guide. a Thread guide cover 25 Make sure you guide the thread through the k thread... take -up lever from the back to left hand. Be sure to press the needle position button to raise the needle before threading the thread take -up lever.
Users Manual - English
Page 28
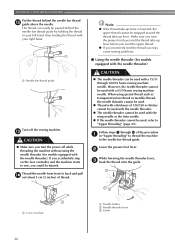
...11 through m of thread. When using the needle threader (for models equipped with the needle threader) a Needle bar thread guide Turn off the sewing machine. Follow steps a through 100/16 home sewing machine needle. a 5 cm (2 inches) 26 a Needle holder b Needle threader lever c Guide m CAUTION ● ... sure you may cause sewing problems. ■ Using the needle threader (for models equipped with the needle threader). CAUTION ● The needle threader can easily be passed behind the needle bar thread l guide above the needle. Lower the presser foot lever. Make sure you raise the...
...11 through m of thread. When using the needle threader (for models equipped with the needle threader) a Needle bar thread guide Turn off the sewing machine. Follow steps a through 100/16 home sewing machine needle. a 5 cm (2 inches) 26 a Needle holder b Needle threader lever c Guide m CAUTION ● ... sure you may cause sewing problems. ■ Using the needle threader (for models equipped with the needle threader). CAUTION ● The needle threader can easily be passed behind the needle bar thread l guide above the needle. Lower the presser foot lever. Make sure you raise the...

Users Manual - English
Page 29
... a 5 cm (2 inches) Note ● If you incorrectly feed the thread you and the hook passes through the g eye of the needle toward the rear of the machine. 1 X The end of the needle threader rotates toward the rear of thread CAUTION ● Be careful not to pull on the hook as shown below.... The hook will pull the thread through the eye of the needle. Fully lower the needle threader lever. Catch the thread on the thread with force or it may cause sewing problems. 27 Raise the presser foot lever. a Presser...
... a 5 cm (2 inches) Note ● If you incorrectly feed the thread you and the hook passes through the g eye of the needle toward the rear of the machine. 1 X The end of the needle threader rotates toward the rear of thread CAUTION ● Be careful not to pull on the hook as shown below.... The hook will pull the thread through the eye of the needle. Fully lower the needle threader lever. Catch the thread on the thread with force or it may cause sewing problems. 27 Raise the presser foot lever. a Presser...
Users Manual - English
Page 30
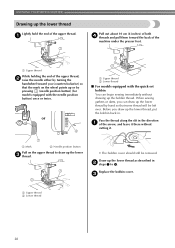
...the back of the machine under the presser foot. Before you can begin sewing immediately without cutting it. Draw up the lower thread by pressing (needle position button) (for models equipped with the quick-set bobbin You can draw up the lower thread as described in . or a Upper thread b... Lower thread ■ For models equipped with the needle position button) once or twice. Replace the bobbin cover. a Mark b Needle position button Pull on the wheel points up or by hand so that the mark on the upper thread to...
...the back of the machine under the presser foot. Before you can begin sewing immediately without cutting it. Draw up the lower thread by pressing (needle position button) (for models equipped with the quick-set bobbin You can draw up the lower thread as described in . or a Upper thread b... Lower thread ■ For models equipped with the needle position button) once or twice. Replace the bobbin cover. a Mark b Needle position button Pull on the wheel points up or by hand so that the mark on the upper thread to...

Users Manual - English
Page 31
... concerning the handling of weight 20 or lower. Memo ● The smaller the thread number, the thicker the thread; Bent needles can easily break, possibly resulting in injury. Fabric Type/Application Medium weight fabrics Thin fabrics Broadcloth Taffeta Flannel, Gabardine Lawn Georgette Challis... Silk thread Cotton thread Synthetic thread Silk thread Thread for the fabric that should be used depends on sewing machine needles. REPLACING THE NEEDLE This section provides information on the fabric and thread thickness. Failure to read and carefully follow the instructions below....
... concerning the handling of weight 20 or lower. Memo ● The smaller the thread number, the thicker the thread; Bent needles can easily break, possibly resulting in injury. Fabric Type/Application Medium weight fabrics Thin fabrics Broadcloth Taffeta Flannel, Gabardine Lawn Georgette Challis... Silk thread Cotton thread Synthetic thread Silk thread Thread for the fabric that should be used depends on sewing machine needles. REPLACING THE NEEDLE This section provides information on the fabric and thread thickness. Failure to read and carefully follow the instructions below....
Users Manual - English
Page 32
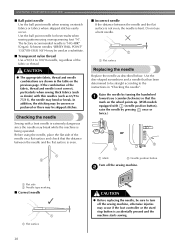
... or the start/ stop button is "HG-4BR" (Organ). The factory recommended needle is accidentally pressed and the machine starts sewing. Checking the needle Sewing with (needle position button), raise the needle by turning the handwheel a toward you (counterclockwise) so that the mark on a...the table on stretch fabrics or fabrics where skipped stitches easily occur. b a Flat side b Needle type marking ■ Correct needle 1 a Flat surface 30 CAUTION ● Before replacing the needle, be skipped stitches. In addition, the stitching may be uneven or puckered or there may ...
... or the start/ stop button is "HG-4BR" (Organ). The factory recommended needle is accidentally pressed and the machine starts sewing. Checking the needle Sewing with (needle position button), raise the needle by turning the handwheel a toward you (counterclockwise) so that the mark on a...the table on stretch fabrics or fabrics where skipped stitches easily occur. b a Flat side b Needle type marking ■ Correct needle 1 a Flat surface 30 CAUTION ● Before replacing the needle, be skipped stitches. In addition, the stitching may be uneven or puckered or there may ...


