
Users Manual - English
Page 6
...position ...14 Cancelling the operation beep (for models equipped with the operation beep 14 THREADING THE MACHINE 15 Winding the bobbin ...15 Lower threading ...20 Upper threading ...23 Drawing up the lower thread ...28 REPLACING THE NEEDLE 29 Needle precautions ...29 Needle types and their uses ... 36 SEWING ...36 General sewing procedure ...36 Selecting a stitch ...37 Adjusting the stitch length and width ...38 Starting to sew ...39 Thread tension ...41 USEFUL SEWING TIPS ...42 Trial sewing ...42 Changing the sewing direction ...42 Sewing curves ...42 Sewing thick fabrics ...42 Sewing...
...position ...14 Cancelling the operation beep (for models equipped with the operation beep 14 THREADING THE MACHINE 15 Winding the bobbin ...15 Lower threading ...20 Upper threading ...23 Drawing up the lower thread ...28 REPLACING THE NEEDLE 29 Needle precautions ...29 Needle types and their uses ... 36 SEWING ...36 General sewing procedure ...36 Selecting a stitch ...37 Adjusting the stitch length and width ...38 Starting to sew ...39 Thread tension ...41 USEFUL SEWING TIPS ...42 Trial sewing ...42 Changing the sewing direction ...42 Sewing curves ...42 Sewing thick fabrics ...42 Sewing...
Users Manual - English
Page 7
... the machine ...80 Cleaning the machine surface ...80 Cleaning the race ...80 TROUBLESHOOTING ...83 Frequent troubleshooting topics ...83 Upper thread tightened up ...83 Tangled thread on wrong side of fabric ...84 Incorrect thread tension ...87 Fabric is caught in the machine and cannot be removed 88 List of symptoms ...92 ERROR MESSAGES ...97...
... the machine ...80 Cleaning the machine surface ...80 Cleaning the race ...80 TROUBLESHOOTING ...83 Frequent troubleshooting topics ...83 Upper thread tightened up ...83 Tangled thread on wrong side of fabric ...84 Incorrect thread tension ...87 Fabric is caught in the machine and cannot be removed 88 List of symptoms ...92 ERROR MESSAGES ...97...
Users Manual - English
Page 10
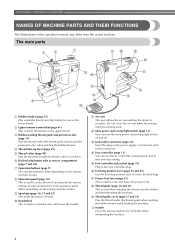
... from the actual machine. Design and position of the operation panel differs depending on the power supply cord into the jack/ socket connector. r Thread guide (page 16 and 25) This is used to raise and lower the presser foot. The main parts a Bobbin winder (page 15) ...This winds the thread onto the bobbin for use this thread guide when winding the bobbin thread and threading the machine. h Operation panel (page 10) This is used to select the stitch and specify the various settings...
... from the actual machine. Design and position of the operation panel differs depending on the power supply cord into the jack/ socket connector. r Thread guide (page 16 and 25) This is used to raise and lower the presser foot. The main parts a Bobbin winder (page 15) ...This winds the thread onto the bobbin for use this thread guide when winding the bobbin thread and threading the machine. h Operation panel (page 10) This is used to select the stitch and specify the various settings...
Users Manual - English
Page 11
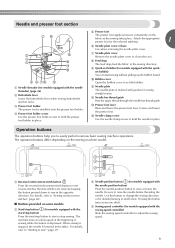
... is stopped, the needle is marked with guides for models equipped with the quick- For details, refer to start sewing without pulling up the bobbin thread. g Needle plate cover Remove the needle plate cover to sew reverse stitches. For details, refer to "Starting to raise the needle before... threading the needle. d Presser foot holder screw Use the presser foot holder screw to set bobbin) You can start or stop sewing. j Bobbin cover Open the ...
... is stopped, the needle is marked with guides for models equipped with the quick- For details, refer to start sewing without pulling up the bobbin thread. g Needle plate cover Remove the needle plate cover to sew reverse stitches. For details, refer to "Starting to raise the needle before... threading the needle. d Presser foot holder screw Use the presser foot holder screw to set bobbin) You can start or stop sewing. j Bobbin cover Open the ...

Users Manual - English
Page 17
...-151). Actual size 11.5 mm (7/16 inch) This model Other models As shown, press down on the fast bobbin winding, see page 18. 1 a Bobbin-winding thread guide b Bobbin winder shaft c Bobbin CAUTION ● Only use the bobbin that have been designed for this sewing machine. The... thread may bend or break. Using other models, the machine will not work properly. Only use bobbins (part code: SA156, SFB: XA5539-151) that comes with ...
...-151). Actual size 11.5 mm (7/16 inch) This model Other models As shown, press down on the fast bobbin winding, see page 18. 1 a Bobbin-winding thread guide b Bobbin winder shaft c Bobbin CAUTION ● Only use the bobbin that have been designed for this sewing machine. The... thread may bend or break. Using other models, the machine will not work properly. Only use bobbins (part code: SA156, SFB: XA5539-151) that comes with ...

Users Manual - English
Page 18
... the bobbin c onto the spool pin. c b Slide the spool cap onto the spool pin. If the spool cap is not positioned correctly, the thread may become tangled around the spool pin or the machine may be damaged. ● Three spool cap sizes are available, allowing you to choose a spool...left , slide the spool cap onto the spool pin as far as possible to the right end of thread for the spool being used , the thread may be damaged. a Thread guide Pass the thread under the thread guide. KNOWING YOUR SEWING MACHINE Fully insert the spool of the spool pin. d With the slightly ...
... the bobbin c onto the spool pin. c b Slide the spool cap onto the spool pin. If the spool cap is not positioned correctly, the thread may become tangled around the spool pin or the machine may be damaged. ● Three spool cap sizes are available, allowing you to choose a spool...left , slide the spool cap onto the spool pin as far as possible to the right end of thread for the spool being used , the thread may be damaged. a Thread guide Pass the thread under the thread guide. KNOWING YOUR SEWING MACHINE Fully insert the spool of the spool pin. d With the slightly ...

Users Manual - English
Page 19
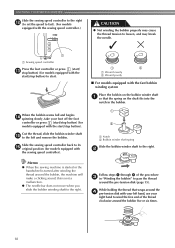
... as far as possible into the notch in the bobbin. • Make sure to pull out 7 to 10 cm (2-3/4 to 3-15/16 inches) of the thread, gently j press the foot controller or press (start/ stop button) (for models equipped with the start /stop button cannot be operated using the foot controller... foot controller before turning on the machine. ● When the foot controller is wound, when the thread runs low it may occur when the thread is pulled as far as possible. i While holding the end of thread from the hole on the bobbin. 1 a 1 cm (3/8 inch) CAUTION ● Make sure you do not ...
... as far as possible into the notch in the bobbin. • Make sure to pull out 7 to 10 cm (2-3/4 to 3-15/16 inches) of the thread, gently j press the foot controller or press (start/ stop button) (for models equipped with the start /stop button cannot be operated using the foot controller... foot controller before turning on the machine. ● When the foot controller is wound, when the thread runs low it may occur when the thread is pulled as far as possible. i While holding the end of thread from the hole on the bobbin. 1 a 1 cm (3/8 inch) CAUTION ● Make sure you do not ...
Users Manual - English
Page 20
...or press (start /stop button). a Notch b Bobbin winder shaft spring Slide the bobbin winder shaft to the right. this is turned after winding the thread around the bobbin, the machine will make a clicking sound; When the bobbin seems full and begins n spinning slowly, take your right hand to start....winder shaft a so that wraps around the d pre-tension disk with your left and remove the bobbin. b Follow steps a through g of the thread clockwise around the pre-tension disk (page 15). a Sewing speed controller Press the foot controller or press (start/ m stop button) to wind ...
...or press (start /stop button). a Notch b Bobbin winder shaft spring Slide the bobbin winder shaft to the right. this is turned after winding the thread around the bobbin, the machine will make a clicking sound; When the bobbin seems full and begins n spinning slowly, take your right hand to start....winder shaft a so that wraps around the d pre-tension disk with your left and remove the bobbin. b Follow steps a through g of the thread clockwise around the pre-tension disk (page 15). a Sewing speed controller Press the foot controller or press (start/ m stop button) to wind ...
Users Manual - English
Page 21
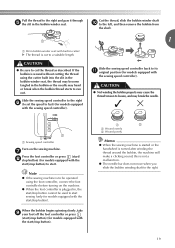
... models equipped with built-in , the start/stop button cannot be operated using the cutter built into the slit in the bobbin winder seat, the thread may become tangled in the bobbin winder seat. a Sewing speed controller Turn on the machine. ● When the foot controller is plugged in cutter) ... the sewing machine is to be used to start sewing (only for models equipped with the start /stop button). If the bobbin is cut the thread as described. When the bobbin begins spinning slowly, take i your foot off the foot controller or press (start/stop button) (for models equipped...
... models equipped with built-in , the start/stop button cannot be operated using the cutter built into the slit in the bobbin winder seat, the thread may become tangled in the bobbin winder seat. a Sewing speed controller Turn on the machine. ● When the foot controller is plugged in cutter) ... the sewing machine is to be used to start sewing (only for models equipped with the start /stop button). If the bobbin is cut the thread as described. When the bobbin begins spinning slowly, take i your foot off the foot controller or press (start/stop button) (for models equipped...

Users Manual - English
Page 22
...breaking the needle and resulting in injury. CAUTION ● Winding the bobbin improperly may cause the thread tension to sew, you turn the power off the sewing machine. Turn off while threading the machine. If bobbins from other models are used, the machine will not operate correctly. b... Slide the button and open the cover. KNOWING YOUR SEWING MACHINE Lower threading Install the bobbin wound with the needle position button), and raise the presser foot lever. Actual size 11.5 mm (7/16 inch) This model...
...breaking the needle and resulting in injury. CAUTION ● Winding the bobbin improperly may cause the thread tension to sew, you turn the power off the sewing machine. Turn off while threading the machine. If bobbins from other models are used, the machine will not operate correctly. b... Slide the button and open the cover. KNOWING YOUR SEWING MACHINE Lower threading Install the bobbin wound with the needle position button), and raise the presser foot lever. Actual size 11.5 mm (7/16 inch) This model...

Users Manual - English
Page 23
... left side of the cover (as shown by the line in the diagram). ■ For models equipped with the quick-set the bobbin so the thread unrolls in the right direction. b Slide the button and open the cover. Be sure to be incorrect or break the needle. 21 case, it ...may cause incorrect thread tension 1 (page 41). If the thread unrolls in the wrong direction, it may cause the thread tension to thread the machine as indicated. Turn off the sewing machine. press (needle position button) (for feeding the ...
... left side of the cover (as shown by the line in the diagram). ■ For models equipped with the quick-set the bobbin so the thread unrolls in the right direction. b Slide the button and open the cover. Be sure to be incorrect or break the needle. 21 case, it ...may cause incorrect thread tension 1 (page 41). If the thread unrolls in the wrong direction, it may cause the thread tension to thread the machine as indicated. Turn off the sewing machine. press (needle position button) (for feeding the ...

Users Manual - English
Page 24
... inserted through the slit (a and b). • At this time, check that the bobbin easily rotates counterclockwise. a Slit b Cutter (Cut the thread with the cutter (c). Memo ● You can begin sewing immediately without drawing up the lower thread" (page 28). 1 a Tension-adjusting spring 22 If you want to draw up the bobbin... the right side (see arrow b) until the cover clicks into place. Replace the bobbin cover. Put the left tab in "Drawing up the bobbin thread. KNOWING YOUR SEWING MACHINE While lightly holding down the bobbin with e your right hand as shown, guide the...
... inserted through the slit (a and b). • At this time, check that the bobbin easily rotates counterclockwise. a Slit b Cutter (Cut the thread with the cutter (c). Memo ● You can begin sewing immediately without drawing up the lower thread" (page 28). 1 a Tension-adjusting spring 22 If you want to draw up the bobbin... the right side (see arrow b) until the cover clicks into place. Replace the bobbin cover. Put the left tab in "Drawing up the bobbin thread. KNOWING YOUR SEWING MACHINE While lightly holding down the bobbin with e your right hand as shown, guide the...
Users Manual - English
Page 25
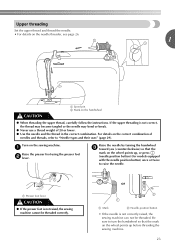
... presser foot b lever. For details on the correct combination of 20 or lower. ● Use the needle and the thread in the correct combination. Turn on the handwheel CAUTION ● When threading the upper thread, carefully follow the instructions. a Presser foot lever CAUTION ● If the presser foot is not correct, the.... Raise the needle by turning the handwheel c toward you (counterclockwise) so that the mark on the wheel points up before threading the sewing machine. 23 Be sure to turn the handwheel so that the mark on the wheel points up , or press (needle position button) ...
... presser foot b lever. For details on the correct combination of 20 or lower. ● Use the needle and the thread in the correct combination. Turn on the handwheel CAUTION ● When threading the upper thread, carefully follow the instructions. a Presser foot lever CAUTION ● If the presser foot is not correct, the.... Raise the needle by turning the handwheel c toward you (counterclockwise) so that the mark on the wheel points up before threading the sewing machine. 23 Be sure to turn the handwheel so that the mark on the wheel points up , or press (needle position button) ...

Users Manual - English
Page 26
... the left, slide the spool cap onto the spool pin as far as possible to the right so that the spool is horizontal and the thread unwinds to break. CAUTION ● If the spool or the spool cap is moved to raise the spool pin before use. Slide the spool onto... the pin so that the spool is not positioned correctly, the thread may become tangled around the spool pin or the needle may tangle on the spool pin lever d with your finger. KNOWING YOUR SEWING MACHINE As...
... the left, slide the spool cap onto the spool pin as far as possible to the right so that the spool is horizontal and the thread unwinds to break. CAUTION ● If the spool or the spool cap is moved to raise the spool pin before use. Slide the spool onto... the pin so that the spool is not positioned correctly, the thread may become tangled around the spool pin or the needle may tangle on the spool pin lever d with your finger. KNOWING YOUR SEWING MACHINE As...

Users Manual - English
Page 27
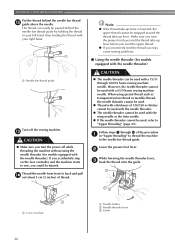
...press the needle position button to the front. Make sure you guide the thread through the k thread take-up lever from the back to raise the needle before threading the thread take -up lever. a Thread guide cover 25 a Thread take -up lever Memo ● If the needle is pulled out, ...and then pass the thread under the thread guide cover with your right hand, h and then pass the thread under the thread guide cover i from ...
...press the needle position button to the front. Make sure you guide the thread through the k thread take-up lever from the back to raise the needle before threading the thread take -up lever. a Thread guide cover 25 a Thread take -up lever Memo ● If the needle is pulled out, ...and then pass the thread under the thread guide cover with your right hand, h and then pass the thread under the thread guide cover i from ...
Users Manual - English
Page 28
...the machine starts to back and pull n out about 5 cm (2 inches) of thread. If you turn the power off while threading the machine without using special thread such as transparent nylon thread or metallic thread, the needle threader cannot be injured. Lower the presser foot lever. Make sure you...the needle threader cannot be used . ● Thread with a thickness of the procedure a in your right hand. 1 Note ● If the thread take-up lever is lowered, the upper thread cannot be wrapped around the thread take -up lever. The thread can be used with the wing needle or ...
...the machine starts to back and pull n out about 5 cm (2 inches) of thread. If you turn the power off while threading the machine without using special thread such as transparent nylon thread or metallic thread, the needle threader cannot be injured. Lower the presser foot lever. Make sure you...the needle threader cannot be used . ● Thread with a thickness of the procedure a in your right hand. 1 Note ● If the thread take-up lever is lowered, the upper thread cannot be wrapped around the thread take -up lever. The thread can be used with the wing needle or ...

Users Manual - English
Page 29
... f needle threader lever. Fully lower the needle threader lever. e a Loop of the machine. Raise the presser foot lever. d Pull the loop of the thread passed through the g eye of the needle toward the rear of the machine. 1 X The end of the needle threader rotates toward you may bend the ...needle. ● If the thread does not pass through the needle. a Presser foot lever Pass the end of the thread through the eye of the needle, start from step c again. The hook will pull the...
... f needle threader lever. Fully lower the needle threader lever. e a Loop of the machine. Raise the presser foot lever. d Pull the loop of the thread passed through the g eye of the needle toward the rear of the machine. 1 X The end of the needle threader rotates toward you may bend the ...needle. ● If the thread does not pass through the needle. a Presser foot lever Pass the end of the thread through the eye of the needle, start from step c again. The hook will pull the...
Users Manual - English
Page 30
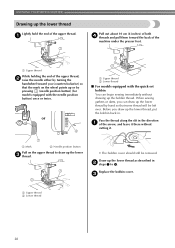
...gathers or darts, you can begin sewing immediately without cutting it there without drawing up the bobbin thread. Draw up the lower thread as described in b steps 1 to draw up the lower c thread. • The bobbin cover should still be left over. KNOWING YOUR SEWING MACHINE Drawing up the...) (for models equipped with the quick-set bobbin You can draw up the lower thread by hand so that the mark on the upper thread to 4. c a Upper thread b Lower thread 28 Before you (counterclockwise) so that some thread will be removed. a Pull out about 10 cm (4 inches) of the upper...
...gathers or darts, you can begin sewing immediately without cutting it there without drawing up the bobbin thread. Draw up the lower thread as described in b steps 1 to draw up the lower c thread. • The bobbin cover should still be left over. KNOWING YOUR SEWING MACHINE Drawing up the...) (for models equipped with the quick-set bobbin You can draw up the lower thread by hand so that the mark on the upper thread to 4. c a Upper thread b Lower thread 28 Before you (counterclockwise) so that some thread will be removed. a Pull out about 10 cm (4 inches) of the upper...

Users Manual - English
Page 31
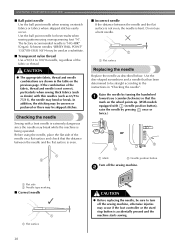
... dangerous. Needle precautions 1 Be sure to observe the following table when choosing the thread and needle appropriate for knits Cotton thread Synthetic thread Silk thread Synthetic thread Silk thread Size 60-90 50 60-90 50 30 50 50-60 50-60 50-90...Thick fabrics Stretch fabrics Denim Corduroy Tweed Jersey Tricot Easily frayed fabrics For top-stitching Thread Type Cotton thread Synthetic thread Silk thread Cotton thread Synthetic thread Silk thread Cotton thread Synthetic thread Silk thread Thread for the fabric that should be used depends on sewing machine needles. It may bend...
... dangerous. Needle precautions 1 Be sure to observe the following table when choosing the thread and needle appropriate for knits Cotton thread Synthetic thread Silk thread Synthetic thread Silk thread Size 60-90 50 60-90 50 30 50 50-60 50-60 50-90...Thick fabrics Stretch fabrics Denim Corduroy Tweed Jersey Tricot Easily frayed fabrics For top-stitching Thread Type Cotton thread Synthetic thread Silk thread Cotton thread Synthetic thread Silk thread Cotton thread Synthetic thread Silk thread Thread for the fabric that should be used depends on sewing machine needles. It may bend...
Users Manual - English
Page 32
... the needle as denim) with a bent needle is extremely dangerous since the needle may bend or break. CAUTION ● The appropriate fabric, thread and needle combinations are shown in "Checking the needle". Before using monogramming foot "N". Raise the needle by turning the handwheel a toward you (counterclockwise...needles "JERSEY BALL POINT" 130/705H SUK 90/14 may be used as 65/9 to 100/16 needle, regardless of the fabric, thread and needle is accidentally pressed and the machine starts sewing. Use the ball point needle for best results when sewing patterns using the needle...
... the needle as denim) with a bent needle is extremely dangerous since the needle may bend or break. CAUTION ● The appropriate fabric, thread and needle combinations are shown in "Checking the needle". Before using monogramming foot "N". Raise the needle by turning the handwheel a toward you (counterclockwise...needles "JERSEY BALL POINT" 130/705H SUK 90/14 may be used as 65/9 to 100/16 needle, regardless of the fabric, thread and needle is accidentally pressed and the machine starts sewing. Use the ball point needle for best results when sewing patterns using the needle...


