
Instruction Manual - English and Spanish
Page 1
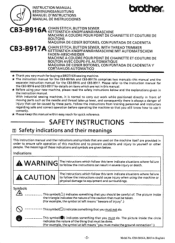
... CADENETA CB3-B917A CHAIN STITCH, BUTTON SEyVER, WITH THREAD TRIMMER KETTENSTICH-KNOPFANNAHMASCHINE MIT AUTOMATISCHEM FADEN-ABSCHNEIDER MACHINE A COUDRE POUR POINT DE CHAINETTE ET COUTURE DE BOUTON AVEC COUPE-FIL AUTOMATIQUE MAQUINA DE COSER BOTONES, CON PUNTADA DE CADENETA Y CORTAHILOS AUTOMATICO * Thank you very much for buying a BROTHER sewing machine. * The instruction manual for the CB3-B916A and CB3-B917A comprises two manuals--this manual and the separate instruction manual for...
... CADENETA CB3-B917A CHAIN STITCH, BUTTON SEyVER, WITH THREAD TRIMMER KETTENSTICH-KNOPFANNAHMASCHINE MIT AUTOMATISCHEM FADEN-ABSCHNEIDER MACHINE A COUDRE POUR POINT DE CHAINETTE ET COUTURE DE BOUTON AVEC COUPE-FIL AUTOMATIQUE MAQUINA DE COSER BOTONES, CON PUNTADA DE CADENETA Y CORTAHILOS AUTOMATICO * Thank you very much for buying a BROTHER sewing machine. * The instruction manual for the CB3-B916A and CB3-B917A comprises two manuals--this manual and the separate instruction manual for...

Instruction Manual - English and Spanish
Page 2
... machine will immediately start operating, which could result in injury. • If an error occurs in machine operation, or if abnormal noises or smells are noticed, immediately turn the pulley until installation is complete, otherwise the machine may operate if the treadle is used for any electrical work that no oil gets into any objects against the machine while sewing, as your nearest Brother dealer...
... machine will immediately start operating, which could result in injury. • If an error occurs in machine operation, or if abnormal noises or smells are noticed, immediately turn the pulley until installation is complete, otherwise the machine may operate if the treadle is used for any electrical work that no oil gets into any objects against the machine while sewing, as your nearest Brother dealer...
Instruction Manual - English and Spanish
Page 3
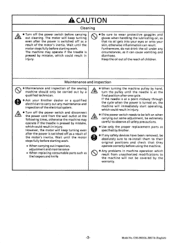
.... CB3-B916A, B917A (English) A 5 Turn off as However, the motor will not be absolutely sure to re-install them to carry out any safety devices have been removed, be covered by Brother. Model No. adjustment and maintenance • When replacing consumable parts such as it can result. Keep the oil out of the reach of the sewing When turning the machine pulley by mistake, If the needle...
.... CB3-B916A, B917A (English) A 5 Turn off as However, the motor will not be absolutely sure to re-install them to carry out any safety devices have been removed, be covered by Brother. Model No. adjustment and maintenance • When replacing consumable parts such as it can result. Keep the oil out of the reach of the sewing When turning the machine pulley by mistake, If the needle...
Instruction Manual - English and Spanish
Page 4
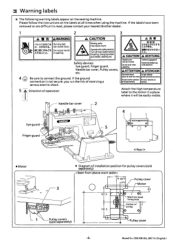
... your nearest Brother dealer. 1 2 3 A IIII * AWARNING illh ts'it will be easily visible. Do not touch when operating. CB3-B916A, B917A (English) glifac11117.tbSULA Z..7&. 2 Warning labels * The following warning labels appear on the labels at all times when using the machine. puede quemarle las mans. Needle bar cover 2 • • Eye guard Finger guard 5 O 0 • Motor • Diagram of installation position for pulley covers (sold separately...
... your nearest Brother dealer. 1 2 3 A IIII * AWARNING illh ts'it will be easily visible. Do not touch when operating. CB3-B916A, B917A (English) glifac11117.tbSULA Z..7&. 2 Warning labels * The following warning labels appear on the labels at all times when using the machine. puede quemarle las mans. Needle bar cover 2 • • Eye guard Finger guard 5 O 0 • Motor • Diagram of installation position for pulley covers (sold separately...
Instruction Manual - English and Spanish
Page 5
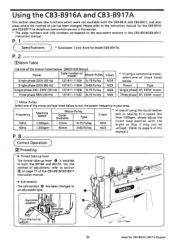
CB3-B916A, B917A (English) P. 1 Specifications ) * Subclasses -7 and -8 are not in this manual.) P. 8 (Correct Operation ['Threading • Thread take-up lever The thread take-up lever 0 is installed to an adjustable type. P. 2 EiWork Table Use one of the motors listed below. (BROTHER Motor) Power Code number of model Motor-Pulley V-belt Single phase 220V (50 Hz) 127-911-11504 N-75 Pulley M24 Single phase 220V (60 Hz) 127-911-11604 N-65 Pulley M23 Single ...
CB3-B916A, B917A (English) P. 1 Specifications ) * Subclasses -7 and -8 are not in this manual.) P. 8 (Correct Operation ['Threading • Thread take-up lever The thread take-up lever 0 is installed to an adjustable type. P. 2 EiWork Table Use one of the motors listed below. (BROTHER Motor) Power Code number of model Motor-Pulley V-belt Single phase 220V (50 Hz) 127-911-11504 N-75 Pulley M24 Single phase 220V (60 Hz) 127-911-11604 N-65 Pulley M23 Single ...
Instruction Manual - English and Spanish
Page 6
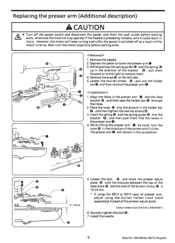
... body 0 . 4. CB3-B916A, B917A (English) Turn the brake lever shaft @ until the brake shoe O is not being trimmed 2-2. Install the pedal 0 . Pedal stoppers 2. Loosen the set screw @ to secure the brake lever shaft @ . * If the brake is turned on page 27 of the arrow. 2. Tighten the set screw @ at low temperatures and low operating speeds and causing the machine to use only the mechanical two-pedal.) 1. Release...
... body 0 . 4. CB3-B916A, B917A (English) Turn the brake lever shaft @ until the brake shoe O is not being trimmed 2-2. Install the pedal 0 . Pedal stoppers 2. Loosen the set screw @ to secure the brake lever shaft @ . * If the brake is turned on page 27 of the arrow. 2. Tighten the set screw @ at low temperatures and low operating speeds and causing the machine to use only the mechanical two-pedal.) 1. Release...
Instruction Manual - English and Spanish
Page 7
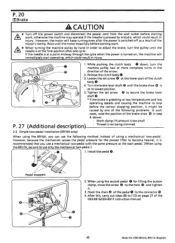
... the spring 0 up position. Insert the spring and the spring guide @ into the bracket 0 , and then push them . ----- 0 0 O 4. Loosen the bolt @ and move the presser adjust plate fi)D until the distance between the top of the feed plate 0 and the end of the button clamp m is switched off the power switch and disconnect the power cord from the wall outlet before starting work . 1. Install the needle. 1 -7- Remove the needle. 2. Model No. However, the motor...
... the spring 0 up position. Insert the spring and the spring guide @ into the bracket 0 , and then push them . ----- 0 0 O 4. Loosen the bolt @ and move the presser adjust plate fi)D until the distance between the top of the feed plate 0 and the end of the button clamp m is switched off the power switch and disconnect the power cord from the wall outlet before starting work . 1. Install the needle. 1 -7- Remove the needle. 2. Model No. However, the motor...


