
Instruction Manual - English
Page 6
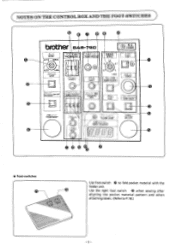
...-4* COUNTER DEC FAST STEP BACK FOLDER RESET SET 4D 77 -LD - ( NOTES ON THE CONTROL BOX AND THE FOOT-SWITCHES 0 0 00 brother BAS - Use the right foot switch ® when sewing after aligning the pocket material pattern and when attaching labels. (Refer to fold pocket material ...with the folder unit. SD f -H MODE AUT02 MANUAL PRO A NO. _t THR AO MONIT SPEED 5 (A) la M POWER 5'7\ I-TEST AUTO1 LABEL O 4 `M STEP 70x;0- STACKER ON OFF T`077 0'29 - H:...
...-4* COUNTER DEC FAST STEP BACK FOLDER RESET SET 4D 77 -LD - ( NOTES ON THE CONTROL BOX AND THE FOOT-SWITCHES 0 0 00 brother BAS - Use the right foot switch ® when sewing after aligning the pocket material pattern and when attaching labels. (Refer to fold pocket material ...with the folder unit. SD f -H MODE AUT02 MANUAL PRO A NO. _t THR AO MONIT SPEED 5 (A) la M POWER 5'7\ I-TEST AUTO1 LABEL O 4 `M STEP 70x;0- STACKER ON OFF T`077 0'29 - H:...

Instruction Manual - English
Page 7
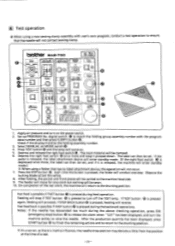
When the MANUAL mode is available if this button and press the START button. Press the button to turn it will decrease the production piece counter by one ... see the needle action when the machine is pressed). To restart sewing, repress this button to out the light. Press to the folder. O MODE LABEL MANUAL AUTO1 AUTO2 • STEP • STACKER ON • OFF O FOLDER RESET O PROGRAM NO. @ FLOPPY 0 THREAD MONITOR O FOOT O SPEED O BOBBIN CHANGE 0 TEST @ START @ STEP BACK O FAST...
When the MANUAL mode is available if this button and press the START button. Press the button to turn it will decrease the production piece counter by one ... see the needle action when the machine is pressed). To restart sewing, repress this button to out the light. Press to the folder. O MODE LABEL MANUAL AUTO1 AUTO2 • STEP • STACKER ON • OFF O FOLDER RESET O PROGRAM NO. @ FLOPPY 0 THREAD MONITOR O FOOT O SPEED O BOBBIN CHANGE 0 TEST @ START @ STEP BACK O FAST...

Instruction Manual - English
Page 19
... LABEL STEP 4 STACKER ON OFF FOLDER RESET [ In a case of upper thread breakage • If the ALARM CODE lamp comes on with pattern alignment operation MANUAL: For folder action checking * Set STACKER ON • OFF button O.
... LABEL STEP 4 STACKER ON OFF FOLDER RESET [ In a case of upper thread breakage • If the ALARM CODE lamp comes on with pattern alignment operation MANUAL: For folder action checking * Set STACKER ON • OFF button O.

Instruction Manual - English
Page 20
... 0. 2. If the pocket pattern and the front material ED are not in step 6 above, the machine will come on the folding group assembly. MODE AUTOS MANUAL AUTOI IAPEL STEP 2,9,V13 - .0 (Pattern-alignment sewing: Select AUTO2] 1. Center blade assembly 0 will descent a little further.
... 0. 2. If the pocket pattern and the front material ED are not in step 6 above, the machine will come on the folding group assembly. MODE AUTOS MANUAL AUTOI IAPEL STEP 2,9,V13 - .0 (Pattern-alignment sewing: Select AUTO2] 1. Center blade assembly 0 will descent a little further.

Instruction Manual - English
Page 21
... foot switch 0 and keep it pressed down . Clamp the label ® in step 7 above, the machine will be switched to the standby condition. 0 MODE 0 ALU02 MANUAL AUTOI LABEL 2.7 v7 STEP STACKERON OFF FOLDER RESET \ N e X If the STEP switch is pressed at the same time as the FOLDER RESET ® button is...
... foot switch 0 and keep it pressed down . Clamp the label ® in step 7 above, the machine will be switched to the standby condition. 0 MODE 0 ALU02 MANUAL AUTOI LABEL 2.7 v7 STEP STACKERON OFF FOLDER RESET \ N e X If the STEP switch is pressed at the same time as the FOLDER RESET ® button is...

Instruction Manual - English
Page 23
... 2-1 on the control box as follows: For left -side material, the folder will move to OFF. Oa . . . . After this, the side to LABEL. -V MODE AUT02 MANUAL AUT0I LABEL A5->7. The stacker roller will operate in AUTO1 mode. (If you wish to re-sew or change the order of sewing, re-set...
... 2-1 on the control box as follows: For left -side material, the folder will move to OFF. Oa . . . . After this, the side to LABEL. -V MODE AUT02 MANUAL AUT0I LABEL A5->7. The stacker roller will operate in AUTO1 mode. (If you wish to re-sew or change the order of sewing, re-set...

Instruction Manual - English
Page 24
... MANU, Right MANU, Right LABEL, Right -- 0I LABEL, Right Si LABEL, Right 01 LABEL, Right • DIP SW 2-1 OFF . . . AUTO1 AUTO2 MANUAL LABEL AUTO1, Right AUTO1, left AUTO2, Right 1 MANU, Right AUTO2, left 01 MANU, Right AUTO1, Right AUTO1, left AUTO2, Right AUTO2, left MANU, Right...Use when sewing alternately on one side of the material. AUTO1, left and right of the material only. The labels will not alternate in MANUAL mode. LABEL, Right -- *Mode and stacker roller movement DIP SW 2-1 ON (Folder circuit board) OFF Continuous mode Alternating mode •...
... MANU, Right MANU, Right LABEL, Right -- 0I LABEL, Right Si LABEL, Right 01 LABEL, Right • DIP SW 2-1 OFF . . . AUTO1 AUTO2 MANUAL LABEL AUTO1, Right AUTO1, left AUTO2, Right 1 MANU, Right AUTO2, left 01 MANU, Right AUTO1, Right AUTO1, left AUTO2, Right AUTO2, left MANU, Right...Use when sewing alternately on one side of the material. AUTO1, left and right of the material only. The labels will not alternate in MANUAL mode. LABEL, Right -- *Mode and stacker roller movement DIP SW 2-1 ON (Folder circuit board) OFF Continuous mode Alternating mode •...
Instruction Manual - English
Page 26
... P ALARM CODE D 25PARIL EM STOP 0 O C 0 / READ 1W7SM WM PIECE COUNTER O 1. Apply air pressure and turn off the TEST lamp. Select MANUAL on . 5. Depress the right foot switch ® once more , the label can then be sewn. 10. Press the STEP button O. After folding, the ... finish the remaining actions and to return to the shunting position. )K At a corner, as there is pressed to the machine head side. 9. bather BAS-760 MODE 7.0UMLIMG PROGRAM NO. digital switch 0 to the shunting position. Depress and release the right foot switch O. t*ent9 1PREAD MONITOR fliNkt ft SPEED ...
... P ALARM CODE D 25PARIL EM STOP 0 O C 0 / READ 1W7SM WM PIECE COUNTER O 1. Apply air pressure and turn off the TEST lamp. Select MANUAL on . 5. Depress the right foot switch ® once more , the label can then be sewn. 10. Press the STEP button O. After folding, the ... finish the remaining actions and to return to the shunting position. )K At a corner, as there is pressed to the machine head side. 9. bather BAS-760 MODE 7.0UMLIMG PROGRAM NO. digital switch 0 to the shunting position. Depress and release the right foot switch O. t*ent9 1PREAD MONITOR fliNkt ft SPEED ...

Instruction Manual - English
Page 48
... cap @ and screw 0, adjust the height by moving needle-bar 0 up and down. such as to If the power switch is turned on in the manual mode.
... cap @ and screw 0, adjust the height by moving needle-bar 0 up and down. such as to If the power switch is turned on in the manual mode.

Instruction Manual - English
Page 6
... ® when sewing after aligning the pocket material pattern and when attaching labels. (Refer to fold pocket material with the folder unit. SD f -H MODE AUT02 MANUAL PRO A NO. _t THR AO MONIT SPEED 5 (A) la M POWER 5'7\ I-TEST AUTO1 LABEL O 4 `M STEP 70x;0- H: ALARM CODE EM-STOP ItrY•_79PIECE COUNTER LEW READ mAe... DEC FAST STEP BACK FOLDER RESET SET 4D 77 -LD - STACKER ON OFF T`077 0'29 - ( NOTES ON THE CONTROL BOX AND THE FOOT-SWITCHES 0 0 00 brother BAS -
... ® when sewing after aligning the pocket material pattern and when attaching labels. (Refer to fold pocket material with the folder unit. SD f -H MODE AUT02 MANUAL PRO A NO. _t THR AO MONIT SPEED 5 (A) la M POWER 5'7\ I-TEST AUTO1 LABEL O 4 `M STEP 70x;0- H: ALARM CODE EM-STOP ItrY•_79PIECE COUNTER LEW READ mAe... DEC FAST STEP BACK FOLDER RESET SET 4D 77 -LD - STACKER ON OFF T`077 0'29 - ( NOTES ON THE CONTROL BOX AND THE FOOT-SWITCHES 0 0 00 brother BAS -

Instruction Manual - English
Page 7
...button and press the START button. By changing the setting of abnormality or when the emergency stop button has been pressed. When the MANUAL mode is pressed, all machine actions will come on each time the button is pressed it on the left foot-switch starts folding ...(plain pattern material). O MODE LABEL MANUAL AUTO1 AUTO2 • STEP • STACKER ON • OFF O FOLDER RESET O PROGRAM NO. @ FLOPPY 0 THREAD MONITOR O FOOT O SPEED O BOBBIN CHANGE 0 TEST @ START...
...button and press the START button. By changing the setting of abnormality or when the emergency stop button has been pressed. When the MANUAL mode is pressed, all machine actions will come on each time the button is pressed it on the left foot-switch starts folding ...(plain pattern material). O MODE LABEL MANUAL AUTO1 AUTO2 • STEP • STACKER ON • OFF O FOLDER RESET O PROGRAM NO. @ FLOPPY 0 THREAD MONITOR O FOOT O SPEED O BOBBIN CHANGE 0 TEST @ START...

Instruction Manual - English
Page 19
... sewing AUTO2: For sewing with a display of U52, refer to "To continue sewing and To return to the shunting position" on with pattern alignment operation MANUAL: For folder action checking * Set STACKER ON • OFF button O. Press right foot-switch 0. Lamp is off: The stacker is connected. The pocket material 0 will...
... sewing AUTO2: For sewing with a display of U52, refer to "To continue sewing and To return to the shunting position" on with pattern alignment operation MANUAL: For folder action checking * Set STACKER ON • OFF button O. Press right foot-switch 0. Lamp is off: The stacker is connected. The pocket material 0 will...

Instruction Manual - English
Page 20
... check mode for pocket folding. Select AUTO2 with MODE switch 0. 2. The pocket material (I) will be switched to the machine and sewing will start . 7. MODE AUTOS MANUAL AUTOI IAPEL STEP 2,9,V13 - Press STACKER button and the lamp will return to the former state. Place pocket material 0 over center blade assembly 5. The center...
... check mode for pocket folding. Select AUTO2 with MODE switch 0. 2. The pocket material (I) will be switched to the machine and sewing will start . 7. MODE AUTOS MANUAL AUTOI IAPEL STEP 2,9,V13 - Press STACKER button and the lamp will return to the former state. Place pocket material 0 over center blade assembly 5. The center...

Instruction Manual - English
Page 21
... assembly. If the label 0 has been folded properly, depress the left foot switch ® The pocket material 0 will return to the standby condition. 0 MODE 0 ALU02 MANUAL AUTOI LABEL 2.7 v7 STEP STACKERON OFF FOLDER RESET \ N e X If the STEP switch is pressed at the same time as the FOLDER RESET ® button is...
... assembly. If the label 0 has been folded properly, depress the left foot switch ® The pocket material 0 will return to the standby condition. 0 MODE 0 ALU02 MANUAL AUTOI LABEL 2.7 v7 STEP STACKERON OFF FOLDER RESET \ N e X If the STEP switch is pressed at the same time as the FOLDER RESET ® button is...

Instruction Manual - English
Page 23
... . . . . When sewing the right side material and attaching a label, the folder will operate to attach a label, and when sewing the left -side material - -V MODE AUT02 MANUAL AUT0I LABEL A5->7. Set the mode @ on the control box to the desired material for sewing (the LED at the right-side material side, and...
... . . . . When sewing the right side material and attaching a label, the folder will operate to attach a label, and when sewing the left -side material - -V MODE AUT02 MANUAL AUT0I LABEL A5->7. Set the mode @ on the control box to the desired material for sewing (the LED at the right-side material side, and...

Instruction Manual - English
Page 24
... Use when sewing alternately on one side of the selector switch will illuminate to indicate the side on which the material is set. AUTO1 AUTO2 MANUAL LABEL AUTO1, Right AUTO1, left AUTO2, Right 1 MANU, Right AUTO2, left 01 MANU, Right AUTO1, Right AUTO1, left AUTO2, Right ... movement are reset when either the MODE switch or stacker switch is ignored. The stacker operation will be attached to the right side.) AUTO1 AUTO2 MANUAL LABEL AUTO1, Right AUTO1, Right 0 AUTO1, Right -0I AUTO1, Right AUTO2, Right 0 AUTO2, Right ill{ AUTO2, Right AUTO2, Right MANU, Right 0 MANU...
... Use when sewing alternately on one side of the selector switch will illuminate to indicate the side on which the material is set. AUTO1 AUTO2 MANUAL LABEL AUTO1, Right AUTO1, left AUTO2, Right 1 MANU, Right AUTO2, left 01 MANU, Right AUTO1, Right AUTO1, left AUTO2, Right ... movement are reset when either the MODE switch or stacker switch is ignored. The stacker operation will be attached to the right side.) AUTO1 AUTO2 MANUAL LABEL AUTO1, Right AUTO1, Right 0 AUTO1, Right -0I AUTO1, Right AUTO2, Right 0 AUTO2, Right ill{ AUTO2, Right AUTO2, Right MANU, Right 0 MANU...

Instruction Manual - English
Page 26
...LAM WwWW STEP 6 FLOPPY O© KEMW. 0FOOT O X1000 C.1/018 BOBBIN CHANGE START 0 SAT9A"C1K3ERON•OFF TAIth,>9 BOBBIN COUNTS 99199- Select MANUAL on the power switch. 2. If TEST button 0 is pressed, the folder will proceed; Notes: If the needle has descended too much during feed... press START button m to finish the remaining actions and to return to ensure that has no label attachment device, this while. 8. bather BAS-760 MODE 7.0UMLIMG PROGRAM NO. On completion of a test. -23- The main material will reverse. Apply air pressure and turn off the ...
...LAM WwWW STEP 6 FLOPPY O© KEMW. 0FOOT O X1000 C.1/018 BOBBIN CHANGE START 0 SAT9A"C1K3ERON•OFF TAIth,>9 BOBBIN COUNTS 99199- Select MANUAL on the power switch. 2. If TEST button 0 is pressed, the folder will proceed; Notes: If the needle has descended too much during feed... press START button m to finish the remaining actions and to return to ensure that has no label attachment device, this while. 8. bather BAS-760 MODE 7.0UMLIMG PROGRAM NO. On completion of a test. -23- The main material will reverse. Apply air pressure and turn off the ...

Instruction Manual - English
Page 48
... be matched the end of needle with rotary hook point 6. -45- M Needle-bar height adjustment 4 Gauge 1 t 10 X When needle-bar 0 is turned on in the manual mode. Remove screw 0 and then needle ® and needle thread guide ®. 4. El Needle and rotary hook timing 1.8mm Gauge 2 1.8mm 0-0.05mm 1. Remove flat-head...
... be matched the end of needle with rotary hook point 6. -45- M Needle-bar height adjustment 4 Gauge 1 t 10 X When needle-bar 0 is turned on in the manual mode. Remove screw 0 and then needle ® and needle thread guide ®. 4. El Needle and rotary hook timing 1.8mm Gauge 2 1.8mm 0-0.05mm 1. Remove flat-head...


