

Instruction Manual - English
Page 2
...THE CONTROL BOX AND THE FOOT-SWITCHES ) 3 ( INSTALLATION ) 5 gEMEIEgglE Installation of the machine table 5 Removal of the fixing bolts from the machine 5 Installation of the spool stand 6 Installation of the control box 6 Connection of the foot-switch connector 6 Connection of the air hose 7 Positioning of the front supporter 7 Installation of the folding group assembly 8 ( LUBRICATION ) 9 (CORRECT OPERATION) 10 ❑1 Needle attachment 10 ❑2 Upper threading 10 M Bobbin case threading 11 El Bobbin thread winding 11 M Thread tension 12 ( SEWING) 13...
...THE CONTROL BOX AND THE FOOT-SWITCHES ) 3 ( INSTALLATION ) 5 gEMEIEgglE Installation of the machine table 5 Removal of the fixing bolts from the machine 5 Installation of the spool stand 6 Installation of the control box 6 Connection of the foot-switch connector 6 Connection of the air hose 7 Positioning of the front supporter 7 Installation of the folding group assembly 8 ( LUBRICATION ) 9 (CORRECT OPERATION) 10 ❑1 Needle attachment 10 ❑2 Upper threading 10 M Bobbin case threading 11 El Bobbin thread winding 11 M Thread tension 12 ( SEWING) 13...
Instruction Manual - English
Page 4
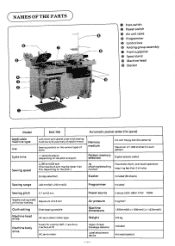
...:t4;1L1II1;.IIII,II',III, (riffI*lAtorI_pIiIliMf;kIl.'.l.i-!f O Foot-switch • Power switch € Air unit valve O Programmer • Control box O Folding group assembly O Front supporter C) Spool stand • Machine head Cl Stacker Model Appl icable machine type Use Cycle time Sewing speed BAS-760 Automatic pocket setter (for jeans) Lock stitch and special cross stitch sewing machine with automatic thread trimmer Sewing pockets on the various types of jeans 11 seconds approx. (depending on the...
...:t4;1L1II1;.IIII,II',III, (riffI*lAtorI_pIiIliMf;kIl.'.l.i-!f O Foot-switch • Power switch € Air unit valve O Programmer • Control box O Folding group assembly O Front supporter C) Spool stand • Machine head Cl Stacker Model Appl icable machine type Use Cycle time Sewing speed BAS-760 Automatic pocket setter (for jeans) Lock stitch and special cross stitch sewing machine with automatic thread trimmer Sewing pockets on the various types of jeans 11 seconds approx. (depending on the...

Instruction Manual - English
Page 7
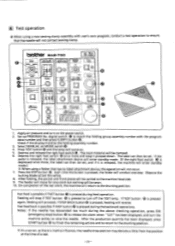
... left foot-switch starts folding (plain pattern material). Press this button to set .) Press this to light the lamp and the machine will come on the left foot switch is pressed). Press this button to display the number of the folding actions can be selected. By changing the setting of DIP switch 2-1, the roller operation can be sewn. -4- If the emergency stop automatically at the bobbin...
... left foot-switch starts folding (plain pattern material). Press this button to set .) Press this to light the lamp and the machine will come on the left foot switch is pressed). Press this button to display the number of the folding actions can be selected. By changing the setting of DIP switch 2-1, the roller operation can be sewn. -4- If the emergency stop automatically at the bobbin...

Instruction Manual - English
Page 8
... the hole in the front cover. 2. Remove nylatch @ and then remove frame side cover (R) upper cap @. 3. Remove fixing bolt 0 on the sewing clamp. 4. The table has eight level adjusters. If the table does not sit well, loosen nuts @ and turn up adjusters 0, and the table can be sure to secure it with bolts to secure them during transportation. 1. Save removed fixing bolts 0 and O for the machine's exclusive use . C INSTALLATION * Supply power directly...
... the hole in the front cover. 2. Remove nylatch @ and then remove frame side cover (R) upper cap @. 3. Remove fixing bolt 0 on the sewing clamp. 4. The table has eight level adjusters. If the table does not sit well, loosen nuts @ and turn up adjusters 0, and the table can be sure to secure it with bolts to secure them during transportation. 1. Save removed fixing bolts 0 and O for the machine's exclusive use . C INSTALLATION * Supply power directly...

Instruction Manual - English
Page 14
... for any idle rotation of the bobbin 3. Replace the bobbin. After replacing bobbin case @, press BOBBIN CHANGE button 0. Pass the bobbin thread from adjustment spring 0. The motor may overheat, if the bobbin idles fora long time or if it rotates without a bobbin. The display will move toward you and stop; Removal of the bobbin case .m, irttg:ED) BOBBIN CHANGE r START eah FAST I STEP BACK U (1) Press BOBBIN CHANGE button 0 and the machine will show "U99" which has now...
... for any idle rotation of the bobbin 3. Replace the bobbin. After replacing bobbin case @, press BOBBIN CHANGE button 0. Pass the bobbin thread from adjustment spring 0. The motor may overheat, if the bobbin idles fora long time or if it rotates without a bobbin. The display will move toward you and stop; Removal of the bobbin case .m, irttg:ED) BOBBIN CHANGE r START eah FAST I STEP BACK U (1) Press BOBBIN CHANGE button 0 and the machine will show "U99" which has now...

Instruction Manual - English
Page 16
... code is off, press THREAD MONITOR button to turn on . . 6. switch ID. If the lamp is displayed, a photo sensor, a motor or a PCB may need replacement. In addition, if error codes U94 or U 95 are displayed, move to the normal standby position, and then turn it on power switch. To start sewing with a new bobbin, set the sewing speed. 9. STEP BACK 1 0 0 U C) 72LA - The machine will move the sewing clamp or the machine...
... code is off, press THREAD MONITOR button to turn on . . 6. switch ID. If the lamp is displayed, a photo sensor, a motor or a PCB may need replacement. In addition, if error codes U94 or U 95 are displayed, move to the normal standby position, and then turn it on power switch. To start sewing with a new bobbin, set the sewing speed. 9. STEP BACK 1 0 0 U C) 72LA - The machine will move the sewing clamp or the machine...

Instruction Manual - English
Page 17
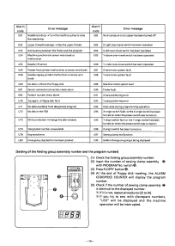
... machine operation will display the program number. (5) Check if the number of sewing clamp assembly e is being displayed [Setting of floppy disk reading, the ALARM CODE/PIECE COUNTER will be interrupted. 6B 3 Is! 1 -14- X If it is not, repeat procedures (2) to raise the needle-bar Alarm code U82 Error message No air pressure or air zipper has been turned off U52 Upper thread breakage- Alarm code U51 Error message Needle-bar drop...
... machine operation will display the program number. (5) Check if the number of sewing clamp assembly e is being displayed [Setting of floppy disk reading, the ALARM CODE/PIECE COUNTER will be interrupted. 6B 3 Is! 1 -14- X If it is not, repeat procedures (2) to raise the needle-bar Alarm code U82 Error message No air pressure or air zipper has been turned off U52 Upper thread breakage- Alarm code U51 Error message Needle-bar drop...

Instruction Manual - English
Page 18
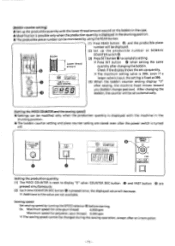
... P5 - hr. Lower thread amount Press SET button 0 when setting the same quantity after changing the bobbin. After changing the bobbin, the counter will be displayed. (2) Set up the producible number at 399. 7 TINA% READ 1 PIECE COUNTER 1960 (4) When the bobbin counter setting display "0" after sewing, the machine head moves toward you (bobbin change position). Check if the display shows the set automatically. [Setting the PIECE COUNTER and the sewing speed] *Settings can be...
... P5 - hr. Lower thread amount Press SET button 0 when setting the same quantity after changing the bobbin. After changing the bobbin, the counter will be displayed. (2) Set up the producible number at 399. 7 TINA% READ 1 PIECE COUNTER 1960 (4) When the bobbin counter setting display "0" after sewing, the machine head moves toward you (bobbin change position). Check if the display shows the set automatically. [Setting the PIECE COUNTER and the sewing speed] *Settings can be...

Instruction Manual - English
Page 25
... backward. [To fast feed] The forward feeding action will stop after pressing TEST button 0 forward feeding will come on . Pass the upper thread with the thread take-up at a thread breakage. The machine will then become fast. and the (reverse) feeding will start sewing and return to where the thread was broken. b(Other BAS-760 elDgessilie PROGRAM NO ±Wers9 DREAD PONTOS 0O STEP FOOT 0 noOT-oga "W" 4 4 0 (1) L'LL...
... backward. [To fast feed] The forward feeding action will stop after pressing TEST button 0 forward feeding will come on . Pass the upper thread with the thread take-up at a thread breakage. The machine will then become fast. and the (reverse) feeding will start sewing and return to where the thread was broken. b(Other BAS-760 elDgessilie PROGRAM NO ±Wers9 DREAD PONTOS 0O STEP FOOT 0 noOT-oga "W" 4 4 0 (1) L'LL...
Instruction Manual - English
Page 26
... the tucking blade action this operation will enter standby mode.) When using a new sewing clamp assembly with the program data number and then press FLOPPY button ea. Depress the right foot switch ® once more , the label can then be sewn. 10. bather BAS-760 MODE 7.0UMLIMG PROGRAM NO. If the pedal is released, the label attachment device will enter standby mode. (If...
... the tucking blade action this operation will enter standby mode.) When using a new sewing clamp assembly with the program data number and then press FLOPPY button ea. Depress the right foot switch ® once more , the label can then be sewn. 10. bather BAS-760 MODE 7.0UMLIMG PROGRAM NO. If the pedal is released, the label attachment device will enter standby mode. (If...

Instruction Manual - English
Page 39
...17) Move the needles to between ® will be set to any desired values. [Example 2] The program as a reference when programming, problems with lifting of the bobbin thread, incorrect cutting of the sewing pattern and also have...needle thread and uneven needle distribution on cycle time, they reach the desired position, press the W and H keys to stop the feed operation. The Y feed timing of the 5 needles. Next, add the speed reduction mode. 0 620 0 r 630 J r 444 J [1] (14) Read the program that is completed up to and points and input "444" L. If the sewing clamp assembly...
...17) Move the needles to between ® will be set to any desired values. [Example 2] The program as a reference when programming, problems with lifting of the bobbin thread, incorrect cutting of the sewing pattern and also have...needle thread and uneven needle distribution on cycle time, they reach the desired position, press the W and H keys to stop the feed operation. The Y feed timing of the 5 needles. Next, add the speed reduction mode. 0 620 0 r 630 J r 444 J [1] (14) Read the program that is completed up to and points and input "444" L. If the sewing clamp assembly...

Instruction Manual - English
Page 49
... pressure adjusting screw ®. 2. Remove clamping screws @ and then bellows assembly ®. 5. Remove face-plate oil cap 0 and loosen screw O. Remove clamping bolt 0 and then side cover 5 . 3. X When the fixed knife 0 becomes blunt, sharpen it as illustrated at right. -46- Press the FOOT button to raise working presser foot 0. 3. Removal of the fixed knife and the movable knife Turn off the power switch. Remove clamping bolt 0 and then bobbin case holder position bracket 0. 7. Remove flat-head screws 0 and then needle plate RR @ and needle plate...
... pressure adjusting screw ®. 2. Remove clamping screws @ and then bellows assembly ®. 5. Remove face-plate oil cap 0 and loosen screw O. Remove clamping bolt 0 and then side cover 5 . 3. X When the fixed knife 0 becomes blunt, sharpen it as illustrated at right. -46- Press the FOOT button to raise working presser foot 0. 3. Removal of the fixed knife and the movable knife Turn off the power switch. Remove clamping bolt 0 and then bobbin case holder position bracket 0. 7. Remove flat-head screws 0 and then needle plate RR @ and needle plate...

Instruction Manual - English
Page 2
...THE CONTROL BOX AND THE FOOT-SWITCHES ) 3 ( INSTALLATION ) 5 gEMEIEgglE Installation of the machine table 5 Removal of the fixing bolts from the machine 5 Installation of the spool stand 6 Installation of the control box 6 Connection of the foot-switch connector 6 Connection of the air hose 7 Positioning of the front supporter 7 Installation of the folding group assembly 8 ( LUBRICATION ) 9 (CORRECT OPERATION) 10 ❑1 Needle attachment 10 ❑2 Upper threading 10 M Bobbin case threading 11 El Bobbin thread winding 11 M Thread tension 12 ( SEWING) 13...
...THE CONTROL BOX AND THE FOOT-SWITCHES ) 3 ( INSTALLATION ) 5 gEMEIEgglE Installation of the machine table 5 Removal of the fixing bolts from the machine 5 Installation of the spool stand 6 Installation of the control box 6 Connection of the foot-switch connector 6 Connection of the air hose 7 Positioning of the front supporter 7 Installation of the folding group assembly 8 ( LUBRICATION ) 9 (CORRECT OPERATION) 10 ❑1 Needle attachment 10 ❑2 Upper threading 10 M Bobbin case threading 11 El Bobbin thread winding 11 M Thread tension 12 ( SEWING) 13...

Instruction Manual - English
Page 7
... foot-switch starts folding. By changing the setting of pieces to see the needle action when the machine is pressed). For resetting the folder to set .) Press this button to 399 can be sewn. -4- For setting a program number when writing programs. For writing and reading programs. Press this to light the lamp and the machine will stop automatically at the bobbin counter to store the number...
... foot-switch starts folding. By changing the setting of pieces to see the needle action when the machine is pressed). For resetting the folder to set .) Press this button to 399 can be sewn. -4- For setting a program number when writing programs. For writing and reading programs. Press this to light the lamp and the machine will stop automatically at the bobbin counter to store the number...

Instruction Manual - English
Page 14
After replacing bobbin case @, press BOBBIN CHANGE button 0. Bobbin case threading 4 1411 N * Bobbin 0 released. Removal of the bobbin case .m, irttg:ED) BOBBIN CHANGE r START eah FAST I STEP BACK U (1) Press BOBBIN CHANGE button 0 and the machine will show "U99" which has now stopped flashing. (3) Press START button 0). Pass the bobbin thread from adjustment spring 0. 2 Bobbin case threading 1. Removal of the bobbin. X Check for any idle rotation of the bobbin 3. The motor may overheat, if the bobbin idles fora long time or if it rotates without a bobbin. If ...
After replacing bobbin case @, press BOBBIN CHANGE button 0. Bobbin case threading 4 1411 N * Bobbin 0 released. Removal of the bobbin case .m, irttg:ED) BOBBIN CHANGE r START eah FAST I STEP BACK U (1) Press BOBBIN CHANGE button 0 and the machine will show "U99" which has now stopped flashing. (3) Press START button 0). Pass the bobbin thread from adjustment spring 0. 2 Bobbin case threading 1. Removal of the bobbin. X Check for any idle rotation of the bobbin 3. The motor may overheat, if the bobbin idles fora long time or if it rotates without a bobbin. If ...

Instruction Manual - English
Page 16
... start sewing with a new bobbin, set the sewing speed. 9. Press STACKER button O to ON again. RM CODE ' ERRS -STOP 0of PIECE COUNTER O a X An alarm code for alarm code U90 also, but if this time, read the following notes: brother BAB-760 MODE AUTOR YMCA 70/"LMg PROGRAM NO ttfr9 THREAD MOMTOR 01 LABEL 75027 STEP 170 ie I START 0 TAT FAST T.TT. Insert floppy disk O. 3. Match the number of sewing clamp assembly...
... start sewing with a new bobbin, set the sewing speed. 9. Press STACKER button O to ON again. RM CODE ' ERRS -STOP 0of PIECE COUNTER O a X An alarm code for alarm code U90 also, but if this time, read the following notes: brother BAB-760 MODE AUTOR YMCA 70/"LMg PROGRAM NO ttfr9 THREAD MOMTOR 01 LABEL 75027 STEP 170 ie I START 0 TAT FAST T.TT. Insert floppy disk O. 3. Match the number of sewing clamp assembly...
Instruction Manual - English
Page 17
...! 1 -14- X If it is identical to sew with PROGRAM No. X If you try to the displayed number. Alarm code U51 Error message Needle-bar drop - Turn the machine pulley to (4). switch 413. (3) Press FLOPPY button G. (4) At the end of sewing clamp assembly e is not, repeat procedures (2) to raise the needle-bar Alarm code U82 Error message No air pressure or air zipper has been turned off U52 Upper thread breakage-
...! 1 -14- X If it is identical to sew with PROGRAM No. X If you try to the displayed number. Alarm code U51 Error message Needle-bar drop - Turn the machine pulley to (4). switch 413. (3) Press FLOPPY button G. (4) At the end of sewing clamp assembly e is not, repeat procedures (2) to raise the needle-bar Alarm code U82 Error message No air pressure or air zipper has been turned off U52 Upper thread breakage-
Instruction Manual - English
Page 18
... piece number can be monitored by turning the SPEED selector p before starting. L - 1ALARM CODE * The maximum setting valve is pressed once, the displayed value will be changed during the sewing operation, except after changing the bobbin. Check if the display shows the set automatically. [Setting the PIECE COUNTER and the sewing speed] *Settings can be modified only when the production quantity is displayed with the lower thread amount...
... piece number can be monitored by turning the SPEED selector p before starting. L - 1ALARM CODE * The maximum setting valve is pressed once, the displayed value will be changed during the sewing operation, except after changing the bobbin. Check if the display shows the set automatically. [Setting the PIECE COUNTER and the sewing speed] *Settings can be modified only when the production quantity is displayed with the lower thread amount...
Instruction Manual - English
Page 25
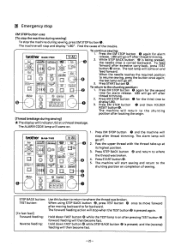
... the upper thread with the thread take-up at a thread breakage. Reverse feeding: Hold down FAST button (5 while the TEST lamp is pressed; U80 will come on . Press EM STOP button 0 again for the second time for alarm release. Press EM STOP button 0 for the third time to the shunting position: 1. Press EM STOP button 0 and then FOLDER RESET button g). Press EM STOP button 0 and the machine will...
... the upper thread with the thread take-up at a thread breakage. Reverse feeding: Hold down FAST button (5 while the TEST lamp is pressed; U80 will come on . Press EM STOP button 0 again for the second time for alarm release. Press EM STOP button 0 for the third time to the shunting position: 1. Press EM STOP button 0 and then FOLDER RESET button g). Press EM STOP button 0 and the machine will...

Instruction Manual - English
Page 49
... presser bar O. The standard spring tension for the sewing clamp spring is raised. 1. Removal of the fixed knife and the movable knife Turn off the power switch. Remove clamping screws 0 and then tilt the machine head. 6. Remove clamping bolt 0 and then bobbin case holder position bracket 0. 7. Remove clamping screws @ and then bellows assembly ®. 5. LI Presser foot height adjustment 37mm O ITAIZ FOOT O 14.5mm The standard presser foot height is 14.5 mm above the needle plate when presser foot 0 is 37 mm. 0 Removal of the fixed...
... presser bar O. The standard spring tension for the sewing clamp spring is raised. 1. Removal of the fixed knife and the movable knife Turn off the power switch. Remove clamping screws 0 and then tilt the machine head. 6. Remove clamping bolt 0 and then bobbin case holder position bracket 0. 7. Remove clamping screws @ and then bellows assembly ®. 5. LI Presser foot height adjustment 37mm O ITAIZ FOOT O 14.5mm The standard presser foot height is 14.5 mm above the needle plate when presser foot 0 is 37 mm. 0 Removal of the fixed...


