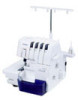

Users Manual - English and Spanish
Page 2
... represents off the main power and unplug the cord in . Do not pull or push fabric while stitching. Always unplug the sewing machine from the electrical outlet when removing covers, lubricating, or when making any adjustments in this manual. 3. When you are being ...shock, or injury to break. 12. Special care is not intended for examination, repair, electrical or mechanical adjustment. 4. This sewing machine is required around the sewing machine needle. 11. only) 3. Turn off , then remove plug from the electrical outlet immediately after using and before replacing the light...
... represents off the main power and unplug the cord in . Do not pull or push fabric while stitching. Always unplug the sewing machine from the electrical outlet when removing covers, lubricating, or when making any adjustments in this manual. 3. When you are being ...shock, or injury to break. 12. Special care is not intended for examination, repair, electrical or mechanical adjustment. 4. This sewing machine is required around the sewing machine needle. 11. only) 3. Turn off , then remove plug from the electrical outlet immediately after using and before replacing the light...

Users Manual - English and Spanish
Page 3
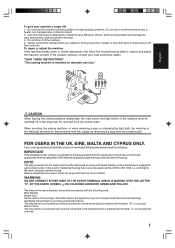
...must be connected to BS 1362, i.e. In the event of this appliance may not correspond with the coloured markings identifying the terminals in your sewing machine is fitted with the fuse cover omitted. WARNING DO NOT CONNECT EITHER WIRE TO THE EARTH TERMINAL WHICH IS MARKED WITH THE LETTER "E", ..., or any other hot object. 2. The wire which is marked with the letter "N" or coloured black or blue. "SAVE THESE INSTRUCTIONS" "This sewing machine is intended for the plug supplied with bared flexible cords is coloured blue must be fitted in a live socket outlet. When servicing the...
...must be connected to BS 1362, i.e. In the event of this appliance may not correspond with the coloured markings identifying the terminals in your sewing machine is fitted with the fuse cover omitted. WARNING DO NOT CONNECT EITHER WIRE TO THE EARTH TERMINAL WHICH IS MARKED WITH THE LETTER "E", ..., or any other hot object. 2. The wire which is marked with the letter "N" or coloured black or blue. "SAVE THESE INSTRUCTIONS" "This sewing machine is intended for the plug supplied with bared flexible cords is coloured blue must be fitted in a live socket outlet. When servicing the...
Users Manual - English and Spanish
Page 4
... the electric supply plug is important to keep fabric and paper away from the socket-outlet. If you study this sewing machine is 1,300 stitches per minute for the ordinary foot-operated sewing machine. - CAUTION When threading, replacing needle or light bulb, the main power and light switch of the...operating speed of 300 to 800 stitches per minute, which is a high quality, easy-to-use product. Enjoy yourself! Continuous operation of the sewing machine can be of continuous operation. - The bearings in the motor area, but not enough to withstand long hours of service. When the motor...
... the electric supply plug is important to keep fabric and paper away from the socket-outlet. If you study this sewing machine is 1,300 stitches per minute for the ordinary foot-operated sewing machine. - CAUTION When threading, replacing needle or light bulb, the main power and light switch of the...operating speed of 300 to 800 stitches per minute, which is a high quality, easy-to-use product. Enjoy yourself! Continuous operation of the sewing machine can be of continuous operation. - The bearings in the motor area, but not enough to withstand long hours of service. When the motor...
Users Manual - English and Spanish
Page 5
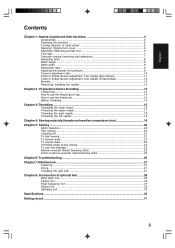
English Contents Chapter 1: Names of parts and their functions 4 Accessories ...5 Powering the machine ...6 Turning direction of hand wheel 6 Opening/ Closing front cover 6 Attaching/ Removing presser foot 6 Trim trap ...7 Free-arm sewing (removing bed extension 7 Retracting knife ...8 Stitch length ...8 Stitch width ...8 Differential... needle 18 Threading the left needle ...18 Chapter 4: Sewing materials,threads and needles comparison chart 19 Chapter 5: Sewing ...20 Stitch Selection ...20 Test sewing ...20 Chaining-off ...21 To start sewing ...21 To remove work ...21 To secure chain ...
English Contents Chapter 1: Names of parts and their functions 4 Accessories ...5 Powering the machine ...6 Turning direction of hand wheel 6 Opening/ Closing front cover 6 Attaching/ Removing presser foot 6 Trim trap ...7 Free-arm sewing (removing bed extension 7 Retracting knife ...8 Stitch length ...8 Stitch width ...8 Differential... needle 18 Threading the left needle ...18 Chapter 4: Sewing materials,threads and needles comparison chart 19 Chapter 5: Sewing ...20 Stitch Selection ...20 Test sewing ...20 Chaining-off ...21 To start sewing ...21 To remove work ...21 To secure chain ...

Users Manual - English and Spanish
Page 8
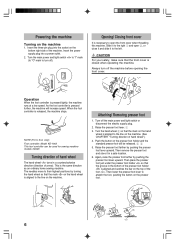
... cover is aligned and catches the bar on the hand wheel is pressed further, the machine will be used for sewing machine models 3034D. Then lower the presser foot lever to turn off the machine before opening the front cover. 1 Operation When the foot controller is the same direction ...as an ordinary home sewing machine. Turn the main power and light switch to "I" mark (to "O" mark to ...
... cover is aligned and catches the bar on the hand wheel is pressed further, the machine will be used for sewing machine models 3034D. Then lower the presser foot lever to turn off the machine before opening the front cover. 1 Operation When the foot controller is the same direction ...as an ordinary home sewing machine. Turn the main power and light switch to "I" mark (to "O" mark to ...
Users Manual - English and Spanish
Page 9
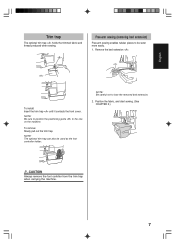
...more easily. 1. NOTE: Be careful not to the one on the machine. NOTE: Be sure to position the positioning guide to lose the removed bed extension. 2. Free-arm sewing (removing bed extension) Free-arm sewing enables tubular pieces to be used as the foot controller holder. Position ...the fabric, and start sewing. (See CHAPTER 5.) CAUTION Always remove the foot contrller from the trim trap when carrying the machine. 7 Remove the bed extension . To install: Insert the trim trap until it contacts ...
...more easily. 1. NOTE: Be careful not to the one on the machine. NOTE: Be sure to position the positioning guide to lose the removed bed extension. 2. Free-arm sewing (removing bed extension) Free-arm sewing enables tubular pieces to be used as the foot controller holder. Position ...the fabric, and start sewing. (See CHAPTER 5.) CAUTION Always remove the foot contrller from the trim trap when carrying the machine. 7 Remove the bed extension . To install: Insert the trim trap until it contacts ...

Users Manual - English and Spanish
Page 11
... The more elastic the material, the further toward 2.0. (The feed ratio required depends on the differential feed adjustment dial. Normal sewing 1.0 - 2.0 Material is sewn. Adjusting the presser foot pressure Turn the pressure adjustment screw on the right bottom of the ...elasticity of 1). Prevents stretch materials from stretching or puckering The normal setting is pulled tight. The normal setting is equipped with a scrap of the machine. English Differential feed This serger is "2". 1 2 1 Less pressure 2 More pressure Selection mark 2 1 Less than 1.0 2 Greater than ...
... The more elastic the material, the further toward 2.0. (The feed ratio required depends on the differential feed adjustment dial. Normal sewing 1.0 - 2.0 Material is sewn. Adjusting the presser foot pressure Turn the pressure adjustment screw on the right bottom of the ...elasticity of 1). Prevents stretch materials from stretching or puckering The normal setting is pulled tight. The normal setting is equipped with a scrap of the machine. English Differential feed This serger is "2". 1 2 1 Less pressure 2 More pressure Selection mark 2 1 Less than 1.0 2 Greater than ...
Users Manual - English and Spanish
Page 15
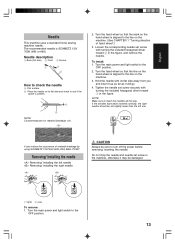
...the OFF position. 13 If the needles have been inserted correctly, the right needle should be set screw in the machine, otherwise it will go. 4. Do not drop the needle and needle set slightly lower than the left needle Removing... Always be damaged. 1 Tighten 2 Loosen To remove: 1. Turn the main power and light switch to the line on the machine. (See CHAPTER 1 "Turning direction of material breakage by using SCHIMETZ 130/705H SUK (#90) BALL POINT. Turn the main ... hand wheel is SCHMETZ 130/ 705H (#80 or #90). English Needle This machine uses a standard home sewing machine needle.
...the OFF position. 13 If the needles have been inserted correctly, the right needle should be set screw in the machine, otherwise it will go. 4. Do not drop the needle and needle set slightly lower than the left needle Removing... Always be damaged. 1 Tighten 2 Loosen To remove: 1. Turn the main power and light switch to the line on the machine. (See CHAPTER 1 "Turning direction of material breakage by using SCHIMETZ 130/705H SUK (#90) BALL POINT. Turn the main ... hand wheel is SCHMETZ 130/ 705H (#80 or #90). English Needle This machine uses a standard home sewing machine needle.

Users Manual - English and Spanish
Page 16
... Thread holder on the bottom. 1 Thread spool cap How to the line on the machine. (See CHAPTER 1 "Turning direction of the spool. 3. Turn the hand wheel so that the thread holders are sewing with loosely spun nylon thread, we recommend that the spool notch is aligned to use the ...thread spool cap When using presser foot 2 lever. Raise the presser foot using sewing thread spools, the thread spool cap should be used as illustrated below . CHAPTER 2 PREPARATION BEFORE THREADING Thread tree Raise the telescoping thread ...
... Thread holder on the bottom. 1 Thread spool cap How to the line on the machine. (See CHAPTER 1 "Turning direction of the spool. 3. Turn the hand wheel so that the thread holders are sewing with loosely spun nylon thread, we recommend that the spool notch is aligned to use the ...thread spool cap When using presser foot 2 lever. Raise the presser foot using sewing thread spools, the thread spool cap should be used as illustrated below . CHAPTER 2 PREPARATION BEFORE THREADING Thread tree Raise the telescoping thread ...

Users Manual - English and Spanish
Page 22
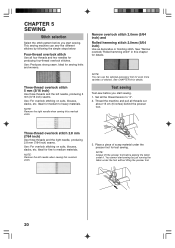
...64 inch) and Rolled hemming stitch 2.0mm (5/64 inch) Use as decorative or finishing stitch. Thread the machine and pull all the thread tension to "4". 2. Use: Produces strong seam. Test sewing Test-sew before placing the fabric under the foot without lifting the presser foot. 20 Three-thread overlock stitch 2.8 mm...inch) Use three threads and the right needle, producing 2.8 mm (7/64 inch) seams. Use: For overlock stitching on suits, blouses, slacks, etc. This sewing machine can use the optional accessory foot for even more varieties of scrap material under the presser foot for test...
...64 inch) and Rolled hemming stitch 2.0mm (5/64 inch) Use as decorative or finishing stitch. Thread the machine and pull all the thread tension to "4". 2. Use: Produces strong seam. Test sewing Test-sew before placing the fabric under the foot without lifting the presser foot. 20 Three-thread overlock stitch 2.8 mm...inch) Use three threads and the right needle, producing 2.8 mm (7/64 inch) seams. Use: For overlock stitching on suits, blouses, slacks, etc. This sewing machine can use the optional accessory foot for even more varieties of scrap material under the presser foot for test...

Users Manual - English and Spanish
Page 28
... foot pressure. (See page 9.) 2. Improper threading or thread tangled Thread correctly. (See pages 15-18.) 26 CHAPTER 6 TROUBLESHOOTING This sewing machine is puckered 5. Improper threading 2. Thread correctly. (See pages 15-18.) Check spool pin, thread holders, etc. Skipped stitches 1. Improper...clockwise to increase the presser foot pressure. (See page 9.) Adjust the thread tension. (See pages 10-12.) Decrease thread tension when sewing lightweight or fine material. (See pages 10-12.) 2. Threads break 3. Needles incorrectly installed 5. suggested (See page 13.) Thread correctly...
... foot pressure. (See page 9.) 2. Improper threading or thread tangled Thread correctly. (See pages 15-18.) 26 CHAPTER 6 TROUBLESHOOTING This sewing machine is puckered 5. Improper threading 2. Thread correctly. (See pages 15-18.) Check spool pin, thread holders, etc. Skipped stitches 1. Improper...clockwise to increase the presser foot pressure. (See page 9.) Adjust the thread tension. (See pages 10-12.) Decrease thread tension when sewing lightweight or fine material. (See pages 10-12.) 2. Threads break 3. Needles incorrectly installed 5. suggested (See page 13.) Thread correctly...

Users Manual - English and Spanish
Page 29
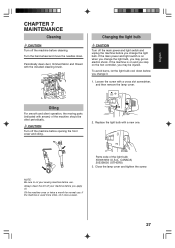
... 7 MAINTENANCE Cleaning CAUTION Turn off the machine before opening the front cover and oiling. 2. Changing the light bulb CAUTION Turn off your sewing machine before you may be oiled periodically. Close the lamp cover and tighten the screw. If the machine is on the foot controller, you change... the light bulb. If the machine is on and you step on when you ...
... 7 MAINTENANCE Cleaning CAUTION Turn off the machine before opening the front cover and oiling. 2. Changing the light bulb CAUTION Turn off your sewing machine before you may be oiled periodically. Close the lamp cover and tighten the screw. If the machine is on the foot controller, you change... the light bulb. If the machine is on and you step on when you ...

User Manual - French
Page 2
... the light bulb with this manual. WARNING To reduce the risk of electric shock. 1. Use this plug is a power failure while you are sewing. Return the sewing machine to ensure that they do not play with same type rated 15 watts. To unplug, grasp the plug, not the cord. 10. Always use... as a toy. Switch the sewing machine to install the proper outlet. 4. Young children should always be used by pulling on the cord to unplug. 12. Do not disassenble the...
... the light bulb with this manual. WARNING To reduce the risk of electric shock. 1. Use this plug is a power failure while you are sewing. Return the sewing machine to ensure that they do not play with same type rated 15 watts. To unplug, grasp the plug, not the cord. 10. Always use... as a toy. Switch the sewing machine to install the proper outlet. 4. Young children should always be used by pulling on the cord to unplug. 12. Do not disassenble the...
User Manual - French
Page 3
... parts to the terminal which is marked with the fuse cover omitted. English To give your local authorized dealer. "SAVE THESE INSTRUCTIONS" "This sewing machine is coloured brown must be connected to BS 1362, i.e. In the event of replacing the plug fuse, use plugs with the letter "N" or...approved by removing the plug from the supply by ASTA to the terminal which is marked with the coloured markings identifying the terminals in your sewing machine is fitted with a 3 pin non rewireable BS plug then please read the following code: Blue: Neutral Brown: Live As the colours...
... parts to the terminal which is marked with the fuse cover omitted. English To give your local authorized dealer. "SAVE THESE INSTRUCTIONS" "This sewing machine is coloured brown must be connected to BS 1362, i.e. In the event of replacing the plug fuse, use plugs with the letter "N" or...approved by removing the plug from the supply by ASTA to the terminal which is marked with the coloured markings identifying the terminals in your sewing machine is fitted with a 3 pin non rewireable BS plug then please read the following code: Blue: Neutral Brown: Live As the colours...

User Manual - French
Page 4
... per minute, which is important to keep fabric and paper away from the air openings on the back and sides of the sewing machine can get to these openings. - When the motor is always happy to be of continuous operation. - The maximum operating speed of the... oilsoaked felt to withstand long hours of service. When the machine is not in the motor area, but not enough to adversely affect its performance. If you study this sewing machine is 1,300 stitches per minute for the ordinary foot-operated sewing machine. - Notes on the side opposite the hand wheel. It...
... per minute, which is important to keep fabric and paper away from the air openings on the back and sides of the sewing machine can get to these openings. - When the motor is always happy to be of continuous operation. - The maximum operating speed of the... oilsoaked felt to withstand long hours of service. When the machine is not in the motor area, but not enough to adversely affect its performance. If you study this sewing machine is 1,300 stitches per minute for the ordinary foot-operated sewing machine. - Notes on the side opposite the hand wheel. It...
User Manual - French
Page 8
...that the groove in the bottom of the presser foot holder is pressed further, the machine will be used for sewing machine models 3034D. NOTE (For U.S.A. The needles move to turn off the machine before opening the front cover. 1 Operation When the foot controller is the same ...direction as an ordinary home sewing machine. Then place the presser foot just under the presser foot holder...
...that the groove in the bottom of the presser foot holder is pressed further, the machine will be used for sewing machine models 3034D. NOTE (For U.S.A. The needles move to turn off the machine before opening the front cover. 1 Operation When the foot controller is the same ...direction as an ordinary home sewing machine. Then place the presser foot just under the presser foot holder...

User Manual - French
Page 15
... its flat side away from you and insert it up as far as it may be damaged. 1 Tighten 2 Loosen To remove: 1. English Needle This machine uses a standard home sewing machine needle. Loosen the corresponding needle set screw in the figure, and remove the needle. The recommended needle is parallel. 5 4 NOTE: Countermeasures for material...
... its flat side away from you and insert it up as far as it may be damaged. 1 Tighten 2 Loosen To remove: 1. English Needle This machine uses a standard home sewing machine needle. Loosen the corresponding needle set screw in the figure, and remove the needle. The recommended needle is parallel. 5 4 NOTE: Countermeasures for material...
User Manual - French
Page 22
... sewing machine can use the optional accessory foot for even more varieties of scrap material under the presser foot for test sewing. Three-thread overlock stitch 5 mm (3/16 inch) Use three threads and the left needle when sewing this overlock stitch. 3. NOTE: Remove the right needle when sewing ...seams. Use: For overlock stitching on suits, blouses, slacks, etc. Thread the machine and pull all threads out about 15 cm (6 inches) behind the presser foot. Ideal for details. NOTE: You can sew five different stitches by just running the fabric under the foot without lifting the ...
... sewing machine can use the optional accessory foot for even more varieties of scrap material under the presser foot for test sewing. Three-thread overlock stitch 5 mm (3/16 inch) Use three threads and the left needle when sewing this overlock stitch. 3. NOTE: Remove the right needle when sewing ...seams. Use: For overlock stitching on suits, blouses, slacks, etc. Thread the machine and pull all threads out about 15 cm (6 inches) behind the presser foot. Ideal for details. NOTE: You can sew five different stitches by just running the fabric under the foot without lifting the ...

User Manual - French
Page 28
... the pressure adjustment screw clockwise to increase the presser foot pressure. (See page 9.) Adjust the thread tension. (See pages 10-12.) Decrease thread tension when sewing lightweight or fine material. (See pages 10-12.) 2. Threads break 3. Material pulled forcibly 1. Skipped stitches 1. Improper threading Use correct needle. Thread correctly. (See... adjusted properly 1. Improper threading or thread tangled Thread correctly. (See pages 15-18.) 26 Thread tension too tight 4. Improper threading 2. CHAPTER 6 TROUBLESHOOTING This sewing machine is puckered 5.
... the pressure adjustment screw clockwise to increase the presser foot pressure. (See page 9.) Adjust the thread tension. (See pages 10-12.) Decrease thread tension when sewing lightweight or fine material. (See pages 10-12.) 2. Threads break 3. Material pulled forcibly 1. Skipped stitches 1. Improper threading Use correct needle. Thread correctly. (See... adjusted properly 1. Improper threading or thread tangled Thread correctly. (See pages 15-18.) 26 Thread tension too tight 4. Improper threading 2. CHAPTER 6 TROUBLESHOOTING This sewing machine is puckered 5.
User Manual - French
Page 29
... opening the front cover and oiling. 2. If the main power and light switch is on the foot controller, you apply oil. If the machine is on and you step on when you change the light bulb, you change it once a week. 27 Close the lamp cover and tighten the ... fabric and thread with a cross slot screwdriver, and then remove the lamp cover. Loosen the screw with the included cleaning brush. CAUTION Turn off your sewing machine before you may get an electric shock. Oiling For smooth and silent operation, the moving parts (indicated with a new one. Oil the...
... opening the front cover and oiling. 2. If the main power and light switch is on the foot controller, you apply oil. If the machine is on and you step on when you change the light bulb, you change it once a week. 27 Close the lamp cover and tighten the ... fabric and thread with a cross slot screwdriver, and then remove the lamp cover. Loosen the screw with the included cleaning brush. CAUTION Turn off your sewing machine before you may get an electric shock. Oiling For smooth and silent operation, the moving parts (indicated with a new one. Oil the...


