Users Manual - English and Spanish
Page 4
...high quality, easy-to these openings. - The bearings in the motor are part of this booklet. CONGRATULATIONS ON CHOOSING THIS COMPACT OVERLOCK MACHINE Your machine is running, sparks can be seen through the air openings in the motor bracket on the side opposite the hand wheel. The ... nearest authorized dealer is disconnected from the air openings on the motor - If you study this sewing machine is 1,300 stitches per minute for the ordinary foot-operated sewing machine. - To fully enjoy all the features, we suggest that the electric supply plug is always happy to 800...
...high quality, easy-to these openings. - The bearings in the motor are part of this booklet. CONGRATULATIONS ON CHOOSING THIS COMPACT OVERLOCK MACHINE Your machine is running, sparks can be seen through the air openings in the motor bracket on the side opposite the hand wheel. The ... nearest authorized dealer is disconnected from the air openings on the motor - If you study this sewing machine is 1,300 stitches per minute for the ordinary foot-operated sewing machine. - To fully enjoy all the features, we suggest that the electric supply plug is always happy to 800...

Users Manual - English and Spanish
Page 5
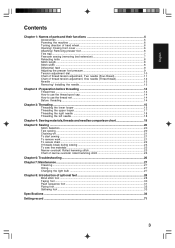
...Contents Chapter 1: Names of parts and their functions 4 Accessories ...5 Powering the machine ...6 Turning direction of hand wheel 6 Opening/ Closing front cover 6 Attaching/ Removing presser foot 6 Trim trap ...7 Free-arm sewing (removing bed extension 7 Retracting knife ...8 Stitch length ...8 Stitch width ...8 ...Sewing ...20 Stitch Selection ...20 Test sewing ...20 Chaining-off ...21 To start sewing ...21 To remove work ...21 To secure chain ...22 If threads break during sewing 23 To sew fine materials ...23 Narrow overlock/ Rolled hemming stitch 23 Chart of narrow overlock/...
...Contents Chapter 1: Names of parts and their functions 4 Accessories ...5 Powering the machine ...6 Turning direction of hand wheel 6 Opening/ Closing front cover 6 Attaching/ Removing presser foot 6 Trim trap ...7 Free-arm sewing (removing bed extension 7 Retracting knife ...8 Stitch length ...8 Stitch width ...8 ...Sewing ...20 Stitch Selection ...20 Test sewing ...20 Chaining-off ...21 To start sewing ...21 To remove work ...21 To secure chain ...22 If threads break during sewing 23 To sew fine materials ...23 Narrow overlock/ Rolled hemming stitch 23 Chart of narrow overlock/...

Users Manual - English and Spanish
Page 22
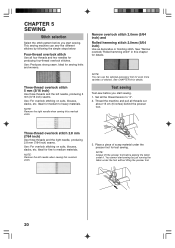
... materials. NOTE: Always lift the presser foot before you start sewing by following the simple steps below: Four-thread overlock stitch Use all threads out about 15 cm (6 inches) behind the presser foot. Thread the machine and pull all four threads and two needles for fine to ..."4". 2. Three-thread overlock stitch 2.8 mm (7/64 inch) Use three threads and the right needle, producing 2.8 mm (7/64 inch) seams. Use: For overlock stitching on suits, blouses, slacks, etc. This sewing machine can use the...
... materials. NOTE: Always lift the presser foot before you start sewing by following the simple steps below: Four-thread overlock stitch Use all threads out about 15 cm (6 inches) behind the presser foot. Thread the machine and pull all four threads and two needles for fine to ..."4". 2. Three-thread overlock stitch 2.8 mm (7/64 inch) Use three threads and the right needle, producing 2.8 mm (7/64 inch) seams. Use: For overlock stitching on suits, blouses, slacks, etc. This sewing machine can use the...

Users Manual - English and Spanish
Page 25
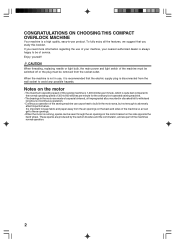
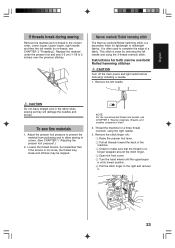
... foot lever. 2 Pull all threads toward the back of a fabric. Narrow overlock/ Rolled hemming stitch The Narrow overlock/Rolled hemming stitch is at its lowest position. 6 Pull the stitch finger to midweight fabrics. To sew fine materials 1. Thread the machine for both narrow overlock/ Rolled hemming stitches CAUTION Turn off the main power and light...
... foot lever. 2 Pull all threads toward the back of a fabric. Narrow overlock/ Rolled hemming stitch The Narrow overlock/Rolled hemming stitch is at its lowest position. 6 Pull the stitch finger to midweight fabrics. To sew fine materials 1. Thread the machine for both narrow overlock/ Rolled hemming stitches CAUTION Turn off the main power and light...

Users Manual - English and Spanish
Page 30
... guide will be used for 3 thread overlock stitch with the adjusting screw so that the line on the machine (see CHAPTER 1 "Turning direction of the fabric is used to see CHAPTER 1 "Attaching/ Removing presser foot"). 2. Use it sews. 3 Adjusting screw 4 Fabric guide To... fabric guide will be removed. 3. The finished stitch can sew blind stitches and overlock at the same time. By turning the screw forward (toward the folded edge. 7. CHAPTER 8 INTRODUCTION OF OPTIONAL FEET CAUTION Turn off the machine while replacing the presser foot. Upper Looper Thread Tension: Slightly...
... guide will be used for 3 thread overlock stitch with the adjusting screw so that the line on the machine (see CHAPTER 1 "Turning direction of the fabric is used to see CHAPTER 1 "Attaching/ Removing presser foot"). 2. Use it sews. 3 Adjusting screw 4 Fabric guide To... fabric guide will be removed. 3. The finished stitch can sew blind stitches and overlock at the same time. By turning the screw forward (toward the folded edge. 7. CHAPTER 8 INTRODUCTION OF OPTIONAL FEET CAUTION Turn off the machine while replacing the presser foot. Upper Looper Thread Tension: Slightly...
Users Manual - English and Spanish
Page 31
...folded edge of hand wheel"). 5. Fold the fabric as guides for 3 thread overlock with one of the lines and press in place lightly with the line on the machine (see CHAPTER 1 "Turning direction of the fabric, so that the needle ...pierces just the folded edge. 6. By turning the screw backward the stitch guide will decorate the right side when pulled flat. Procedure 1. If you sew with the right sides together, the needle thread ladder will go to CHAPTER 5 "Narrow overlock...
...folded edge of hand wheel"). 5. Fold the fabric as guides for 3 thread overlock with one of the lines and press in place lightly with the line on the machine (see CHAPTER 1 "Turning direction of the fabric, so that the needle ...pierces just the folded edge. 6. By turning the screw backward the stitch guide will decorate the right side when pulled flat. Procedure 1. If you sew with the right sides together, the needle thread ladder will go to CHAPTER 5 "Narrow overlock...

Users Manual - English and Spanish
Page 32
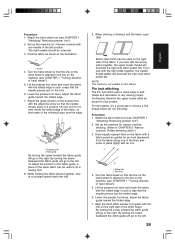
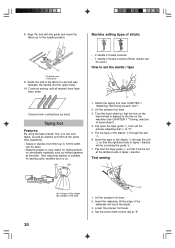
...sewing until all marked lines have been sewn. Correct minor contractions by hand. Flip open the tape guide 1, then set at shoulder. Set the stitch width control dial at "0". 5. " 3 Adjusting screw 4 Fabric guide 9. Also attaching elastics is suitable for reinforcement on . - 2 needle 4 thread overlock - 1 needle 3 thread overlock... along the guide 4. 7. Test sewing Usage of the elastic Usage of stitch): ! 8. Flip shut the tape guide 1 so that the line on the machine (see CHAPTER 1 "Attaching/ Removing presser foot"). 2. Machine setting (type of the tape 5...
...sewing until all marked lines have been sewn. Correct minor contractions by hand. Flip open the tape guide 1, then set at shoulder. Set the stitch width control dial at "0". 5. " 3 Adjusting screw 4 Fabric guide 9. Also attaching elastics is suitable for reinforcement on . - 2 needle 4 thread overlock - 1 needle 3 thread overlock... along the guide 4. 7. Test sewing Usage of the elastic Usage of stitch): ! 8. Flip shut the tape guide 1 so that the line on the machine (see CHAPTER 1 "Attaching/ Removing presser foot"). 2. Machine setting (type of the tape 5...

Users Manual - English and Spanish
Page 33
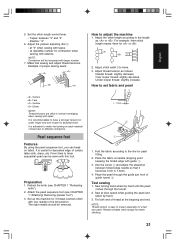
... elastics. It is useful for decorated edge of proper sewing seam: How to loosen especially for 3 thread overlock stitch with larger number. 7. Place the fabric at the beginnig and end. It is easy to adjust the machine 1. Sew turning hand wheel by hand. 3. Sew at desirable number for beautiful finish. Pearl sequence foot Features By...
... elastics. It is useful for decorated edge of proper sewing seam: How to loosen especially for 3 thread overlock stitch with larger number. 7. Place the fabric at the beginnig and end. It is easy to adjust the machine 1. Sew turning hand wheel by hand. 3. Sew at desirable number for beautiful finish. Pearl sequence foot Features By...
Users Manual - English and Spanish
Page 34
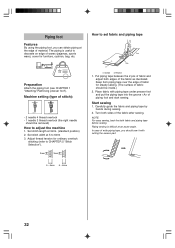
... fabric as illustrated. Keep 3cm piping tape over the edge of fabric for ordinary overlock stitching (refer to CHAPTER 5 "Stitch Selection"). 3mm 3mm How to adjust the machine 1. Place fabric with cutting the excess part. 5 ~ 6mm 5 ~ 6mm 32 Start sewing 1. Put piping tape between the 2 pcs of fabric and adjust both fabric and...
... fabric as illustrated. Keep 3cm piping tape over the edge of fabric for ordinary overlock stitching (refer to CHAPTER 5 "Stitch Selection"). 3mm 3mm How to adjust the machine 1. Place fabric with cutting the excess part. 5 ~ 6mm 5 ~ 6mm 32 Start sewing 1. Put piping tape between the 2 pcs of fabric and adjust both fabric and...
Users Manual - English and Spanish
Page 35
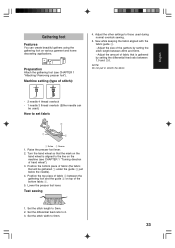
.... Adjust the size of stitch): 4. Turn the hand wheel so that will be used during normal overlock sewing. 5. Position the bottom piece of hand wheel"). 3. Set the stitch width to 2. 3. Lower the presser foot lever. Test sewing 1. Position the top piece of fabric 2 between 2mm and 5mm. - LG English Gathering foot Features You... (the fabric that the mark on the hand wheel is gathered by setting the sitich length between the gathering foot and the guide 3 on the machine (see CHAPTER 1 "Attaching/ Removing presser foot"). Set the differential feed ratio to 5mm. 33
.... Adjust the size of stitch): 4. Turn the hand wheel so that will be used during normal overlock sewing. 5. Position the bottom piece of hand wheel"). 3. Set the stitch width to 2. 3. Lower the presser foot lever. Test sewing 1. Position the top piece of fabric 2 between 2mm and 5mm. - LG English Gathering foot Features You... (the fabric that the mark on the hand wheel is gathered by setting the sitich length between the gathering foot and the guide 3 on the machine (see CHAPTER 1 "Attaching/ Removing presser foot"). Set the differential feed ratio to 5mm. 33

User Manual - French
Page 4
... air can be removed from the wall socket to avoid any possible hazards. If you study this sewing machine is 1,300 stitches per minute for the ordinary foot-operated sewing machine. - The maximum operating speed of this booklet. These sparks are produced by the carbon brushes and the commutator...seen through the air openings in the motor area, but not enough to adversely affect its performance. CONGRATULATIONS ON CHOOSING THIS COMPACT OVERLOCK MACHINE Your machine is quite fast compared to the normal operating speed of 300 to 800 stitches per minute, which is a high quality, ...
... air can be removed from the wall socket to avoid any possible hazards. If you study this sewing machine is 1,300 stitches per minute for the ordinary foot-operated sewing machine. - The maximum operating speed of this booklet. These sparks are produced by the carbon brushes and the commutator...seen through the air openings in the motor area, but not enough to adversely affect its performance. CONGRATULATIONS ON CHOOSING THIS COMPACT OVERLOCK MACHINE Your machine is quite fast compared to the normal operating speed of 300 to 800 stitches per minute, which is a high quality, ...
User Manual - French
Page 5
...Contents Chapter 1: Names of parts and their functions 4 Accessories ...5 Powering the machine ...6 Turning direction of hand wheel 6 Opening/ Closing front cover 6 Attaching/ Removing presser foot 6 Trim trap ...7 Free-arm sewing (removing bed extension 7 Retracting knife ...8 Stitch length ...8 Stitch width ...8 ...Sewing ...20 Stitch Selection ...20 Test sewing ...20 Chaining-off ...21 To start sewing ...21 To remove work ...21 To secure chain ...22 If threads break during sewing 23 To sew fine materials ...23 Narrow overlock/ Rolled hemming stitch 23 Chart of narrow overlock/...
...Contents Chapter 1: Names of parts and their functions 4 Accessories ...5 Powering the machine ...6 Turning direction of hand wheel 6 Opening/ Closing front cover 6 Attaching/ Removing presser foot 6 Trim trap ...7 Free-arm sewing (removing bed extension 7 Retracting knife ...8 Stitch length ...8 Stitch width ...8 ...Sewing ...20 Stitch Selection ...20 Test sewing ...20 Chaining-off ...21 To start sewing ...21 To remove work ...21 To secure chain ...22 If threads break during sewing 23 To sew fine materials ...23 Narrow overlock/ Rolled hemming stitch 23 Chart of narrow overlock/...
User Manual - French
Page 22
... under the foot without lifting the presser foot. 20 See CHAPTER 8 for sewing knits and wovens. Ideal for details. This sewing machine can use the optional accessory foot for medium to "4". 2. Narrow overlock stitch 2.0mm (5/64 inch) and Rolled hemming stitch 2.0mm (5/64 inch)... Use as decorative or finishing stitch. Three-thread overlock stitch 2.8 mm (7/64 inch) Use three threads...
... under the foot without lifting the presser foot. 20 See CHAPTER 8 for sewing knits and wovens. Ideal for details. This sewing machine can use the optional accessory foot for medium to "4". 2. Narrow overlock stitch 2.0mm (5/64 inch) and Rolled hemming stitch 2.0mm (5/64 inch)... Use as decorative or finishing stitch. Three-thread overlock stitch 2.8 mm (7/64 inch) Use three threads...
User Manual - French
Page 25
...the upperlooper is often used to re-thread, see CHAPTER 4 "Sewing materials, threads, and needles comparison chart". 2. Remove the left needle and using the right needle. 3. Thread the machine for both narrow overlock/ Rolled hemming stitches CAUTION Turn off the main power and light... switch before removing/ installing a needle. 1. Narrow overlock/ Rolled hemming stitch The Narrow overlock/Rolled hemming stitch is too loose, the thread...
...the upperlooper is often used to re-thread, see CHAPTER 4 "Sewing materials, threads, and needles comparison chart". 2. Remove the left needle and using the right needle. 3. Thread the machine for both narrow overlock/ Rolled hemming stitches CAUTION Turn off the main power and light... switch before removing/ installing a needle. 1. Narrow overlock/ Rolled hemming stitch The Narrow overlock/Rolled hemming stitch is too loose, the thread...

User Manual - French
Page 30
... Length: 3 - 4 mm - Set up the machine for putting a near invisible hem in such a way that the needle is aligned to do a sewing test. 8. Upper Looper Thread Tension: 2-5 - In this foot is also useful when sewing special stitches like a ladder or small parallel lines when... Needle Thread Tension: Slightly Slackened (0-2) - Open the fabric as a decorative finish on the left position. The finished stitch can sew blind stitches and overlock at the same time. Recommended settings - Stitch Width: 5 mm - Adjust the guide position of the fabric is pulled flat....
... Length: 3 - 4 mm - Set up the machine for putting a near invisible hem in such a way that the needle is aligned to do a sewing test. 8. Upper Looper Thread Tension: 2-5 - In this foot is also useful when sewing special stitches like a ladder or small parallel lines when... Needle Thread Tension: Slightly Slackened (0-2) - Open the fabric as a decorative finish on the left position. The finished stitch can sew blind stitches and overlock at the same time. Recommended settings - Stitch Width: 5 mm - Adjust the guide position of the fabric is pulled flat....

User Manual - French
Page 31
... on the hand wheel is not suitable for 3 thread overlock with one of the lines and press in such a way that some of hand wheel"). 5. Set up the machine for pin tuck placement. While holding the fabric pieces together, sew at a constant speed down to a position 1/8 inch... (2.5 to the line on the machine (see CHAPTER 1 "Turning direction of the stitching loops over the edge. !...
... on the hand wheel is not suitable for 3 thread overlock with one of the lines and press in such a way that some of hand wheel"). 5. Set up the machine for pin tuck placement. While holding the fabric pieces together, sew at a constant speed down to a position 1/8 inch... (2.5 to the line on the machine (see CHAPTER 1 "Turning direction of the stitching loops over the edge. !...
User Manual - French
Page 32
...overlock (Either needle can be used.) How to 12mm width can be sewn. - Align the fold with the guide and insert the fabric up to set along the guide 4. 7. Continue sewing until all marked lines have been sewn. Turn the hand wheel so that it will be set the elastic / tape 14 5 2 3 1. Machine... setting (type of the tape 5 1. " 3 Adjusting screw 4 Fabric guide 9. Attatching tapes is aligned to sew half way between the needle and the upper knife. 10. Lift the presser foot lever. 2. Guide...
...overlock (Either needle can be used.) How to 12mm width can be sewn. - Align the fold with the guide and insert the fabric up to set along the guide 4. 7. Continue sewing until all marked lines have been sewn. Turn the hand wheel so that it will be set the elastic / tape 14 5 2 3 1. Machine... setting (type of the tape 5 1. " 3 Adjusting screw 4 Fabric guide 9. Attatching tapes is aligned to sew half way between the needle and the upper knife. 10. Lift the presser foot lever. 2. Guide...
User Manual - French
Page 33
...the machine 1. Elastics: "4" 6. NOTE: Contraction will be increased with tapes. Adjust thread tension as or . From 3mm to 5mm sequential pearl can bead on each material / thread due to different contraction. Fold the fabric according to make trial sewing on fabric. Test sewing 1.... by hand until the pearl comes through the guide just front of thread at desirable number for 3 thread overlock stitch with elastics. Place the fabric at "0" when sewing with guide 1. 3. Retract movable stitch tongue for or . 2. at needle dropping point keeping the folded...
...the machine 1. Elastics: "4" 6. NOTE: Contraction will be increased with tapes. Adjust thread tension as or . From 3mm to 5mm sequential pearl can bead on each material / thread due to different contraction. Fold the fabric according to make trial sewing on fabric. Test sewing 1.... by hand until the pearl comes through the guide just front of thread at desirable number for 3 thread overlock stitch with elastics. Place the fabric at "0" when sewing with guide 1. 3. Retract movable stitch tongue for or . 2. at needle dropping point keeping the folded...

User Manual - French
Page 34
... at 5 to 6mm 3. The piping is difficult at 3mm. (standard position) 2. Machine setting (type of wares (pajamas, sports ware), cover for furniture, cushion, bag, etc. Start sewing 1. Piping sewing is useful to decorate on edge of stitch): - 2 needle 4 thread overlock - 1 needle 3 thread overlock (the right needle should be inside.) 2. In case of the fabric as...
... at 5 to 6mm 3. The piping is difficult at 3mm. (standard position) 2. Machine setting (type of wares (pajamas, sports ware), cover for furniture, cushion, bag, etc. Start sewing 1. Piping sewing is useful to decorate on edge of stitch): - 2 needle 4 thread overlock - 1 needle 3 thread overlock (the right needle should be inside.) 2. In case of the fabric as...

User Manual - French
Page 35
...Set the stitch length to those used .) How to 5mm. 33 Sew while keeping the fabric aligned with the fabric guide 3. - Position the top piece of fabric that will be used during normal overlock sewing. 5. Machine setting (type of hand wheel"). 3. Adjust the other settings to ...3mm. 2. Raise the presser foot lever. 2. Set the differential feed ratio to the line on the machine (see CHAPTER 1 "Attaching/ Removing presser foot")....
...Set the stitch length to those used .) How to 5mm. 33 Sew while keeping the fabric aligned with the fabric guide 3. - Position the top piece of fabric that will be used during normal overlock sewing. 5. Machine setting (type of hand wheel"). 3. Adjust the other settings to ...3mm. 2. Raise the presser foot lever. 2. Set the differential feed ratio to the line on the machine (see CHAPTER 1 "Attaching/ Removing presser foot")....


