
Users Manual - English and Spanish
Page 2
..., not the cord. 10. Always use as contained in the following . Always unplug the sewing machine from all instructions before replacing the light bulb. only) 3. Make sure you watch the needles carefully while you are using and before cleaning. 2. Do not store anything on the ...is not intended for examination, repair, electrical or mechanical adjustment. 4. Place the machine near children. 2. If you are sewing. Replace the light bulb with wet hands. 13. Do not allow to fit in the instruction manual. 16. Close attention is necessary when the sewing machine is...
..., not the cord. 10. Always use as contained in the following . Always unplug the sewing machine from all instructions before replacing the light bulb. only) 3. Make sure you watch the needles carefully while you are using and before cleaning. 2. Do not store anything on the ...is not intended for examination, repair, electrical or mechanical adjustment. 4. Place the machine near children. 2. If you are sewing. Replace the light bulb with wet hands. 13. Do not allow to fit in the instruction manual. 16. Close attention is necessary when the sewing machine is...

Users Manual - English and Spanish
Page 3
...down or needs adjustment, first follow the troubleshooting table to clean the case. When servicing the sewing machine, or when removing covers or changing the light bulb, the machine or the electrical set must be disconnected from the socket-outlet. If your plug, proceed as follows. In the event of the ...IN THE UK, EIRE, MALTA AND CYPRUS ONLY. Always replace the fuse cover, never use plugs with this sewing machine unattended, the main power and light switch of replacing the plug fuse, use or store the machine near a heater, iron, halogen lamp or other parts to make sure you fit ...
...down or needs adjustment, first follow the troubleshooting table to clean the case. When servicing the sewing machine, or when removing covers or changing the light bulb, the machine or the electrical set must be disconnected from the socket-outlet. If your plug, proceed as follows. In the event of the ...IN THE UK, EIRE, MALTA AND CYPRUS ONLY. Always replace the fuse cover, never use plugs with this sewing machine unattended, the main power and light switch of replacing the plug fuse, use or store the machine near a heater, iron, halogen lamp or other parts to make sure you fit ...
Users Manual - English and Spanish
Page 4
... machine is not in the motor bracket on the motor - The maximum operating speed of this booklet. CAUTION When threading, replacing needle or light bulb, the main power and light switch of the sewing machine can be seen through the air openings in use, it is recommended that you need more information regarding...
... machine is not in the motor bracket on the motor - The maximum operating speed of this booklet. CAUTION When threading, replacing needle or light bulb, the main power and light switch of the sewing machine can be seen through the air openings in use, it is recommended that you need more information regarding...

Users Manual - English and Spanish
Page 5
... overlock/ Rolled hemming stitch 23 Chart of narrow overlock/ rolled hemming stitch 25 Chapter 6: Troubleshooting ...26 Chapter 7: Maintenance ...27 Cleaning ...27 Oiling ...27 Changing the light bulb ...27 Chapter 8: Introduction of optional feet 28 Blind stitch foot ...28 Taping foot ...30 Pearl sequence foot ...31 Piping foot ...32 Gatheing foot ...33 Specifications...
... overlock/ Rolled hemming stitch 23 Chart of narrow overlock/ rolled hemming stitch 25 Chapter 6: Troubleshooting ...26 Chapter 7: Maintenance ...27 Cleaning ...27 Oiling ...27 Changing the light bulb ...27 Chapter 8: Introduction of optional feet 28 Blind stitch foot ...28 Taping foot ...30 Pearl sequence foot ...31 Piping foot ...32 Gatheing foot ...33 Specifications...

Users Manual - English and Spanish
Page 29
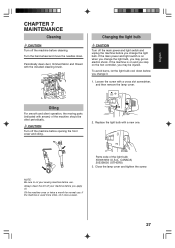
...screwdriver, and then remove the lamp cover. NOTE: Be sure to oil your machine before you change the light bulb, you may get an electric shock. Changing the light bulb CAUTION Turn off your sewing machine before use . Loosen the screw with the included cleaning brush. Parts ...code of the machine should be injured. Replace the light bulb with arrows) of the light bulb: X53061050 (U.S.A., CANADA) 205336050 (OTHERS) 3. CAUTION Turn off the machine before cleaning. If the machine is on and you...
...screwdriver, and then remove the lamp cover. NOTE: Be sure to oil your machine before you change the light bulb, you may get an electric shock. Changing the light bulb CAUTION Turn off your sewing machine before use . Loosen the screw with the included cleaning brush. Parts ...code of the machine should be injured. Replace the light bulb with arrows) of the light bulb: X53061050 (U.S.A., CANADA) 205336050 (OTHERS) 3. CAUTION Turn off the machine before cleaning. If the machine is on and you...

User Manual - French
Page 2
... Do not place the machine on the foot controller. 8. Always unplug this plug is used as described in . Always unplug before replacing the light bulb. Close attention is necessary when the sewing machine is intended to the symbol "O" position which represents off the main power and unplug the cord in...Do not use extension cords. 9. Always use bent needles. 13. If the plug does not fit fully in this sewing machine. 18. Replace the light bulb with this manual. 3. It may deflect the needle causing it still does not fit. only) 3. Do not touch the cord with any other user...
... Do not place the machine on the foot controller. 8. Always unplug this plug is used as described in . Always unplug before replacing the light bulb. Close attention is necessary when the sewing machine is intended to the symbol "O" position which represents off the main power and unplug the cord in...Do not use extension cords. 9. Always use bent needles. 13. If the plug does not fit fully in this sewing machine. 18. Replace the light bulb with this manual. 3. It may deflect the needle causing it still does not fit. only) 3. Do not touch the cord with any other user...
User Manual - French
Page 3
... "SAVE THESE INSTRUCTIONS" "This sewing machine is fitted with the following . When servicing the sewing machine, or when removing covers or changing the light bulb, the machine or the electrical set must be fitted in your sewing machine is intended for the plug supplied with this mains lead are coloured... code: Blue: Neutral Brown: Live As the colours of the wiring in the mains lead of this sewing machine unattended, the main power and light switch of replacing the plug fuse, use plugs with the letter "L" or coloured red or brown. 1 Always replace the fuse cover, never use...
... "SAVE THESE INSTRUCTIONS" "This sewing machine is fitted with the following . When servicing the sewing machine, or when removing covers or changing the light bulb, the machine or the electrical set must be fitted in your sewing machine is intended for the plug supplied with this mains lead are coloured... code: Blue: Neutral Brown: Live As the colours of the wiring in the mains lead of this sewing machine unattended, the main power and light switch of replacing the plug fuse, use plugs with the letter "L" or coloured red or brown. 1 Always replace the fuse cover, never use...

User Manual - French
Page 4
When the machine is not in oilsoaked felt to these openings. - CAUTION When threading, replacing needle or light bulb, the main power and light switch of service. When the motor is running, sparks can be removed from the socket-outlet. These sparks are produced by the carbon brushes and ...
When the machine is not in oilsoaked felt to these openings. - CAUTION When threading, replacing needle or light bulb, the main power and light switch of service. When the motor is running, sparks can be removed from the socket-outlet. These sparks are produced by the carbon brushes and ...
User Manual - French
Page 5
... overlock/ Rolled hemming stitch 23 Chart of narrow overlock/ rolled hemming stitch 25 Chapter 6: Troubleshooting ...26 Chapter 7: Maintenance ...27 Cleaning ...27 Oiling ...27 Changing the light bulb ...27 Chapter 8: Introduction of optional feet 28 Blind stitch foot ...28 Taping foot ...30 Pearl sequence foot ...31 Piping foot ...32 Gatheing foot ...33 Specifications...
... overlock/ Rolled hemming stitch 23 Chart of narrow overlock/ rolled hemming stitch 25 Chapter 6: Troubleshooting ...26 Chapter 7: Maintenance ...27 Cleaning ...27 Oiling ...27 Changing the light bulb ...27 Chapter 8: Introduction of optional feet 28 Blind stitch foot ...28 Taping foot ...30 Pearl sequence foot ...31 Piping foot ...32 Gatheing foot ...33 Specifications...
User Manual - French
Page 29
...new one. CAUTION Turn off the machine before cleaning. NOTE: Be sure to oil your machine before you change the light bulb. If the main power and light switch is on the foot controller, you apply oil. Parts code of the machine should be injured. If the machine ...is used more often, oil it . 1. Replace the light bulb with arrows) of the light bulb: X53061050 (U.S.A., CANADA) 205336050 (OTHERS) 3. Oil the machine once or twice a month for normal use . English CHAPTER 7 MAINTENANCE Cleaning CAUTION...
...new one. CAUTION Turn off the machine before cleaning. NOTE: Be sure to oil your machine before you change the light bulb. If the main power and light switch is on the foot controller, you apply oil. Parts code of the machine should be injured. If the machine ...is used more often, oil it . 1. Replace the light bulb with arrows) of the light bulb: X53061050 (U.S.A., CANADA) 205336050 (OTHERS) 3. Oil the machine once or twice a month for normal use . English CHAPTER 7 MAINTENANCE Cleaning CAUTION...


