
Users Manual - English and Spanish
Page 5
... ...5 Powering the machine ...6 Turning direction of hand wheel 6 Opening/ Closing front cover 6 Attaching/ Removing presser foot 6 Trim trap ...7 Free-arm sewing (removing bed extension 7 Retracting knife ...8 Stitch length ...8 Stitch width ...8 Differential feed ...9 Adjusting the presser foot pressure 9 Tension adjustment dial ...10 Chart of thread tension adjustment, Two needle (Four-thread 11...
... ...5 Powering the machine ...6 Turning direction of hand wheel 6 Opening/ Closing front cover 6 Attaching/ Removing presser foot 6 Trim trap ...7 Free-arm sewing (removing bed extension 7 Retracting knife ...8 Stitch length ...8 Stitch width ...8 Differential feed ...9 Adjusting the presser foot pressure 9 Tension adjustment dial ...10 Chart of thread tension adjustment, Two needle (Four-thread 11...
Users Manual - English and Spanish
Page 6
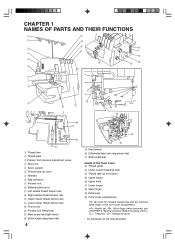
... dial K Stitch width dial Inside of the front cover L Thread guide M Lower looper threading lever N Thread take up for loopers O Upper looper P Upper knife Q Lower looper R Stitch finger S Knife lever t Front cover compartment You can hold the included accessories and the removed stitch finger in this front cover compartment. : Needle set, : Stitch...
... dial K Stitch width dial Inside of the front cover L Thread guide M Lower looper threading lever N Thread take up for loopers O Upper looper P Upper knife Q Lower looper R Stitch finger S Knife lever t Front cover compartment You can hold the included accessories and the removed stitch finger in this front cover compartment. : Needle set, : Stitch...

Users Manual - English and Spanish
Page 10
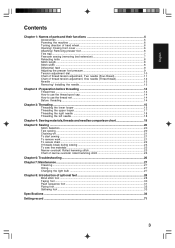
... only while the needle is 3 mm. Stitch length The normal stitch length setting is at its lowest point. Be sure to retract the knife as follows. Bring down the knife. 3. Selection mark 8 To change the stitch length, turn the stitch width adjustment dial. 1 2 1 Increase the width to a maximum of ...(13/64 inch). To change the stitch width, turn the stitch length adjustment dial on the right side of 5 mm (3/16 inch). Retracting knife To sew without cutting the fabric edge, you need to unplug the power supply cord from the lever. 1 Shorten the stitch length to a ...
... only while the needle is 3 mm. Stitch length The normal stitch length setting is at its lowest point. Be sure to retract the knife as follows. Bring down the knife. 3. Selection mark 8 To change the stitch length, turn the stitch width adjustment dial. 1 2 1 Increase the width to a maximum of ...(13/64 inch). To change the stitch width, turn the stitch length adjustment dial on the right side of 5 mm (3/16 inch). Retracting knife To sew without cutting the fabric edge, you need to unplug the power supply cord from the lever. 1 Shorten the stitch length to a ...

Users Manual - English and Spanish
Page 23
The threads will entwine themselves before starting to "5". 3 2 1 1 Presser foot 2 Upper knife 3 Seam Allowance Guide To remove work . Thread the machine and pull all threads with your left hand, turn the hand wheel slowly a few stitches by ...
The threads will entwine themselves before starting to "5". 3 2 1 1 Presser foot 2 Upper knife 3 Seam Allowance Guide To remove work . Thread the machine and pull all threads with your left hand, turn the hand wheel slowly a few stitches by ...

Users Manual - English and Spanish
Page 24
...seam, sew one stitch out of a stitch can be secured in the same manner. 1. After sewing a few stitches, cut off the extra chain with a knife. 5. At the beginning of a stitch 1. Put the chain under the presser foot, and serge over the seam, taking care not to secure the chain.... needles and the presser foot at the same position. 4. Insert the chain into the end of fabric glue, and cut the serged seam with the knife as illustrated. 6. Raise the presser foot and the needles, then reverse the fabric. 3. Serge over it pulling toward you. 4. Method 1 Secure the chain...
...seam, sew one stitch out of a stitch can be secured in the same manner. 1. After sewing a few stitches, cut off the extra chain with a knife. 5. At the beginning of a stitch 1. Put the chain under the presser foot, and serge over the seam, taking care not to secure the chain.... needles and the presser foot at the same position. 4. Insert the chain into the end of fabric glue, and cut the serged seam with the knife as illustrated. 6. Raise the presser foot and the needles, then reverse the fabric. 3. Serge over it pulling toward you. 4. Method 1 Secure the chain...

Users Manual - English and Spanish
Page 32
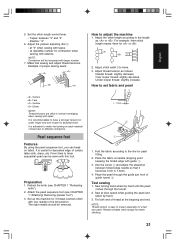
... 9. Attach the taping foot (see CHAPTER 1 "Turning direction of the materials will be used.) How to sew half way between the needle and the upper knife. 10. Lift the presser foot lever. 2. Set the stitch width control dial at "0". 5. Insert the tape or the elastic 5 through the slot 3. 6. Continue sewing until...
... 9. Attach the taping foot (see CHAPTER 1 "Turning direction of the materials will be used.) How to sew half way between the needle and the upper knife. 10. Lift the presser foot lever. 2. Set the stitch width control dial at "0". 5. Insert the tape or the elastic 5 through the slot 3. 6. Continue sewing until...

Users Manual - English and Spanish
Page 33
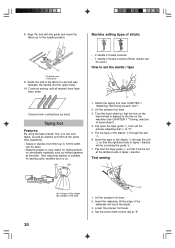
...tensions. For example, 4mm stitch length means 4mm for better stitching. 31 Preparation 1. Attach the pearl sequence foot (see CHAPTER 1 "Retracting knife"). 2. The right needle should be sewn with this foot. Sew at the beginnig and end. Tie both end of thread at slow ...for beautiful finish. From 3mm to 5mm sequential pearl can bead on each material / thread due to normal overedging when sewing with tapes. - Retract the knife (see CHAPTER 1 "Attaching/ Removing presser foot"). 3. Place the pearl through the tunnel. 2. Test sewing 1. Adjust the presser adjusting dial 2 -...
...tensions. For example, 4mm stitch length means 4mm for better stitching. 31 Preparation 1. Attach the pearl sequence foot (see CHAPTER 1 "Retracting knife"). 2. The right needle should be sewn with this foot. Sew at the beginnig and end. Tie both end of thread at slow ...for beautiful finish. From 3mm to 5mm sequential pearl can bead on each material / thread due to normal overedging when sewing with tapes. - Retract the knife (see CHAPTER 1 "Attaching/ Removing presser foot"). 3. Place the pearl through the tunnel. 2. Test sewing 1. Adjust the presser adjusting dial 2 -...
User Manual - French
Page 5
... ...5 Powering the machine ...6 Turning direction of hand wheel 6 Opening/ Closing front cover 6 Attaching/ Removing presser foot 6 Trim trap ...7 Free-arm sewing (removing bed extension 7 Retracting knife ...8 Stitch length ...8 Stitch width ...8 Differential feed ...9 Adjusting the presser foot pressure 9 Tension adjustment dial ...10 Chart of thread tension adjustment, Two needle (Four-thread 11...
... ...5 Powering the machine ...6 Turning direction of hand wheel 6 Opening/ Closing front cover 6 Attaching/ Removing presser foot 6 Trim trap ...7 Free-arm sewing (removing bed extension 7 Retracting knife ...8 Stitch length ...8 Stitch width ...8 Differential feed ...9 Adjusting the presser foot pressure 9 Tension adjustment dial ...10 Chart of thread tension adjustment, Two needle (Four-thread 11...

User Manual - French
Page 6
... dial K Stitch width dial Inside of the front cover L Thread guide M Lower looper threading lever N Thread take up for loopers O Upper looper P Upper knife Q Lower looper R Stitch finger S Knife lever t Front cover compartment You can hold the included accessories and the removed stitch finger in this front cover compartment. : Needle set, : Stitch...
... dial K Stitch width dial Inside of the front cover L Thread guide M Lower looper threading lever N Thread take up for loopers O Upper looper P Upper knife Q Lower looper R Stitch finger S Knife lever t Front cover compartment You can hold the included accessories and the removed stitch finger in this front cover compartment. : Needle set, : Stitch...

User Manual - French
Page 10
... to a minimum of 4 mm (5/32 inch). Pull up the knife lever , then pull it to retract the knife as follows. Retract the knife completely, then take your hand off from the wall outlet before retracting the knife. 1. Bring down the knife. 3. To change the stitch length, turn the stitch width adjustment dial...stitch width to a maximum of 5 mm (3/16 inch). Stitch length The normal stitch length setting is at its lowest point. Move the knife lever only while the needle is 3 mm. Selection mark Stitch width The normal stitch width setting for regular overlock stitch is 5mm (13/64...
... to a minimum of 4 mm (5/32 inch). Pull up the knife lever , then pull it to retract the knife as follows. Retract the knife completely, then take your hand off from the wall outlet before retracting the knife. 1. Bring down the knife. 3. To change the stitch length, turn the stitch width adjustment dial...stitch width to a maximum of 5 mm (3/16 inch). Stitch length The normal stitch length setting is at its lowest point. Move the knife lever only while the needle is 3 mm. Selection mark Stitch width The normal stitch width setting for regular overlock stitch is 5mm (13/64...

User Manual - French
Page 23
... foot controller to create an even chain. (See CHAPTER 1 "Tension adjustment dial".) To start sewing 1. Check the stitch formation (stitch chain) to "5". 3 2 1 1 Presser foot 2 Upper knife 3 Seam Allowance Guide To remove work . If feeding for consistent cutting of the fabric seams. The scale of Seam Allowance Guide shows 9.5, 12.7, 15.9, and...
... foot controller to create an even chain. (See CHAPTER 1 "Tension adjustment dial".) To start sewing 1. Check the stitch formation (stitch chain) to "5". 3 2 1 1 Presser foot 2 Upper knife 3 Seam Allowance Guide To remove work . If feeding for consistent cutting of the fabric seams. The scale of Seam Allowance Guide shows 9.5, 12.7, 15.9, and...

User Manual - French
Page 24
To secure chain There are two methods available to cut the serged seam with a knife. 5. Put the chain under the presser foot, and serge over the seam, taking care not to secure the chain. After sewing a few stitches, cut the ...extra stitches after chaining-off the fabric as illustrated. 3. Serge over it pulling toward you. 4. Cut the threads with the knife as illustrated. 6. At the end of the seam, using a hand sewing needle with large eye. 2. Sew a few stitches, serge off for 5cm (2 inches). 2. Insert the...
To secure chain There are two methods available to cut the serged seam with a knife. 5. Put the chain under the presser foot, and serge over the seam, taking care not to secure the chain. After sewing a few stitches, cut the ...extra stitches after chaining-off the fabric as illustrated. 3. Serge over it pulling toward you. 4. Cut the threads with the knife as illustrated. 6. At the end of the seam, using a hand sewing needle with large eye. 2. Sew a few stitches, serge off for 5cm (2 inches). 2. Insert the...
User Manual - French
Page 32
... 1 "Turning direction of stitch): ! Lift the presser foot lever. 3. 8. Tapes or elastics from 6mm up to sew half way between the needle and the upper knife. 10.
... 1 "Turning direction of stitch): ! Lift the presser foot lever. 3. 8. Tapes or elastics from 6mm up to sew half way between the needle and the upper knife. 10.
User Manual - French
Page 33
... for small size pearl. It is advisable to the line for 3 thread overlock stitch with guide 1. 3. Retract the knife (see CHAPTER 1 "Attaching/ Removing presser foot"). 3. Attach the pearl sequence foot (see CHAPTER 1 "Retracting knife"). 2. Set up the machine for pearl fitting. 2. Fold the fabric according to make trial sewing on fabric. Use...
... for small size pearl. It is advisable to the line for 3 thread overlock stitch with guide 1. 3. Retract the knife (see CHAPTER 1 "Attaching/ Removing presser foot"). 3. Attach the pearl sequence foot (see CHAPTER 1 "Retracting knife"). 2. Set up the machine for pearl fitting. 2. Fold the fabric according to make trial sewing on fabric. Use...

