
User Guide
Page 2
... a permanent record of your purchase, in the event of the unit. Retain this User's Guide with Brother, you need to call Customer Service Please complete the following information for future reference: Model Number: FAX-2440C and MFC-620CN (Circle your model number) Serial Number:* Date of Purchase: Place ...of Purchase: * The serial number is on -line at http://www.brother.com/registration By registering your product with your product ...
... a permanent record of your purchase, in the event of the unit. Retain this User's Guide with Brother, you need to call Customer Service Please complete the following information for future reference: Model Number: FAX-2440C and MFC-620CN (Circle your model number) Serial Number:* Date of Purchase: Place ...of Purchase: * The serial number is on -line at http://www.brother.com/registration By registering your product with your product ...
User Guide
Page 5
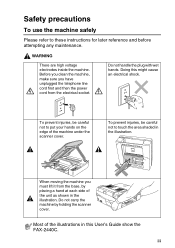
... machine you have unplugged the telephone line cord first and then the power cord from the base, by holding the scanner cover. iii Doing this User's Guide show the FAX-2440C.
... machine you have unplugged the telephone line cord first and then the power cord from the base, by holding the scanner cover. iii Doing this User's Guide show the FAX-2440C.
User Guide
Page 21
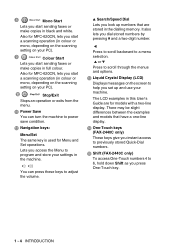
... PC). 0 Stop/Exit Stops an operation or exits from the menu. Also for MFC-620CN, lets you start a scanning operation (in this User's Guide are stored in black and white. You can turn the machine to scroll through the menus and options. A Power Save You can press these... with a two-line display. Press to scroll backward to a menu selection. ▲ or ▼ Press to power save condition. D One-Touch keys (FAX-2440C only) These keys give you set up numbers that have a one-line display. C Liquid Crystal Display (LCD) Displays messages on your machine. 8 Mono Start...
... PC). 0 Stop/Exit Stops an operation or exits from the menu. Also for MFC-620CN, lets you start a scanning operation (in this User's Guide are stored in black and white. You can turn the machine to scroll through the menus and options. A Power Save You can press these... with a two-line display. Press to scroll backward to a menu selection. ▲ or ▼ Press to power save condition. D One-Touch keys (FAX-2440C only) These keys give you set up numbers that have a one-line display. C Liquid Crystal Display (LCD) Displays messages on your machine. 8 Mono Start...
User Guide
Page 92
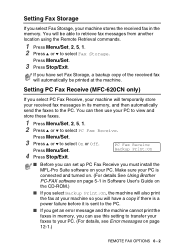
... be printed at your machine so you will also print the fax at the machine. Press Menu/Set. 4 Press Stop/Exit. Make sure your PC is connected and turned on. (For details See Using Brother PC-FAX software on page 5-1 in Software User's Guide on the CD-ROM.) ■ If you select Backup Print...:On, the machine will have set up PC Fax Receive you must install the MFL-Pro Suite software on page 12-1.) REMOTE...
... be printed at your machine so you will also print the fax at the machine. Press Menu/Set. 4 Press Stop/Exit. Make sure your PC is connected and turned on. (For details See Using Brother PC-FAX software on page 5-1 in Software User's Guide on the CD-ROM.) ■ If you select Backup Print...:On, the machine will have set up PC Fax Receive you must install the MFL-Pro Suite software on page 12-1.) REMOTE...
User Guide
Page 146
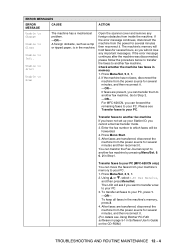
... 1. Press Menu/Set, 9, 0, 1. 2. To keep all faxes to another fax machine. After faxes are present, you want to transfer a fax to Scan The machine has a mechanical problem. -OR- Please see Using Brother PC-FAX software on the CD-ROM.) TROUBLESHOOTING AND ROUTINE MAINTENANCE 12 - 4 To transfer all faxes in Software User's Guide on page 5-1 in the machine's memory, press...
... 1. Press Menu/Set, 9, 0, 1. 2. To keep all faxes to another fax machine. After faxes are present, you want to transfer a fax to Scan The machine has a mechanical problem. -OR- Please see Using Brother PC-FAX software on the CD-ROM.) TROUBLESHOOTING AND ROUTINE MAINTENANCE 12 - 4 To transfer all faxes in Software User's Guide on page 5-1 in the machine's memory, press...

User Guide
Page 152
Colour Enhancement is not full colour in Software User's Guide on page 1-10.) Make sure you are cut off . (See Media Type on page... the paper support flap. (See How to see if the same problem occurs. Machine does not print from another fax machine. TROUBLESHOOTING AND ROUTINE MAINTENANCE 12 - 10 Stains appear on page 1-10.) Don't handle the paper until the... not loaded in the printer driver 'Basic' tab. Machine does not print from Adobe Illustrator. Printing Received Faxes Condensed print and white streaks across the page or the top and bottom of quality in the paper tray at...
Colour Enhancement is not full colour in Software User's Guide on page 1-10.) Make sure you are cut off . (See Media Type on page... the paper support flap. (See How to see if the same problem occurs. Machine does not print from another fax machine. TROUBLESHOOTING AND ROUTINE MAINTENANCE 12 - 10 Stains appear on page 1-10.) Don't handle the paper until the... not loaded in the printer driver 'Basic' tab. Machine does not print from Adobe Illustrator. Printing Received Faxes Condensed print and white streaks across the page or the top and bottom of quality in the paper tray at...
User Guide
Page 182
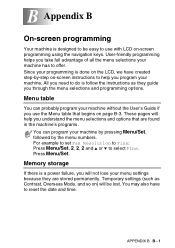
... by -step on ) will not lose your machine. APPENDIX B B - 1 User-friendly programming helps you take full advantage of all the menu selections your machine without the User's Guide if you program your menu settings because they guide you need to reset the date and time. These pages will help you... use with LCD on page B-3. Memory storage If there is a power failure, you understand the menu selections and options that begins on -screen programming using the navigation keys. For example to set Fax ...
... by -step on ) will not lose your machine. APPENDIX B B - 1 User-friendly programming helps you take full advantage of all the menu selections your machine without the User's Guide if you program your menu settings because they guide you need to reset the date and time. These pages will help you... use with LCD on page B-3. Memory storage If there is a power failure, you understand the menu selections and options that begins on -screen programming using the navigation keys. For example to set Fax ...
User Guide
Page 188
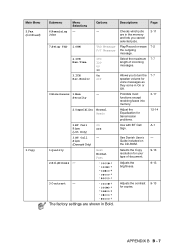
... 9-13 APPENDIX B B - 7 Main Menu 2.Fax (Continued) 3.Copy Submenu 6.Remaining Jobs Menu Selections - Security 2.Compatibility Normal Basic 3.BT Call On Sign Off (U.K. Descriptions Checks which jobs are shown in the memory and lets you to turn the speaker volume for your type of incoming messages. See Danish User's Guide included on the CD-ROM...
... 9-13 APPENDIX B B - 7 Main Menu 2.Fax (Continued) 3.Copy Submenu 6.Remaining Jobs Menu Selections - Security 2.Compatibility Normal Basic 3.BT Call On Sign Off (U.K. Descriptions Checks which jobs are shown in the memory and lets you to turn the speaker volume for your type of incoming messages. See Danish User's Guide included on the CD-ROM...
User Guide
Page 197
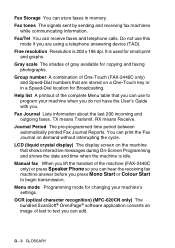
... is idle. TX means Transmit. Menu mode Programming mode for changing your machine when you do not have the User's Guide with you can store faxes in a Speed-Dial location for copying and faxing photographs. Gray scale The shades of text to program your machine's settings. It is 203 x 196 dpi. ...Do not use to text you . Help list A printout of the machine (FAX-2440C only) or press Speaker Phone so you press Mono Start or Colour Start to begin transmission. You can use this mode if you can print...
... is idle. TX means Transmit. Menu mode Programming mode for changing your machine when you do not have the User's Guide with you can store faxes in a Speed-Dial location for copying and faxing photographs. Gray scale The shades of text to program your machine's settings. It is 203 x 196 dpi. ...Do not use to text you . Help list A printout of the machine (FAX-2440C only) or press Speaker Phone so you press Mono Start or Colour Start to begin transmission. You can use this mode if you can print...

Quick Setup Guide
Page 1
Please read this "Quick Setup Guide" and User's Guide in a convenient place for quick and easy reference at all times. Setting Up the Machine Using the FAX as a Printer or for PC-FAX Send Quick Setup Guide FAX-2440C Before you can use the machine, you must set up the machine. Version A Setting Up the Machine Setup is Complete! To find the best solution for your problem or question, access the Brother Solutions Center: http://solutions.brother.com Keep this "Quick Setup Guide" for proper set up instructions.
Please read this "Quick Setup Guide" and User's Guide in a convenient place for quick and easy reference at all times. Setting Up the Machine Using the FAX as a Printer or for PC-FAX Send Quick Setup Guide FAX-2440C Before you can use the machine, you must set up the machine. Version A Setting Up the Machine Setup is Complete! To find the best solution for your problem or question, access the Brother Solutions Center: http://solutions.brother.com Keep this "Quick Setup Guide" for proper set up instructions.
Quick Setup Guide
Page 4
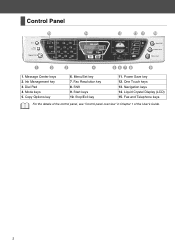
Mode keys 5. Start keys 10. Stop/Exit key 11. Liquid Crystal Display (LCD) 15. Control Panel 1. Ink Management key 3. One Touch keys 13. Message Center keys 2. Copy Options key 6. Shift 9. Fax and Telephone keys For the details of the control panel, see "Control panel overview" in Chapter 1 of the User's Guide. 2 Menu/Set key 7. Dial Pad 4. Fax Resolution key 8. Navigation keys 14. Power Save key 12.
Mode keys 5. Start keys 10. Stop/Exit key 11. Liquid Crystal Display (LCD) 15. Control Panel 1. Ink Management key 3. One Touch keys 13. Message Center keys 2. Copy Options key 6. Shift 9. Fax and Telephone keys For the details of the control panel, see "Control panel overview" in Chapter 1 of the User's Guide. 2 Menu/Set key 7. Dial Pad 4. Fax Resolution key 8. Navigation keys 14. Power Save key 12.
Quick Setup Guide
Page 7
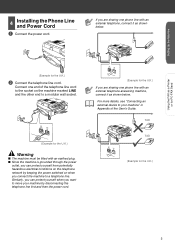
... 4 Installing the Phone Line and Power Cord 1 Connect the power cord. Connect one end of the User's Guide. Setting Up the Machine Using the FAX as shown below . (Example for the U.K.) 2 Connect the telephone line cord. For more details, see "Connecting an external device to your machine by disconnecting the ...
... 4 Installing the Phone Line and Power Cord 1 Connect the power cord. Connect one end of the User's Guide. Setting Up the Machine Using the FAX as shown below . (Example for the U.K.) 2 Connect the telephone line cord. For more details, see "Connecting an external device to your machine by disconnecting the ...
Quick Setup Guide
Page 9
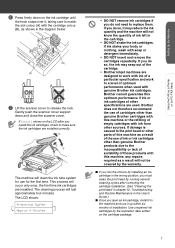
...cartridge package. 7 The machine will last approximately four minutes. The cleaning process will clean the ink tube system for use for PC-FAX Send 6 Press firmly down and close the scanner cover. If damage is caused to the print head or other parts of this ...User's Guide.) ■ Once you open an ink cartridge, install it in the machine and use it may seep out of empty cartridges with soap or detergent immediately. • DO NOT insert and remove the cartridges repeatedly. Brother cannot guarantee this machine or the refilling of the cartridge. • Brother inkjet...
...cartridge package. 7 The machine will last approximately four minutes. The cleaning process will clean the ink tube system for use for PC-FAX Send 6 Press firmly down and close the scanner cover. If damage is caused to the print head or other parts of this ...User's Guide.) ■ Once you open an ink cartridge, install it in the machine and use it may seep out of empty cartridges with soap or detergent immediately. • DO NOT insert and remove the cartridges repeatedly. Brother cannot guarantee this machine or the refilling of the cartridge. • Brother inkjet...

Quick Setup Guide
Page 11
... 20 characters), and then press Menu/Set. Enter 0 4 for 2004.) 5 Enter the two digits for PC-FAX Send 7 Setting the Date and Time 1 Press Menu/Set. 2 Press 0. 3 Press 2. 4 Enter the last two digits of the User's Guide. 6 Press Stop/Exit. Time:15:25 (e.g. Enter 1 5, 2 5 for entering your name. ■ If you send. ...want to repeat input, press Stop/Exit to start from Step 1. 8 Setting Your Station ID You should store your name and fax number to be printed on all fax pages that you need to enter a character that is on the dial pad, and then press Menu/Set. Setting Up the ...
... 20 characters), and then press Menu/Set. Enter 0 4 for 2004.) 5 Enter the two digits for PC-FAX Send 7 Setting the Date and Time 1 Press Menu/Set. 2 Press 0. 3 Press 2. 4 Enter the last two digits of the User's Guide. 6 Press Stop/Exit. Time:15:25 (e.g. Enter 1 5, 2 5 for entering your name. ■ If you send. ...want to repeat input, press Stop/Exit to start from Step 1. 8 Setting Your Station ID You should store your name and fax number to be printed on all fax pages that you need to enter a character that is on the dial pad, and then press Menu/Set. Setting Up the ...
Quick Setup Guide
Page 12
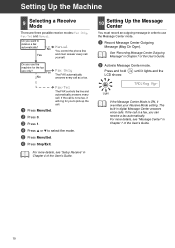
.... For more details, see "Setup Receive" in Chapter 7 of the User's Guide. 10 Setting Center Up the Message You must answer every call as a fax. 1 Press Menu/Set. The built-in order to receive a fax automatically? Press and hold LCD shows: until it overrides your Receive Mode... setting. See "Recording Message Center Outgoing Message" in Chapter 4 of the User's Guide. 2 Activate Message Center mode. Setting Up the Machine 9 Selecting a Receive Mode There are three possible receive modes: Fax Only, Fax/Tel and Manual. Do you use only? Manual No You control the phone...
.... For more details, see "Setup Receive" in Chapter 7 of the User's Guide. 10 Setting Center Up the Message You must answer every call as a fax. 1 Press Menu/Set. The built-in order to receive a fax automatically? Press and hold LCD shows: until it overrides your Receive Mode... setting. See "Recording Message Center Outgoing Message" in Chapter 4 of the User's Guide. 2 Activate Message Center mode. Setting Up the Machine 9 Selecting a Receive Mode There are three possible receive modes: Fax Only, Fax/Tel and Manual. Do you use only? Manual No You control the phone...

