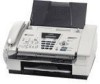
User Guide
Page 15
... 10-14 Important information 11-1 For your safety 11-1 IT power system (For Norway only 11-1 LAN connection (FAX-1940CN and MFC-3340CN only 11-1 International ENERGY STAR® Compliance Statement ... 11-1 Important safety instructions 11-2 Trademarks 11-4 Troubleshooting and routine maintenance 12-1 Troubleshooting ...print quality 12-16 Checking the printing alignment 12-18 Checking the ink volume 12-19 Packing and shipping the machine 12-20 Routine maintenance 12-23 Cleaning the Scanner 12-23 Cleaning the machine Printer Platen 12-24 Replacing the ink cartridges 12-25
... 10-14 Important information 11-1 For your safety 11-1 IT power system (For Norway only 11-1 LAN connection (FAX-1940CN and MFC-3340CN only 11-1 International ENERGY STAR® Compliance Statement ... 11-1 Important safety instructions 11-2 Trademarks 11-4 Troubleshooting and routine maintenance 12-1 Troubleshooting ...print quality 12-16 Checking the printing alignment 12-18 Checking the ink volume 12-19 Packing and shipping the machine 12-20 Routine maintenance 12-23 Cleaning the Scanner 12-23 Cleaning the machine Printer Platen 12-24 Replacing the ink cartridges 12-25
User Guide
Page 143
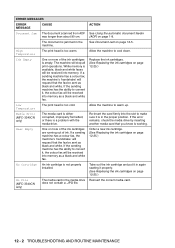
... into memory as black and white. Low Temperature The print head is not properly installed. While memory is working. No Cartridge An ink cartridge is too cold. Allow the machine to warm up. The machine will be received into memory as black and white....drive does not contain a .JPG file. Order a new ink cartridge. (See Replacing the ink cartridges on page 12-25.) Take out the ink cartridge and put it is jammed in the proper position. Replace the ink cartridges. (See Replacing the ink cartridges on page 1-8. ERROR MESSAGES ERROR MESSAGE CAUSE Document Jam The...
... into memory as black and white. Low Temperature The print head is not properly installed. While memory is working. No Cartridge An ink cartridge is too cold. Allow the machine to warm up. The machine will be received into memory as black and white....drive does not contain a .JPG file. Order a new ink cartridge. (See Replacing the ink cartridges on page 12-25.) Take out the ink cartridge and put it is jammed in the proper position. Replace the ink cartridges. (See Replacing the ink cartridges on page 1-8. ERROR MESSAGES ERROR MESSAGE CAUSE Document Jam The...
User Guide
Page 150
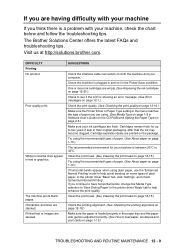
...fresh. Check the machine is a problem with your computer. DIFFICULTY Printing No printout Poor quality print. One or more ink cartridges are empty. (See Replacing the ink cartridges on page 12-25.) Check to see if the LCD is adjusted correctly. (See How to load paper, envelopes and....) If horizontal bands appear when using plain paper, use the 'Enhanced Normal Printing' mode to help enhance the print quality. The Brother Solutions Center offers the latest FAQs and troubleshooting tips. The machine prints blank pages. Characters and lines are skewed. White horizontal lines ...
...fresh. Check the machine is a problem with your computer. DIFFICULTY Printing No printout Poor quality print. One or more ink cartridges are empty. (See Replacing the ink cartridges on page 12-25.) Check to see if the LCD is adjusted correctly. (See How to load paper, envelopes and....) If horizontal bands appear when using plain paper, use the 'Enhanced Normal Printing' mode to help enhance the print quality. The Brother Solutions Center offers the latest FAQs and troubleshooting tips. The machine prints blank pages. Characters and lines are skewed. White horizontal lines ...

User Guide
Page 152
... (FAX-1940CN only) on page 4-3.) If you frequently encounter interference on the phone line, try to change the menu setting of Compatibility to Basic. (See How to improve print quality on page 12-15.) If you call your machine to send the colour fax again. (See Replacing the ink cartridges on page... shows the same problem, your machine may be out of Phone Line Type to your telephone company to Fine or S.Fine. Replace the colour ink cartridges that are secured. Try sending the fax again. Make a copy to check your resolution to check the line. Vertical black lines when sending.
... (FAX-1940CN only) on page 4-3.) If you frequently encounter interference on the phone line, try to change the menu setting of Compatibility to Basic. (See How to improve print quality on page 12-15.) If you call your machine to send the colour fax again. (See Replacing the ink cartridges on page... shows the same problem, your machine may be out of Phone Line Type to your telephone company to Fine or S.Fine. Replace the colour ink cartridges that are secured. Try sending the fax again. Make a copy to check your resolution to check the line. Vertical black lines when sending.

User Guide
Page 156
...the print head's warranty. 1 Press Ink Management. 2 Press ▲ or ▼ to select Black, Color or All. Press Menu/Set. The machine will regularly clean the print head. If you get a horizontal line in the text or graphics on your Brother dealer for service. How to improve ...or ▼ to select Cleaning. When cleaning is finished, the machine will go back to standby mode automatically. Clean the print head and ink cartridges if you clean the print head at once. TROUBLESHOOTING AND ROUTINE MAINTENANCE 12 - 15 You can start the cleaning process manually if needed. Cleaning...
...the print head's warranty. 1 Press Ink Management. 2 Press ▲ or ▼ to select Black, Color or All. Press Menu/Set. The machine will regularly clean the print head. If you get a horizontal line in the text or graphics on your Brother dealer for service. How to improve ...or ▼ to select Cleaning. When cleaning is finished, the machine will go back to standby mode automatically. Clean the print head and ink cartridges if you clean the print head at once. TROUBLESHOOTING AND ROUTINE MAINTENANCE 12 - 15 You can start the cleaning process manually if needed. Cleaning...

User Guide
Page 158
.... When a print head nozzle is still missing after the fifth cleaning and test print, replace the ink cartridge for the clogged colour. (Perhaps the ink cartridge was in this . If you still see missing ink in your Brother dealer. If ink is clogged the printed sample looks like this Print Quality Check Sheet, repeat the cleaning and...
.... When a print head nozzle is still missing after the fifth cleaning and test print, replace the ink cartridge for the clogged colour. (Perhaps the ink cartridge was in this . If you still see missing ink in your Brother dealer. If ink is clogged the printed sample looks like this Print Quality Check Sheet, repeat the cleaning and...
User Guide
Page 160
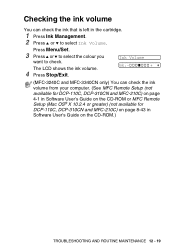
... is left in Software User's Guide on the CD-ROM.) TROUBLESHOOTING AND ROUTINE MAINTENANCE 12 - 19 Checking the ink volume You can check the ink volume from your computer. (See MFC Remote Setup (not available for DCP-110C, DCP-310CN and MFC-210C) on page 4-1 in Software User's Guide on ... or MFC Remote Setup (Mac OS® X 10.2.4 or greater) (not available for DCP-110C, DCP-310CN and MFC-210C) on page 8-43 in the cartridge. 1 Press Ink Management. 2 Press ▲ or ▼ to check. Press Menu/Set. 3 Press ▲ or ▼ to select the colour you want to select...
... is left in Software User's Guide on the CD-ROM.) TROUBLESHOOTING AND ROUTINE MAINTENANCE 12 - 19 Checking the ink volume You can check the ink volume from your computer. (See MFC Remote Setup (not available for DCP-110C, DCP-310CN and MFC-210C) on page 4-1 in Software User's Guide on ... or MFC Remote Setup (Mac OS® X 10.2.4 or greater) (not available for DCP-110C, DCP-310CN and MFC-210C) on page 8-43 in the cartridge. 1 Press Ink Management. 2 Press ▲ or ▼ to check. Press Menu/Set. 3 Press ▲ or ▼ to select the colour you want to select...
User Guide
Page 161
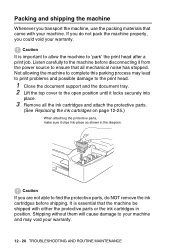
If you do NOT remove the ink cartridges before disconnecting it clips into place. 3 Remove all the ink cartridges and attach the protective parts. (See Replacing the ink cartridges on page 12-25.) When attaching the protective parts, make sure it from the power source to ensure that all mechanical noise has stopped. Not ..., use the packing materials that the machine be shipped with your machine. Caution It is essential that came with either the protective parts or the ink cartridges in the diagram. Listen carefully to 'park' the print head after a print job.
If you do NOT remove the ink cartridges before disconnecting it clips into place. 3 Remove all the ink cartridges and attach the protective parts. (See Replacing the ink cartridges on page 12-25.) When attaching the protective parts, make sure it from the power source to ensure that all mechanical noise has stopped. Not ..., use the packing materials that the machine be shipped with your machine. Caution It is essential that came with either the protective parts or the ink cartridges in the diagram. Listen carefully to 'park' the print head after a print job.
User Guide
Page 163
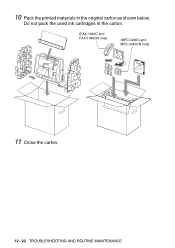
Do not pack the used ink cartridges in the original carton as shown below. 10 Pack the printed materials in the carton. (FAX-1840C and FAX-1940CN only) (MFC-3240C and MFC-3340CN only) 11 Close the carton. 12 - 22 TROUBLESHOOTING AND ROUTINE MAINTENANCE
Do not pack the used ink cartridges in the original carton as shown below. 10 Pack the printed materials in the carton. (FAX-1840C and FAX-1940CN only) (MFC-3240C and MFC-3340CN only) 11 Close the carton. 12 - 22 TROUBLESHOOTING AND ROUTINE MAINTENANCE
User Guide
Page 166
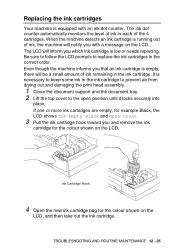
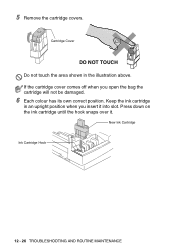
... machine will notify you and remove the ink cartridge for the colour shown on the LCD, and then take out the ink cartridge. Ink Cartridge Hook 4 Open the new ink cartridge bag for the colour shown on the LCD. Be sure to follow the LCD prompts to replace the ink cartridges in the ink cartridge to prevent air from drying out and...
... machine will notify you and remove the ink cartridge for the colour shown on the LCD, and then take out the ink cartridge. Ink Cartridge Hook 4 Open the new ink cartridge bag for the colour shown on the LCD. Be sure to follow the LCD prompts to replace the ink cartridges in the ink cartridge to prevent air from drying out and...
User Guide
Page 167
Cartridge Cover DO NOT TOUCH Do not touch the area shown in an upright position when you open the bag the cartridge will not be damaged. 6 Each colour has its own correct position. Keep the ink cartridge in the illustration above. New Ink Cartridge Ink Cartridge Hook 12 - 26 TROUBLESHOOTING AND ROUTINE MAINTENANCE Press down on the ink cartridge until the hook snaps over it into slot. If the cartridge cover comes off when you insert it . 5 Remove the cartridge covers.
Cartridge Cover DO NOT TOUCH Do not touch the area shown in an upright position when you open the bag the cartridge will not be damaged. 6 Each colour has its own correct position. Keep the ink cartridge in the illustration above. New Ink Cartridge Ink Cartridge Hook 12 - 26 TROUBLESHOOTING AND ROUTINE MAINTENANCE Press down on the ink cartridge until the hook snaps over it into slot. If the cartridge cover comes off when you insert it . 5 Remove the cartridge covers.
User Guide
Page 168
... one . 7 If you replaced an ink cartridge while Near Empty was a brand new one , please be sure to verify that colour. If you to select 2. For each new cartridge you installed, press 1 on the dial pad to automatically reset the ink dot counter for that it was displayed...message is on the LCD, the machine will automatically reset the ink dot counter. WARNING If ink gets in your eyes, irrigate them with water immediately and call a doctor if you have installed ink cartridges, check that the ink cartridges are concerned. TROUBLESHOOTING AND ROUTINE MAINTENANCE 12 - 27 If ...
... one . 7 If you replaced an ink cartridge while Near Empty was a brand new one , please be sure to verify that colour. If you to select 2. For each new cartridge you installed, press 1 on the dial pad to automatically reset the ink dot counter for that it was displayed...message is on the LCD, the machine will automatically reset the ink dot counter. WARNING If ink gets in your eyes, irrigate them with water immediately and call a doctor if you have installed ink cartridges, check that the ink cartridges are concerned. TROUBLESHOOTING AND ROUTINE MAINTENANCE 12 - 27 If ...
User Guide
Page 169
.... ■ Do not dismantle or tamper with the ink cartridge, this machine or the refilling of empty cartridges with soap or detergent immediately. ■ If you install an ink cartridge in the machine and use of cartridges other than genuine Brother products due to replace them. Use unopened ink cartridges by the warranty. 12 - 28 TROUBLESHOOTING AND ROUTINE MAINTENANCE...
.... ■ Do not dismantle or tamper with the ink cartridge, this machine or the refilling of empty cartridges with soap or detergent immediately. ■ If you install an ink cartridge in the machine and use of cartridges other than genuine Brother products due to replace them. Use unopened ink cartridges by the warranty. 12 - 28 TROUBLESHOOTING AND ROUTINE MAINTENANCE...
User Guide
Page 208
... LC900M LC900Y SPECIFICATIONS S - 9 Approximately 500 pages at 5% coverage Yellow, Cyan and Magenta - and, • Ink remaining in the ink cartridge to leave a small amount of pages printed; • Periodic, automatic, print head assembly cleaning (Your machine will use a... small amount of Ink Cartridge Replacement Consumables The machine uses individual Black, Yellow, Cyan and Magenta ink cartridges that are based upon the following assumptions: • Continuous printing at a resolution of 600...
... LC900M LC900Y SPECIFICATIONS S - 9 Approximately 500 pages at 5% coverage Yellow, Cyan and Magenta - and, • Ink remaining in the ink cartridge to leave a small amount of pages printed; • Periodic, automatic, print head assembly cleaning (Your machine will use a... small amount of Ink Cartridge Replacement Consumables The machine uses individual Black, Yellow, Cyan and Magenta ink cartridges that are based upon the following assumptions: • Continuous printing at a resolution of 600...
User Guide
Page 213
... of document 1-8 Type 2-6 Phone line connections A-7 difficulties 12-11 multi-line (PBX A-11 set 2-3 PhotoCapture Center™ Borderless 10-12 CompactFlash 10-1 I Ink cartridges checking ink volume .... 12-19 replacing 12-25 Ink Dot Counter 12-25 L LCD (liquid crystal display B-1, B-2 contrast 2-9 Help List 8-3 M Maintenance, routine ...... 12-23 Manual dialling 3-1, 5-8 receive 4-1, 4-3 transmission 3-5 Memory Security...
... of document 1-8 Type 2-6 Phone line connections A-7 difficulties 12-11 multi-line (PBX A-11 set 2-3 PhotoCapture Center™ Borderless 10-12 CompactFlash 10-1 I Ink cartridges checking ink volume .... 12-19 replacing 12-25 Ink Dot Counter 12-25 L LCD (liquid crystal display B-1, B-2 contrast 2-9 Help List 8-3 M Maintenance, routine ...... 12-23 Manual dialling 3-1, 5-8 receive 4-1, 4-3 transmission 3-5 Memory Security...
Software User Guide
Page 9
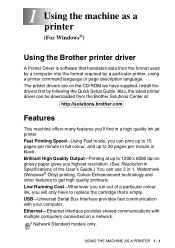
... technology and other features to 20 pages per minute in full colour, and up to replace the cartridge that translates data from the Brother Solutions Center at up to get high quality printouts. USB-Universal Serial Bus Interface provides fast communication ...quality ink jet printer. Network Standard models only. Install the drivers first by a particular printer, using a printer command language or page description language. Ethernet-Ethernet Interface provides shared communications with your computer. 1 Using the machine as a printer (For Windows®) Using the Brother ...
... technology and other features to 20 pages per minute in full colour, and up to replace the cartridge that translates data from the Brother Solutions Center at up to get high quality printouts. USB-Universal Serial Bus Interface provides fast communication ...quality ink jet printer. Network Standard models only. Install the drivers first by a particular printer, using a printer command language or page description language. Ethernet-Ethernet Interface provides shared communications with your computer. 1 Using the machine as a printer (For Windows®) Using the Brother ...
Software User Guide
Page 90
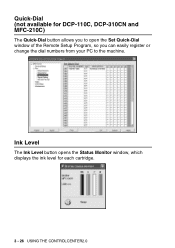
Ink Level The Ink Level button opens the Status Monitor window, which displays the ink level for DCP-110C, DCP-310CN and MFC-210C) The Quick-Dial button allows you to open the Set Quick-Dial window of the Remote Setup Program, so you can easily register or change the dial numbers from your PC to the machine. Quick-Dial (not available for each cartridge. 3 - 26 USING THE CONTROLCENTER2.0
Ink Level The Ink Level button opens the Status Monitor window, which displays the ink level for DCP-110C, DCP-310CN and MFC-210C) The Quick-Dial button allows you to open the Set Quick-Dial window of the Remote Setup Program, so you can easily register or change the dial numbers from your PC to the machine. Quick-Dial (not available for each cartridge. 3 - 26 USING THE CONTROLCENTER2.0
Software User Guide
Page 168
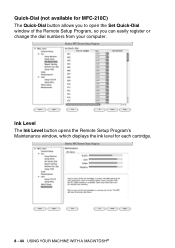
Ink Level The Ink Level button opens the Remote Setup Program's Maintenance window, which displays the ink level for MFC-210C) The Quick-Dial button allows you to open the Set Quick-Dial window of the Remote Setup Program, so you can easily register or change the dial numbers from your computer. Quick-Dial (not available for each cartridge. 8 - 44 USING YOUR MACHINE WITH A MACINTOSH®
Ink Level The Ink Level button opens the Remote Setup Program's Maintenance window, which displays the ink level for MFC-210C) The Quick-Dial button allows you to open the Set Quick-Dial window of the Remote Setup Program, so you can easily register or change the dial numbers from your computer. Quick-Dial (not available for each cartridge. 8 - 44 USING YOUR MACHINE WITH A MACINTOSH®


