
Owner's guide
Page 2
... battery away from children. Replace only with an agency-approved (e.g. REFER SERVICING TO QUALIFIED PERSONNEL. WARNING: Contains small parts which may be found at www.Bose.com/compliance. 2 - As with liquids, such as lighted candles, on the bottom of important operating and maintenance instructions in this owner's guide carefully. UL) CR2032...
... battery away from children. Replace only with an agency-approved (e.g. REFER SERVICING TO QUALIFIED PERSONNEL. WARNING: Contains small parts which may be found at www.Bose.com/compliance. 2 - As with liquids, such as lighted candles, on the bottom of important operating and maintenance instructions in this owner's guide carefully. UL) CR2032...
Owner's guide
Page 3
...keep from touching power lines or circuits, as contact with them may be sure the antenna or cable system is grounded. Please call Bose to be referred to this product yourself. Use extreme care when installing an outside antenna system to the antenna grounding illustration on the...all warnings - Install in accordance with one wider than the other. Use only with the cart, stand, tripod, bracket or table specified by Bose Corporation. Servicing is connected to rain or moisture, does not operate normally, or has been dropped - To prevent risk of the polarized or grounding...
...keep from touching power lines or circuits, as contact with them may be sure the antenna or cable system is grounded. Please call Bose to be referred to this product yourself. Use extreme care when installing an outside antenna system to the antenna grounding illustration on the...all warnings - Install in accordance with one wider than the other. Use only with the cart, stand, tripod, bracket or table specified by Bose Corporation. Servicing is connected to rain or moisture, does not operate normally, or has been dropped - To prevent risk of the polarized or grounding...
Owner's guide
Page 4
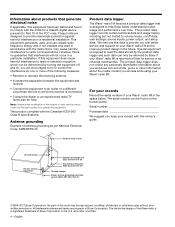
...device, pursuant to Part 15 of the FCC rules. This product complies with better service and support on your Wave® radio III is returned to Bose for help Bose better understand product usage and performance over time. The product data logger records certain technical data and usage history...• Connect the equipment to an outlet on a different circuit than the one to which can be determined by Bose if your Wave® radio III and to improve product design in a particular installation. English These limits are designed to provide reasonable protection against harmful ...
...device, pursuant to Part 15 of the FCC rules. This product complies with better service and support on your Wave® radio III is returned to Bose for help Bose better understand product usage and performance over time. The product data logger records certain technical data and usage history...• Connect the equipment to an outlet on a different circuit than the one to which can be determined by Bose if your Wave® radio III and to improve product design in a particular installation. English These limits are designed to provide reasonable protection against harmful ...
Owner's guide
Page 5
...Using headphones 13 Using the AUX IN connector 13 Using an external antenna 14 Connecting to a Lifestyle® system 14 PERSONALIZING YOUR WAVE® RADIO III .......... 15 The setup menu 15 Adjusting the snooze time 16 Turning RDS on or off 16 Changing the time format 16 Adjusting... 17 Turning the touch pad on or off 17 Changing the system standby timeout 18 Performing a system reset 18 MAINTAINING YOUR WAVE® RADIO III 19 Troubleshooting 19 Customer service 19 Cleaning 19 Replacing the remote control battery 20 Limited warranty 20 Technical information 20 INDEX 21 ...
...Using headphones 13 Using the AUX IN connector 13 Using an external antenna 14 Connecting to a Lifestyle® system 14 PERSONALIZING YOUR WAVE® RADIO III .......... 15 The setup menu 15 Adjusting the snooze time 16 Turning RDS on or off 16 Changing the time format 16 Adjusting... 17 Turning the touch pad on or off 17 Changing the system standby timeout 18 Performing a system reset 18 MAINTAINING YOUR WAVE® RADIO III 19 Troubleshooting 19 Customer service 19 Cleaning 19 Replacing the remote control battery 20 Limited warranty 20 Technical information 20 INDEX 21 ...
Owner's guide
Page 6
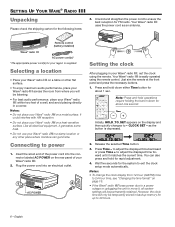
...the necessary buttons. 1. Press and hold down for your Wave® radio III. 2. It could interfere with AM reception. • Do not place your Wave® radio III on a heat-sensitive surface. CLOCK SET - as an antenna. Your Wave® radio III uses the power cord as the button is supplied. Notes:...Notes: • To change the clock display from where you will only be listening. • For best audio performance, place your Wave® radio III within two feet of a wall, and avoid placing directly in a damp location or any other flat surface. • To enjoy ...
...the necessary buttons. 1. Press and hold down for your Wave® radio III. 2. It could interfere with AM reception. • Do not place your Wave® radio III on a heat-sensitive surface. CLOCK SET - as an antenna. Your Wave® radio III uses the power cord as the button is supplied. Notes:...Notes: • To change the clock display from where you will only be listening. • For best audio performance, place your Wave® radio III within two feet of a wall, and avoid placing directly in a damp location or any other flat surface. • To enjoy ...
Owner's guide
Page 7
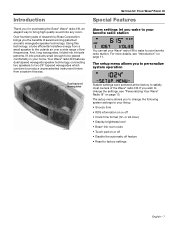
...to factory settings English - 7 or 24-hour) • Display brightness level • Bose® link room code • Touch pad on page 15. Your Wave® radio III features dual tapered waveguide speaker technology, connecting two speakers to two 26" tapered waveguides which ...12- Introduction Thank you for purchasing the Bose® Wave® radio III, an elegant way to the outside air over a wide range of low frequencies. Over fourteen years of research by Bose Corporation brings you the benefits of the Wave® radio III. Using this technology, a tube efficiently ...
...to factory settings English - 7 or 24-hour) • Display brightness level • Bose® link room code • Touch pad on page 15. Your Wave® radio III features dual tapered waveguide speaker technology, connecting two speakers to two 26" tapered waveguides which ...12- Introduction Thank you for purchasing the Bose® Wave® radio III, an elegant way to the outside air over a wide range of low frequencies. Over fourteen years of research by Bose Corporation brings you the benefits of the Wave® radio III. Using this technology, a tube efficiently ...
Owner's guide
Page 8
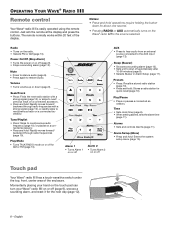
...Power On/Off (Stop Alarm) • Turns the power on or off for about one second. • Pressing RADIO or AUX automatically turns on the Wave® radio III to next/previous radio frequency (page 10), or playlist on or off AUX • Press to hear audio from an external source connected to... setting alarms, sets the alarm time (page 11). Volume • Turns volume up or down for AM or FM (page 10). Touch pad Your Wave® radio III has a touch-sensitive switch under the top, front, center area of the display. Notes: • Press-and-hold : Enters the system setup menu...
...Power On/Off (Stop Alarm) • Turns the power on or off for about one second. • Pressing RADIO or AUX automatically turns on the Wave® radio III to next/previous radio frequency (page 10), or playlist on or off AUX • Press to hear audio from an external source connected to... setting alarms, sets the alarm time (page 11). Volume • Turns volume up or down for AM or FM (page 10). Touch pad Your Wave® radio III has a touch-sensitive switch under the top, front, center area of the display. Notes: • Press-and-hold : Enters the system setup menu...
Owner's guide
Page 9
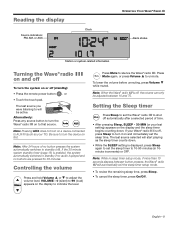
... mode, if more than 10 seconds elapses between 10 and 75. Press Mute to unmute. Note: When the Wave® radio III is off , press Sleep to turn the Wave® radio III on the display and the sleep timer begins counting down . • While the SLEEP setting is displayed, press...automatically after a selected period of no buttons are pressed for 30 minutes. The last source selected will be adjusted between button presses, the Wave® radio III will automatically exit the sleep timer setup mode. • To review the remaining sleep time, press Sleep. • To cancel the sleep...
... mode, if more than 10 seconds elapses between 10 and 75. Press Mute to unmute. Note: When the Wave® radio III is off , press Sleep to turn the Wave® radio III on the display and the sleep timer begins counting down . • While the SLEEP setting is displayed, press...automatically after a selected period of no buttons are pressed for 30 minutes. The last source selected will be adjusted between button presses, the Wave® radio III will automatically exit the sleep timer setup mode. • To review the remaining sleep time, press Sleep. • To cancel the sleep...
Owner's guide
Page 10
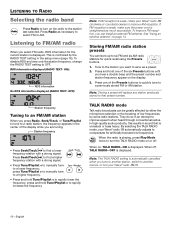
...to another source, or turn your Wave® radio III off. 10 - They do so in the center of the six Presets buttons until you select FM radio, RDS information for the current station is weak, rotate your Wave® radio III automatically adjusts to rapidly lower the...frequency, change the RADIO TEXT setting to improve speech when heard through conventional radios. See "Using an external antenna" on , TALK RADIO- TALK RADIO mode Talk radio broadcasts can be greatly affected by some radio stations. By selecting the TALK RADIO mode, your Wave® radio III clockwise or counterclockwise ...
...to another source, or turn your Wave® radio III off. 10 - They do so in the center of the six Presets buttons until you select FM radio, RDS information for the current station is weak, rotate your Wave® radio III automatically adjusts to rapidly lower the...frequency, change the RADIO TEXT setting to improve speech when heard through conventional radios. See "Using an external antenna" on , TALK RADIO- TALK RADIO mode Talk radio broadcasts can be greatly affected by some radio stations. By selecting the TALK RADIO mode, your Wave® radio III clockwise or counterclockwise ...
Owner's guide
Page 11
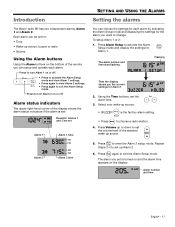
... Alarm Setup mode and display the settings for each alarm: Press to turn Alarm 2 on the display: Alarm number and time English - 11 Introduction The Wave® radio III has two independent alarms, Alarm 1 and Alarm 2. Flashing Then the display shows you want to exit the Alarm Setup mode. Press Alarm Setup to...
... Alarm Setup mode and display the settings for each alarm: Press to turn Alarm 2 on the display: Alarm number and time English - 11 Introduction The Wave® radio III has two independent alarms, Alarm 1 and Alarm 2. Flashing Then the display shows you want to exit the Alarm Setup mode. Press Alarm Setup to...
Owner's guide
Page 12
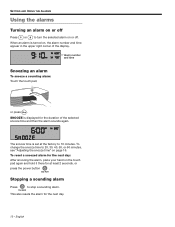
SETTING AND USING THE ALARMS Using the alarms Turning an alarm on or off Press or to turn the selected alarm on page 16. The snooze time is set at least 2 seconds, or press the power button . Stopping a sounding alarm Press to 20, 30, 40, 50, or 60 minutes, see "Adjusting the snooze time" on or off. SNOOZE is turned on the touch pad again and hold it there for the next day. 12 - When an alarm is displayed for the duration of the display. To reset a snoozed alarm for the next day: After snoozing the alarm, place your hand on , the alarm number and time appear in the upper right...
SETTING AND USING THE ALARMS Using the alarms Turning an alarm on or off Press or to turn the selected alarm on page 16. The snooze time is set at least 2 seconds, or press the power button . Stopping a sounding alarm Press to 20, 30, 40, 50, or 60 minutes, see "Adjusting the snooze time" on or off. SNOOZE is turned on the touch pad again and hold it there for the next day. 12 - When an alarm is displayed for the duration of the display. To reset a snoozed alarm for the next day: After snoozing the alarm, place your hand on , the alarm number and time appear in the upper right...
Owner's guide
Page 13
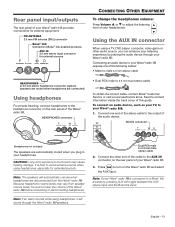
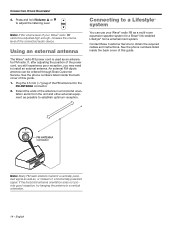
...the volume of the Wave® radio III before connecting or disconnecting headphones. Connecting an audio device to your Wave® radio III requires one end of the stereo cable to a Bose® link accessory, pressing AUX will sound through your Wave® radio III provides connections for external...Long-term exposure to adjust the listening level of your Wave® radio III. 3. Rear panel input/outputs The rear panel of your Wave® radio III. FM ANTENNA 3.5 mm FM antenna (75) connector Bose® link Connects to Bose® link-enabled products AUX IN 3.5 mm stereo ...
...the volume of the Wave® radio III before connecting or disconnecting headphones. Connecting an audio device to your Wave® radio III requires one end of the stereo cable to a Bose® link accessory, pressing AUX will sound through your Wave® radio III provides connections for external...Long-term exposure to adjust the listening level of your Wave® radio III. 3. Rear panel input/outputs The rear panel of your Wave® radio III. FM ANTENNA 3.5 mm FM antenna (75) connector Bose® link Connects to Bose® link-enabled products AUX IN 3.5 mm stereo ...
Owner's guide
Page 14
... volume level of this guide. 1. An external FM dipole antenna can use your Wave® radio III cannot be ordered through Bose Customer Service. FM ANTENNA connector Note: Many FM radio stations transmit a vertically polarized signal as well as an antenna for a Bose® link-enabled Lifestyle® home entertainment system. Using an external antenna The...
... volume level of this guide. 1. An external FM dipole antenna can use your Wave® radio III cannot be ordered through Bose Customer Service. FM ANTENNA connector Note: Many FM radio stations transmit a vertically polarized signal as well as an antenna for a Bose® link-enabled Lifestyle® home entertainment system. Using an external antenna The...
Owner's guide
Page 15
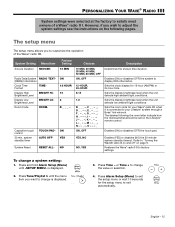
... value or selection. 4. PERSONALIZING YOUR WAVE® RADIO III System settings were selected at the factory to satisfy most owners of the Wave® radio III. Display Low Brightness Level BRIGHT LO- Restores the Wave® radio III to display RDS information. system standby ...timer TOUCH PADAUTO OFF- Enables (ON) or disables (OFF) the system to factory settings. Sets the room code for your Lifestyle® system through a Bose...
... value or selection. 4. PERSONALIZING YOUR WAVE® RADIO III System settings were selected at the factory to satisfy most owners of the Wave® radio III. Display Low Brightness Level BRIGHT LO- Restores the Wave® radio III to display RDS information. system standby ...timer TOUCH PADAUTO OFF- Enables (ON) or disables (OFF) the system to factory settings. Sets the room code for your Lifestyle® system through a Bose...
Owner's guide
Page 16
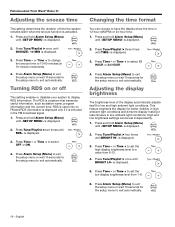
... from 8-15. 4. Press Tune/Playlist > four times until BRIGHT LO- is displayed. 3. is displayed. 3. Press and hold Alarm Setup (Menu) until TIME- PERSONALIZING YOUR WAVE® RADIO III Adjusting the snooze time This setting determines the duration of the display automatically adjusts itself for low and high ambient light conditions. Press and hold...
... from 8-15. 4. Press Tune/Playlist > four times until BRIGHT LO- is displayed. 3. is displayed. 3. Press and hold Alarm Setup (Menu) until TIME- PERSONALIZING YOUR WAVE® RADIO III Adjusting the snooze time This setting determines the duration of the display automatically adjusts itself for low and high ambient light conditions. Press and hold...
Owner's guide
Page 17
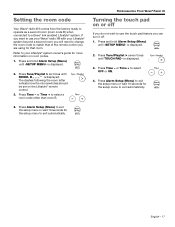
...it off. 1. Press and hold Alarm Setup (Menu) until ROOM- is displayed. B is displayed. 2. Press Time - Setting the room code Your Wave® radio III comes from the factory ready to operate as a second room (room code B) when connected to select a room code other than room B. 4. If ...you want to exit automatically. or Time + to a Bose® link enabled Lifestyle® system. Press Alarm Setup (Menu) to exit the setup...
...it off. 1. Press and hold Alarm Setup (Menu) until ROOM- is displayed. B is displayed. 2. Press Time - Setting the room code Your Wave® radio III comes from the factory ready to operate as a second room (room code B) when connected to select a room code other than room B. 4. If ...you want to exit automatically. or Time + to a Bose® link enabled Lifestyle® system. Press Alarm Setup (Menu) to exit the setup...
Owner's guide
Page 18
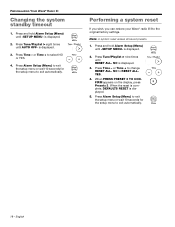
... reset erases all saved presets. 1. Press Time - NO is displayed. 2. NO to change RESET ALL- or Time + to RESET ALLYES. 4. PERSONALIZING YOUR WAVE® RADIO III Changing the system standby timeout 1. Press and hold Alarm Setup (Menu) until -SETUP MENU- is displayed. 3. Press Alarm Setup (Menu) to exit the setup... for the setup menu to select NO or YES. 4. Performing a system reset If you wish, you can restore your Wave® radio III to exit automatically. is displayed. 2. Press Time - When PRESS PRESET 3 TO CONFIRM appears on the display, press Presets 3.
... reset erases all saved presets. 1. Press Time - NO is displayed. 2. NO to change RESET ALL- or Time + to RESET ALLYES. 4. PERSONALIZING YOUR WAVE® RADIO III Changing the system standby timeout 1. Press and hold Alarm Setup (Menu) until -SETUP MENU- is displayed. 3. Press Alarm Setup (Menu) to exit the setup... for the setup menu to select NO or YES. 4. Performing a system reset If you wish, you can restore your Wave® radio III to exit automatically. is displayed. 2. Press Time - When PRESS PRESET 3 TO CONFIRM appears on the display, press Presets 3.
Owner's guide
Page 19
Cleaning Use only a soft dry cloth to order an external FM antenna. English - 19 Customer service If you lose your Wave® radio III. Call Bose® Customer Support as soon as possible to arrange for 10 seconds and then reconnect it is fully inserted. • Operate the ...as an FM antenna. For additional help in the enclosure. See the phone numbers listed inside the back cover. Troubleshooting MAINTAINING YOUR WAVE® RADIO III Problem System does not function No sound Poor sound quality Remote control is inconsistent or does not work AM reception is weak FM reception...
Cleaning Use only a soft dry cloth to order an external FM antenna. English - 19 Customer service If you lose your Wave® radio III. Call Bose® Customer Support as soon as possible to arrange for 10 seconds and then reconnect it is fully inserted. • Operate the ...as an FM antenna. For additional help in the enclosure. See the phone numbers listed inside the back cover. Troubleshooting MAINTAINING YOUR WAVE® RADIO III Problem System does not function No sound Poor sound quality Remote control is inconsistent or does not work AM reception is weak FM reception...
Owner's guide
Page 20
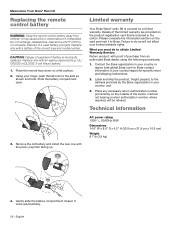
.../60Hz 60W Dimensions 14.6" W x 8.6" D x 4.2" H (36.8 cm x 21.9 cm x 10.6 cm) Weight 8.7 lb (3.9 kg) insbtratutcSetrieyoetnoospfbeorerattuiysnpegeds of MAINTAINING YOUR WAVE® RADIO III Replacing the remote control battery WARNING: Keep the remote control battery away from an authorized Bose dealer, using the following procedures: 1. It locks automatically. 20 - insbtratutcSetrieyoetnoospfbeorerattuiysnpegeds of nsbtratutcetriyoetnoospfbeorerattuiysnpegeds of 4. Replace only with proof...
.../60Hz 60W Dimensions 14.6" W x 8.6" D x 4.2" H (36.8 cm x 21.9 cm x 10.6 cm) Weight 8.7 lb (3.9 kg) insbtratutcSetrieyoetnoospfbeorerattuiysnpegeds of MAINTAINING YOUR WAVE® RADIO III Replacing the remote control battery WARNING: Keep the remote control battery away from an authorized Bose dealer, using the following procedures: 1. It locks automatically. 20 - insbtratutcSetrieyoetnoospfbeorerattuiysnpegeds of nsbtratutcetriyoetnoospfbeorerattuiysnpegeds of 4. Replace only with proof...
Owner's guide
Page 21
... time 6, 15, 16 ambient light conditions 15, 16 audio device, connecting 13 AUX IN connector 13 auxiliary source 9 B backup memory 6 battery replacement 19 Bose® link 13, 14, 15, 17 brightness level 15, 16 C carton 20 cleaning 20 clock display 9 clock setup mode 6 clock time 6 clock ...power 6 power cord 6, 10, 14, 19 power outage 6 preset number 10 presets 10 press and hold operations 8 Q quick recall 10 R radio alarm 11 radio station 10 rapid adjustment 6 rear panel 13 refrigerator 19 registration card 20 remote control 8 remote control battery 19 remote control buttons 8 restore audio ...
... time 6, 15, 16 ambient light conditions 15, 16 audio device, connecting 13 AUX IN connector 13 auxiliary source 9 B backup memory 6 battery replacement 19 Bose® link 13, 14, 15, 17 brightness level 15, 16 C carton 20 cleaning 20 clock display 9 clock setup mode 6 clock time 6 clock ...power 6 power cord 6, 10, 14, 19 power outage 6 preset number 10 presets 10 press and hold operations 8 Q quick recall 10 R radio alarm 11 radio station 10 rapid adjustment 6 rear panel 13 refrigerator 19 registration card 20 remote control 8 remote control battery 19 remote control buttons 8 restore audio ...
