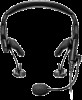

English Owners Guide
Page 2
...passive mode, the volume controls on page 29. |2 E N G If your ability to safe levels that do not interfere with your headset is needed, use instructions. IMPORTANT SAFETY INSTRUCTIONS Please read this guide carefully. As with any loud noise and the related loss of communications .... Important Safety Instructions WARNINGS/CAUTIONS • Do NOT use standard cockpit resource management skills to turn off if it emits any headset issue or failure in the passive noise reducing mode, switch to an alternate communications method and use the headphones with Acoustic...
...passive mode, the volume controls on page 29. |2 E N G If your ability to safe levels that do not interfere with your headset is needed, use instructions. IMPORTANT SAFETY INSTRUCTIONS Please read this guide carefully. As with any loud noise and the related loss of communications .... Important Safety Instructions WARNINGS/CAUTIONS • Do NOT use standard cockpit resource management skills to turn off if it emits any headset issue or failure in the passive noise reducing mode, switch to an alternate communications method and use the headphones with Acoustic...
English Owners Guide
Page 3
...located or operating in a residential installation. See "Clean the headset" on page 41 for specific care, return and shipping instructions. This product contains magnetic material. NOTE: This equipment has been tested and found at: www.Bose.com/compliance |3 E N G However, there is in ...water or any interference received, including interference that interference will void the limited product warranty. • Do NOT immerse the headset or any part, for help. To avoid ...
...located or operating in a residential installation. See "Clean the headset" on page 41 for specific care, return and shipping instructions. This product contains magnetic material. NOTE: This equipment has been tested and found at: www.Bose.com/compliance |3 E N G However, there is in ...water or any interference received, including interference that interference will void the limited product warranty. • Do NOT immerse the headset or any part, for help. To avoid ...
English Owners Guide
Page 5
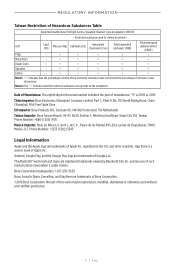
... 9, No. 353 North Riying Road, China (Shanghai) Pilot Free Trade Zone EU Importer: Bose Products B.V., Gorslaan 60, 1441 RG Purmerend, The Netherlands Taiwan Importer: Bose Taiwan Branch, 9F-A1, No.10, Section 3, Minsheng East Road, Taipei City 104, Taiwan Phone... are trademarks of Apple Inc. and any use of manufacture; REGULATORY INFORMATION Taiwan Restriction of Hazardous Substances Table Equipment name: Bose ProFlight Series 2 Aviation Headset, Type designation: 430970 Restricted substances and its chemical symbols Unit Lead (Pb) Mercury (Hg) Cadmium (Cd) Hexavalent ...
... 9, No. 353 North Riying Road, China (Shanghai) Pilot Free Trade Zone EU Importer: Bose Products B.V., Gorslaan 60, 1441 RG Purmerend, The Netherlands Taiwan Importer: Bose Taiwan Branch, 9F-A1, No.10, Section 3, Minsheng East Road, Taipei City 104, Taiwan Phone... are trademarks of Apple Inc. and any use of manufacture; REGULATORY INFORMATION Taiwan Restriction of Hazardous Substances Table Equipment name: Bose ProFlight Series 2 Aviation Headset, Type designation: 430970 Restricted substances and its chemical symbols Unit Lead (Pb) Mercury (Hg) Cadmium (Cd) Hexavalent ...

English Owners Guide
Page 6
CONTENTS BOSE CONNECT APP Features...10 WHAT'S IN THE BOX Contents...11 Headset components...12 Control module options 13 IMPORTANCE OF PROPER FIT Fit the headband...14 Choose the correct StayHear+ tips 15 Fit the earbuds to your ... 16 Adjust the microphone 17 Conditions related to fit 18 Secure clothing clip and control module holder 18 Clothing clip...18 Control module holder 18 HEADSET CONTROLS Power on...19 Power off...19 ACOUSTIC NOISE CANCELLATION Acoustic Noise Cancelling functions 20 Tap Control for talk-through communication 21 Reset Tap Control...
CONTENTS BOSE CONNECT APP Features...10 WHAT'S IN THE BOX Contents...11 Headset components...12 Control module options 13 IMPORTANCE OF PROPER FIT Fit the headband...14 Choose the correct StayHear+ tips 15 Fit the earbuds to your ... 16 Adjust the microphone 17 Conditions related to fit 18 Secure clothing clip and control module holder 18 Clothing clip...18 Control module holder 18 HEADSET CONTROLS Power on...19 Power off...19 ACOUSTIC NOISE CANCELLATION Acoustic Noise Cancelling functions 20 Tap Control for talk-through communication 21 Reset Tap Control...

English Owners Guide
Page 8
... BLUETOOTH CONNECTIONS Connect an additional mobile device 37 Switch between connected devices 37 Clear the headset pairing list 37 BLUETOOTH FUNCTIONS Bluetooth volume functions 38 Call functions...38 CARE AND MAINTENANCE Store the headset...40 Clean the headset...41 Limited warranty...41 Serial number location 42 Replacement parts and accessories 42 Side pad...
... BLUETOOTH CONNECTIONS Connect an additional mobile device 37 Switch between connected devices 37 Clear the headset pairing list 37 BLUETOOTH FUNCTIONS Bluetooth volume functions 38 Call functions...38 CARE AND MAINTENANCE Store the headset...40 Clean the headset...41 Limited warranty...41 Serial number location 42 Replacement parts and accessories 42 Side pad...

English Owners Guide
Page 10
Customize your headset experience: • Name your headset experience with a single swipe. BOSE CONNECT APP Enhance your headset. • Share audio and music. • Adjust Bluetooth volume. NOTE: Applies to Bluetooth headsets only. • Find answers to and switch between multiple mobile devices with the Bose Connect app. FEATURES Easily connect to frequently asked questions. | 1 0 E N G
Customize your headset experience: • Name your headset experience with a single swipe. BOSE CONNECT APP Enhance your headset. • Share audio and music. • Adjust Bluetooth volume. NOTE: Applies to Bluetooth headsets only. • Find answers to and switch between multiple mobile devices with the Bose Connect app. FEATURES Easily connect to frequently asked questions. | 1 0 E N G

English Owners Guide
Page 11
Visit: worldwide.Bose.com/Support/ProFlight2 | 1 1 E N G NOTES: • For control module options, see page 13. • For aircraft connector types, see page 29. • If any part of the product is damaged, don't use it. Contact your authorized Bose dealer or Bose customer service. CONTENTS WHAT'S IN THE BOX Carry case Carry case hook AA batteries (2) Control module holder Bose ProFlight Series 2 Aviation Headset StayHear+ tips: Large (black) and Small (white) NOTE: Medium (gray) tips are attached to the earbuds.
Visit: worldwide.Bose.com/Support/ProFlight2 | 1 1 E N G NOTES: • For control module options, see page 13. • For aircraft connector types, see page 29. • If any part of the product is damaged, don't use it. Contact your authorized Bose dealer or Bose customer service. CONTENTS WHAT'S IN THE BOX Carry case Carry case hook AA batteries (2) Control module holder Bose ProFlight Series 2 Aviation Headset StayHear+ tips: Large (black) and Small (white) NOTE: Medium (gray) tips are attached to the earbuds.

English Owners Guide
Page 12
W hat 's in the Box HEADSET COMPONENTS Headband Side pad StayHear+ tip Earbud storage hook Microphone assembly (boom microphone, microphone base, and cable) Cable clip Control module (see page 13) | 1 2 E N G Aircraft connectors (see page 29)
W hat 's in the Box HEADSET COMPONENTS Headband Side pad StayHear+ tip Earbud storage hook Microphone assembly (boom microphone, microphone base, and cable) Cable clip Control module (see page 13) | 1 2 E N G Aircraft connectors (see page 29)
English Owners Guide
Page 14
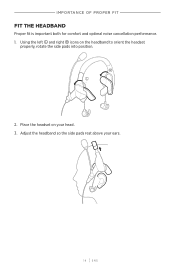
Adjust the headband so the side pads rest above your head. 3. IMPORTANCE OF PROPER FIT FIT THE HEADBAND Proper fit is important both for comfort and optimal noise cancellation performance. 1. Place the headset on the headband to orient the headset properly, rotate the side pads into position. 2. Using the left T and right U icons on your ears. | 1 4 E N G
Adjust the headband so the side pads rest above your head. 3. IMPORTANCE OF PROPER FIT FIT THE HEADBAND Proper fit is important both for comfort and optimal noise cancellation performance. 1. Place the headset on the headband to orient the headset properly, rotate the side pads into position. 2. Using the left T and right U icons on your ears. | 1 4 E N G
English Owners Guide
Page 15
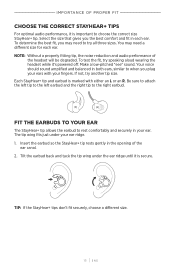
To test the fit, try speaking aloud wearing the headset while it is secure. Your voice should sound amplified and balanced in each ear. FIT THE EARBUDS TO YOUR EAR The StayHear+ tip allows the ... to try another tip size. Tilt the earbud back and tuck the tip wing under your ears with either an L or an R. I mportance of the headset will be degraded. Select the size that gives you may need to choose the correct size StayHear+ tip. To determine the best fit, you...
To test the fit, try speaking aloud wearing the headset while it is secure. Your voice should sound amplified and balanced in each ear. FIT THE EARBUDS TO YOUR EAR The StayHear+ tip allows the ... to try another tip size. Tilt the earbud back and tuck the tip wing under your ears with either an L or an R. I mportance of the headset will be degraded. Select the size that gives you may need to choose the correct size StayHear+ tip. To determine the best fit, you...
English Owners Guide
Page 16
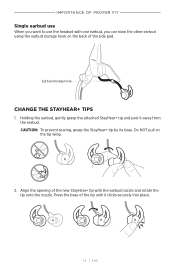
... pull on the back of the side pad. Press the base of the new StayHear+ tip with one earbud, you want to use the headset with the earbud nozzle and rotate the tip onto the nozzle. R R R | 1 6 E N G I mportance of P roper F it Single earbud use When you can stow the other earbud...
... pull on the back of the side pad. Press the base of the new StayHear+ tip with one earbud, you want to use the headset with the earbud nozzle and rotate the tip onto the nozzle. R R R | 1 6 E N G I mportance of P roper F it Single earbud use When you can stow the other earbud...

English Owners Guide
Page 17
...with your mouth. Position the microphone so it is 0.5" (12.7 mm) from the factory attached to the left side of the headset, see "Microphone Placement" on the base is facing your mouth. Test the headset before flight. | 1 7 E N G NOTES: • If necessary, twist the microphone base to the other side of ...the headset. If you want to move the microphone to rotate the microphone into position. • The microphone should not be touching your lips. 3. I mMpPoOrRtTaAnNcCeE OofF...
...with your mouth. Position the microphone so it is 0.5" (12.7 mm) from the factory attached to the left side of the headset, see "Microphone Placement" on the base is facing your mouth. Test the headset before flight. | 1 7 E N G NOTES: • If necessary, twist the microphone base to the other side of ...the headset. If you want to move the microphone to rotate the microphone into position. • The microphone should not be touching your lips. 3. I mMpPoOrRtTaAnNcCeE OofF...
English Owners Guide
Page 18
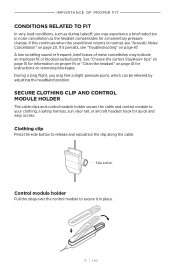
... for instructions on page 47. I mMpPoOrRtTaAnNcCeE OofF P RroOpPeErR FIiTt CONDITIONS RELATED TO FIT In very loud conditions, such as the headset compensates for quick and easy access. If this continues when the sound level returns to secure it persists, see "Acoustic Noise Cancellation...see "Troubleshooting" on removing blockages. Clothing clip Press the side button to your clothing, a safety harness, sun visor rail, or aircraft headset hook for a momentary pressure change. SECURE CLOTHING CLIP AND CONTROL MODULE HOLDER The cable clips and control module holder secure the cable and...
... for instructions on page 47. I mMpPoOrRtTaAnNcCeE OofF P RroOpPeErR FIiTt CONDITIONS RELATED TO FIT In very loud conditions, such as the headset compensates for quick and easy access. If this continues when the sound level returns to secure it persists, see "Acoustic Noise Cancellation...see "Troubleshooting" on removing blockages. Clothing clip Press the side button to your clothing, a safety harness, sun visor rail, or aircraft headset hook for a momentary pressure change. SECURE CLOTHING CLIP AND CONTROL MODULE HOLDER The cable clips and control module holder secure the cable and...
English Owners Guide
Page 19
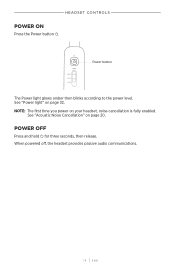
NOTE: The first time you power on page 32. HEADSET CONTROLS POWER ON Press the Power button I for three seconds, then release. See "Power light" on your headset, noise cancellation is fully enabled. See "Acoustic Noise Cancellation" on page 20. Power button The Power light glows amber then blinks according to the power level. When powered off, the headset provides passive audio communications. | 1 9 E N G POWER OFF Press and hold I .
NOTE: The first time you power on page 32. HEADSET CONTROLS POWER ON Press the Power button I for three seconds, then release. See "Power light" on your headset, noise cancellation is fully enabled. See "Acoustic Noise Cancellation" on page 20. Power button The Power light glows amber then blinks according to the power level. When powered off, the headset provides passive audio communications. | 1 9 E N G POWER OFF Press and hold I .

English Owners Guide
Page 20
... typical jet aircraft. ACOUSTIC NOISE CANCELLATION Acoustic Noise Cancellation reduces unwanted noise providing a clearer, more lifelike audio performance. NOTE: When you receive a call, the headset remains at the current noise cancellation level.
... typical jet aircraft. ACOUSTIC NOISE CANCELLATION Acoustic Noise Cancellation reduces unwanted noise providing a clearer, more lifelike audio performance. NOTE: When you receive a call, the headset remains at the current noise cancellation level.

English Owners Guide
Page 22
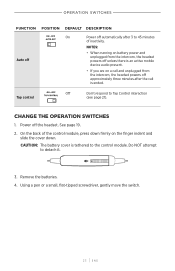
... Mono Power on . Process audio as mono or stereo. NOTE: Some operation switches are located in Flex power models only (see page 29). • Bluetooth headsets return to the previous Bluetooth state when powered on automatically when connected to aircraft power. Set sensitivity/volume of intercom audio. FUNCTION POSITION DEFAULT...
... Mono Power on . Process audio as mono or stereo. NOTE: Some operation switches are located in Flex power models only (see page 29). • Bluetooth headsets return to the previous Bluetooth state when powered on automatically when connected to aircraft power. Set sensitivity/volume of intercom audio. FUNCTION POSITION DEFAULT...
English Owners Guide
Page 23
...switch. | 2 3 E N G On the back of inactivity. NOTES: • When running on battery power and unplugged from the intercom, the headset powers off unless there is an active mobile device audio present. • If you are on the finger indent and slide the cover down. Tap... 21). OpPeErRaAtTiIOoNn SW wiItTCchHeEsS FUNCTION POSITION DEFAULT DESCRIPTION Auto off On Power off automatically after the call and unplugged from the intercom, the headset powers off approximately three minutes after 3 to 45 minutes of the control module, press down firmly on a call is...
...switch. | 2 3 E N G On the back of inactivity. NOTES: • When running on battery power and unplugged from the intercom, the headset powers off unless there is an active mobile device audio present. • If you are on the finger indent and slide the cover down. Tap... 21). OpPeErRaAtTiIOoNn SW wiItTCchHeEsS FUNCTION POSITION DEFAULT DESCRIPTION Auto off On Power off automatically after the call and unplugged from the intercom, the headset powers off approximately three minutes after 3 to 45 minutes of the control module, press down firmly on a call is...
English Owners Guide
Page 25
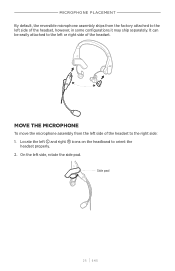
MOVE THE MICROPHONE To move the microphone assembly from the factory attached to the left side of the headset, however, in some configurations it may ship separately. It can be easily attached to the left T and right U icons on the headband to orient the headset properly. 2. Side pad | 2 5 E N G Locate the left or right side of the headset. MICROPHONE PLACEMENT By default, the reversible microphone assembly ships from the left side of the headset to the right side: 1. On the left side, rotate the side pad.
MOVE THE MICROPHONE To move the microphone assembly from the factory attached to the left side of the headset, however, in some configurations it may ship separately. It can be easily attached to the left T and right U icons on the headband to orient the headset properly. 2. Side pad | 2 5 E N G Locate the left or right side of the headset. MICROPHONE PLACEMENT By default, the reversible microphone assembly ships from the left side of the headset to the right side: 1. On the left side, rotate the side pad.

English Owners Guide
Page 27
MICROPHONE PLACEMENT 7. Slide the microphone connector into the connector socket. 9. CAUTION: Do NOT force the microphone connector into the connector socket until the release button is secure. Test the headset before flight. | 2 7 E N G On the right side, align the release button to the release button opening, and insert the microphone connector into the base of the connector socket. 8.
MICROPHONE PLACEMENT 7. Slide the microphone connector into the connector socket. 9. CAUTION: Do NOT force the microphone connector into the connector socket until the release button is secure. Test the headset before flight. | 2 7 E N G On the right side, align the release button to the release button opening, and insert the microphone connector into the base of the connector socket. 8.
English Owners Guide
Page 28
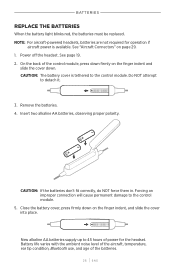
Power off the headset. Do NOT attempt to the control module. CAUTION: If the batteries don't fit correctly, do NOT force them in. Close the battery cover, press firmly ... the back of the control module, press down firmly on the finger indent and slide the cover down on page 29. 1. NOTE: For aircraft-powered headsets, batteries are not required for the...
Power off the headset. Do NOT attempt to the control module. CAUTION: If the batteries don't fit correctly, do NOT force them in. Close the battery cover, press firmly ... the back of the control module, press down firmly on the finger indent and slide the cover down on page 29. 1. NOTE: For aircraft-powered headsets, batteries are not required for the...
