Operating guide
Page 3
...part of the following two conditions: (1) This device may not cause harmful interference, and (2) this guide. ©2010 Bose Corporation. If this equipment. Operation is no guarantee that may cause harmful interference to provide reasonable protection against harmful interference in ... the dealer or an experienced radio/TV technician for a Class B digital device, pursuant to an outlet on the carton): LIFESTYLE Serial numbers: Control console Acoustimass® module Retailer information: Dealer name Dealer phone Purchase date Please keep your sales receipt and a copy of the...
...part of the following two conditions: (1) This device may not cause harmful interference, and (2) this guide. ©2010 Bose Corporation. If this equipment. Operation is no guarantee that may cause harmful interference to provide reasonable protection against harmful interference in ... the dealer or an experienced radio/TV technician for a Class B digital device, pursuant to an outlet on the carton): LIFESTYLE Serial numbers: Control console Acoustimass® module Retailer information: Dealer name Dealer phone Purchase date Please keep your sales receipt and a copy of the...
Operating guide
Page 5
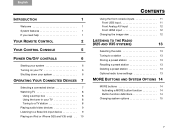
...CONTROL CONSOLE 5 POWER ON/OFF CONTROLS 6 Starting your system 6 Turning on your TV 6 Shutting down your system 6 OPERATING YOUR CONNECTED DEVICES 7 Selecting a connected device 7 Watching TV 8 Using a set top box 8 Using the tuner in your TV 8 Tuning to a TV station 8 Playing audio/video devices 9 Listening to a Bose... link input device 9 Playing an iPod or iPhone (V25 and V35 only) . . 10 TAB 5 TAB 6 TAB 7 TAB 8 CONTENTS Using the front console inputs 11 Front USB input 11 Front Analog A/V input 12 Front...
...CONTROL CONSOLE 5 POWER ON/OFF CONTROLS 6 Starting your system 6 Turning on your TV 6 Shutting down your system 6 OPERATING YOUR CONNECTED DEVICES 7 Selecting a connected device 7 Watching TV 8 Using a set top box 8 Using the tuner in your TV 8 Tuning to a TV station 8 Playing audio/video devices 9 Listening to a Bose... link input device 9 Playing an iPod or iPhone (V25 and V35 only) . . 10 TAB 5 TAB 6 TAB 7 TAB 8 CONTENTS Using the front console inputs 11 Front USB input 11 Front Analog A/V input 12 Front...
Operating guide
Page 8
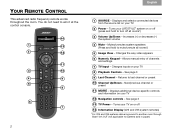
...control console. Turns your TV on or off all rooms*) 5 Image View - Increases (+) or decreases (-) the system volume 4 Mute - Changes the way video appears 6 Numeric Keypad - Turns your LIFESTYLE® system on your TV 8 Playback Controls...controls and information on your TV. 2 Power - iPod 3:20 The Beatles 14 1 13 2 12 11 3 10 4 9 5 8 6 7 2 TAB 4 TAB 3 TAB 2 English 1 SOURCE - Mutes/unmutes system speakers (Press and hold to turn off 14 Information Display (V25 and V35 system remotes) *For V25 and V35 systems delivering sound to another room through Bose...
...control console. Turns your TV on or off all rooms*) 5 Image View - Increases (+) or decreases (-) the system volume 4 Mute - Changes the way video appears 6 Numeric Keypad - Turns your LIFESTYLE® system on your TV 8 Playback Controls...controls and information on your TV. 2 Power - iPod 3:20 The Beatles 14 1 13 2 12 11 3 10 4 9 5 8 6 7 2 TAB 4 TAB 3 TAB 2 English 1 SOURCE - Mutes/unmutes system speakers (Press and hold to turn off 14 Information Display (V25 and V35 system remotes) *For V25 and V35 systems delivering sound to another room through Bose...
Operating guide
Page 11
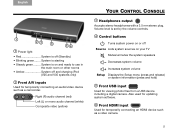
...other rooms • Amber System off and charging iPod (V25 and V35 systems only) 2 Front A/V inputs Used for temporarily connecting an audio/video device such as a video camera. 5 Volume level is set by the volume controls. 4 Control buttons Turns system power on or off (Standby) • Blinking green... a digital camera. Right (R) audio channel (red) Left (L) or mono audio channel (white) Composite video (yellow) TAB 5 TAB 6 TAB 7 TAB 8 YOUR CONTROL CONSOLE 3 Headphones output Accepts stereo headphones with a 3.5 mm stereo plug. System is starting • Steady green .........
...other rooms • Amber System off and charging iPod (V25 and V35 systems only) 2 Front A/V inputs Used for temporarily connecting an audio/video device such as a video camera. 5 Volume level is set by the volume controls. 4 Control buttons Turns system power on or off (Standby) • Blinking green... a digital camera. Right (R) audio channel (red) Left (L) or mono audio channel (white) Composite video (yellow) TAB 5 TAB 6 TAB 7 TAB 8 YOUR CONTROL CONSOLE 3 Headphones output Accepts stereo headphones with a 3.5 mm stereo plug. System is starting • Steady green .........
Operating guide
Page 12
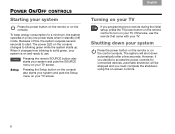
... system Press the power button on the remote or on the control console. When it changes from blinking to solid green, your system is on and ready to turn on your TV If you must complete the shutdown using the on the console. Shutting down automatically after a few seconds. The system will...start. The power LED on your TV screen. Pressing the remote SOURCE button also starts your system and puts the SOURCE menu on the console changes to access the power controls for connected devices, automatic shutdown will shut down your system Press the power button on the remote or on -screen...
... system Press the power button on the remote or on the control console. When it changes from blinking to solid green, your system is on and ready to turn on your TV If you must complete the shutdown using the on the console. Shutting down automatically after a few seconds. The system will...start. The power LED on your TV screen. Pressing the remote SOURCE button also starts your system and puts the SOURCE menu on the console changes to access the power controls for connected devices, automatic shutdown will shut down your system Press the power button on the remote or on -screen...
Operating guide
Page 15
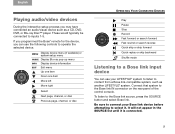
..., DVD, DVR, or Blu-ray Disc™ player. To listen to the Bose link IN connector on the rear panel of the control console. Connect that system to the Bose link source, press the SOURCE button and select Bose link. It will not appear in the SOURCE list until it . MENU Display ...mode Listening to a Bose link input device You can use your Bose link device before attempting to inputs 1-5. If you programmed the Bose® remote for the device, you may have connected an audio/visual device such as another LIFESTYLE® system. Be sure to connect your LIFESTYLE® system to ...
..., DVD, DVR, or Blu-ray Disc™ player. To listen to the Bose link IN connector on the rear panel of the control console. Connect that system to the Bose link source, press the SOURCE button and select Bose link. It will not appear in the SOURCE list until it . MENU Display ...mode Listening to a Bose link input device You can use your Bose link device before attempting to inputs 1-5. If you programmed the Bose® remote for the device, you may have connected an audio/visual device such as another LIFESTYLE® system. Be sure to connect your LIFESTYLE® system to ...

Operating guide
Page 23
... Sends HDMI audio to your TV (audio from the TV is not affected by plugging headphones into the control console or by pressing Mute or Volume on the remote) Off Sends HDMI audio to the LIFESTYLE® system speakers Video Output * Factory setting Changes the resolution (Standard/720p/1080i/1080p) of the front...
... Sends HDMI audio to your TV (audio from the TV is not affected by plugging headphones into the control console or by pressing Mute or Volume on the remote) Off Sends HDMI audio to the LIFESTYLE® system speakers Video Output * Factory setting Changes the resolution (Standard/720p/1080i/1080p) of the front...
Operating guide
Page 24
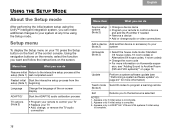
...Restart initial Start the interactive setup process from the setup (Note 1) beginning Language Change the language of the control console. Using the navigation buttons on Homewide expan- Menu item What you can do Source setup options (Note 2) ... process at any time using the Unify™ intelligent integration system, you to Another Room (V25 and V35 systems)*" on page 19 Update Perform a system software update (see "Performing a system software update" on...if initial setup is complete. 3. Appears only in LIFESTYLE® V25 and V35 systems if initial setup is complete. 18
...Restart initial Start the interactive setup process from the setup (Note 1) beginning Language Change the language of the control console. Using the navigation buttons on Homewide expan- Menu item What you can do Source setup options (Note 2) ... process at any time using the Unify™ intelligent integration system, you to Another Room (V25 and V35 systems)*" on page 19 Update Perform a system software update (see "Performing a system software update" on...if initial setup is complete. 3. Appears only in LIFESTYLE® V25 and V35 systems if initial setup is complete. 18

Operating guide
Page 25
... ROOM (V25 AND V35 SYSTEMS)* Expanding your system Your LIFESTYLE® system can select and control the radio that is built into the control console in the main room. Your system has two house code modes. If you live in a multi-unit dwelling, you can deliver Bose® quality sound in up a Bose link-enabled speaker system...
... ROOM (V25 AND V35 SYSTEMS)* Expanding your system Your LIFESTYLE® system can select and control the radio that is built into the control console in the main room. Your system has two house code modes. If you live in a multi-unit dwelling, you can deliver Bose® quality sound in up a Bose link-enabled speaker system...
Operating guide
Page 26
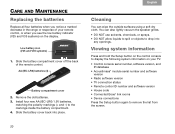
Slide the battery compartment cover off the back of your remote control, or when you see the low battery indicator (V25 and V35 systems) on your TV: • Control console serial number, software version, and IR database • Acoustimass® module serial number and ...software version • Radio software version • TV connection status • Remote control ID number and software version • House code • Connected Bose...
Slide the battery compartment cover off the back of your remote control, or when you see the low battery indicator (V25 and V35 systems) on your TV: • Control console serial number, software version, and IR database • Acoustimass® module serial number and ...software version • Radio software version • TV connection status • Remote control ID number and software version • House code • Connected Bose...
Operating guide
Page 27
It should blink with the console" on -screen instructions to initial operation of my Bose® remote • Make sure the control console is turned on the Acoustimass module. • Check connections between the front and rear speakers and the Acoustimass module. • For radio operation (V25 and V35 systems only), connect the FM and AM...
It should blink with the console" on -screen instructions to initial operation of my Bose® remote • Make sure the control console is turned on the Acoustimass module. • Check connections between the front and rear speakers and the Acoustimass module. • For radio operation (V25 and V35 systems only), connect the FM and AM...
Operating guide
Page 28
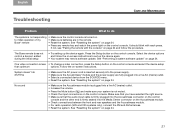
... left and right rear speakers are connected properly. • Move AM antenna at least 20 inches (50 cm) from the control console and Acoustimass® module. • Adjust antenna position to improve reception. • Make sure the AM antenna is in ...Bose® Customer Service to determine if and how other electronic equipment. • Select another station. You may be creating unwanted signals, and to obtain possible remedies. Radio does not work (V25 and V35 systems only) • Make sure antennas are connected to the rear speaker jacks. No sound from control console...
... left and right rear speakers are connected properly. • Move AM antenna at least 20 inches (50 cm) from the control console and Acoustimass® module. • Adjust antenna position to improve reception. • Make sure the AM antenna is in ...Bose® Customer Service to determine if and how other electronic equipment. • Select another station. You may be creating unwanted signals, and to obtain possible remedies. Radio does not work (V25 and V35 systems only) • Make sure antennas are connected to the rear speaker jacks. No sound from control console...
Operating guide
Page 29
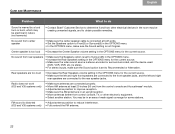
Make sure it is correct for the coaxial heard on the control console. remote commands Intermittent audio dropouts • Contact Bose® Customer Service to request a composite video cable that came with the device. A connected device does not • Try connecting the ...emitter to minimize noise. No TV picture, but audio is set to Front(3) or Surround(5) (V25 and V35 systems only) • Weak FM stations will produce static in the OPTIONS menu to the control console. Sound is turned on -screen instructions. No sound from any external devices connected to the...
Make sure it is correct for the coaxial heard on the control console. remote commands Intermittent audio dropouts • Contact Bose® Customer Service to request a composite video cable that came with the device. A connected device does not • Try connecting the ...emitter to minimize noise. No TV picture, but audio is set to Front(3) or Surround(5) (V25 and V35 systems only) • Weak FM stations will produce static in the OPTIONS menu to the control console. Sound is turned on -screen instructions. No sound from any external devices connected to the...
Operating guide
Page 30
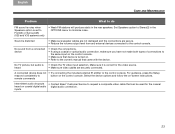
... 3. See the address sheet included in solving problems, contact Bose® Customer Service. Press and release the power button on and ready to pair the remote with the console 1. Press and hold the power button on the control console changes to restart the system. The power light changes to ... available periodically and can be downloaded over the Internet to display the Setup menu. 2. Note: To make sure your Bose® remote is on the control console to red. Contacting customer service For additional help in the carton. 24 Press any remote button and verify that the ...
... 3. See the address sheet included in solving problems, contact Bose® Customer Service. Press and release the power button on and ready to pair the remote with the console 1. Press and hold the power button on the control console changes to restart the system. The power light changes to ... available periodically and can be downloaded over the Internet to display the Setup menu. 2. Note: To make sure your Bose® remote is on the control console to red. Contacting customer service For additional help in the carton. 24 Press any remote button and verify that the ...
Operating guide
Page 31
...a USB port, navigate to the USB root directory, and open source software programs originating from an authorized Bose dealer, using the following the date of distribution of the control console. 3. To read the file "licenses.pdf," plug the USB drive into the USB input on the front... distribute such source code to you in your product's control console: 1. To receive a copy of the source code for instructions on a disc for a period of three (3) years following procedures: 1. English TAB 2 TAB 3 TAB 4 Limited Warranty Your LIFESTYLE® system is subject to the terms of the ...
...a USB port, navigate to the USB root directory, and open source software programs originating from an authorized Bose dealer, using the following the date of distribution of the control console. 3. To read the file "licenses.pdf," plug the USB drive into the USB input on the front... distribute such source code to you in your product's control console: 1. To receive a copy of the source code for instructions on a disc for a period of three (3) years following procedures: 1. English TAB 2 TAB 3 TAB 4 Limited Warranty Your LIFESTYLE® system is subject to the terms of the ...
Installation guide
Page 3
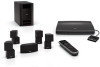
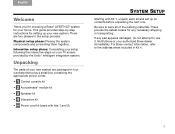
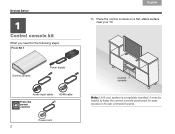
...Bose contact information, refer to use it. There are packaged in Kit 4. 1 These provide the safest means for any part appears damaged, do not attempt to the address sheet included in four numbered kits plus a small box containing the appropriate power cords: 1 • 1 Control console...save all of your new system. English TAB 2 TAB 3 TAB 4 Welcome Thank you for choosing a Bose® LIFESTYLE® system for your authorized Bose dealer immediately. If any necessary shipping or transporting. This guide provides step-by the UnifyTM intelligent integration system....
...Bose contact information, refer to use it. There are packaged in Kit 4. 1 These provide the safest means for any part appears damaged, do not attempt to the address sheet included in four numbered kits plus a small box containing the appropriate power cords: 1 • 1 Control console...save all of your new system. English TAB 2 TAB 3 TAB 4 Welcome Thank you for choosing a Bose® LIFESTYLE® system for your authorized Bose dealer immediately. If any necessary shipping or transporting. This guide provides step-by the UnifyTM intelligent integration system....
Installation guide
Page 4
Place the control console on a flat, stable surface near your system is completely installed, it may be helpful to keep the control console positioned for the following steps: From Kit 1 TAB 5 TAB 4 TAB 3 TAB 2 English 1. Control console Power supply Audio input cable From the power cord kit HDMI cable Power cord 2 Control console Note: Until your TV. TAB 8 TAB 7 SYSTEM SETUP TAB 6 11 Control console kit What you need for easy access to its rear connection panel.
Place the control console on a flat, stable surface near your system is completely installed, it may be helpful to keep the control console positioned for the following steps: From Kit 1 TAB 5 TAB 4 TAB 3 TAB 2 English 1. Control console Power supply Audio input cable From the power cord kit HDMI cable Power cord 2 Control console Note: Until your TV. TAB 8 TAB 7 SYSTEM SETUP TAB 6 11 Control console kit What you need for easy access to its rear connection panel.

Installation guide
Page 5
TAB 5 TAB 6 TAB 7 TAB 8 SYSTEM SETUP 3. Plug one . If an HDMI cable is already connected to an HDMI input on your TV. HDMI OUT Video to TV on your TV, you are using into the connector labeled HDMI OUT Video to TV 3 Just disconnect the other end of the HDMI cable you can use this one end of the HDMI cable into an HDMI INPUT connector on the control console. English TAB 2 TAB 3 TAB 4 2. Plug the other end.
TAB 5 TAB 6 TAB 7 TAB 8 SYSTEM SETUP 3. Plug one . If an HDMI cable is already connected to an HDMI input on your TV. HDMI OUT Video to TV on your TV, you are using into the connector labeled HDMI OUT Video to TV 3 Just disconnect the other end of the HDMI cable you can use this one end of the HDMI cable into an HDMI INPUT connector on the control console. English TAB 2 TAB 3 TAB 4 2. Plug the other end.
Installation guide
Page 6
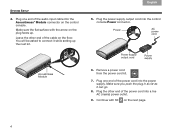
... into the power supply. Plug the power supply output cord into a live AC (mains) power outlet. 9. Leave the other end of the cable on the control console. You will be asked to connect it can go. 8. Acoustimass Module TAB 4 TAB 3 TAB 2 English 5. Plug the other end of the power cord into the...
... into the power supply. Plug the power supply output cord into a live AC (mains) power outlet. 9. Leave the other end of the cable on the control console. You will be asked to connect it can go. 8. Acoustimass Module TAB 4 TAB 3 TAB 2 English 5. Plug the other end of the power cord into the...
Installation guide
Page 14
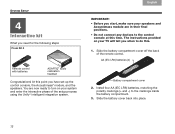
... will tell you when to turn on your speakers and Acoustimass module are now ready to do this point you have set up the control console, the Acoustimass® module, and the speakers. AA (IEC LR6) batteries (4) Battery compartment cover 2. Slide the battery cover back ... devices to the markings inside the battery compartment. 3. Install four AA (IEC LR6) batteries, matching the polarity markings (+ and -) to the control console at this time. Slide the battery compartment cover off the back of the setup process using the UnifyTM intelligent integration system. TAB 4 TAB 3 ...
... will tell you when to turn on your speakers and Acoustimass module are now ready to do this point you have set up the control console, the Acoustimass® module, and the speakers. AA (IEC LR6) batteries (4) Battery compartment cover 2. Slide the battery cover back ... devices to the markings inside the battery compartment. 3. Install four AA (IEC LR6) batteries, matching the polarity markings (+ and -) to the control console at this time. Slide the battery compartment cover off the back of the setup process using the UnifyTM intelligent integration system. TAB 4 TAB 3 ...


