Bose® link AL8 homewide wireless audio link - Owner's guide
Page 3
..., laundry tub, in a wet basement, near water - Note: The product label is used only with its advanced features. Do not install near any way: such as vases, shall not be reproduced, modified, distributed or otherwise used indoors. Unplug this apparatus during lightning storms ... It is damaged; Read these instructions - . 3. This product must be placed on boats. Ultra Low Delay Audio Coding licensed by Bose Corporation. As with arrowhead symbol, within an equilateral triangle alerts the user to follow the instructions in this owner's guide carefully. The ...
..., laundry tub, in a wet basement, near water - Note: The product label is used only with its advanced features. Do not install near any way: such as vases, shall not be reproduced, modified, distributed or otherwise used indoors. Unplug this apparatus during lightning storms ... It is damaged; Read these instructions - . 3. This product must be placed on boats. Ultra Low Delay Audio Coding licensed by Bose Corporation. As with arrowhead symbol, within an equilateral triangle alerts the user to follow the instructions in this owner's guide carefully. The ...
Bose® link AL8 homewide wireless audio link - Owner's guide
Page 4
...comply with the limits for a Class B digital device, pursuant to provide reasonable protection against harmful interference in a residential installation. However, this device must accept any interference, including interference that interference will not occur in accordance with the instructions, may... your product registration card together with this equipment. Serial numbers: Transmitter Receiver Dealer name: _____ Dealer phone Purchase date Bose recommends that generate electrical noise U.S.A. These limits are located on the bottom of the device. RF Guideline: This device...
...comply with the limits for a Class B digital device, pursuant to provide reasonable protection against harmful interference in a residential installation. However, this device must accept any interference, including interference that interference will not occur in accordance with the instructions, may... your product registration card together with this equipment. Serial numbers: Transmitter Receiver Dealer name: _____ Dealer phone Purchase date Bose recommends that generate electrical noise U.S.A. These limits are located on the bottom of the device. RF Guideline: This device...
SL2 wireless surround link - Owner's guide
Page 2
...product near a bathtub, washbowl, kitchen sink, laundry tub, in a wet basement, near any electronic product, use attachments/accessories specified by Bose Corporation. Do not block any part of important operating and maintenance instructions in this owner's guide carefully. Only use care not to this ...as directed by the manufacturer. 10. Unplug this product from overheating, put the product in accordance with a dry cloth - Do not install near a swimming pool, or anywhere else that produce heat. 9. Svenska Nederlands Italiano Français Español Deutsch Dansk English ...
...product near a bathtub, washbowl, kitchen sink, laundry tub, in a wet basement, near any electronic product, use attachments/accessories specified by Bose Corporation. Do not block any part of important operating and maintenance instructions in this owner's guide carefully. Only use care not to this ...as directed by the manufacturer. 10. Unplug this product from overheating, put the product in accordance with a dry cloth - Do not install near a swimming pool, or anywhere else that produce heat. 9. Svenska Nederlands Italiano Français Español Deutsch Dansk English ...
SL2 wireless surround link - Owner's guide
Page 3
...related markings. 16. However, this equipment does cause harmful interference to radio or television reception, which can be helpful to which assumes installation provides a distance of the FCC rules. the apparatus has been exposed to correct the interference by turning the equipment off and on... the sales slip and a copy of the SL2 transmitter. This device must accept any way: such as described in a particular installation. English Dansk Deutsch Español Français Italiano Nederlands Svenska SAFETY INFORMATION 12. Servicing is required when the apparatus has...
...related markings. 16. However, this equipment does cause harmful interference to radio or television reception, which can be helpful to which assumes installation provides a distance of the FCC rules. the apparatus has been exposed to correct the interference by turning the equipment off and on... the sales slip and a copy of the SL2 transmitter. This device must accept any way: such as described in a particular installation. English Dansk Deutsch Español Français Italiano Nederlands Svenska SAFETY INFORMATION 12. Servicing is required when the apparatus has...
Personal® music center II - Owner's guide
Page 3
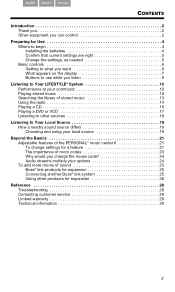
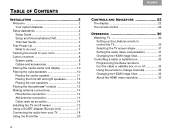
... 2 Thank you 2 Other equipment you can control 2 Preparing for Use 4 Where to begin 4 Installing the batteries 4 Confirm that current settings are right 5 Change the settings, as needed 5 Basic controls...want 6 What appears on the display 7 Buttons to use while you listen 9 Listening to Your LIFESTYLE® System 10 Performance at your command 10 Playing stored music 10 Searching the library of stored... your options 24 To add more rooms of sound 25 Bose® link products for expansion 25 Connecting another Bose® link system 25 Using other products for expansion 26...
... 2 Thank you 2 Other equipment you can control 2 Preparing for Use 4 Where to begin 4 Installing the batteries 4 Confirm that current settings are right 5 Change the settings, as needed 5 Basic controls...want 6 What appears on the display 7 Buttons to use while you listen 9 Listening to Your LIFESTYLE® System 10 Performance at your command 10 Playing stored music 10 Searching the library of stored... your options 24 To add more rooms of sound 25 Bose® link products for expansion 25 Connecting another Bose® link system 25 Using other products for expansion 26...

Personal® music center II - Owner's guide
Page 4
..., you can get your PERSONAL® music center II with the remote, refer to use now. Slide the battery cover back into place. Installing the batteries Use your remote ready to "Using other products for expansion" on page 25. Figure 1 Inserting the batteries + + + + ...Note: Change the batteries when you have a Bose® link product and still need to the markings inside the battery compartment (Figure 1). 3. If you have an older (legacy) product to the LIFESTYLE® system before you can use them with the PERSONAL® music center...
..., you can get your PERSONAL® music center II with the remote, refer to use now. Slide the battery cover back into place. Installing the batteries Use your remote ready to "Using other products for expansion" on page 25. Figure 1 Inserting the batteries + + + + ...Note: Change the batteries when you have a Bose® link product and still need to the markings inside the battery compartment (Figure 1). 3. If you have an older (legacy) product to the LIFESTYLE® system before you can use them with the PERSONAL® music center...
Personal® music center II - Owner's guide
Page 22
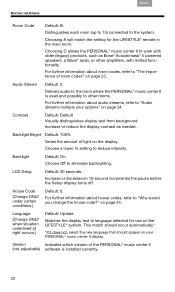
...% setting to "The importance of room codes" on the LIFESTYLE® system. For further information about audio streams, refer to the system. Delivers audio to the room where the PERSONAL® music center II is installed currently. 22 BEYOND THE BASICS Français Españ...;ol English Room Code Default: B. Audio Stream Default: 2. Increase or reduce the display contrast as Bose® Acoustimass® 5 powered speakers, a Wave® ...
...% setting to "The importance of room codes" on the LIFESTYLE® system. For further information about audio streams, refer to the system. Delivers audio to the room where the PERSONAL® music center II is installed currently. 22 BEYOND THE BASICS Français Españ...;ol English Room Code Default: B. Audio Stream Default: 2. Increase or reduce the display contrast as Bose® Acoustimass® 5 powered speakers, a Wave® ...
Personal® music center II - Owner's guide
Page 28
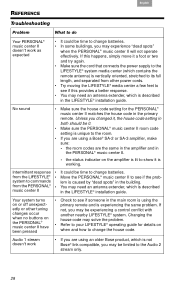
... Changing the house code may solve the problem. • Refer to your LIFESTYLE® operating guide for the PERSONAL® music center II matches the house code in the LIFESTYLE® installation guide. the room codes are using a Bose® SA-2 or SA-3 amplifier, make sure: - Your system turns on... the PERSONAL® music center II have been pressed • Check to see if someone in the main room is using an older Bose product, which...
... Changing the house code may solve the problem. • Refer to your LIFESTYLE® operating guide for the PERSONAL® music center II matches the house code in the LIFESTYLE® installation guide. the room codes are using a Bose® SA-2 or SA-3 amplifier, make sure: - Your system turns on... the PERSONAL® music center II have been pressed • Check to see if someone in the main room is using an older Bose product, which...
Personal® music center II - Owner's guide
Page 29
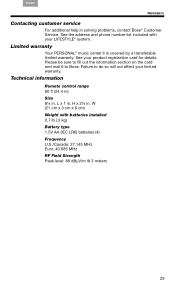
.... Technical information Remote control range 80 ft (24.4 m) Size 8¼ in solving problems, contact Bose® Customer Service. H x 2½ in . See the address and phone number list included with batteries installed 0.7 lb (.3 kg) Battery type 1.5V AA (IEC LR6) batteries (4) Frequency U.S./Canada: 27....145 MHz Euro: 40.685 MHz RF Field Strength Peak level: 88 dBμV/m @ 3 meters 29 Failure to Bose. See your LIFESTYLE® system. Please be...
.... Technical information Remote control range 80 ft (24.4 m) Size 8¼ in solving problems, contact Bose® Customer Service. H x 2½ in . See the address and phone number list included with batteries installed 0.7 lb (.3 kg) Battery type 1.5V AA (IEC LR6) batteries (4) Frequency U.S./Canada: 27....145 MHz Euro: 40.685 MHz RF Field Strength Peak level: 88 dBμV/m @ 3 meters 29 Failure to Bose. See your LIFESTYLE® system. Please be...
Owner's guide
Page 4
...antenna connections 14 FM antenna connection 14 AM antenna connection 14 Cable radio as an option 14 Installing the TV on/off sensor 15 Using a SCART adapter (Europe only 17 Connecting the audio from...AND INDICATORS 22 The display 22 The remote control 22 OPERATION 30 Watching TV 30 Setting up the Lifestyle remote to control the TV 30 Selecting the TV screen shape 31 Setting the audio delay compensation ...31 Changing the HDMI Image View 31 Controlling a cable or satellite box 32 Programming the Bose remote to turn the cable or satellite box on or off 32 Using the remote to ...
...antenna connections 14 FM antenna connection 14 AM antenna connection 14 Cable radio as an option 14 Installing the TV on/off sensor 15 Using a SCART adapter (Europe only 17 Connecting the audio from...AND INDICATORS 22 The display 22 The remote control 22 OPERATION 30 Watching TV 30 Setting up the Lifestyle remote to control the TV 30 Selecting the TV screen shape 31 Setting the audio delay compensation ...31 Changing the HDMI Image View 31 Controlling a cable or satellite box 32 Programming the Bose remote to turn the cable or satellite box on or off 32 Using the remote to ...
Owner's guide
Page 6
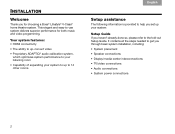
It contains all the steps needed to -use system delivers superior performance for choosing a Bose® Lifestyle® V-Class® home theater system. This elegant and easy-to get you through basic system installation, including: • System placement • Speaker connections • Display/media center interconnections • TV/video connections • Audio connections ... up your system: Setup Guide If you haven't already done so, please refer to the fold-out Setup Guide. TAB TAB TAB 6Italiano TAB 5 INSTALLATION Welcome Thank you for both music and video programming.
It contains all the steps needed to -use system delivers superior performance for choosing a Bose® Lifestyle® V-Class® home theater system. This elegant and easy-to get you through basic system installation, including: • System placement • Speaker connections • Display/media center interconnections • TV/video connections • Audio connections ... up your system: Setup Guide If you haven't already done so, please refer to the fold-out Setup Guide. TAB TAB TAB 6Italiano TAB 5 INSTALLATION Welcome Thank you for both music and video programming.
Owner's guide
Page 7
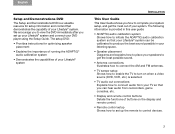
...and remote control. • Remote control setup Shows how to set up the remote to view the DVD immediately after you set up your Lifestyle® system and connect your DVD player using the Setup Guide. English TAB 2 TAB 3 TAB Setup and Demonstrations DVD The Setup and... placement • Explains the importance of running the ADAPTiQ® audio calibration system • Demonstrates the capabilities of your Lifestyle® system TAB TAB 6 TAB TAB INSTALLATION This User Guide This User Guide shows you how to complete your system setup, and get the best possible sound. •...
...and remote control. • Remote control setup Shows how to set up the remote to view the DVD immediately after you set up your Lifestyle® system and connect your DVD player using the Setup Guide. English TAB 2 TAB 3 TAB Setup and Demonstrations DVD The Setup and... placement • Explains the importance of running the ADAPTiQ® audio calibration system • Demonstrates the capabilities of your Lifestyle® system TAB TAB 6 TAB TAB INSTALLATION This User Guide This User Guide shows you how to complete your system setup, and get the best possible sound. •...

Owner's guide
Page 8
Fi gu re 2 System menu Setup tab. 4 Fi gu re 1 Lifestyle® language menu. Select a language by pressing the corresponding numeric key on the TV (see Figure 1) directs you to choose the system language. TAB 4 TAB 3 ... through a sequence of menus. The Setup menu appears as shown in Figure 2. The first menu displayed on the remote control. TAB TAB TAB 6Italiano TAB 5 INSTALLATION First Power-Up After you connect your Lifestyle® system to your Lifestyle® system, you are ready to apply power. 1. Turn on the TV and...
Fi gu re 2 System menu Setup tab. 4 Fi gu re 1 Lifestyle® language menu. Select a language by pressing the corresponding numeric key on the TV (see Figure 1) directs you to choose the system language. TAB 4 TAB 3 ... through a sequence of menus. The Setup menu appears as shown in Figure 2. The first menu displayed on the remote control. TAB TAB TAB 6Italiano TAB 5 INSTALLATION First Power-Up After you connect your Lifestyle® system to your Lifestyle® system, you are ready to apply power. 1. Turn on the TV and...
Owner's guide
Page 9
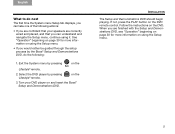
Exit the System menu by pressing on the DVD. Follow the instructions on the Lifestyle® remote. 2. Select the DVD player by the Bose® Setup and Demonstrations DVD, do next The first time the System menu Setup tab displays, you can take one of the following : 1. Turn... and placed, and that your DVD player on the DVD remote control. TAB TAB 6 TAB TAB INSTALLATION The Setup and Demonstrations DVD should begin playing. If not, press the PLAY button on and insert the Bose® Setup and Demonstrations DVD. English TAB 2 TAB 3 TAB What to do the following actions: ...
Exit the System menu by pressing on the DVD. Follow the instructions on the Lifestyle® remote. 2. Select the DVD player by the Bose® Setup and Demonstrations DVD, do next The first time the System menu Setup tab displays, you can take one of the following : 1. Turn... and placed, and that your DVD player on the DVD remote control. TAB TAB 6 TAB TAB INSTALLATION The Setup and Demonstrations DVD should begin playing. If not, press the PLAY button on and insert the Bose® Setup and Demonstrations DVD. English TAB 2 TAB 3 TAB What to do the following actions: ...
Owner's guide
Page 10
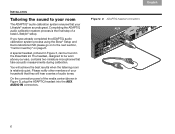
...completed the ADAPTiQ audio calibration system process using the Bose® Setup and Demonstrations DVD please go on to the next section, "Carton inventory" on page 8. Please notify other members of audio tones. TAB TAB TAB 6Italiano TAB 5 INSTALLATION Tailoring the sound to your room The ADAPTiQ®... best results when the listening room is the final step of the media center (shown in the Essentials kit. On the connection panel of a basic Lifestyle® setup. TAB 4 TAB 3 TAB 2 English Fi gu re 3 ADAPTiQ headset connection. 6 You will hear a series of your ears, ...
...completed the ADAPTiQ audio calibration system process using the Bose® Setup and Demonstrations DVD please go on to the next section, "Carton inventory" on page 8. Please notify other members of audio tones. TAB TAB TAB 6Italiano TAB 5 INSTALLATION Tailoring the sound to your room The ADAPTiQ®... best results when the listening room is the final step of the media center (shown in the Essentials kit. On the connection panel of a basic Lifestyle® setup. TAB 4 TAB 3 TAB 2 English Fi gu re 3 ADAPTiQ headset connection. 6 You will hear a series of your ears, ...
Owner's guide
Page 11
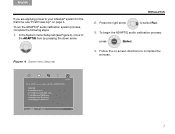
English TAB 2 TAB 3 TAB If you are applying power to the ADAPTiQ item by pressing the down arrow. In the System menu Setup tab (see Figure 4), move to your Lifestyle® system for the first time, see "First Power-Up" on -screen directions to select Run. 3. Follow the on page 4. To run the ADAPTiQ® audio calibration system process, complete the following steps: 1. Fi gu re 4 System menu Setup tab TAB TAB 6 TAB TAB INSTALLATION 2. To begin the ADAPTiQ audio calibration process, press (Enter). 4. Press the right arrow to complete the process. 7
English TAB 2 TAB 3 TAB If you are applying power to the ADAPTiQ item by pressing the down arrow. In the System menu Setup tab (see Figure 4), move to your Lifestyle® system for the first time, see "First Power-Up" on -screen directions to select Run. 3. Follow the on page 4. To run the ADAPTiQ® audio calibration system process, complete the following steps: 1. Fi gu re 4 System menu Setup tab TAB TAB 6 TAB TAB INSTALLATION 2. To begin the ADAPTiQ audio calibration process, press (Enter). 4. Press the right arrow to complete the process. 7
Owner's guide
Page 12
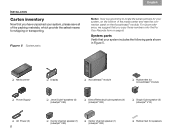
...10063; Jewel Cube® speakesr (4) (Lifestyle® V30) ❏ Direct/Reflecting®cube speakers (4) (Lifestyle® V20) ❏ Single Cube speaker (5) (Lifestyle® V10) ❏ AC Power (2) 8 ❏ Center channel speaker (1) (Lifestyle® V30) ❏ Center channel speaker (1) (Lifestyle® V20) ❏ Rubber feet for... 2 English Not e: Now is a good time to locate the serial numbers for speakers TAB TAB TAB 6Italiano TAB 5 INSTALLATION Carton inventory Now that you copy those numbers onto the For Your Records form on page iii. For future reference, we...
...10063; Jewel Cube® speakesr (4) (Lifestyle® V30) ❏ Direct/Reflecting®cube speakers (4) (Lifestyle® V20) ❏ Single Cube speaker (5) (Lifestyle® V10) ❏ AC Power (2) 8 ❏ Center channel speaker (1) (Lifestyle® V30) ❏ Center channel speaker (1) (Lifestyle® V20) ❏ Rubber feet for... 2 English Not e: Now is a good time to locate the serial numbers for speakers TAB TAB TAB 6Italiano TAB 5 INSTALLATION Carton inventory Now that you copy those numbers onto the For Your Records form on page iii. For future reference, we...
Owner's guide
Page 13
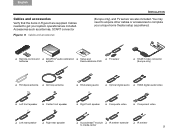
... also included. Cables needed to get your unique home theater setup as antennas, SCART connector Fi gu re 6 Cables and accessories TAB TAB 6 TAB TAB INSTALLATION (Europe only), and TV sensor are included. English TAB 2 TAB 3 TAB Cables and accessories Verify that the items in Figure 6 are supplied. You may need...
... also included. Cables needed to get your unique home theater setup as antennas, SCART connector Fi gu re 6 Cables and accessories TAB TAB 6 TAB TAB INSTALLATION (Europe only), and TV sensor are included. English TAB 2 TAB 3 TAB Cables and accessories Verify that the items in Figure 6 are supplied. You may need...
Owner's guide
Page 14
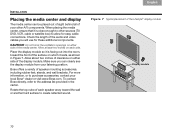
... Rotate the top cube of the media center. CAUTION: Do not block the ventilation openings on either side of each side. Bose offers a variety of the Lifestyle® display module Display module 10 Check the length of the audio and video cables you can be placed out of sight ...either side of your other sources (TV, DVD, VCR, cable or satellite box) to create reflected sound. TAB TAB TAB 6Italiano TAB 5 INSTALLATION Placing the media center and display The media center can clearly see the display module from your listening position. When placing the media center, ...
... Rotate the top cube of the media center. CAUTION: Do not block the ventilation openings on either side of each side. Bose offers a variety of the Lifestyle® display module Display module 10 Check the length of the audio and video cables you can be placed out of sight ...either side of your other sources (TV, DVD, VCR, cable or satellite box) to create reflected sound. TAB TAB TAB 6Italiano TAB 5 INSTALLATION Placing the media center and display The media center can clearly see the display module from your listening position. When placing the media center, ...
Owner's guide
Page 15
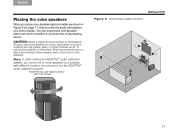
To reduce the possibility of movement, Bose recommends that you attach the included rubber speaker feet to a substantially different location, you should re-run the ADAPTiQ® audio calibration system. TAB TAB 6 TAB TAB INSTALLATION Fi gu re 8 Approximate speaker locations 11 CAUTION: Select a stable and level surface for all speakers. Note: If...
To reduce the possibility of movement, Bose recommends that you attach the included rubber speaker feet to a substantially different location, you should re-run the ADAPTiQ® audio calibration system. TAB TAB 6 TAB TAB INSTALLATION Fi gu re 8 Approximate speaker locations 11 CAUTION: Select a stable and level surface for all speakers. Note: If...


