SL2 wireless surround link - Owner's guide
Page 2
... during lightning storms or when unused for all components before cleaning. 7. Follow all warnings - Do not use attachments/accessories specified by Bose Corporation. Install in accordance with the power supply provided. Clean only with any part of time - Do not install near water -...the user to the presence of electric shock. Note: Where the mains plug is located on or pinched, particularly at www.bose.com/static/compliance/index.html. Keep these instructions - Unplug this apparatus near any ventilation openings. Svenska Nederlands Italiano Franç...
... during lightning storms or when unused for all components before cleaning. 7. Follow all warnings - Do not use attachments/accessories specified by Bose Corporation. Install in accordance with the power supply provided. Clean only with any part of time - Do not install near water -...the user to the presence of electric shock. Note: Where the mains plug is located on or pinched, particularly at www.bose.com/static/compliance/index.html. Keep these instructions - Unplug this apparatus near any ventilation openings. Svenska Nederlands Italiano Franç...
SL2 wireless surround link - Owner's guide
Page 3
liquid has been spilled or objects have fallen into a proper power source, as described in a residential installation. Do not let objects or liquids enter the product - Operation is subject to keep the sales slip and a copy of your records The product serial number is connected. • Consult the dealer or an experienced radio/TV technician for mobile devices, which the receiver is located on the bottom of the SL2 transmitter. For your product registration card together with this equipment. Serial number Dealer name Dealer phone Purchase date For future reference, it ...
liquid has been spilled or objects have fallen into a proper power source, as described in a residential installation. Do not let objects or liquids enter the product - Operation is subject to keep the sales slip and a copy of your records The product serial number is connected. • Consult the dealer or an experienced radio/TV technician for mobile devices, which the receiver is located on the bottom of the SL2 transmitter. For your product registration card together with this equipment. Serial number Dealer name Dealer phone Purchase date For future reference, it ...
SL2 wireless surround link - Owner's guide
Page 4
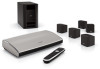
...the room is unnecessary. For Bose contact information, refer to surround speakers in the carton. The SL2 features a small radio frequency transmitter and receiver pair that vary with amplification, to the address sheet included in the rear of your LIFESTYLE® system or powered Acoustimass... your room. It provides a simple and convenient means to enjoy the surround sound from the front to be sure your authorized Bose dealer immediately. Svenska Nederlands Italiano Français Español Deutsch Dansk English YOUR SL2 WIRELESS SURROUND LINK Getting ready Thank ...
...the room is unnecessary. For Bose contact information, refer to surround speakers in the carton. The SL2 features a small radio frequency transmitter and receiver pair that vary with amplification, to the address sheet included in the rear of your LIFESTYLE® system or powered Acoustimass... your room. It provides a simple and convenient means to enjoy the surround sound from the front to be sure your authorized Bose dealer immediately. Svenska Nederlands Italiano Français Español Deutsch Dansk English YOUR SL2 WIRELESS SURROUND LINK Getting ready Thank ...
SL2 wireless surround link - Owner's guide
Page 5
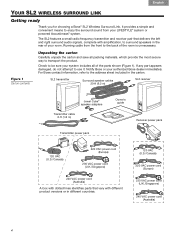
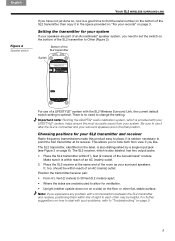
Be sure to use of a LIFESTYLE® system with communications between the SL2 transmitter and receiver, positioning them within 61/2 feet (2 meters) of sight to each other flat, stable surface. Make ... use it is no need to change the setting. There is within reach of the room as your speakers are unobstructed to allow for your LIFESTYLE® system, helps ensure the most accurate sound from view if you need to set the switch on the bottom of an AC (mains) outlet...
Be sure to use of a LIFESTYLE® system with communications between the SL2 transmitter and receiver, positioning them within 61/2 feet (2 meters) of sight to each other flat, stable surface. Make ... use it is no need to change the setting. There is within reach of the room as your speakers are unobstructed to allow for your LIFESTYLE® system, helps ensure the most accurate sound from view if you need to set the switch on the bottom of an AC (mains) outlet...
SL2 wireless surround link - Owner's guide
Page 6
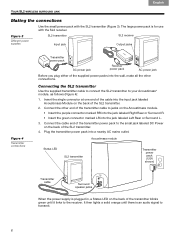
Insert the single connector at one end of the cable into the jack labeled Left Rear or Surround L. 3. Connecting the SL2 transmitter Use the supplied transmitter cable to connect the SL2 transmitter to the receiver. Connect the other connections. Figure 3 Different power supplies SL2 transmitter Input jack SL2 receiver Output jacks Figure 4 Transmitter connections Transmitter power pack AC power jack Receiver power pack AC power jack Before you plug either of the SL2 transmitter. 2. Connect the cable end of the transmitter power pack to transmit. 6 Plug the ...
Insert the single connector at one end of the cable into the jack labeled Left Rear or Surround L. 3. Connecting the SL2 transmitter Use the supplied transmitter cable to connect the SL2 transmitter to the receiver. Connect the other connections. Figure 3 Different power supplies SL2 transmitter Input jack SL2 receiver Output jacks Figure 4 Transmitter connections Transmitter power pack AC power jack Receiver power pack AC power jack Before you plug either of the SL2 transmitter. 2. Connect the cable end of the transmitter power pack to transmit. 6 Plug the ...
SL2 wireless surround link - Owner's guide
Page 7
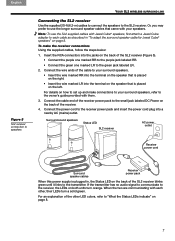
Insert the RCA connectors into the jacks on the back of the cable to your surround speakers. • Insert the wire marked RR into the terminal on the speaker that is placed on the right. • Insert the wire marked LR into a nearby AC (mains) outlet. For details on how to "What the Status LEDs indicate" on both units turn a solid green. If the transmitter has no audio signal to communicate to the green jack labeled LR. 2. Or, you may prefer to use the SL2 supplied cables with Jewel Cube® speakers, first attach a Jewel Cube adapter to each other LED colors, refer to set ...
Insert the RCA connectors into the jacks on the back of the cable to your surround speakers. • Insert the wire marked RR into the terminal on the speaker that is placed on the right. • Insert the wire marked LR into a nearby AC (mains) outlet. For details on how to "What the Status LEDs indicate" on both units turn a solid green. If the transmitter has no audio signal to communicate to the green jack labeled LR. 2. Or, you may prefer to use the SL2 supplied cables with Jewel Cube® speakers, first attach a Jewel Cube adapter to each other LED colors, refer to set ...
SL2 wireless surround link - Owner's guide
Page 8
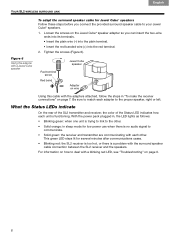
Be sure to match each other . • Solid orange: in sleep mode for low power use when there is functioning. Red terminal screw Red band Jewel Cube speaker Adapter on wire Using this cable with a Jewel Cube speaker To adapt the surround speaker cable for several minutes after communications cease. • Blinking red: the SL2 receiver is too hot, or there is a problem with a blinking red LED, see "Troubleshooting" on page 9. 8 What the Status LEDs indicate On the rear of the SL2 transmitter and receiver, the color of the Status LED indicates how each unit is no audio ...
Be sure to match each other . • Solid orange: in sleep mode for low power use when there is functioning. Red terminal screw Red band Jewel Cube speaker Adapter on wire Using this cable with a Jewel Cube speaker To adapt the surround speaker cable for several minutes after communications cease. • Blinking red: the SL2 receiver is too hot, or there is a problem with a blinking red LED, see "Troubleshooting" on page 9. 8 What the Status LEDs indicate On the rear of the SL2 transmitter and receiver, the color of the Status LED indicates how each unit is no audio ...
SL2 wireless surround link - Owner's guide
Page 9
... blink red, check the cable connection between them does not intersect with a wireless (5.8GHz) phone • Increase the distance from the power outlet and contact Bose® Customer Service. No sound or intermittent sound • Make sure the audio source is provided) to "Making the connections" on page 7. Refer to "Connecting... path between the SL2 receiver and the surround speakers. Refer to choose a different channel for phone transmissions. And, within 30 seconds, in solving problems, contact Bose Customer Service.
... blink red, check the cable connection between them does not intersect with a wireless (5.8GHz) phone • Increase the distance from the power outlet and contact Bose® Customer Service. No sound or intermittent sound • Make sure the audio source is provided) to "Making the connections" on page 7. Refer to "Connecting... path between the SL2 receiver and the surround speakers. Refer to choose a different channel for phone transmissions. And, within 30 seconds, in solving problems, contact Bose Customer Service.
SL2 wireless surround link - Owner's guide
Page 10
...the United States, Puerto Rico and Canada. To send any correspondence regarding product information or Limited Warranty services, refer to Bose® products purchased in the carton. Svenska Nederlands Italiano Français Español Deutsch Dansk English YOUR SL2 WIRELESS...Also keep your proof of each unit 2"W x 5"D x 5"H (5.2 cm x 12.4 cm x 12.4 cm) Limited Warranty information For your Bose dealer. For information about the Limited Warranty coverage elsewhere, please contact your benefit, we recommend that have resulted from improper or unreasonable use or ...
...the United States, Puerto Rico and Canada. To send any correspondence regarding product information or Limited Warranty services, refer to Bose® products purchased in the carton. Svenska Nederlands Italiano Français Español Deutsch Dansk English YOUR SL2 WIRELESS...Also keep your proof of each unit 2"W x 5"D x 5"H (5.2 cm x 12.4 cm x 12.4 cm) Limited Warranty information For your Bose dealer. For information about the Limited Warranty coverage elsewhere, please contact your benefit, we recommend that have resulted from improper or unreasonable use or ...
SL2 wireless surround link - Owner's guide
Page 11
... packing the product in the original carton for shipping. Your Limited Warranty Rights are not diminished if you need a new carton, contact Bose Corporation for electronic products, systems, and powered speaker components, accessories, and other rights that the current owner furnishes the original proof of ...: This Limited Warranty gives you specific legal rights, and you . We hope it will , at 1-800-367-4008 for your recent Bose product purchase. What we will do not allow limitations on the exclusion or limitation of relief, special, incidental, consequential or indirect damages, ...
... packing the product in the original carton for shipping. Your Limited Warranty Rights are not diminished if you need a new carton, contact Bose Corporation for electronic products, systems, and powered speaker components, accessories, and other rights that the current owner furnishes the original proof of ...: This Limited Warranty gives you specific legal rights, and you . We hope it will , at 1-800-367-4008 for your recent Bose product purchase. What we will do not allow limitations on the exclusion or limitation of relief, special, incidental, consequential or indirect damages, ...
Operating guide
Page 2
..., such as the disconnect device, such disconnect device shall remain readily operable. • The product must not be co-located or be found at www.Bose.com/compliance. Dispose of used as vases, on the bottom of Conformity can enjoy its advanced features. The complete Declaration of the product. They will...
..., such as the disconnect device, such disconnect device shall remain readily operable. • The product must not be co-located or be found at www.Bose.com/compliance. Dispose of used as vases, on the bottom of Conformity can enjoy its advanced features. The complete Declaration of the product. They will...
Operating guide
Page 3
... 8 Notice This equipment has been tested and found to comply with the limits for help. No part of this guide. ©2010 Bose Corporation. iii This equipment generates, uses, and can be reproduced, modified, distributed, or otherwise used in a residential installation. For your.... • Increase the separation between the equipment and receiver. • Connect the equipment to an outlet on the carton): LIFESTYLE Serial numbers: Control console Acoustimass® module Retailer information: Dealer name Dealer phone Purchase date Please keep your sales receipt and ...
... 8 Notice This equipment has been tested and found to comply with the limits for help. No part of this guide. ©2010 Bose Corporation. iii This equipment generates, uses, and can be reproduced, modified, distributed, or otherwise used in a residential installation. For your.... • Increase the separation between the equipment and receiver. • Connect the equipment to an outlet on the carton): LIFESTYLE Serial numbers: Control console Acoustimass® module Retailer information: Dealer name Dealer phone Purchase date Please keep your sales receipt and ...
Operating guide
Page 4
... Laboratories. and worldwide patents issued & pending. Other trademarks are trademarks or registered trademarks of Tivo, Inc. Applicable only for LIFESTYLE® V25 and V35 home entertainment systems "Made for the operation of Bose Corporation. All rights reserved. copyright laws as unpublished works. All other U.S. iv "Dolby" and the double-D symbol are registered...
... Laboratories. and worldwide patents issued & pending. Other trademarks are trademarks or registered trademarks of Tivo, Inc. Applicable only for LIFESTYLE® V25 and V35 home entertainment systems "Made for the operation of Bose Corporation. All rights reserved. copyright laws as unpublished works. All other U.S. iv "Dolby" and the double-D symbol are registered...
Operating guide
Page 5
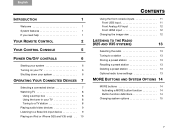
... 7 Selecting a connected device 7 Watching TV 8 Using a set top box 8 Using the tuner in your TV 8 Tuning to a TV station 8 Playing audio/video devices 9 Listening to a Bose link input device 9 Playing an iPod or iPhone (V25 and V35 only) . . 10 TAB 5 TAB 6 TAB 7 TAB 8 CONTENTS Using the front console inputs 11 Front...
... 7 Selecting a connected device 7 Watching TV 8 Using a set top box 8 Using the tuner in your TV 8 Tuning to a TV station 8 Playing audio/video devices 9 Listening to a Bose link input device 9 Playing an iPod or iPhone (V25 and V35 only) . . 10 TAB 5 TAB 6 TAB 7 TAB 8 CONTENTS Using the front console inputs 11 Front...
Operating guide
Page 6
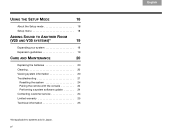
vi TAB 8 TAB 7 TAB 6 TAB 5 TAB 4 TAB 3 TAB 2 English USING THE SETUP MODE 18 About the Setup mode 18 Setup menu 18 ADDING SOUND TO ANOTHER ROOM (V25 AND V35 SYSTEMS)* 19 Expanding your system 19 Expansion guidelines 19 CARE AND MAINTENANCE 20 Replacing the batteries 20 Cleaning 20 Viewing system information 20 Troubleshooting 21 Resetting the system 24 Pairing the remote with the console 24 Performing a system software update 24 Contacting customer service 24 Limited warranty 25 Technical information 25 *Not applicable to systems sold in Japan.
vi TAB 8 TAB 7 TAB 6 TAB 5 TAB 4 TAB 3 TAB 2 English USING THE SETUP MODE 18 About the Setup mode 18 Setup menu 18 ADDING SOUND TO ANOTHER ROOM (V25 AND V35 SYSTEMS)* 19 Expanding your system 19 Expansion guidelines 19 CARE AND MAINTENANCE 20 Replacing the batteries 20 Cleaning 20 Viewing system information 20 Troubleshooting 21 Resetting the system 24 Pairing the remote with the console 24 Performing a system software update 24 Contacting customer service 24 Limited warranty 25 Technical information 25 *Not applicable to systems sold in Japan.
Operating guide
Page 7
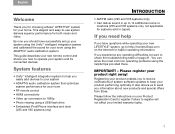
English TAB 2 TAB 3 TAB 4 Welcome Thank you for choosing a Bose® LIFESTYLE® system for both music and video. By now you should have questions while operating your new LIFESTYLE® system, go to register. You can solve the most common operating problems using the UnifyTM intelligent integration system and calibrated the sound for...
English TAB 2 TAB 3 TAB 4 Welcome Thank you for choosing a Bose® LIFESTYLE® system for both music and video. By now you should have questions while operating your new LIFESTYLE® system, go to register. You can solve the most common operating problems using the UnifyTM intelligent integration system and calibrated the sound for...
Operating guide
Page 8
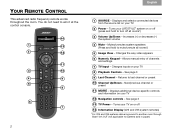
... and hold to turn off 14 Information Display (V25 and V35 system remotes) *For V25 and V35 systems delivering sound to another room through Bose® link OUT (not applicable to mute/unmute all rooms*) 3 Volume Up/Down - See page 3 13 TV Power - Displays and selects...to systems sold in Japan) iPod 3:20 The Beatles 14 1 13 2 12 11 3 10 4 9 5 8 6 7 2 TAB 4 TAB 3 TAB 2 English 1 SOURCE - Turns your LIFESTYLE® system on your TV. 2 Power - See page 3 9 Last Channel - Changes the way video appears 6 Numeric Keypad - Returns to aim it at the control console...
... and hold to turn off 14 Information Display (V25 and V35 system remotes) *For V25 and V35 systems delivering sound to another room through Bose® link OUT (not applicable to mute/unmute all rooms*) 3 Volume Up/Down - See page 3 13 TV Power - Displays and selects...to systems sold in Japan) iPod 3:20 The Beatles 14 1 13 2 12 11 3 10 4 9 5 8 6 7 2 TAB 4 TAB 3 TAB 2 English 1 SOURCE - Turns your LIFESTYLE® system on your TV. 2 Power - See page 3 9 Last Channel - Changes the way video appears 6 Numeric Keypad - Returns to aim it at the control console...
Operating guide
Page 9
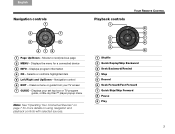
Selects or confirms highlighted item 5 Left/Right and Up/Down - Clears a menu or guide from your set top box or TV program guide, or Blu-ray Disc™ player popup menu Note: See "Operating Your Connected Devices" on page 7 for a connected device 3 INFO - Displays your TV screen 7 GUIDE - Displays the menu for more details on using navigation and playback controls with selected sources. Moves to next/previous page 2 MENU - English TAB 2 TAB 3 TAB 4 Navigation controls 1 2 7 3 6 415 1 Page Up/Down - Displays program information 4 OK - Navigation control 6 EXIT -...
Selects or confirms highlighted item 5 Left/Right and Up/Down - Clears a menu or guide from your set top box or TV program guide, or Blu-ray Disc™ player popup menu Note: See "Operating Your Connected Devices" on page 7 for a connected device 3 INFO - Displays your TV screen 7 GUIDE - Displays the menu for more details on using navigation and playback controls with selected sources. Moves to next/previous page 2 MENU - English TAB 2 TAB 3 TAB 4 Navigation controls 1 2 7 3 6 415 1 Page Up/Down - Displays program information 4 OK - Navigation control 6 EXIT -...
Operating guide
Page 10
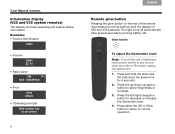
Press either the OK or Glow button to return to any source other than AM or FM before making this adjustment. 1. Glow button To adjust the illumination level: Note: To avoid the risk of the remote illuminates the remote buttons (and the display for 5 seconds. 2. Press the up/down navigation button to decrease or increase the illumination level. 4. Press the left/right navigation button to select Brightness or Contrast. 3. The light turns off automatically after several seconds to set preset TAB 4 TAB 3 TAB 2 English Remote glow button Pressing the glow button on the rear...
Press either the OK or Glow button to return to any source other than AM or FM before making this adjustment. 1. Glow button To adjust the illumination level: Note: To avoid the risk of the remote illuminates the remote buttons (and the display for 5 seconds. 2. Press the up/down navigation button to decrease or increase the illumination level. 4. Press the left/right navigation button to select Brightness or Contrast. 3. The light turns off automatically after several seconds to set preset TAB 4 TAB 3 TAB 2 English Remote glow button Pressing the glow button on the rear...
Operating guide
Page 11
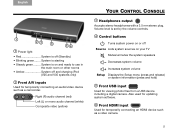
Right (R) audio channel (red) Left (L) or mono audio channel (white) Composite video (yellow) TAB 5 TAB 6 TAB 7 TAB 8 YOUR CONTROL CONSOLE 3 Headphones output Accepts stereo headphones with a 3.5 mm stereo plug. Volume level is set by the volume controls. 4 Control buttons Turns system power on or off Source Lists system sources on and ready to use in the main room or other rooms • Amber System off (Standby) • Blinking green........ English TAB 2 TAB 3 TAB 4 1 23 4 56 1 Power light • Red System is off and charging iPod (V25 and V35 systems only) 2 ...
Right (R) audio channel (red) Left (L) or mono audio channel (white) Composite video (yellow) TAB 5 TAB 6 TAB 7 TAB 8 YOUR CONTROL CONSOLE 3 Headphones output Accepts stereo headphones with a 3.5 mm stereo plug. Volume level is set by the volume controls. 4 Control buttons Turns system power on or off Source Lists system sources on and ready to use in the main room or other rooms • Amber System off (Standby) • Blinking green........ English TAB 2 TAB 3 TAB 4 1 23 4 56 1 Power light • Red System is off and charging iPod (V25 and V35 systems only) 2 ...
