Owner's guide
Page 2
..., is classified as marked on the bottom of the unit. Additional safety information See the additional instructions on the back panel and bottom of your Lifestyle° music center and the bottom panel of your Acoustimass° module: The lightning flash with this owner's guide. NO USER-SERVICEABLE PARTS INSIDE. Batteries...
..., is classified as marked on the bottom of the unit. Additional safety information See the additional instructions on the back panel and bottom of your Lifestyle° music center and the bottom panel of your Acoustimass° module: The lightning flash with this owner's guide. NO USER-SERVICEABLE PARTS INSIDE. Batteries...
Owner's guide
Page 3
... sound 20 Listening to the radio 21 Listening to a CD 22 Using the system with an external component 22 Maintaining Your Lifestyle° 8 System Fine-tuning your system 23 Changing the house code settings 24 Adding speakers 25 Troubleshooting 26 Warranty period 27... Customer service 27 Cleaning the Lifestyle 8 system 28 Product Information Technical information 29 Accessories 29 Index 30 Bost Corporation inside back cover For your sales slip and ...
... sound 20 Listening to the radio 21 Listening to a CD 22 Using the system with an external component 22 Maintaining Your Lifestyle° 8 System Fine-tuning your system 23 Changing the house code settings 24 Adding speakers 25 Troubleshooting 26 Warranty period 27... Customer service 27 Cleaning the Lifestyle 8 system 28 Product Information Technical information 29 Accessories 29 Index 30 Bost Corporation inside back cover For your sales slip and ...
Owner's guide
Page 4
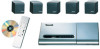
...environment. This complete audio home entertainment system offers superb sound, elegance, technology, and simplicity for purchasing the Bose° Lifestyle° 8 system. Your system includes: • A Lifestyle° music center with built-in SURROUND (5-speaker) mode, whether the program is usually sent to ...sound to the surround speakers. Even with a hide-away Acoustimass module • An easy-to-use remote control Bose Videostage* decoder technology enables the Lifestyle° 8 system to reproduce the realism of the terms Surround, Dolby Surround, and the double-D symbol 00 ...
...environment. This complete audio home entertainment system offers superb sound, elegance, technology, and simplicity for purchasing the Bose° Lifestyle° 8 system. Your system includes: • A Lifestyle° music center with built-in SURROUND (5-speaker) mode, whether the program is usually sent to ...sound to the surround speakers. Even with a hide-away Acoustimass module • An easy-to-use remote control Bose Videostage* decoder technology enables the Lifestyle° 8 system to reproduce the realism of the terms Surround, Dolby Surround, and the double-D symbol 00 ...
Owner's guide
Page 5
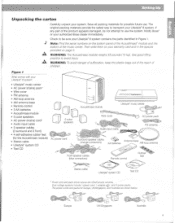
Use good lifting practice to be sure your authorized Bose dealer immediately. The power cords and packs for the Acoustimass module) • Stereo cable • Lifestyle' system CD • Test CD 5 cube speakers AC power cord Acoustimass module Wire cover Lifestyle` music center S j „.0EP IT AC...Australia 5 A WARNING: To avoid danger of suffocation, keep the plastic bags out of the reach of the music center. Notify Bose' or your Lifestyle' 8 system contains the parts identified in the spaces provided on the bottom panel of the Acoustimass` module and the bottom of ...
Use good lifting practice to be sure your authorized Bose dealer immediately. The power cords and packs for the Acoustimass module) • Stereo cable • Lifestyle' system CD • Test CD 5 cube speakers AC power cord Acoustimass module Wire cover Lifestyle` music center S j „.0EP IT AC...Australia 5 A WARNING: To avoid danger of suffocation, keep the plastic bags out of the reach of the music center. Notify Bose' or your Lifestyle' 8 system contains the parts identified in the spaces provided on the bottom panel of the Acoustimass` module and the bottom of ...
Owner's guide
Page 6
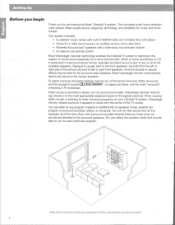
... We recommend a maximum distance of 3 feet (1 m) so that provide the maximum home theater effect from Bose". You may obtain rubber feet (part no. 178321), free of charge, from your Lifestyles 8 system (Figures 2 and 3). Vibration can place them up to move, particularly on the inside back cover... locations Follow these guidelines to your speakers. For additional stability, you cannot pinpoint where the sound comes from the picture. Contact Bose Customer Service (see "Fine-tuning your system" on line with the placement and orientation of the cubes to produce the sound most...
... We recommend a maximum distance of 3 feet (1 m) so that provide the maximum home theater effect from Bose". You may obtain rubber feet (part no. 178321), free of charge, from your Lifestyles 8 system (Figures 2 and 3). Vibration can place them up to move, particularly on the inside back cover... locations Follow these guidelines to your speakers. For additional stability, you cannot pinpoint where the sound comes from the picture. Contact Bose Customer Service (see "Fine-tuning your system" on line with the placement and orientation of the cubes to produce the sound most...
Owner's guide
Page 7
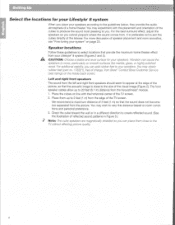
Note: if you do not pinpoint the exact location of your ear, the better. 3. Placing speakers in the back half of the sound source (Figure 3). Place the speakers at the front edge of the TV). Do not direct the sound straight at the listener. 7 C Right front Figure 3 Speaker placement - 111- 17)- The surround cables allow up to reflect sound off one at ear height or higher, if possible. 2. Setting Up Figure 2 Recommended front speaker locations Center speaker The sound from the center speaker should appear to your room. Surround speakers The surround (rear) ...
Note: if you do not pinpoint the exact location of your ear, the better. 3. Placing speakers in the back half of the sound source (Figure 3). Place the speakers at the front edge of the TV). Do not direct the sound straight at the listener. 7 C Right front Figure 3 Speaker placement - 111- 17)- The surround cables allow up to reflect sound off one at ear height or higher, if possible. 2. Setting Up Figure 2 Recommended front speaker locations Center speaker The sound from the center speaker should appear to your room. Surround speakers The surround (rear) ...
Owner's guide
Page 8
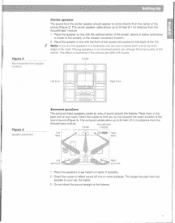
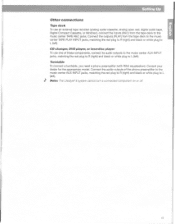
... feet provide increased stability and protection from a wall and the ceiling. The slots on either end, as the front speakers (see your dealer or call Bose. 3. Do not allow for the Acoustimass module. Once you need additional audio and/or video cables to connect all of your components, see the example...
... feet provide increased stability and protection from a wall and the ceiling. The slots on either end, as the front speakers (see your dealer or call Bose. 3. Do not allow for the Acoustimass module. Once you need additional audio and/or video cables to connect all of your components, see the example...
Owner's guide
Page 9
... end of one is positive (+) and the plain one speaker cable to the corresponding jack on the rear of your dealer, electronics store, or call Bose' customer service.
... end of one is positive (+) and the plain one speaker cable to the corresponding jack on the rear of your dealer, electronics store, or call Bose' customer service.
Owner's guide
Page 10
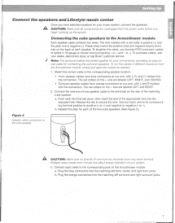
... and speaker connections '7e,;1::572 °;-:f5Nnetleff, c0 4'" ...A5tAret'*-A1- > 9"Pil'ASK;Vt>"4.-1 7#>10;PACP" 4:;:iv.+Z1-0).•• Connecting the Acoustimass' module to the Lifestyle' music center Connect the Acoustimass module to the music center with the fixed level audio output available from the FIXED OUTPUT jacks. 2. Note: Do not...
... and speaker connections '7e,;1::572 °;-:f5Nnetleff, c0 4'" ...A5tAret'*-A1- > 9"Pil'ASK;Vt>"4.-1 7#>10;PACP" 4:;:iv.+Z1-0).•• Connecting the Acoustimass' module to the Lifestyle' music center Connect the Acoustimass module to the music center with the fixed level audio output available from the FIXED OUTPUT jacks. 2. Note: Do not...

Owner's guide
Page 11
Connecting the music center AC (mains)powerpack The Lifestyle" music center comes with a 120V AC (mains) power pack for use the correct power pack for your music center. • Model PS71, 120V in North ... and Canada or an appropriate 230V or 240V power pack for the proper voltage (Figure 7). Firmly insert the small connector on the back of the Lifestyle' music center. 2. On a dual voltage system, the voltage selector switch is preset at the factory to be correct for your local electric utility for Europe...
Connecting the music center AC (mains)powerpack The Lifestyle" music center comes with a 120V AC (mains) power pack for use the correct power pack for your music center. • Model PS71, 120V in North ... and Canada or an appropriate 230V or 240V power pack for the proper voltage (Figure 7). Firmly insert the small connector on the back of the Lifestyle' music center. 2. On a dual voltage system, the voltage selector switch is preset at the factory to be correct for your local electric utility for Europe...
Owner's guide
Page 12
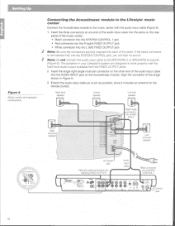
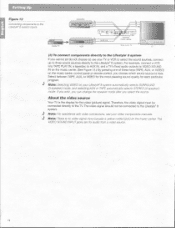
...0 0 .rs Cl (0, Tape input Auxiliary Video sound jacks input jacks input jacks Figure 10 Connecting components through your TV Note: Your Lifestyle/18 system includes one set of equipment, including cable N, laserdisc players, DVD players, CDI players, additional VCRs, and satellite decoder. It...has fixedand variable outputs, use a stereo VCR as a source for the video, not as the switching center. Settingup theprimary video soundsource The Lifestyle° 8 system has one 6-foot (1.8 m) stereo cable to connect the right Randleft (L)audio outputs from encoded video tapes, you must...
...0 0 .rs Cl (0, Tape input Auxiliary Video sound jacks input jacks input jacks Figure 10 Connecting components through your TV Note: Your Lifestyle/18 system includes one set of equipment, including cable N, laserdisc players, DVD players, CDI players, additional VCRs, and satellite decoder. It...has fixedand variable outputs, use a stereo VCR as a source for the video, not as the switching center. Settingup theprimary video soundsource The Lifestyle° 8 system has one 6-foot (1.8 m) stereo cable to connect the right Randleft (L)audio outputs from encoded video tapes, you must...
Owner's guide
Page 13
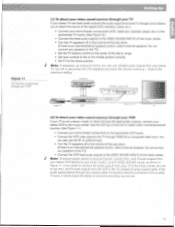
Do not connect any speakers to the TV) • Connect the VCR fixed audio outputs to the VIDEO SOUND INPUTs of the music center. ,st' Note: To ensure proper stereo or surroundsound, connect The L andR audio outputs from your stereo VCR directly to yourmusic center L andR VIDEO SOUNDinputs, as a tuner and to select other connected sound sources. (See Figure 11.) • Connect your home theater components to the appropriate VCR inputs. • Connect the VCR video signal to the TV through VIDEO IN or composite video input. Turn off or the volume all the way down . (If there is an ...
Do not connect any speakers to the TV) • Connect the VCR fixed audio outputs to the VIDEO SOUND INPUTs of the music center. ,st' Note: To ensure proper stereo or surroundsound, connect The L andR audio outputs from your stereo VCR directly to yourmusic center L andR VIDEO SOUNDinputs, as a tuner and to select other connected sound sources. (See Figure 11.) • Connect your home theater components to the appropriate VCR inputs. • Connect the VCR video signal to the TV through VIDEO IN or composite video input. Turn off or the volume all the way down . (If there is an ...
Owner's guide
Page 14
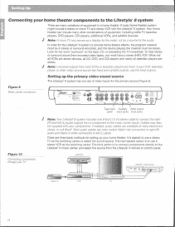
...or VIDEO for the most pleasing sound quality for audio from a video source. 74 Note: For assistance with video connections, see your Lifestyle`8 system automatically selects SURROUND (5-speaker) mode, and selecting AUX or TAPE automatically selects STEREO (2-speaker) mode. Note: Selecting VIDEO on ... choose to) use your TV or VCR to select the sound sources, connect up to three sound sources directly to the Lifestyles 8 system. Setting Up Figure 12 Connecting components to the Lifestyle' 8 system inputs Lasamisc a V ffi L R Aucuat U 0 mus'c Center (INITahri -* C0IY0 V VCR v$0,00.0 ...
...or VIDEO for the most pleasing sound quality for audio from a video source. 74 Note: For assistance with video connections, see your Lifestyle`8 system automatically selects SURROUND (5-speaker) mode, and selecting AUX or TAPE automatically selects STEREO (2-speaker) mode. Note: Selecting VIDEO on ... choose to) use your TV or VCR to select the sound sources, connect up to three sound sources directly to the Lifestyles 8 system. Setting Up Figure 12 Connecting components to the Lifestyle' 8 system inputs Lasamisc a V ffi L R Aucuat U 0 mus'c Center (INITahri -* C0IY0 V VCR v$0,00.0 ...
Owner's guide
Page 15
...) and black or white plug to the music center TAPE REC jacks. Turntable To connect a turntable, you need a phono preamplifier (with RIM equalization). Note: The Lifestyle 8 system cannot turn a connected component on or off. 15 Consult your dealer for the appropriate model. Connect the outputs (PLAY) from the tape deck to...
...) and black or white plug to the music center TAPE REC jacks. Turntable To connect a turntable, you need a phono preamplifier (with RIM equalization). Note: The Lifestyle 8 system cannot turn a connected component on or off. 15 Consult your dealer for the appropriate model. Connect the outputs (PLAY) from the tape deck to...
Owner's guide
Page 16
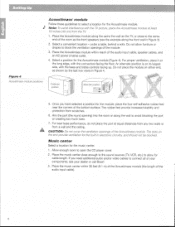
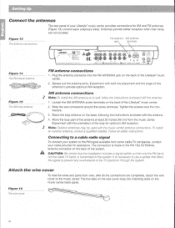
Antennas provide better reception when their wires are not bundled. Figure 13 The antenna connections FM antenna AM antenna jack terminals -_Igor r) r i Asp TA. ti r ,Oo, Oi e 0 e 0 0 rst DO Setting Up Connect the antennas The rear panel of your Lifestyle music center provides connections for AM and FM antennas (Figure 13). Unwind each antenna's wires.
Antennas provide better reception when their wires are not bundled. Figure 13 The antenna connections FM antenna AM antenna jack terminals -_Igor r) r i Asp TA. ti r ,Oo, Oi e 0 e 0 0 rst DO Setting Up Connect the antennas The rear panel of your Lifestyle music center provides connections for AM and FM antennas (Figure 13). Unwind each antenna's wires.
Owner's guide
Page 17
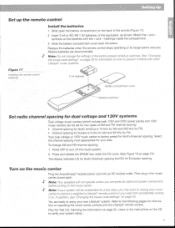
...with the + and - Press and release the ERASE key under the CD cover. (See Figure 19 on the batteries with other Lifestyle music systems. Figure 17 Installing the remote control batteries 3 AA batteries Battery compartment cover Miniature switches Set radio channel spacing for dual ...the music center. markings inside the compartment. 3. Alkaline batteries are ready to the instructions on operating the music center controls and the Lifestyle remote control. In addition, see "Changing the house code settings" on page 22. Listen to enjoy your pets from accidentally turning it...
...with the + and - Press and release the ERASE key under the CD cover. (See Figure 19 on the batteries with other Lifestyle music systems. Figure 17 Installing the remote control batteries 3 AA batteries Battery compartment cover Miniature switches Set radio channel spacing for dual ...the music center. markings inside the compartment. 3. Alkaline batteries are ready to the instructions on operating the music center controls and the Lifestyle remote control. In addition, see "Changing the house code settings" on page 22. Listen to enjoy your pets from accidentally turning it...
Owner's guide
Page 18
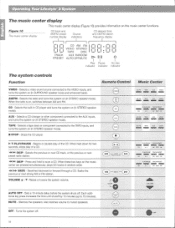
... disc indicator The system controls Function Remote Control Music Center VIDEO - SEEK - Seeks the previous or next strong AM or FM station. MUTE - Operating Your Lifestyle® 8 System The music center display This music center display (Figure 18) provides information on , switches between AM and FM.
... disc indicator The system controls Function Remote Control Music Center VIDEO - SEEK - Seeks the previous or next strong AM or FM station. MUTE - Operating Your Lifestyle® 8 System The music center display This music center display (Figure 18) provides information on , switches between AM and FM.
Owner's guide
Page 19
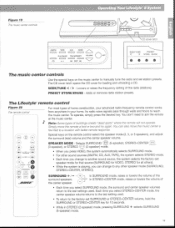
... the factory-set station presets. SPEAKER MODE - Its radio wave signals pass through walls and floors to aim the remote at the music center. The Lifestyle' remote control Figure 20 The emote control For most types of home construction, your home. e, AM,WM TAPE L O AUX E0) VIOE0 C CO PLAY/PAUSE WACKIPAESCI...
... the factory-set station presets. SPEAKER MODE - Its radio wave signals pass through walls and floors to aim the remote at the music center. The Lifestyle' remote control Figure 20 The emote control For most types of home construction, your home. e, AM,WM TAPE L O AUX E0) VIOE0 C CO PLAY/PAUSE WACKIPAESCI...
Owner's guide
Page 20
... the time. Turning the system on and choosing video sound Press the VIDEO key on the remote or the console to turn off your Lifestyle 8 system Your Lifestyle' 8 system offers the option of listening in STEREO (2speaker) mode for proper playback of time set and flashes the amount of movie soundtracks. For...
... the time. Turning the system on and choosing video sound Press the VIDEO key on the remote or the console to turn off your Lifestyle 8 system Your Lifestyle' 8 system offers the option of listening in STEREO (2speaker) mode for proper playback of time set and flashes the amount of movie soundtracks. For...
Owner's guide
Page 21
... radio Press the AM/FM key on the remote or the console to turn your music system on in STEREO mode. Setting a station preset Your Lifestyles music center can store up to erase. 2. Use the SKIP w, (forward) or A4 (reverse) keys to select the preset station you set one or more...
... radio Press the AM/FM key on the remote or the console to turn your music system on in STEREO mode. Setting a station preset Your Lifestyles music center can store up to erase. 2. Use the SKIP w, (forward) or A4 (reverse) keys to select the preset station you set one or more...
