Owner's guide
Page 4
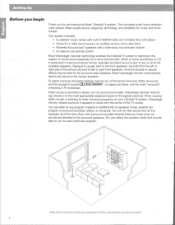
... disc (CD) player • Inputs for a video sound source, an auxiliary source, and a tape deck • Powered Acoustimase speakers with a hide-away Acoustimass module • An easy-to-use remote control Bose Videostage* decoder technology enables the Lifestyle° 8 system to you for each particular program. To select surround-encoded material, look for music...
... disc (CD) player • Inputs for a video sound source, an auxiliary source, and a tape deck • Powered Acoustimase speakers with a hide-away Acoustimass module • An easy-to-use remote control Bose Videostage* decoder technology enables the Lifestyle° 8 system to you for each particular program. To select surround-encoded material, look for music...
Owner's guide
Page 5
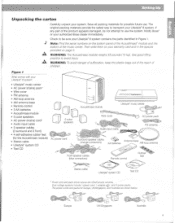
...) • Stereo cable • Lifestyle' system CD • Test CD 5 cube speakers AC power cord Acoustimass module Wire cover Lifestyle` music center S j „.0EP IT AC power pack eta, Audio input cable .acr "c„. Europe UK/Singapore Australia 5 Save all packing materials for possible future use the system. Notify Bose' or your Lifestyle' 8 system contains the parts...
...) • Stereo cable • Lifestyle' system CD • Test CD 5 cube speakers AC power cord Acoustimass module Wire cover Lifestyle` music center S j „.0EP IT AC power pack eta, Audio input cable .acr "c„. Europe UK/Singapore Australia 5 Save all packing materials for possible future use the system. Notify Bose' or your Lifestyle' 8 system contains the parts...
Owner's guide
Page 8
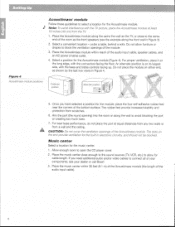
... on the end provide ventilation for the module, place the four self-adhesive rubber feet near the corners of the audio input cable, speaker cables, and an AC power (mains) outlet. 4. The rubber feet provide increased stability and protection from a wall and the ceiling. under a table, behind ...the TV, or close enough to the sound sources (TV, VCR, etc.) to allow furniture or drapes to connect all of your dealer or call Bose. 3. Preferred position ) Alternate position 0 5. Music center Select a location for the Acoustimass module (Figure 4). If you have selected a position for ...
... on the end provide ventilation for the module, place the four self-adhesive rubber feet near the corners of the audio input cable, speaker cables, and an AC power (mains) outlet. 4. The rubber feet provide increased stability and protection from a wall and the ceiling. under a table, behind ...the TV, or close enough to the sound sources (TV, VCR, etc.) to allow furniture or drapes to connect all of your dealer or call Bose. 3. Preferred position ) Alternate position 0 5. Music center Select a location for the Acoustimass module (Figure 4). If you have selected a position for ...
Owner's guide
Page 9
... molded into the connectors. Push each terminal tab down, then insert the end of the matching cube speaker. b. Repeat this step for your dealer, electronics store, or call Bose' customer service. Bridged wires create short circuits that affect proper operation of wire from any terminal touch ...simplypullapart the cables as needed. 1. To lengthen the cable, use standard RCA extension cables or splice in different directions from the power outlet before you have orange connectors at one is negative (-). Plug the orange connectors into the exposed hole. The wire marked with...
... molded into the connectors. Push each terminal tab down, then insert the end of the matching cube speaker. b. Repeat this step for your dealer, electronics store, or call Bose' customer service. Bridged wires create short circuits that affect proper operation of wire from any terminal touch ...simplypullapart the cables as needed. 1. To lengthen the cable, use standard RCA extension cables or splice in different directions from the power outlet before you have orange connectors at one is negative (-). Plug the orange connectors into the exposed hole. The wire marked with...
Owner's guide
Page 10
....+Z1-0).•• Connecting the Acoustimass' module to the Lifestyle' music center Connect the Acoustimass module to the SPEAKERS A or SPEAKERS 8 outputs (Figure 6). The speakers in Figure 6. 3. Right front speaker Center speaker Left front speaker Right Surround speaker Rght angle connector into SYSTEM CONTROL r 4e5 • ...the music center with the fixed level audio output available from the FIXED OUTPUT jacks. 2. Left surround speaker AC power jack Red and white COnneCtOrs into matching FIXED OUTPUTs Audio input cable Black CaineCtOr into AUDIO INPUT I- ...
....+Z1-0).•• Connecting the Acoustimass' module to the Lifestyle' music center Connect the Acoustimass module to the SPEAKERS A or SPEAKERS 8 outputs (Figure 6). The speakers in Figure 6. 3. Right front speaker Center speaker Left front speaker Right Surround speaker Rght angle connector into SYSTEM CONTROL r 4e5 • ...the music center with the fixed level audio output available from the FIXED OUTPUT jacks. 2. Left surround speaker AC power jack Red and white COnneCtOrs into matching FIXED OUTPUTs Audio input cable Black CaineCtOr into AUDIO INPUT I- ...
Owner's guide
Page 17
... (Figure 17). 2. Turn on how to prevent conflicts with the + and - Note: Your speakers will be set for two types of AM and FM channel spacing. • Channel spacing for...and 200 kHz for FM. • Channel spacing for Europe is factory preset for your new Lifestyle system. In addition, see "Changing the house code settings" on the CD to verify your ... the following the instructions on the back of the factory-preset miniature switches. Then plug in the music center power pack. Note: If your system setup. 17 04 4. ',(•7•77; °ZS.. •275C971...
... (Figure 17). 2. Turn on how to prevent conflicts with the + and - Note: Your speakers will be set for two types of AM and FM channel spacing. • Channel spacing for...and 200 kHz for FM. • Channel spacing for Europe is factory preset for your new Lifestyle system. In addition, see "Changing the house code settings" on the CD to verify your ... the following the instructions on the back of the factory-preset miniature switches. Then plug in the music center power pack. Note: If your system setup. 17 04 4. ',(•7•77; °ZS.. •275C971...
Owner's guide
Page 25
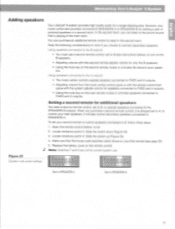
...2krt0292--ci- 4/...012 CIWZN:3 1 4'. 9: ?p pf:070 (1',X9 tar de Adding speakers Your Lifestyle 8 system provides high quality audio for additional speakers You need a second remote control, set to B, to operate speakers connected to B, follow these steps: 1. Locate miniature switch 5. Locate miniature switch 6. ... are not for adding a pair of powered speakers in the second room. Open the remote control battery cover. 2. Slide the switch up (Figure 23). 4. To set your music center also provides connections (SPEAKERS A or SPEAKERS B) for curren system use a second remote...
...2krt0292--ci- 4/...012 CIWZN:3 1 4'. 9: ?p pf:070 (1',X9 tar de Adding speakers Your Lifestyle 8 system provides high quality audio for additional speakers You need a second remote control, set to B, to operate speakers connected to B, follow these steps: 1. Locate miniature switch 5. Locate miniature switch 6. ... are not for adding a pair of powered speakers in the second room. Open the remote control battery cover. 2. Slide the switch up (Figure 23). 4. To set your music center also provides connections (SPEAKERS A or SPEAKERS B) for curren system use a second remote...
Owner's guide
Page 26
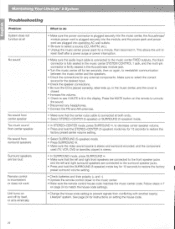
... any external components. Make sure to select the correct source for the desired input. • Check the speaker connections. • Be sure the CD is placed correctly, label-side up, in the display. See ...setting to prevent signals from surround speakers Surround speakers are too loud Remote control is inconsistent or does not work Unit turns on and off by itself after a power surge or power interruption. • Make sure ...is connected at all No sound No sound from center speaker Too much sound from center speaker No sound from conflicting with another nearby Lifestyle system.
... any external components. Make sure to select the correct source for the desired input. • Check the speaker connections. • Be sure the CD is placed correctly, label-side up, in the display. See ...setting to prevent signals from surround speakers Surround speakers are too loud Remote control is inconsistent or does not work Unit turns on and off by itself after a power surge or power interruption. • Make sure ...is connected at all No sound No sound from center speaker Too much sound from center speaker No sound from conflicting with another nearby Lifestyle system.
Owner's guide
Page 29
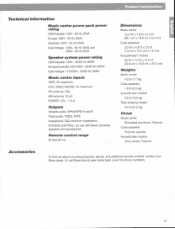
... cover for use with Bose' powered speakers and accessories Remote controlrange 65 feet (20 m) Dimensions Music center 15.0"W x 7.r D x 2.5"H (38.1 cm x 19.8 cm x 6.4 cm) Cube speakers 3.0"W x 4.8"D x 3.0"H (7.6 cm x 12.2 cm x 7.6 cm) Acoustimass' module 20"W x 7.5"D x 14.0"H (50.8 cm x 19.0 cm x 35.5 cm) Weights Music center 4.0 lb (1.7 kg) Cube speakers 1.0 lb (0.5 kg...: 230V- 50 Hz 25VA Australia: 240V- 50 Hz 25VA Dual Voltage: 120V- 60 Hz 25VA and 230V- 50 Hz 25VA Speaker system power rating USA/Canada: 120V- 50/60 Hz 350W Europe/Australia: 220-240V- 50/60 Hz 350W Dual Voltage: 115/230V- 50...
... cover for use with Bose' powered speakers and accessories Remote controlrange 65 feet (20 m) Dimensions Music center 15.0"W x 7.r D x 2.5"H (38.1 cm x 19.8 cm x 6.4 cm) Cube speakers 3.0"W x 4.8"D x 3.0"H (7.6 cm x 12.2 cm x 7.6 cm) Acoustimass' module 20"W x 7.5"D x 14.0"H (50.8 cm x 19.0 cm x 35.5 cm) Weights Music center 4.0 lb (1.7 kg) Cube speakers 1.0 lb (0.5 kg...: 230V- 50 Hz 25VA Australia: 240V- 50 Hz 25VA Dual Voltage: 120V- 60 Hz 25VA and 230V- 50 Hz 25VA Speaker system power rating USA/Canada: 120V- 50/60 Hz 350W Europe/Australia: 220-240V- 50/60 Hz 350W Dual Voltage: 115/230V- 50...
Owner's guide
Page 30
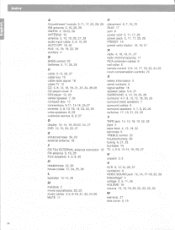
..., 27 DVD 12, 15, 20, 22, 27 E enhanced bass 20, 23 external antenna 16 F FM 7552 EXTERNAL antenna connector 16 FM antenna 5, 16, 29 front speakers 4, 6, 8, 26 H headphones 22, 26 house codes 17, 24, 25, 26 L laserdisc 12-14, 26 M moisture 2 movie soundtracks 20, 23 music center 2-5, 8-19, 21..., 26 power pack 5, 11, 17, 26, 29 PRESET 19 preset radio station 18, 19, 21 R radio 4, 18, 19, 21, 27 radio channel spacing 17 RCA extension cables 9 red collar 9 remote control 3-5, 14, 17, 19, 22, 24-29 room compensation controls 23 S safety Information 2 serial numbers 5 signal splitter 16 speaker cable ...
..., 27 DVD 12, 15, 20, 22, 27 E enhanced bass 20, 23 external antenna 16 F FM 7552 EXTERNAL antenna connector 16 FM antenna 5, 16, 29 front speakers 4, 6, 8, 26 H headphones 22, 26 house codes 17, 24, 25, 26 L laserdisc 12-14, 26 M moisture 2 movie soundtracks 20, 23 music center 2-5, 8-19, 21..., 26 power pack 5, 11, 17, 26, 29 PRESET 19 preset radio station 18, 19, 21 R radio 4, 18, 19, 21, 27 radio channel spacing 17 RCA extension cables 9 red collar 9 remote control 3-5, 14, 17, 19, 22, 24-29 room compensation controls 23 S safety Information 2 serial numbers 5 signal splitter 16 speaker cable ...

The Bose® Lifestyle® amplifier - Owner's guide
Page 5
... date We suggest you have a dual voltage Lifestyle® amplifier 15 Powering-up the remote control 10 Setting Zone 2 Protocol 10 Connecting the Lifestyle® stereo amplifier to a Model 20 music center 11 Connecting the Lifestyle® stereo amplifier to a Model 5 music center 13 Connecting speakers to your Lifestyle® stereo amplifier 14 Checking to see...
... date We suggest you have a dual voltage Lifestyle® amplifier 15 Powering-up the remote control 10 Setting Zone 2 Protocol 10 Connecting the Lifestyle® stereo amplifier to a Model 20 music center 11 Connecting the Lifestyle® stereo amplifier to a Model 5 music center 13 Connecting speakers to your Lifestyle® stereo amplifier 14 Checking to see...

The Bose® Lifestyle® amplifier - Owner's guide
Page 6
... safest way to your yard, patio, swimming deck, garage, or utility room. Dual voltage units include a 120V power cord and a 230V plug adapter. CAUTION: If you with Bose non-powered environmental speakers or Bose non-powered accessory speakers ONLY. The Lifestyle® stereo amplifier provides you purchased a dual voltage unit, DO NOT plug it . You may...
... safest way to your yard, patio, swimming deck, garage, or utility room. Dual voltage units include a 120V power cord and a 230V plug adapter. CAUTION: If you with Bose non-powered environmental speakers or Bose non-powered accessory speakers ONLY. The Lifestyle® stereo amplifier provides you purchased a dual voltage unit, DO NOT plug it . You may...

The Bose® Lifestyle® amplifier - Owner's guide
Page 7
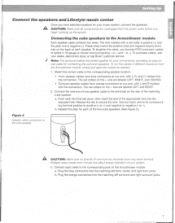
...amplifier: • Locate the amplifier indoors and within 8 feet (2.5 m) of a power outlet. • Make sure that have hazards concealed behind them, such as the finished surface of ...to prevent moisture from getting into the unit. It is neither designed nor tested for your Lifestyle® stereo amplifier and mount it to limit its temperature. • DO NOT...volume level in the amplifier's enclosure. Setting Up Your Lifestyle® Stereo Amplifier Selecting a location for your Lifestyle® stereo amplifier Select a location for use outdoors or...
...amplifier: • Locate the amplifier indoors and within 8 feet (2.5 m) of a power outlet. • Make sure that have hazards concealed behind them, such as the finished surface of ...to prevent moisture from getting into the unit. It is neither designed nor tested for your Lifestyle® stereo amplifier and mount it to limit its temperature. • DO NOT...volume level in the amplifier's enclosure. Setting Up Your Lifestyle® Stereo Amplifier Selecting a location for your Lifestyle® stereo amplifier Select a location for use outdoors or...

The Bose® Lifestyle® amplifier - Owner's guide
Page 10
...These rooms are referred to as room A, B, C, and D, with room A being the primary room (the one used for a tworoom system Operating speakers in other rooms with the Personal® music center Systems that have a multi-room interface are connected to control all connected rooms as one The...music center which requires no internal switch settings before it allows you to control more than one room of Bose® powered speakers placed in more than one room. Note: Refer to your Lifestyle® system owner's guide for more rooms are controlled by the ROOM or HOUSE button 8 January ...
...These rooms are referred to as room A, B, C, and D, with room A being the primary room (the one used for a tworoom system Operating speakers in other rooms with the Personal® music center Systems that have a multi-room interface are connected to control all connected rooms as one The...music center which requires no internal switch settings before it allows you to control more than one room of Bose® powered speakers placed in more than one room. Note: Refer to your Lifestyle® system owner's guide for more rooms are controlled by the ROOM or HOUSE button 8 January ...

The Bose® Lifestyle® amplifier - Owner's guide
Page 11
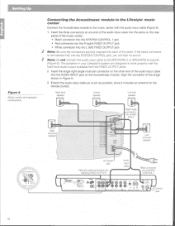
...; system off and disconnect the media center from the AC (mains) power outlet. Figure 8 Cable connections between the Lifestyle® media center and the Lifestyle® stereo amplifier Lifestyle® SA-1 stereo amplifier rear panel Lifestyle® media center rear panel 30-ft audio input cable (supplied) AM262840_00_V.pdf ... cable into an outlet until you have completed all other end of the audio input cable, insert the 3.5 mm mini-plug into the SPEAKER ZONES 2 output jack on the rear panel of the amplifier. Insert the red RCA piggyback connector into the R (right) ...
...; system off and disconnect the media center from the AC (mains) power outlet. Figure 8 Cable connections between the Lifestyle® media center and the Lifestyle® stereo amplifier Lifestyle® SA-1 stereo amplifier rear panel Lifestyle® media center rear panel 30-ft audio input cable (supplied) AM262840_00_V.pdf ... cable into an outlet until you have completed all other end of the audio input cable, insert the 3.5 mm mini-plug into the SPEAKER ZONES 2 output jack on the rear panel of the amplifier. Insert the red RCA piggyback connector into the R (right) ...

The Bose® Lifestyle® amplifier - Owner's guide
Page 13
... Figure 10 Cable connections between the Model 20 music center and the Lifestyle® stereo amplifier CAUTION: Before making connections, turn the Lifestyle® system off and disconnect the music center from the AC (mains) power outlet. Insert the single multi-pin connector at one end of the... audio input cable into the SYSTEM CONTROL jack on the rear panel of the amplifier. SPEAKER OUTPUTS INPUT Model...
... Figure 10 Cable connections between the Model 20 music center and the Lifestyle® stereo amplifier CAUTION: Before making connections, turn the Lifestyle® system off and disconnect the music center from the AC (mains) power outlet. Insert the single multi-pin connector at one end of the... audio input cable into the SYSTEM CONTROL jack on the rear panel of the amplifier. SPEAKER OUTPUTS INPUT Model...

The Bose® Lifestyle® amplifier - Owner's guide
Page 15
...;er, you have completed all other end of the music center. CAUTION: DO NOT connect the audio input cable for the Lifestyle® stereo amplifier to temporarily unplug the theater speakers from the AC (mains) power outlet. Insert the white RCA piggyback connector into an outlet until you need to the...
...;er, you have completed all other end of the music center. CAUTION: DO NOT connect the audio input cable for the Lifestyle® stereo amplifier to temporarily unplug the theater speakers from the AC (mains) power outlet. Insert the white RCA piggyback connector into an outlet until you need to the...

The Bose® Lifestyle® amplifier - Owner's guide
Page 16
... (-) terminal into the red jack and release the tab. ON K40 l 2345678 Connecting speakers to your Lifestyle® stereo amplifier CAUTION: DO NOT connect the amplifier to powered speakers of two insulated wires. Doing so may cause damage to the L (left in your first remote.... 3. or black) terminal. Insert the wire coming from the speaker's positive (+) terminal ...
... (-) terminal into the red jack and release the tab. ON K40 l 2345678 Connecting speakers to your Lifestyle® stereo amplifier CAUTION: DO NOT connect the amplifier to powered speakers of two insulated wires. Doing so may cause damage to the L (left in your first remote.... 3. or black) terminal. Insert the wire coming from the speaker's positive (+) terminal ...


