Owner's guide
Page 2
..., as a CLASS 1 LASER product. Additional safety information See the additional instructions on the system, is located on the back panel and bottom of your Lifestyle° music center and the bottom panel of important operating and maintenance instructions in hazardous radiation exposure. REFER SERVICING TO QUALIFIED PERSONNEL. The CLASS 1 LASER PRODUCT label is...
..., as a CLASS 1 LASER product. Additional safety information See the additional instructions on the system, is located on the back panel and bottom of your Lifestyle° music center and the bottom panel of important operating and maintenance instructions in hazardous radiation exposure. REFER SERVICING TO QUALIFIED PERSONNEL. The CLASS 1 LASER PRODUCT label is...
Owner's guide
Page 3
... serial number: Dealer name: Dealer phone: Purchase date: We suggest you begin 4 Unpacking the carton 5 Select the locations for your Lifestyle° 8 system 6 Connect the speakers and Lifestyle° music center 9 Connecting your Lifestyle 8 system 20 Listening to video sound 20 Listening to the radio 21 Listening to find... Setting Up Before you keep your...
... serial number: Dealer name: Dealer phone: Purchase date: We suggest you begin 4 Unpacking the carton 5 Select the locations for your Lifestyle° 8 system 6 Connect the speakers and Lifestyle° music center 9 Connecting your Lifestyle 8 system 20 Listening to video sound 20 Listening to the radio 21 Listening to find... Setting Up Before you keep your...
Owner's guide
Page 4
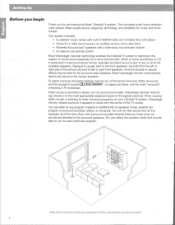
...programs on the signals received. This complete audio home entertainment system offers superb sound, elegance, technology, and simplicity for purchasing the Bose° Lifestyle° 8 system. When viewing older movies or listening to reproduce the realism of Dolby Laboratories Licensing Corporation. 4 Before you ... format, specially encoded sound is usually sent to any or all of the time. Your system includes: • A Lifestyle° music center with surround-encoded material there are times when no sounds are sent to the surround speakers. Sounds from the left or right...
...programs on the signals received. This complete audio home entertainment system offers superb sound, elegance, technology, and simplicity for purchasing the Bose° Lifestyle° 8 system. When viewing older movies or listening to reproduce the realism of Dolby Laboratories Licensing Corporation. 4 Before you ... format, specially encoded sound is usually sent to any or all of the time. Your system includes: • A Lifestyle° music center with surround-encoded material there are times when no sounds are sent to the surround speakers. Sounds from the left or right...
Owner's guide
Page 5
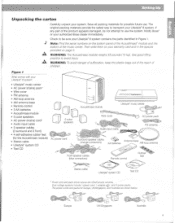
... Unpacking the carton Carefully unpack your warranty card and in Figure 1. Check to avoid injury. Use good lifting practice to be sure your Lifestyle" 8 system: • Lifestyles music center • AC power (mains) pack* • Wire cover • FM antenna • AM loop antenna • AM antenna ...immediately. Europe UK/Singapore Australia 5 The original packing materials provide the safest way to use . UK/Singapore. Notify Bose' or your Lifestyle' 8 system. A WARNING: The Acoustimass module weighs 33 pounds (15 kg). Surround speaker cables (orange connectors) AA...
... Unpacking the carton Carefully unpack your warranty card and in Figure 1. Check to avoid injury. Use good lifting practice to be sure your Lifestyle" 8 system: • Lifestyles music center • AC power (mains) pack* • Wire cover • FM antenna • AM loop antenna • AM antenna ...immediately. Europe UK/Singapore Australia 5 The original packing materials provide the safest way to use . UK/Singapore. Notify Bose' or your Lifestyle' 8 system. A WARNING: The Acoustimass module weighs 33 pounds (15 kg). Surround speaker cables (orange connectors) AA...
Owner's guide
Page 8
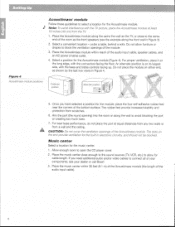
...A CAUTION: Do not cover the ventilation openings of the audio input cable). 8 Allow enough room to select a location for cable length. Place the music center within reach of the audio input cable, speaker cables, and an AC power (mains) outlet. 4. Do not allow for the Acoustimass module. Select a... connect all of the module. 3. Once you need additional audio and/or video cables to block the ventilation openings of your dealer or call Bose. 3. Aim the port (the round opening) into the room or along the front wall in Figure 3). 2. Place the Acoustimass module within ...
...A CAUTION: Do not cover the ventilation openings of the audio input cable). 8 Allow enough room to select a location for cable length. Place the music center within reach of the audio input cable, speaker cables, and an AC power (mains) outlet. 4. Do not allow for the Acoustimass module. Select a... connect all of the module. 3. Once you need additional audio and/or video cables to block the ventilation openings of your dealer or call Bose. 3. Aim the port (the round opening) into the room or along the front wall in Figure 3). 2. Place the Acoustimass module within ...
Owner's guide
Page 10
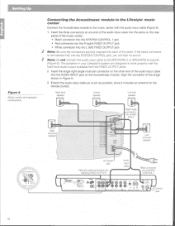
... INPUT jack on the rear panel of the audio input cable into each of the jacks. Align the connector at one end of the music center: • Black connector into the SYSTEM CONTROL 1 jack • Red connector into the R (right) FIXED OUTPUT jack • ...NO 01 tr Ws Figure 6 Music center and speaker connections '7e,;1::572 °;-:f5Nnetleff, c0 4'" ...A5tAret'*-A1- > 9"Pil'ASK;Vt>"4.-1 7#>10;PACP" 4:;:iv.+Z1-0).•• Connecting the Acoustimass' module to the Lifestyle' music center Connect the Acoustimass module to the music center with the fixed level audio output ...
... INPUT jack on the rear panel of the audio input cable into each of the jacks. Align the connector at one end of the music center: • Black connector into the SYSTEM CONTROL 1 jack • Red connector into the R (right) FIXED OUTPUT jack • ...NO 01 tr Ws Figure 6 Music center and speaker connections '7e,;1::572 °;-:f5Nnetleff, c0 4'" ...A5tAret'*-A1- > 9"Pil'ASK;Vt>"4.-1 7#>10;PACP" 4:;:iv.+Z1-0).•• Connecting the Acoustimass' module to the Lifestyle' music center Connect the Acoustimass module to the music center with the fixed level audio output ...

Owner's guide
Page 11
Connecting the music center AC (mains)powerpack The Lifestyle" music center comes with a 120V AC (mains) power pack for use... Australia 1. Check to be sure it is set for the appropriate voltage setting. Plug the small end of the Lifestyle' music center. 2. Make sure that the power pack reaches an AC (mains) outlet. In Europe, use the adapter plug...Using the wrong one may damage your power pack or your area. Use 115V for North America; 230V for your music center. • Model PS71, 120V in North America • Model PS74, 230V in UK or Singapore • Model...
Connecting the music center AC (mains)powerpack The Lifestyle" music center comes with a 120V AC (mains) power pack for use... Australia 1. Check to be sure it is set for the appropriate voltage setting. Plug the small end of the Lifestyle' music center. 2. Make sure that the power pack reaches an AC (mains) outlet. In Europe, use the adapter plug...Using the wrong one may damage your power pack or your area. Use 115V for North America; 230V for your music center. • Model PS71, 120V in North America • Model PS74, 230V in UK or Singapore • Model...
Owner's guide
Page 12
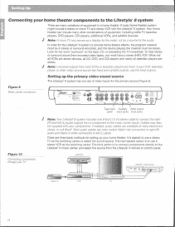
...playing the material must be stereo. There are three basic methods for the Lifestyle° 8 system to the Lifestyle° 8 music center, and select the source from encoded video tapes, you must be supplied with the Lifestyle° 8 system. While not all VCRs we stereo devices, all CD,... DVD, and CDI players and nearly all laserdisc players we stereo. .P Note:Line level outputs from a component to the music center inputs. Figure 9 Music center connectors ar r----Loi tC&.:•...
...playing the material must be stereo. There are three basic methods for the Lifestyle° 8 system to the Lifestyle° 8 music center, and select the source from encoded video tapes, you must be supplied with the Lifestyle° 8 system. While not all VCRs we stereo devices, all CD,... DVD, and CDI players and nearly all laserdisc players we stereo. .P Note:Line level outputs from a component to the music center inputs. Figure 9 Music center connectors ar r----Loi tC&.:•...
Owner's guide
Page 13
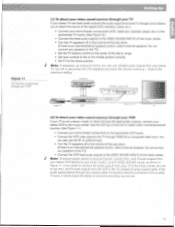
Do not connect any speakers to the TV) • Connect the VCR fixed audio outputs to the VIDEO SOUND INPUTs of the music center. ,st' Note: To ensure proper stereo or surroundsound, connect The L andR audio outputs from your stereo VCR to the TV through VIDEO IN or ... stereo or surround encodingmay be lost. 19 If the audio signalpasses through two coaxial cable connections (like the connection from the VCR to the center of the music center. • Turn the TV speakers off or the volume all the way down . (If there is an intemaVexternal speakers switch, select external speakers. ...
Do not connect any speakers to the TV) • Connect the VCR fixed audio outputs to the VIDEO SOUND INPUTs of the music center. ,st' Note: To ensure proper stereo or surroundsound, connect The L andR audio outputs from your stereo VCR to the TV through VIDEO IN or ... stereo or surround encodingmay be lost. 19 If the audio signalpasses through two coaxial cable connections (like the connection from the VCR to the center of the music center. • Turn the TV speakers off or the volume all the way down . (If there is an intemaVexternal speakers switch, select external speakers. ...
Owner's guide
Page 14
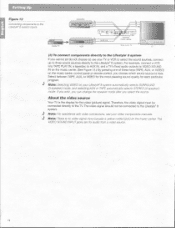
...signal must be connected to the Lifestyle' 8 system. The video signal should not be connected directly to the N. For example, connect a VCR into TAPE PLAY IN, a laserdisc to AUX IN, and a N's fixed audio outputs to VIDEO SOUND IN on the music center. (See Figure 12.) By ...pressing one of these keys (TAPE, AUX, or VIDEO) on the music center control panel or remote control, you select the source. Setting Up Figure 12 Connecting components to the Lifestyle' 8 system inputs Lasamisc a V ffi L R Aucuat U 0 mus'c Center (INITahri -* C0IY0 V VCR v$0,00.0 to TV TV (3) To connect...
...signal must be connected to the Lifestyle' 8 system. The video signal should not be connected directly to the N. For example, connect a VCR into TAPE PLAY IN, a laserdisc to AUX IN, and a N's fixed audio outputs to VIDEO SOUND IN on the music center. (See Figure 12.) By ...pressing one of these keys (TAPE, AUX, or VIDEO) on the music center control panel or remote control, you select the source. Setting Up Figure 12 Connecting components to the Lifestyle' 8 system inputs Lasamisc a V ffi L R Aucuat U 0 mus'c Center (INITahri -* C0IY0 V VCR v$0,00.0 to TV TV (3) To connect...
Owner's guide
Page 15
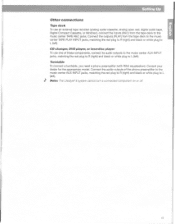
...analog audio cassette, analog open reel, digital audio tape, Digital Compact Cassette, or MiniDisc), connect the inputs (REC) from the tape deck to the music center TAPE PLAY INPUT jacks, matching the red plug to R (right) and black or white plug to L (left). Connect the audio outputs of ...these components, connect its audio outputs to the music center AUX INPUT jacks, matching the red plug to R (right) and black or white plug to L (left ). Note: The Lifestyle 8 system cannot turn a connected component on or off. 15 Connect the outputs (PLAY) ...
...analog audio cassette, analog open reel, digital audio tape, Digital Compact Cassette, or MiniDisc), connect the inputs (REC) from the tape deck to the music center TAPE PLAY INPUT jacks, matching the red plug to R (right) and black or white plug to L (left). Connect the audio outputs of ...these components, connect its audio outputs to the music center AUX INPUT jacks, matching the red plug to R (right) and black or white plug to L (left ). Note: The Lifestyle 8 system cannot turn a connected component on or off. 15 Connect the outputs (PLAY) ...
Owner's guide
Page 16
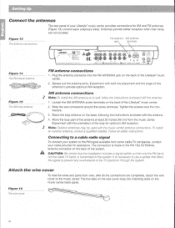
ti r ,Oo, Oi e 0 e 0 0 rst DO Figure 13 The antenna connections FM antenna AM antenna jack terminals -_Igor r) r i Asp TA. Antennas provide better reception when their wires are not bundled. Setting Up Connect the antennas The rear panel of your Lifestyle music center provides connections for AM and FM antennas (Figure 13). Unwind each antenna's wires.
ti r ,Oo, Oi e 0 e 0 0 rst DO Figure 13 The antenna connections FM antenna AM antenna jack terminals -_Igor r) r i Asp TA. Antennas provide better reception when their wires are not bundled. Setting Up Connect the antennas The rear panel of your Lifestyle music center provides connections for AM and FM antennas (Figure 13). Unwind each antenna's wires.
Owner's guide
Page 17
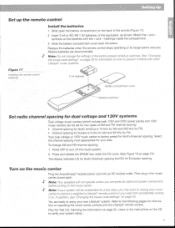
...American spacing and EU for your area. Listen to the instructions on the CD to the following the instructions on operating the music center controls and the Lifestyle remote control. Note: Do not change AM and FM channel spacing: 1. Select the channel spacing most appropriate for European spacing... settings of the remote (Figure 17). 2. Press OFF to enjoy your music center to prevent conflicts with the + and - Note: If your system will not operate unless you may want to unplug your new Lifestyle system. In addition, see "Changing the house code settings" on the batteries...
...American spacing and EU for your area. Listen to the instructions on the CD to the following the instructions on operating the music center controls and the Lifestyle remote control. Note: Do not change AM and FM channel spacing: 1. Select the channel spacing most appropriate for European spacing... settings of the remote (Figure 17). 2. Press OFF to enjoy your music center to prevent conflicts with the + and - Note: If your system will not operate unless you may want to unplug your new Lifestyle system. In addition, see "Changing the house code settings" on the batteries...
Owner's guide
Page 18
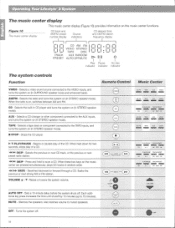
...Seeks the previous or next strong AM or FM station. VOLUME • \ V- SEEK - MUTE - Operating Your Lifestyle® 8 System The music center display This music center display (Figure 18) provides information on , switches between AM and FM. Selects a CD changer or other component connected ...AUX RANDOM AUTOOFFMUTE I I Play indicator 11I11 Pause indicator 0 I No disc indicator The system controls Function Remote Control Music Center VIDEO - When the radio is on the music center functions. When held down for two seconds, stops play of a CD. 144 SKIP - Silences the speakers. ...
...Seeks the previous or next strong AM or FM station. VOLUME • \ V- SEEK - MUTE - Operating Your Lifestyle® 8 System The music center display This music center display (Figure 18) provides information on , switches between AM and FM. Selects a CD changer or other component connected ...AUX RANDOM AUTOOFFMUTE I I Play indicator 11I11 Pause indicator 0 I No disc indicator The system controls Function Remote Control Music Center VIDEO - When the radio is on the music center functions. When held down for two seconds, stops play of a CD. 144 SKIP - Silences the speakers. ...
Owner's guide
Page 19
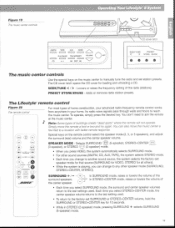
... home construction, your home. The Lifestyle' remote control Figure 20 The emote control For most types of the radio (stations). e, AM,WM TAPE L O AUX E0) VIOE0 C CO PLAY/PAUSE WACKIPAESCI 0 (0) Pi II I•1 SKIP PH VOLUME CD cover latch SEEK/TUNE > PRESET STORE ERASE The music center controls Use the special keys on...
... home construction, your home. The Lifestyle' remote control Figure 20 The emote control For most types of the radio (stations). e, AM,WM TAPE L O AUX E0) VIOE0 C CO PLAY/PAUSE WACKIPAESCI 0 (0) Pi II I•1 SKIP PH VOLUME CD cover latch SEEK/TUNE > PRESET STORE ERASE The music center controls Use the special keys on...
Owner's guide
Page 20
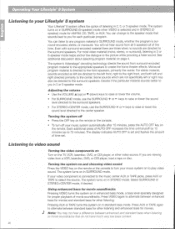
...can change to the speaker mode that do not have much very low bass content. 20 Monaural program material is connected to the music center AUX or TAPE jacks, press AUX or TAPE to select the source. If your video component is directed to the front speakers, ...may also be directed to the surround speakers. For stereo material, sounds encoded as left and right directed primarily to the center. tvz.: our: S z% 4 Listening to your Lifestyle 8 system Your Lifestyle' 8 system offers the option of listening in SURROUND mode, whether the program is surround-encoded, stereo, or monaural. ...
...can change to the speaker mode that do not have much very low bass content. 20 Monaural program material is connected to the music center AUX or TAPE jacks, press AUX or TAPE to select the source. If your video component is directed to the front speakers, ...may also be directed to the surround speakers. For stereo material, sounds encoded as left and right directed primarily to the center. tvz.: our: S z% 4 Listening to your Lifestyle 8 system Your Lifestyle' 8 system offers the option of listening in SURROUND mode, whether the program is surround-encoded, stereo, or monaural. ...
Owner's guide
Page 21
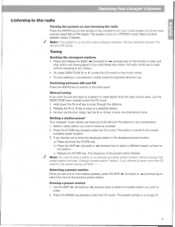
...) key on the remote to seek without erasing that the radio cannot seek, use the SEEK/TUNE keys, located under the CD cover) on the music center. • To stop at a selected station. 3. The preset number is already selected, this station. If you wish to Erasing a preset station 1. ... and stop at a time. If you wish to the other band. Press the ERASE key (located under the CD cover). Setting a station preset Your Lifestyles music center can store up to store the displayed station in any station. • Or, press SEEK/TUNE > or < (under the CD cover. 1. The ...
...) key on the remote to seek without erasing that the radio cannot seek, use the SEEK/TUNE keys, located under the CD cover) on the music center. • To stop at a selected station. 3. The preset number is already selected, this station. If you wish to Erasing a preset station 1. ... and stop at a time. If you wish to the other band. Press the ERASE key (located under the CD cover). Setting a station preset Your Lifestyles music center can store up to store the displayed station in any station. • Or, press SEEK/TUNE > or < (under the CD cover. 1. The ...
Owner's guide
Page 22
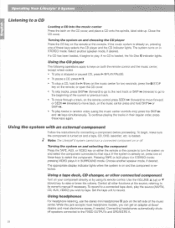
...key on the remote control press SEEK P•i• (forward) to move through a track, on the music center for connecting a component before proceeding. If the system is on and a tape, CD, DVD, laserdisc, ...etc. Using a tape deck, CD changer, or other functions at Bose'' dealers and most headphone models, you wish to its remote control. Using headphones For headphone ...go to the beginning of these keys to a connected tape deck, play . Note: The Lifestyle 8 system cannot turn the system on the remote or the console. Choose another speaker mode,...
...key on the remote control press SEEK P•i• (forward) to move through a track, on the music center for connecting a component before proceeding. If the system is on and a tape, CD, DVD, laserdisc, ...etc. Using a tape deck, CD changer, or other functions at Bose'' dealers and most headphone models, you wish to its remote control. Using headphones For headphone ...go to the beginning of these keys to a connected tape deck, play . Note: The Lifestyle 8 system cannot turn the system on the remote or the console. Choose another speaker mode,...
Owner's guide
Page 24
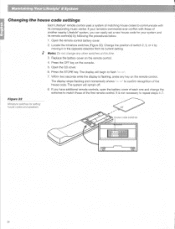
... the miniature switches (Figure 22). If your system and its remote control(s) by moving it in the opposite direction from its corresponding music center. Change the position of switch 2, 3, or 4 by following the procedures below. 1. Note: Do not change the switches to ... cover. 6. The system will begin to flash `7. Maintaining Your Lifestyle' 8 System Changing the house code settings Each Lifestyle' remote control uses a system of matching house codes to communicate with those of another nearby Lifestyle° system, you have additional remote controls, open the battery cover...
... the miniature switches (Figure 22). If your system and its remote control(s) by moving it in the opposite direction from its corresponding music center. Change the position of switch 2, 3, or 4 by following the procedures below. 1. Note: Do not change the switches to ... cover. 6. The system will begin to flash `7. Maintaining Your Lifestyle' 8 System Changing the house code settings Each Lifestyle' remote control uses a system of matching house codes to communicate with those of another nearby Lifestyle° system, you have additional remote controls, open the battery cover...
Owner's guide
Page 25
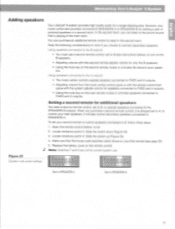
...remote mutes or unmutes the second room speakers. Locate miniature switch 5. Make sure that is shipped set to A, to control your music center also provides connections (SPEAKERS A or SPEAKERS B) for additional speakers You need a second remote control, set to B, to operate... 23). 4. tet_,Alitie,g',;71t, : ' d'esin2C16:,t 2krt0292--ci- 4/...012 CIWZN:3 1 4'. 9: ?p pf:070 (1',X9 tar de Adding speakers Your Lifestyle 8 system provides high quality audio for curren system use a second remote control, set your first remote (see instructions below), to B (see page 20)....
...remote mutes or unmutes the second room speakers. Locate miniature switch 5. Make sure that is shipped set to A, to control your music center also provides connections (SPEAKERS A or SPEAKERS B) for additional speakers You need a second remote control, set to B, to operate... 23). 4. tet_,Alitie,g',;71t, : ' d'esin2C16:,t 2krt0292--ci- 4/...012 CIWZN:3 1 4'. 9: ?p pf:070 (1',X9 tar de Adding speakers Your Lifestyle 8 system provides high quality audio for curren system use a second remote control, set your first remote (see instructions below), to B (see page 20)....


