Owner's guide
Page 2
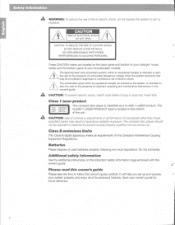
... instructions on the Important Safety Information page enclosed with arrowhead symbol, within an equilateral triangle, is located on the back panel and bottom of your Lifestyle° music center and the bottom panel of sufficient magnitude to follow this owner's guide. REFER SERVICING TO QUALIFIED PERSONNEL. The CLASS 1 LASER PRODUCT label is...
... instructions on the Important Safety Information page enclosed with arrowhead symbol, within an equilateral triangle, is located on the back panel and bottom of your Lifestyle° music center and the bottom panel of sufficient magnitude to follow this owner's guide. REFER SERVICING TO QUALIFIED PERSONNEL. The CLASS 1 LASER PRODUCT label is...
Owner's guide
Page 3
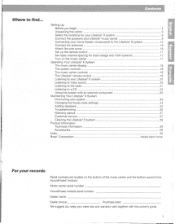
... We suggest you begin 4 Unpacking the carton 5 Select the locations for your Lifestyle° 8 system 6 Connect the speakers and Lifestyle° music center 9 Connecting your home theater components to the Lifestyle° 8 system 12 Connect the antennas 16 Attach the wire cover 16 Set...your records Serial numbers are located on the music center 17 Operating Your Lifestyle* 8 System The music center display 18 The system controls 18 The music center controls 19 The Lifestyle' remote control 19 Listening to your Lifestyle 8 system 20 Listening to video sound 20 ...
... We suggest you begin 4 Unpacking the carton 5 Select the locations for your Lifestyle° 8 system 6 Connect the speakers and Lifestyle° music center 9 Connecting your home theater components to the Lifestyle° 8 system 12 Connect the antennas 16 Attach the wire cover 16 Set...your records Serial numbers are located on the music center 17 Operating Your Lifestyle* 8 System The music center display 18 The system controls 18 The music center controls 19 The Lifestyle' remote control 19 Listening to your Lifestyle 8 system 20 Listening to video sound 20 ...
Owner's guide
Page 4
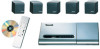
...that sounds best to the most appropriate speakers based on your Lifestyle° 8 system, Videostage circuitry directs sound so it to you for purchasing the Bose° Lifestyle° 8 system. Your system includes: • A Lifestyle° music center with built-in stereo, but not surround-encoded, ... symbolare trademarks of the available speakers. Even with a hide-away Acoustimass module • An easy-to-use remote control Bose Videostage* decoder technology enables the Lifestyle° 8 system to any of the TV screen. Dialogue is recorded in AM/FM radio and compact disc (CD...
...that sounds best to the most appropriate speakers based on your Lifestyle° 8 system, Videostage circuitry directs sound so it to you for purchasing the Bose° Lifestyle° 8 system. Your system includes: • A Lifestyle° music center with built-in stereo, but not surround-encoded, ... symbolare trademarks of the available speakers. Even with a hide-away Acoustimass module • An easy-to-use remote control Bose Videostage* decoder technology enables the Lifestyle° 8 system to any of the TV screen. Dialogue is recorded in AM/FM radio and compact disc (CD...
Owner's guide
Page 5
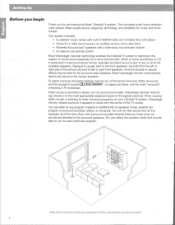
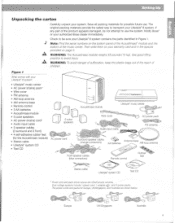
Notify Bose' or your system. The power cords and packs for the Acoustimass module) • Stereo cable • Lifestyle' system CD • Test CD 5 cube speakers AC power cord Acoustimass module Wire cover Lifestyle` music center S j „.0EP IT AC power pack eta, Audio input ...cable .acr "c„. Setting Up Unpacking the carton Carefully unpack your authorized Bose dealer immediately. If any part of the product appears damaged...
Notify Bose' or your system. The power cords and packs for the Acoustimass module) • Stereo cable • Lifestyle' system CD • Test CD 5 cube speakers AC power cord Acoustimass module Wire cover Lifestyle` music center S j „.0EP IT AC power pack eta, Audio input ...cable .acr "c„. Setting Up Unpacking the carton Carefully unpack your authorized Bose dealer immediately. If any part of the product appears damaged...
Owner's guide
Page 8
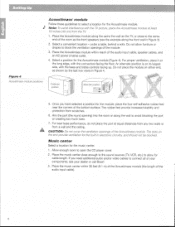
..., with the bass and treble controls facing up. If you have selected a position for the Acoustimass module (Figure 4). Place the music center within reach of the bottom surface. The rubber feet provide increased stability and protection from a wall and the ceiling. A CAUTION... of the module. 3. Place the Acoustimass module along the same the wall as the front speakers (see your dealer or call Bose. 3. Preferred position ) Alternate position 0 5. Music center Select a location for the built-in Figure 3). 2. Select a convenient location - under a table, behind a sofa. ...
..., with the bass and treble controls facing up. If you have selected a position for the Acoustimass module (Figure 4). Place the music center within reach of the bottom surface. The rubber feet provide increased stability and protection from a wall and the ceiling. A CAUTION... of the module. 3. Place the Acoustimass module along the same the wall as the front speakers (see your dealer or call Bose. 3. Preferred position ) Alternate position 0 5. Music center Select a location for the built-in Figure 3). 2. Select a convenient location - under a table, behind a sofa. ...
Owner's guide
Page 9
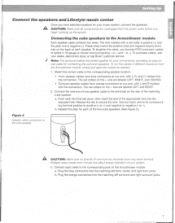
...as needed. 1. Note: The surround cables are labeled LEFT and RIGHT. 2. The red collars on the + wire are joined together for your music system, connect the speakers. b. Connect each wire to its corresponding terminal positive to positive (+ to +) and negative to negative (- Connecting the ...; Surround speaker cables have selected locations for each terminal tab down, then insert the end of your dealer, electronics store, or call Bose' customer service. a. Connect the wire end of the matching cube speaker. 44,sc. a. Bridged wires create short circuits that affect proper...
...as needed. 1. Note: The surround cables are labeled LEFT and RIGHT. 2. The red collars on the + wire are joined together for your music system, connect the speakers. b. Connect each wire to its corresponding terminal positive to positive (+ to +) and negative to negative (- Connecting the ...; Surround speaker cables have selected locations for each terminal tab down, then insert the end of your dealer, electronics store, or call Bose' customer service. a. Connect the wire end of the matching cube speaker. 44,sc. a. Bridged wires create short circuits that affect proper...
Owner's guide
Page 10
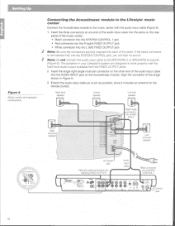
... possible, since it includes an antenna for the remote control. Align the connector at one end of the audio input cable into each of the music center: • Black connector into the SYSTEM CONTROL 1 jack • Red connector into the R (right) FIXED OUTPUT jack • White connector ... Note: Be sure the connectors are designed to the SPEAKERS A or SPEAKERS 8 outputs (Figure 6). fr itzeiz:k,..ii?".wi NO 01 tr Ws Figure 6 Music center and speaker connections '7e,;1::572 °;-:f5Nnetleff, c0 4'" ...A5tAret'*-A1- > 9"Pil'ASK;Vt>"4.-1 7#>10;PACP" 4:;:iv.+Z1-0).•• Connecting...
... possible, since it includes an antenna for the remote control. Align the connector at one end of the audio input cable into each of the music center: • Black connector into the SYSTEM CONTROL 1 jack • Red connector into the R (right) FIXED OUTPUT jack • White connector ... Note: Be sure the connectors are designed to the SPEAKERS A or SPEAKERS 8 outputs (Figure 6). fr itzeiz:k,..ii?".wi NO 01 tr Ws Figure 6 Music center and speaker connections '7e,;1::572 °;-:f5Nnetleff, c0 4'" ...A5tAret'*-A1- > 9"Pil'ASK;Vt>"4.-1 7#>10;PACP" 4:;:iv.+Z1-0).•• Connecting...

Owner's guide
Page 11
`rei-v8tat 40?);,IFIQP.:.:WaSe , eirto: Setting Up Connecting the Acoustimass* module power (mains) cord 1. Plug the small end of the Lifestyle' music center. 2. In Europe, use . (See Figures 1 and 8.) Dual voltage models include both 120V and 230V power packs. Note: Do not plug... jack on the back of the power (mains) cord into a power outlet until all component connections are complete. 77 Connecting the music center AC (mains)powerpack The Lifestyle" music center comes with a 120V AC (mains) power pack for your area. If you are complete. A CAUTION: Be sure to ...
`rei-v8tat 40?);,IFIQP.:.:WaSe , eirto: Setting Up Connecting the Acoustimass* module power (mains) cord 1. Plug the small end of the Lifestyle' music center. 2. In Europe, use . (See Figures 1 and 8.) Dual voltage models include both 120V and 230V power packs. Note: Do not plug... jack on the back of the power (mains) cord into a power outlet until all component connections are complete. 77 Connecting the music center AC (mains)powerpack The Lifestyle" music center comes with a 120V AC (mains) power pack for your area. If you are complete. A CAUTION: Be sure to ...
Owner's guide
Page 12
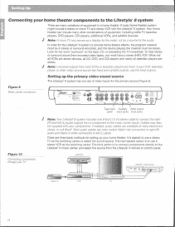
... soundsource has fixedand variable outputs, use a stereo VCR as the switching center. The third option is to connect components directly to the Lifestyle° 8 music center, and select the source from encoded video tapes, you must be stereo. In order for the video, not as the switching... center to select the sound source. To hear stereo or surround sound from the Lifestyle° 8 remote or control panel. A basic home theater system ...
... soundsource has fixedand variable outputs, use a stereo VCR as the switching center. The third option is to connect components directly to the Lifestyle° 8 music center, and select the source from encoded video tapes, you must be stereo. In order for the video, not as the switching... center to select the sound source. To hear stereo or surround sound from the Lifestyle° 8 remote or control panel. A basic home theater system ...
Owner's guide
Page 13
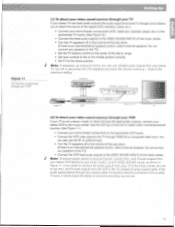
... VCR as a tuner and to select other connected sound sources. (See Figure 11.) • Connect your stereo VCR to the VIDEO SOUND INPUTs of the music center. • Turn the TV speakers off or the volume all the way down . (If there is an intemal/external speakers switch, select external speakers... home theater components (VCR, cable box, laserdisc player, etc.) to the appropriate TV inputs. (See Figure 10.) • Connect the fixed audio outputs to the music center. Do not connect any speakers to the TV) • Connect the VCR fixed audio outputs to the VIDEO SOUND INPUTs of the...
... VCR as a tuner and to select other connected sound sources. (See Figure 11.) • Connect your stereo VCR to the VIDEO SOUND INPUTs of the music center. • Turn the TV speakers off or the volume all the way down . (If there is an intemal/external speakers switch, select external speakers... home theater components (VCR, cable box, laserdisc player, etc.) to the appropriate TV inputs. (See Figure 10.) • Connect the fixed audio outputs to the music center. Do not connect any speakers to the TV) • Connect the VCR fixed audio outputs to the VIDEO SOUND INPUTs of the...
Owner's guide
Page 14
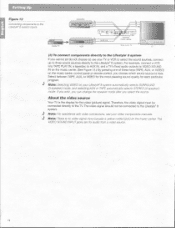
.... Note: For assistance with video connections, see your TV or VCR to select the sound sources, connect up to three sound sources directly to the Lifestyles 8 system. Note: Selecting VIDEO on the music center. The video signal should not be connected directly to the N. Setting Up Figure 12 Connecting components to the...
.... Note: For assistance with video connections, see your TV or VCR to select the sound sources, connect up to three sound sources directly to the Lifestyles 8 system. Note: Selecting VIDEO on the music center. The video signal should not be connected directly to the N. Setting Up Figure 12 Connecting components to the...
Owner's guide
Page 15
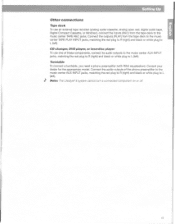
Note: The Lifestyle 8 system cannot turn a connected component on or off. 15 :r: Other connections Tape deck To use one of the phono preamplifier to the music center AUX INPUT jacks, matching the red plug to R (right) and black or white plug to L (left). Connect the audio outputs of these ...components, connect its audio outputs to the music center AUX INPUT jacks, matching the red plug to R (right) and black or white plug to L (left ). Consult your dealer for the appropriate model...
Note: The Lifestyle 8 system cannot turn a connected component on or off. 15 :r: Other connections Tape deck To use one of the phono preamplifier to the music center AUX INPUT jacks, matching the red plug to R (right) and black or white plug to L (left). Connect the audio outputs of these ...components, connect its audio outputs to the music center AUX INPUT jacks, matching the red plug to R (right) and black or white plug to L (left ). Consult your dealer for the appropriate model...
Owner's guide
Page 16
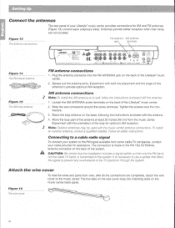
ti r ,Oo, Oi e 0 e 0 0 rst DO Unwind each antenna's wires. Antennas provide better reception when their wires are not bundled. Figure 13 The antenna connections FM antenna AM antenna jack terminals -_Igor r) r i Asp TA. Setting Up Connect the antennas The rear panel of your Lifestyle music center provides connections for AM and FM antennas (Figure 13).
ti r ,Oo, Oi e 0 e 0 0 rst DO Unwind each antenna's wires. Antennas provide better reception when their wires are not bundled. Figure 13 The antenna connections FM antenna AM antenna jack terminals -_Igor r) r i Asp TA. Setting Up Connect the antennas The rear panel of your Lifestyle music center provides connections for AM and FM antennas (Figure 13).
Owner's guide
Page 17
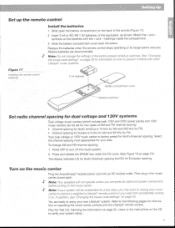
... key under the CD cover. (See Figure 19 on how to prevent conflicts with the + and - Listen to the instructions on operating the music center controls and the Lifestyle remote control. Slide the battery compartment cover back into an AC (mains) outlet. To change the settings of the remote (Figure 17). 2. Then...
... key under the CD cover. (See Figure 19 on how to prevent conflicts with the + and - Listen to the instructions on operating the music center controls and the Lifestyle remote control. Slide the battery compartment cover back into an AC (mains) outlet. To change the settings of the remote (Figure 17). 2. Then...
Owner's guide
Page 18
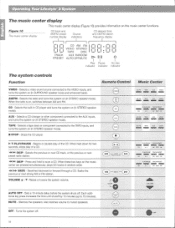
... EXIP .01 a CO RAVOIPCE IIIAOPAESE7 a a a .Iii I AM FM STEREO DISCI ri - Silences the speakers. Operating Your Lifestyle® 8 System The music center display This music center display (Figure 18) provides information on , switches between AM and FM. Seeks the previous or next strong AM or FM ... 11I11 Pause indicator 0 I No disc indicator The system controls Function Remote Control Music Center VIDEO - Selects a video sound source connected to 75 minutes). AM/FM - When the radio is on the music center functions. CD - TAPE - Begins or pauses play of the CD. SKIP...
... EXIP .01 a CO RAVOIPCE IIIAOPAESE7 a a a .Iii I AM FM STEREO DISCI ri - Silences the speakers. Operating Your Lifestyle® 8 System The music center display This music center display (Figure 18) provides information on , switches between AM and FM. Seeks the previous or next strong AM or FM ... 11I11 Pause indicator 0 I No disc indicator The system controls Function Remote Control Music Center VIDEO - Selects a video sound source connected to 75 minutes). AM/FM - When the radio is on the music center functions. CD - TAPE - Begins or pauses play of the CD. SKIP...
Owner's guide
Page 19
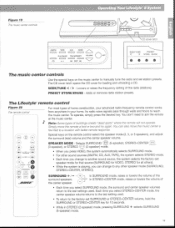
Adds or removes radio station presets. The Lifestyle' remote control Figure 20 The emote control ... PLAY/PAUSE WACKIPAESCI 0 (0) Pi II I•1 SKIP PH VOLUME CD cover latch SEEK/TUNE > PRESET STORE ERASE The music center controls Use the special keys on the remote control select the speaker mode (2, 3, or 5 speakers), and adjust the..., the center speaker volume returns to the last setting used . o 9copT.h Special keys on the music center to reach the music center. Each time you press VIDEO, the system automatically selects SURROUND mode. • For other speaker...
Adds or removes radio station presets. The Lifestyle' remote control Figure 20 The emote control ... PLAY/PAUSE WACKIPAESCI 0 (0) Pi II I•1 SKIP PH VOLUME CD cover latch SEEK/TUNE > PRESET STORE ERASE The music center controls Use the special keys on the remote control select the speaker mode (2, 3, or 5 speakers), and adjust the..., the center speaker volume returns to the last setting used . o 9copT.h Special keys on the music center to reach the music center. Each time you press VIDEO, the system automatically selects SURROUND mode. • For other speaker...
Owner's guide
Page 20
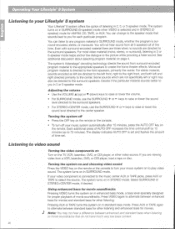
tvz.: our: S z% 4 Listening to your Lifestyle 8 system Your Lifestyle' 8 system offers the option of the time. You will not hear sound from all 5 speakers all of listening in 2, 3, or 5-speaker mode. Even with surround-... and flashes the amount of movie soundtracks. Adjusting the volume • Use the VOLUME ♦ (up to the surround speakers. Tbming the system off your music system automatically after 15 minutes, press the AUTO OFF key on the remote. The display indicates AUTO OFF is set . The system turns on in...
tvz.: our: S z% 4 Listening to your Lifestyle 8 system Your Lifestyle' 8 system offers the option of the time. You will not hear sound from all 5 speakers all of listening in 2, 3, or 5-speaker mode. Even with surround-... and flashes the amount of movie soundtracks. Adjusting the volume • Use the VOLUME ♦ (up to the surround speakers. Tbming the system off your music system automatically after 15 minutes, press the AUTO OFF key on the remote. The display indicates AUTO OFF is set . The system turns on in...
Owner's guide
Page 21
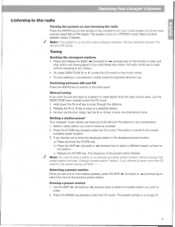
... < key to the most recently heard AM or FM station. Release the STORE key. Press the ERASE key (located under the CD cover) on the music center. • To stop at the next strong signal. J7.}, z ▪ ,,s 1,5 Listening to the radio Turning the system on and choosing the ...Note: You cannot store a station in the displayed preset location: a. If you wish to the other band. As soon as a preset. 2. Setting a station preset Your Lifestyles music center can store up to seek without erasing that the radio cannot seek, use the SEEK/TUNE keys, located under the CD cover). Use the...
... < key to the most recently heard AM or FM station. Release the STORE key. Press the ERASE key (located under the CD cover) on the music center. • To stop at the next strong signal. J7.}, z ▪ ,,s 1,5 Listening to the radio Turning the system on and choosing the ...Note: You cannot store a station in the displayed preset location: a. If you wish to the other band. As soon as a preset. 2. Setting a station preset Your Lifestyles music center can store up to seek without erasing that the radio cannot seek, use the SEEK/TUNE keys, located under the CD cover). Use the...
Owner's guide
Page 22
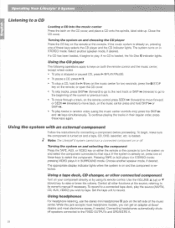
... system on and choosing the CD player Press the CD key on , pressing one of the music center. Select another speaker mode, if desired. To continue playing the tracks in STEREO mode; Note: The Lifestyle 8 system cannot turn the system on and select the component connected to move back, on the..., and place a CD onto the spindle, label-side up ) or • (down) key to tape. Using a tape deck, CD changer, or other functions at Bose'' dealers and most headphone models, you wish to raise or lower the volume. While this jack accepts most electronics stores, if needed. If the system...
... system on and choosing the CD player Press the CD key on , pressing one of the music center. Select another speaker mode, if desired. To continue playing the tracks in STEREO mode; Note: The Lifestyle 8 system cannot turn the system on and select the component connected to move back, on the..., and place a CD onto the spindle, label-side up ) or • (down) key to tape. Using a tape deck, CD changer, or other functions at Bose'' dealers and most headphone models, you wish to raise or lower the volume. While this jack accepts most electronics stores, if needed. If the system...
Owner's guide
Page 24
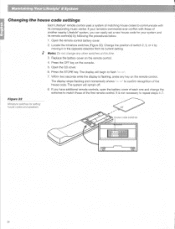
... with those of the first remote control. Maintaining Your Lifestyle' 8 System Changing the house code settings Each Lifestyle' remote control uses a system of switch 2, 3, or 4 by following the procedures below. 1. If your system and its corresponding music center. Press the OFF key on the remote control....Do not change the switches to flash `7. Within two seconds while the display is not necessary to confirm recognition of another nearby Lifestyle° system, you have additional remote controls, open the battery cover of each one and change any key on the remote ...
... with those of the first remote control. Maintaining Your Lifestyle' 8 System Changing the house code settings Each Lifestyle' remote control uses a system of switch 2, 3, or 4 by following the procedures below. 1. If your system and its corresponding music center. Press the OFF key on the remote control....Do not change the switches to flash `7. Within two seconds while the display is not necessary to confirm recognition of another nearby Lifestyle° system, you have additional remote controls, open the battery cover of each one and change any key on the remote ...


