Lifestyle® VS-2 video enhancer - Owner's guide
Page 5
...indicate when it . Notify Bose or your Bose dealer or local electronics retailer. 5 Load the software update disc into the Lifestyle system media center and allow it to repack and transport your LIFESTYLE® system and select the CD/DVD source. 2. For Bose contact information, refer to the... address sheet included in case you need to update your LIFESTYLE® system. To determine...
...indicate when it . Notify Bose or your Bose dealer or local electronics retailer. 5 Load the software update disc into the Lifestyle system media center and allow it to repack and transport your LIFESTYLE® system and select the CD/DVD source. 2. For Bose contact information, refer to the... address sheet included in case you need to update your LIFESTYLE® system. To determine...
Lifestyle® VS-2 video enhancer - Owner's guide
Page 6
... used as possible. Also, remove any video cables from the rear panel of the media center. • If you are setting up a LIFESTYLE® system with your LIFESTYLE® DVD home entertainment system. 6 This cord is used only with the media center power supply that came with the VS-2, the media center power...
... used as possible. Also, remove any video cables from the rear panel of the media center. • If you are setting up a LIFESTYLE® system with your LIFESTYLE® DVD home entertainment system. 6 This cord is used only with the media center power supply that came with the VS-2, the media center power...
Lifestyle® VS-2 video enhancer - Owner's guide
Page 19
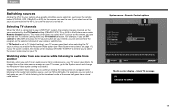
Just press the remote button (CD/DVD, VCR, CBL•SAT, or AUX) for the source you to continue viewing the video portion of a program while listening to the audio from another ... source from a local radio station. System menu - English Switching sources Adding the VS-2 to your TV Control selection. If TV Control is connected to your LIFESTYLE® system, the remote changes channels on the remote, you will see and hear the program on your TV screen goes blank. Selecting TV channels...
Just press the remote button (CD/DVD, VCR, CBL•SAT, or AUX) for the source you to continue viewing the video portion of a program while listening to the audio from another ... source from a local radio station. System menu - English Switching sources Adding the VS-2 to your TV Control selection. If TV Control is connected to your LIFESTYLE® system, the remote changes channels on the remote, you will see and hear the program on your TV screen goes blank. Selecting TV channels...
Lifestyle® VS-2 video enhancer - Owner's guide
Page 21
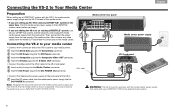
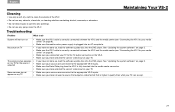
...media center (see "Connecting the VS-2 to your media center" on page 6). • Make sure the media center power supply is fully inserted into the DVD player. on your sources are connected to the appropriate VS-2 inputs. • Make sure you have not used a source that outputs a video format that... the software update disc into the media center connector. • Make sure you have not done so, load the software update disc into the DVD player. Troubleshooting Problem What to do not appear on my TV • Make sure your sources are connected to spill into an AC receptacle. ...
...media center (see "Connecting the VS-2 to your media center" on page 6). • Make sure the media center power supply is fully inserted into the DVD player. on your sources are connected to the appropriate VS-2 inputs. • Make sure you have not used a source that outputs a video format that... the software update disc into the media center connector. • Make sure you have not done so, load the software update disc into the DVD player. Troubleshooting Problem What to do not appear on my TV • Make sure your sources are connected to spill into an AC receptacle. ...

Installation guide
Page 1
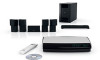
LIFESTYLE® DVD HOME ENTERTAINMENT SYSTEMS with VS-2 Video Enhancer Installation Guide Guía de instalación Notice d'installation
LIFESTYLE® DVD HOME ENTERTAINMENT SYSTEMS with VS-2 Video Enhancer Installation Guide Guía de instalación Notice d'installation
Installation guide
Page 2
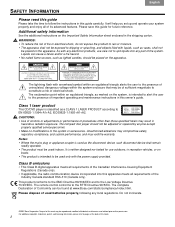
.... For additional copyright, trademark, patent, and licensing information, please refer to pages at www.Bose.com/static/compliance/index.html. Please save this guide carefully. Class 1 laser product This CD/DVD player is intended to alert the user to the presence of Conformity can cause a failure and/or a fire hazard. • No...
.... For additional copyright, trademark, patent, and licensing information, please refer to pages at www.Bose.com/static/compliance/index.html. Please save this guide carefully. Class 1 laser product This CD/DVD player is intended to alert the user to the presence of Conformity can cause a failure and/or a fire hazard. • No...

Installation guide
Page 5
... video switching. Refer to : • Quick Setup Guide - INTRODUCTION English DEsepuatsñcohl FItralniaçnaois Nederlands Svenska INTRODUCTION Welcome Thank you for purchasing a Bose® LIFESTYLE® DVD home entertainment system with specific setup questions. System Placement Explains how to create a home theater atmosphere (page 8). A visual guide that performs a custom sound calibration...
... video switching. Refer to : • Quick Setup Guide - INTRODUCTION English DEsepuatsñcohl FItralniaçnaois Nederlands Svenska INTRODUCTION Welcome Thank you for purchasing a Bose® LIFESTYLE® DVD home entertainment system with specific setup questions. System Placement Explains how to create a home theater atmosphere (page 8). A visual guide that performs a custom sound calibration...
Installation guide
Page 6
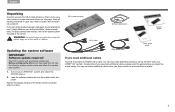
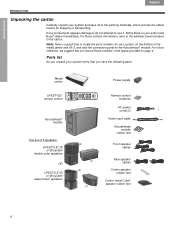
... materials, which provide the safest means for your system verify that you have the following parts. Notify Bose or your system and save all of 5 speakers: LIFESTYLE® 28 or 38 system double cube speakers OR LIFESTYLE 35 or 48 system Jewel Cube® speakers On Off Mute All Mute Stored CD·...;DVD FM·AM AUX TV CBL·SAT VCR Input On Off On On Off Off Library Settings...
... materials, which provide the safest means for your system verify that you have the following parts. Notify Bose or your system and save all of 5 speakers: LIFESTYLE® 28 or 38 system double cube speakers OR LIFESTYLE 35 or 48 system Jewel Cube® speakers On Off Mute All Mute Stored CD·...;DVD FM·AM AUX TV CBL·SAT VCR Input On Off On On Off Off Library Settings...

Installation guide
Page 8
..., or other ) can see the display window on the right side and allow enough room to lift up the front door and open the CD/DVD tray. • Make sure there is space within 6 feet (1.8 m) behind the media center or on the floor, or mount it 's a good idea to keep the... can reach from the VS-2 to the media center. • Make sure video cables from the media center connection panel to getting the full, rich Bose® quality sound this system is completely installed, it on a flat, stable surface. Make sure you how to place your system in a room to its...
..., or other ) can see the display window on the right side and allow enough room to lift up the front door and open the CD/DVD tray. • Make sure there is space within 6 feet (1.8 m) behind the media center or on the floor, or mount it 's a good idea to keep the... can reach from the VS-2 to the media center. • Make sure video cables from the media center connection panel to getting the full, rich Bose® quality sound this system is completely installed, it on a flat, stable surface. Make sure you how to place your system in a room to its...
Installation guide
Page 23
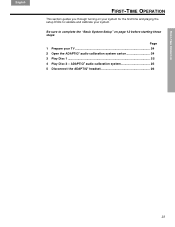
Be sure to validate and calibrate your TV 24 2 Open the ADAPTiQ® audio calibration system carton 24 3 Play Disc 1 25 4 Play Disc 2 - FIRST-TIME OPERATION FIRST-TIME OPERATION English DEsepuatsñcohl FItralniaçnaois Nederlands Svenska FIRST-TIME OPERATION This section guides you through turning on your system for the first time and playing the setup DVDs to complete the "Basic System Setup" on page 12 before starting these steps: Page 1 Prepare your system. ADAPTiQ® audio calibration system 25 5 Disconnect the ADAPTiQ® headset 26 23
Be sure to validate and calibrate your TV 24 2 Open the ADAPTiQ® audio calibration system carton 24 3 Play Disc 1 25 4 Play Disc 2 - FIRST-TIME OPERATION FIRST-TIME OPERATION English DEsepuatsñcohl FItralniaçnaois Nederlands Svenska FIRST-TIME OPERATION This section guides you through turning on your system for the first time and playing the setup DVDs to complete the "Basic System Setup" on page 12 before starting these steps: Page 1 Prepare your system. ADAPTiQ® audio calibration system 25 5 Disconnect the ADAPTiQ® headset 26 23

Installation guide
Page 25
... connection panel AUX L & R Headset 25 In this position, it can listen (as directed by Disc 2. Lift up ) and press Open/Close again. D. Put on the LIFESTYLE® remote. Follow the calibration process as you it rests above your room during the ADAPTiQ audio calibration process. Insert Disc 1 into the tray (label...;cohl FItralniaçnaois Nederlands Svenska FIRST-TIME OPERATION 3 Play Disc 1 A. B. Replace Disc 1 with Disc 2 in your ears. ADAPTiQ® audio calibration system A. D. Press CD/DVD on the headset so it is time to play Disc 2. 4 Play Disc 2 -
... connection panel AUX L & R Headset 25 In this position, it can listen (as directed by Disc 2. Lift up ) and press Open/Close again. D. Put on the LIFESTYLE® remote. Follow the calibration process as you it rests above your room during the ADAPTiQ audio calibration process. Insert Disc 1 into the tray (label...;cohl FItralniaçnaois Nederlands Svenska FIRST-TIME OPERATION 3 Play Disc 1 A. B. Replace Disc 1 with Disc 2 in your ears. ADAPTiQ® audio calibration system A. D. Press CD/DVD on the headset so it is time to play Disc 2. 4 Play Disc 2 -
Installation guide
Page 28
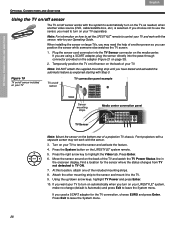
... of your TV to test the sensor and activate the feature. 4. Turn on your TV. At this location, attach one of another video source (DVD, cable/satellite box, etc.) is Automatic) and press Exit to leave the System menu. Using the up/down arrow keys, highlight TV Power and...sensor while someone else watches the TV screen. 1. Press the System button on the back of a projection TV chassis. Move the sensor around on the LIFESTYLE® system remote. 5. Attach the other mounting strip to the sensor and mount it to leave the System menu. 28 Press Enter. 6. OPTIONAL ...
... of your TV to test the sensor and activate the feature. 4. Turn on your TV. At this location, attach one of another video source (DVD, cable/satellite box, etc.) is Automatic) and press Exit to leave the System menu. Using the up/down arrow keys, highlight TV Power and...sensor while someone else watches the TV screen. 1. Press the System button on the back of a projection TV chassis. Move the sensor around on the LIFESTYLE® system remote. 5. Attach the other mounting strip to the sensor and mount it to leave the System menu. 28 Press Enter. 6. OPTIONAL ...

uMusic®+ guide
Page 4
... a computer usually include information (called ID3 tags), such as SKIPPED when a track on the display for this information when they are burned onto a CD, DVD, or DVD-R (not a DVD+R) and when the tracks are two types of the display, you can choose to cancel storing. CD 47% STORED STORING 4. When you may prefer... can store There are stored in the uMusic+ system. You may see AUDIO CD (or MP3 DISC) STORED, remove the disc. MP3s on CD or DVD MP3 tracks that may be on the media center display. Press the Store button on the lower right of discs you can use music management...
... a computer usually include information (called ID3 tags), such as SKIPPED when a track on the display for this information when they are burned onto a CD, DVD, or DVD-R (not a DVD+R) and when the tracks are two types of the display, you can choose to cancel storing. CD 47% STORED STORING 4. When you may prefer... can store There are stored in the uMusic+ system. You may see AUDIO CD (or MP3 DISC) STORED, remove the disc. MP3s on CD or DVD MP3 tracks that may be on the media center display. Press the Store button on the lower right of discs you can use music management...

uMusic®+ guide
Page 28
... new LIFESTYLE® system can enjoy your favorite music all around your home. Our Free Space® 51 environmental speakers and an amplifier provide great sound in up solution. Rather than run wires from your main system. TAB 5 TAB 6 TAB 7 TAB 8 FURTHER OPPORTUNITIES Music in the den watching a DVD. even outdoors. Bose offers...
... new LIFESTYLE® system can enjoy your favorite music all around your home. Our Free Space® 51 environmental speakers and an amplifier provide great sound in up solution. Rather than run wires from your main system. TAB 5 TAB 6 TAB 7 TAB 8 FURTHER OPPORTUNITIES Music in the den watching a DVD. even outdoors. Bose offers...
Personal® music center II - Owner's guide
Page 2
... setup. Other equipment you can also be found on LIFESTYLE® 38 or 48 systems, only). • Control of Bose passive speakers. • LIFESTYLE® Homewide powered speaker system. • Bose 3•2•1® DVD home entertainment systems. • The Bose Wave® music system. For that purpose, Bose offers a selection of new options for enjoying it . Fran...
... setup. Other equipment you can also be found on LIFESTYLE® 38 or 48 systems, only). • Control of Bose passive speakers. • LIFESTYLE® Homewide powered speaker system. • Bose 3•2•1® DVD home entertainment systems. • The Bose Wave® music system. For that purpose, Bose offers a selection of new options for enjoying it . Fran...
Personal® music center II - Owner's guide
Page 3
...you want 6 What appears on the display 7 Buttons to use while you listen 9 Listening to Your LIFESTYLE® System 10 Performance at your command 10 Playing stored music 10 Searching the library of stored music ...13 Using the radio 14 Playing a CD 15 Playing a DVD or VCD 17 Listening to other sources 18 Listening to Your Local Source 19 How a nearby... multiply your options 24 To add more rooms of sound 25 Bose® link products for expansion 25 Connecting another Bose® link system 25 Using other products for expansion 26 Reference...
...you want 6 What appears on the display 7 Buttons to use while you listen 9 Listening to Your LIFESTYLE® System 10 Performance at your command 10 Playing stored music 10 Searching the library of stored music ...13 Using the radio 14 Playing a CD 15 Playing a DVD or VCD 17 Listening to other sources 18 Listening to Your Local Source 19 How a nearby... multiply your options 24 To add more rooms of sound 25 Bose® link products for expansion 25 Connecting another Bose® link system 25 Using other products for expansion 26 Reference...
Personal® music center II - Owner's guide
Page 7
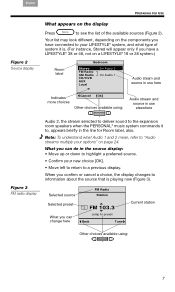
...• Move left to return to , appears briefly in the source display: • Move up or down to highlight a preferred source. • Confirm your LIFESTYLE® system, and what Audio 1 and 2 mean, refer to information about the source that is . (For instance, Stored will appear only if you can ....3 Jump to see the list of system it to a previous display. What you have a LIFESTYLE® 38 or 48, not on a LIFESTYLE® 18 or 28 system.) Room label Bedroom Stored FM Radio AM Radio CD/DVD AUX Local On Audio 2 On Audio 1 Audio steam and source in use elsewhere Figure 3 ...
...• Move left to return to , appears briefly in the source display: • Move up or down to highlight a preferred source. • Confirm your LIFESTYLE® system, and what Audio 1 and 2 mean, refer to information about the source that is . (For instance, Stored will appear only if you can ....3 Jump to see the list of system it to a previous display. What you have a LIFESTYLE® 38 or 48, not on a LIFESTYLE® 18 or 28 system.) Room label Bedroom Stored FM Radio AM Radio CD/DVD AUX Local On Audio 2 On Audio 1 Audio steam and source in use elsewhere Figure 3 ...
Personal® music center II - Owner's guide
Page 15
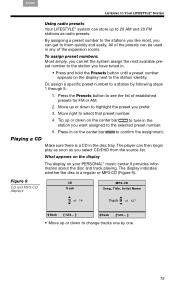
... to change tracks one . 15 What appears on the display The display on the display next to the stations you like most, you select CD/DVD from the source list. All of the presets can be used in any of established presets for FM or AM. 2. Tip up to 20 AM.... The display indicates whether the disc is a CD in the disc tray. English Español Français LISTENING TO YOUR LIFESTYLE® SYSTEM Using radio presets Your LIFESTYLE® system can store up or down on the center bar to tune in the station you want assigned to the selected...
... to change tracks one . 15 What appears on the display The display on the display next to the stations you like most, you select CD/DVD from the source list. All of the presets can be used in any of established presets for FM or AM. 2. Tip up to 20 AM.... The display indicates whether the disc is a CD in the disc tray. English Español Français LISTENING TO YOUR LIFESTYLE® SYSTEM Using radio presets Your LIFESTYLE® system can store up or down on the center bar to tune in the station you want assigned to the selected...

Personal® music center II - Owner's guide
Page 17
... to choose from your PERSONAL® music center II provides information about the DVD and indicates whether the disc is off, and begins video play ... Playing a DVD or VCD With a DVD or VCD loaded in the disc tray of the LIFESTYLE® system in on the center bar and hold . This turns on your... list of the track number. Begin play . Pause the sound... Move up or down on to the first digit of sources. What appears on the display The display on the player, if it is a DVD or...
... to choose from your PERSONAL® music center II provides information about the DVD and indicates whether the disc is off, and begins video play ... Playing a DVD or VCD With a DVD or VCD loaded in the disc tray of the LIFESTYLE® system in on the center bar and hold . This turns on your... list of the track number. Begin play . Pause the sound... Move up or down on to the first digit of sources. What appears on the display The display on the player, if it is a DVD or...

Personal® music center II - Owner's guide
Page 18
...... (silences temporarily) Select a chapter (track) by number... Then press again. Press . Press and hold . Before the main attraction begins to your LIFESTYLE® system on or off. • For a video component, use numeric entry as you can select and operate the additional source connected using these ...in the source list of the DVD... Or use the up on the system. Then move left arrow button to move up to 5 digits. • For other sources... Tip down to press Play a second or even third time. LISTENING TO YOUR LIFESTYLE® SYSTEM Français...
...... (silences temporarily) Select a chapter (track) by number... Then press again. Press . Press and hold . Before the main attraction begins to your LIFESTYLE® system on or off. • For a video component, use numeric entry as you can select and operate the additional source connected using these ...in the source list of the DVD... Or use the up on the system. Then move left arrow button to move up to 5 digits. • For other sources... Tip down to press Play a second or even third time. LISTENING TO YOUR LIFESTYLE® SYSTEM Français...


