
The Bose® Lifestyle® amplifier - Owner's guide
Page 5
...-room interface 7 Connecting the Lifestyle® stereo amplifier to a Lifestyle® media center 9 Setting up the remote control 10 Setting Zone 2 Protocol 10 Connecting the Lifestyle® stereo amplifier to a Model 20 music center 11 Connecting the Lifestyle® stereo amplifier to a Model 5 music center 13 Connecting speakers to your Lifestyle® stereo amplifier 14 Checking...
...-room interface 7 Connecting the Lifestyle® stereo amplifier to a Lifestyle® media center 9 Setting up the remote control 10 Setting Zone 2 Protocol 10 Connecting the Lifestyle® stereo amplifier to a Model 20 music center 11 Connecting the Lifestyle® stereo amplifier to a Model 5 music center 13 Connecting speakers to your Lifestyle® stereo amplifier 14 Checking...

The Bose® Lifestyle® amplifier - Owner's guide
Page 6
... 240V power cord for use with a simple solution when you want to add Bose® non-powered environmental speakers or Bose non-powered accessory speakers to see if you can enjoy Bose quality sound and Lifestyle® system convenience in your product. Using the wrong voltage setting may need ...panel of the product. CAUTION: If you check the position of the shipping carton 30-ft audio input cable PN197406 Lifestyle® stereo amplifier Owner's guide Power cord* USA/Canada (120V) * The Lifestyle® stereo amplifier includes a 120V AC (mains) power cord for...
... 240V power cord for use with a simple solution when you want to add Bose® non-powered environmental speakers or Bose non-powered accessory speakers to see if you can enjoy Bose quality sound and Lifestyle® system convenience in your product. Using the wrong voltage setting may need ...panel of the product. CAUTION: If you check the position of the shipping carton 30-ft audio input cable PN197406 Lifestyle® stereo amplifier Owner's guide Power cord* USA/Canada (120V) * The Lifestyle® stereo amplifier includes a 120V AC (mains) power cord for...

The Bose® Lifestyle® amplifier - Owner's guide
Page 7
...; stereo amplifier and mount it according to the following guidelines when selecting a location for your Lifestyle® system or the accessory speakers, consider the following guidelines. If adequate ventilation is not provided, the amplifier will automatically protect itself by reducing its... feet (2.5 m) of a power outlet. • Make sure that have hazards concealed behind them, such as the finished surface of the supplied 30-foot audio input cable. • Place the amplifier in an area where the maximum ambient temperature is installed on a shelf, or in a...
...; stereo amplifier and mount it according to the following guidelines when selecting a location for your Lifestyle® system or the accessory speakers, consider the following guidelines. If adequate ventilation is not provided, the amplifier will automatically protect itself by reducing its... feet (2.5 m) of a power outlet. • Make sure that have hazards concealed behind them, such as the finished surface of the supplied 30-foot audio input cable. • Place the amplifier in an area where the maximum ambient temperature is installed on a shelf, or in a...

The Bose® Lifestyle® amplifier - Owner's guide
Page 10
The Personal music center allows you must follow the procedure for setting up to four sets of speakers. If two or more than one room of Bose® powered speakers placed in individual rooms. These rooms are connected to your system, the Personal music center displays ROOM and HOUSE buttons...center, you to control up the Personal music center for the first time. Setting Up Your Lifestyle® Stereo Amplifier Figure 7 Sample display for a tworoom system Operating speakers in other rooms with the Personal® music center Systems that share a source Press the HOUSE button...
The Personal music center allows you must follow the procedure for setting up to four sets of speakers. If two or more than one room of Bose® powered speakers placed in individual rooms. These rooms are connected to your system, the Personal music center displays ROOM and HOUSE buttons...center, you to control up the Personal music center for the first time. Setting Up Your Lifestyle® Stereo Amplifier Figure 7 Sample display for a tworoom system Operating speakers in other rooms with the Personal® music center Systems that share a source Press the HOUSE button...

The Bose® Lifestyle® amplifier - Owner's guide
Page 11
... (Figure 8). 2. Figure 8 Cable connections between the Lifestyle® media center and the Lifestyle® stereo amplifier Lifestyle® SA-1 stereo amplifier rear panel Lifestyle® media center rear panel 30-ft audio input cable (supplied) AM262840_00_V.pdf January 4,... 2002 9 DO NOT plug the amplifier into the L (left) INPUT jack. Insert the single-connector end of the audio input cable into the R (right) INPUT jack of the amplifier. 3. Insert the red RCA piggyback connector into the SPEAKER...
... (Figure 8). 2. Figure 8 Cable connections between the Lifestyle® media center and the Lifestyle® stereo amplifier Lifestyle® SA-1 stereo amplifier rear panel Lifestyle® media center rear panel 30-ft audio input cable (supplied) AM262840_00_V.pdf January 4,... 2002 9 DO NOT plug the amplifier into the L (left) INPUT jack. Insert the single-connector end of the audio input cable into the R (right) INPUT jack of the amplifier. 3. Insert the red RCA piggyback connector into the SPEAKER...

The Bose® Lifestyle® amplifier - Owner's guide
Page 13
...to a Model 20 music center ® Figure 10 Cable connections between the Model 20 music center and the Lifestyle® stereo amplifier CAUTION: Before making connections, turn the Lifestyle® system off and disconnect the music center from the AC (mains) power outlet. Insert the red RCA...cable, insert the 3.5 mm mini-plug into the SYSTEM CONTROL jack on the rear panel of the amplifier. SPEAKER OUTPUTS INPUT Model 20 music center rear panel 30-ft audio input cable (supplied) AM262840_00_V.pdf January 4, 2002 11 Insert the single multi-pin connector at one end ...
...to a Model 20 music center ® Figure 10 Cable connections between the Model 20 music center and the Lifestyle® stereo amplifier CAUTION: Before making connections, turn the Lifestyle® system off and disconnect the music center from the AC (mains) power outlet. Insert the red RCA...cable, insert the 3.5 mm mini-plug into the SYSTEM CONTROL jack on the rear panel of the amplifier. SPEAKER OUTPUTS INPUT Model 20 music center rear panel 30-ft audio input cable (supplied) AM262840_00_V.pdf January 4, 2002 11 Insert the single multi-pin connector at one end ...

The Bose® Lifestyle® amplifier - Owner's guide
Page 15
...center and the Lifestyle® stereo amplifier Model 5 music center rear panel Lifestyle® stereo...+- When adding the Lifestyle® amplifi...speakers from both FIXED OUTPUT jacks. 4. CAUTION: DO NOT connect the audio input cable for the Lifestyle® stereo amplifier to the SPEAKERS A or SPEAKERS...Lifestyle® Stereo Amplifier Connecting the Lifestyle® stereo amplifier to a Model 5 music center In systems using a Model 5 music center, home theater speakers... mini-plug L R A B SPEAKERS OUTPUT FIXED REC PLAY AUX TAPE INPUT L R ...
...center and the Lifestyle® stereo amplifier Model 5 music center rear panel Lifestyle® stereo...+- When adding the Lifestyle® amplifi...speakers from both FIXED OUTPUT jacks. 4. CAUTION: DO NOT connect the audio input cable for the Lifestyle® stereo amplifier to the SPEAKERS A or SPEAKERS...Lifestyle® Stereo Amplifier Connecting the Lifestyle® stereo amplifier to a Model 5 music center In systems using a Model 5 music center, home theater speakers... mini-plug L R A B SPEAKERS OUTPUT FIXED REC PLAY AUX TAPE INPUT L R ...

The Bose® Lifestyle® amplifier - Owner's guide
Page 16
...control battery cover and locate the miniature switches (Figure 13). 2. ON K40 l 2345678 Connecting speakers to your Lifestyle® stereo amplifier CAUTION: DO NOT connect the amplifier to powered speakers of two insulated wires. The plain wire should be connected to the negative (- Insert the wire...cause damage to the equipment. or black) terminal. Slide switch 5 down (off) and 6 up a second RC-5 remote control to operate your Lifestyle® stereo amplifier. 1. Speaker cable consists of any make or model, nor to any amplified music sources. Be sure that the...
...control battery cover and locate the miniature switches (Figure 13). 2. ON K40 l 2345678 Connecting speakers to your Lifestyle® stereo amplifier CAUTION: DO NOT connect the amplifier to powered speakers of two insulated wires. The plain wire should be connected to the negative (- Insert the wire...cause damage to the equipment. or black) terminal. Slide switch 5 down (off) and 6 up a second RC-5 remote control to operate your Lifestyle® stereo amplifier. 1. Speaker cable consists of any make or model, nor to any amplified music sources. Be sure that the...

The Bose® Lifestyle® amplifier - Owner's guide
Page 18
...; stereo amplifier, follow the guidelines below. Protecting outdoor wiring Although some Bose® speakers are correct. If the problem still exists, contact your Lifestyle® system after the wires are in working order. • Be sure a music source is selected (AM, FM, CD, ...on page 14. 16 January 4, 2002 AM262840_00_V.pdf It is commonly available at both ends. • See "Connecting speakers to protect speaker wire connections. Maintaining Your Lifestyle® Stereo Amplifier Cleaning the amplifier The amplifier, which is designed only for indoor use a...
...; stereo amplifier, follow the guidelines below. Protecting outdoor wiring Although some Bose® speakers are correct. If the problem still exists, contact your Lifestyle® system after the wires are in working order. • Be sure a music source is selected (AM, FM, CD, ...on page 14. 16 January 4, 2002 AM262840_00_V.pdf It is commonly available at both ends. • See "Connecting speakers to protect speaker wire connections. Maintaining Your Lifestyle® Stereo Amplifier Cleaning the amplifier The amplifier, which is designed only for indoor use a...

The Bose® Lifestyle® amplifier - Owner's guide
Page 19
... the volume setting to see if the level returns to Bose. AM262840_00_V.pdf January 4, 2002 17 If the speaker still does not play, the problem is in that speaker and the amplifier. Interference • Make sure the speaker wires are using an RC-20 or RC-5 remote control..., make sure the remote control switch settings are correct. For more informa- Warranty period The Lifestyle® stereo amplifier is • Check the speaker wire connections. If the speaker does not play, the problem is firmly inserted in the SYSTEM CONTROL 2 jack. • ...
... the volume setting to see if the level returns to Bose. AM262840_00_V.pdf January 4, 2002 17 If the speaker still does not play, the problem is in that speaker and the amplifier. Interference • Make sure the speaker wires are using an RC-20 or RC-5 remote control..., make sure the remote control switch settings are correct. For more informa- Warranty period The Lifestyle® stereo amplifier is • Check the speaker wire connections. If the speaker does not play, the problem is firmly inserted in the SYSTEM CONTROL 2 jack. • ...

Owner's guide
Page 5
...Using two listening zones 30 Changing the house code settings 32 Taking care of your Lifestyle® 30 system 33 Troubleshooting ...34 Warranty period ...35 Customer service ...35 Product Information Technical information 36 Accessories ...36 Index ...37 Bose® Corporation inside... We suggest you begin ...4 Unpacking the carton 5 Selecting the locations for your Lifestyle® 30 Series II system 6 Connecting the speakers and Lifestyle® music center 9 Connecting your Lifestyle® 30 system 22 Operating the special features 23 Chimes ...23 Listening to digital sound 24...
...Using two listening zones 30 Changing the house code settings 32 Taking care of your Lifestyle® 30 system 33 Troubleshooting ...34 Warranty period ...35 Customer service ...35 Product Information Technical information 36 Accessories ...36 Index ...37 Bose® Corporation inside... We suggest you begin ...4 Unpacking the carton 5 Selecting the locations for your Lifestyle® 30 Series II system 6 Connecting the speakers and Lifestyle® music center 9 Connecting your Lifestyle® 30 system 22 Operating the special features 23 Chimes ...23 Listening to digital sound 24...

Owner's guide
Page 6
... sources such as two or even single-channel PCM and Dolby Digital bitstreams, and helps to five independent speakers. This feature is equipped with : • Digital-audio bitstreams. Look for purchasing the Bose® Lifestyle® 30 Series II system. The result is enhanced by a loud special effect (e.g., a crash or explosion). up to five discrete audio...
... sources such as two or even single-channel PCM and Dolby Digital bitstreams, and helps to five independent speakers. This feature is equipped with : • Digital-audio bitstreams. Look for purchasing the Bose® Lifestyle® 30 Series II system. The result is enhanced by a loud special effect (e.g., a crash or explosion). up to five discrete audio...

Owner's guide
Page 7
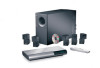
...and packs for Europe, UK/Singapore, and Australia are shown below. Notify Bose® or your Lifestyle® 30 system contains the parts identified in the spaces provided on your Lifestyle® 30 system. WARNING: The Acoustimass module weighs 33 pounds (15 kg). Dual ...unpack your Lifestyle® 30 Series II system: Acoustimass module • Lifestyle® music center • AC power (mains) pack* • FM antenna • AM loop antenna • Antenna base • Remote control • 3 AA batteries • Acoustimass module • 5 Jewel Cube® speakers • ...
...and packs for Europe, UK/Singapore, and Australia are shown below. Notify Bose® or your Lifestyle® 30 system contains the parts identified in the spaces provided on your Lifestyle® 30 system. WARNING: The Acoustimass module weighs 33 pounds (15 kg). Dual ...unpack your Lifestyle® 30 Series II system: Acoustimass module • Lifestyle® music center • AC power (mains) pack* • FM antenna • AM loop antenna • Antenna base • Remote control • 3 AA batteries • Acoustimass module • 5 Jewel Cube® speakers • ...

Owner's guide
Page 8
... a stable and level surface for your Lifestyle® 30 Series II system When you can cause these guidelines to select locations that the sound does not become too separated from your Lifestyle® 30 system (Figures 2 and 3). Left and right front speakers The sound from the left and right front speakers should appear to come directly from center...
... a stable and level surface for your Lifestyle® 30 Series II system When you can cause these guidelines to select locations that the sound does not become too separated from your Lifestyle® 30 system (Figures 2 and 3). Left and right front speakers The sound from the left and right front speakers should appear to come directly from center...

Owner's guide
Page 9
...50 feet (15.2 m) distance from the Acoustimass® module. Figure 2 Recommended front speaker locations Left front Center ® Setting Up Right front Figure 3 Speaker placement Surround speakers The surround (rear) speakers create an area of the listener. Direct the cubes so that you cannot pinpoint the exact... location of your room. Place the speakers at ear height or higher, if possible. 2. Left Center Right Acoustimass front front module Left surround Right surround 1. AM199736_06_V....
...50 feet (15.2 m) distance from the Acoustimass® module. Figure 2 Recommended front speaker locations Left front Center ® Setting Up Right front Figure 3 Speaker placement Surround speakers The surround (rear) speakers create an area of the listener. Direct the cubes so that you cannot pinpoint the exact... location of your room. Place the speakers at ear height or higher, if possible. 2. Left Center Right Acoustimass front front module Left surround Right surround 1. AM199736_06_V....

Owner's guide
Page 10
..., VCR, DVD player, etc.) to allow furniture or drapes to connect all of your dealer or call Bose®. 3. under a table, behind a sofa. Do not allow for the module, place the four self... front wall in electronic circuitry, and should not store tapes directly on either end, as the front speakers (see your components, see the example along the wall to the same end of the audio input... module at equal distances from any two walls or from the TV. 1. Place the Acoustimass module within 30 feet (9.1 m) of the Acoustimass module (the length of the room as shown by the last two views...
..., VCR, DVD player, etc.) to allow furniture or drapes to connect all of your dealer or call Bose®. 3. under a table, behind a sofa. Do not allow for the module, place the four self... front wall in electronic circuitry, and should not store tapes directly on either end, as the front speakers (see your components, see the example along the wall to the same end of the audio input... module at equal distances from any two walls or from the TV. 1. Place the Acoustimass module within 30 feet (9.1 m) of the Acoustimass module (the length of the room as shown by the last two views...
Owner's guide
Page 11
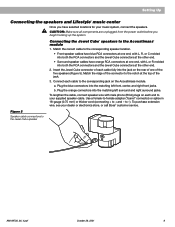
...both the RCA connectors and the Jewel Cube connectors at the other end. 2. Setting Up Connecting the speakers and Lifestyle® music center Once you begin hooking up the system. a. Figure 5 Speaker cable connections to + and - Connect each end to the Acoustimass® module 1. Plug the blue...female adapter ("barrel" connector) or splice in 18-gauge (0.75 mm2) or thicker cord (connecting + to the Jewel Cube speaker AM199736_06_V.pdf October 28, 2001 9 Connecting the Jewel Cube® speakers to your dealer or electronics store, or call Bose® customer service.
...both the RCA connectors and the Jewel Cube connectors at the other end. 2. Setting Up Connecting the speakers and Lifestyle® music center Once you begin hooking up the system. a. Figure 5 Speaker cable connections to + and - Connect each end to the Acoustimass® module 1. Plug the blue...female adapter ("barrel" connector) or splice in 18-gauge (0.75 mm2) or thicker cord (connecting + to the Jewel Cube speaker AM199736_06_V.pdf October 28, 2001 9 Connecting the Jewel Cube® speakers to your dealer or electronics store, or call Bose® customer service.
Owner's guide
Page 12
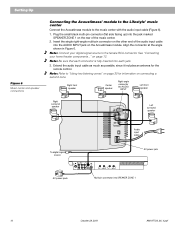
... digital signal source to the female RCA connector. Plug the small black multi-pin connector (flat side facing up) into the jack marked SPEAKER ZONE 1 on the rear of the audio input cable into the AUDIO INPUT jack on the Acoustimass module. Align the connector at the ...angle shown in Figure 6. Setting Up Figure 6 Music center and speaker connections Connecting the Acoustimass® module to the Lifestyle® music center Connect the Acoustimass module to "Using two listening zones" on page 30 for the remote control. Insert the single right-angle multi-pin connector on...
... digital signal source to the female RCA connector. Plug the small black multi-pin connector (flat side facing up) into the jack marked SPEAKER ZONE 1 on the rear of the audio input cable into the AUDIO INPUT jack on the Acoustimass module. Align the connector at the ...angle shown in Figure 6. Setting Up Figure 6 Music center and speaker connections Connecting the Acoustimass® module to the Lifestyle® music center Connect the Acoustimass module to "Using two listening zones" on page 30 for the remote control. Insert the single right-angle multi-pin connector on...

Owner's guide
Page 15
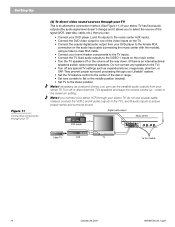
...as the switching center to -male RCA cable. A second option is an internal/external speakers switch, select external speakers. If no valid digital signal is best to connect components directly to the Lifestyle® 30 music center, and select the source from the DVD player (or other digital device)... the middle position (neutral). • Set TV to the AUX inputs. It is r eceived, it selects the backup analog signal being sent to the Lifestyle® 30 system inputs DVD player L R V Music center Cable TV L TAPE IN RL R TAPE OUT L L R R V VCR To the module TV ...
...as the switching center to -male RCA cable. A second option is an internal/external speakers switch, select external speakers. If no valid digital signal is best to connect components directly to the Lifestyle® 30 music center, and select the source from the DVD player (or other digital device)... the middle position (neutral). • Set TV to the AUX inputs. It is r eceived, it selects the backup analog signal being sent to the Lifestyle® 30 system inputs DVD player L R V Music center Cable TV L TAPE IN RL R TAPE OUT L L R R V VCR To the module TV ...
Owner's guide
Page 16
Do not connect any special TV settings such as a second choice, you connect your stereo VCR through your Lifestyle® system. • Set the TV balance control to the center of the video inputs on the TV. • Connect the coaxial digital audio output ... components to the TV inputs. • Connect the TV fixed audio outputs to the VIDEO 1 inputs on the music center. • Turn the TV speakers off any speakers to the TV.) • Turn off or the volume all the way down. (If there is an alternative connection method. (See Figure 11.) If...
Do not connect any special TV settings such as a second choice, you connect your stereo VCR through your Lifestyle® system. • Set the TV balance control to the center of the video inputs on the TV. • Connect the coaxial digital audio output ... components to the TV inputs. • Connect the TV fixed audio outputs to the VIDEO 1 inputs on the music center. • Turn the TV speakers off any speakers to the TV.) • Turn off or the volume all the way down. (If there is an alternative connection method. (See Figure 11.) If...


