
The Bose® Lifestyle® amplifier - Owner's guide
Page 5
... remote control 10 Setting Zone 2 Protocol 10 Connecting the Lifestyle® stereo amplifier to a Model 20 music center 11 Connecting the Lifestyle® stereo amplifier to a Model 5 music center 13 Connecting speakers to your Lifestyle® stereo amplifier 14 Checking to see if you keep your Lifestyle® stereo amplifier. AM262840_00_V.pdf January...
... remote control 10 Setting Zone 2 Protocol 10 Connecting the Lifestyle® stereo amplifier to a Model 20 music center 11 Connecting the Lifestyle® stereo amplifier to a Model 5 music center 13 Connecting speakers to your Lifestyle® stereo amplifier 14 Checking to see if you keep your Lifestyle® stereo amplifier. AM262840_00_V.pdf January...

The Bose® Lifestyle® amplifier - Owner's guide
Page 6
... transport this product. Contact your product. Figure 1 Contents of the shipping carton 30-ft audio input cable PN197406 Lifestyle® stereo amplifier Owner's guide Power cord* USA/Canada (120V) * The Lifestyle® stereo amplifier includes a 120V AC (mains) power cord for...Australia (240V) plug adaptor Note: Use only the power cord supplied with Bose non-powered environmental speakers or Bose non-powered accessory speakers ONLY. If any way. See "Checking to see if you have a dual voltage Lifestyle® ampli- fier" on page 15 for instructions on the ...
... transport this product. Contact your product. Figure 1 Contents of the shipping carton 30-ft audio input cable PN197406 Lifestyle® stereo amplifier Owner's guide Power cord* USA/Canada (120V) * The Lifestyle® stereo amplifier includes a 120V AC (mains) power cord for...Australia (240V) plug adaptor Note: Use only the power cord supplied with Bose non-powered environmental speakers or Bose non-powered accessory speakers ONLY. If any way. See "Checking to see if you have a dual voltage Lifestyle® ampli- fier" on page 15 for instructions on the ...

The Bose® Lifestyle® amplifier - Owner's guide
Page 7
...; Stereo Amplifier Selecting a location for your Lifestyle® stereo amplifier Select a location for your amplifier: • Locate the amplifier indoors and within the reach of the supplied 30-foot audio input cable. • Place the amplifier in ...heat-sensitive surface, such as electrical wiring or plumbing. The amplifier must be situated close to either your Lifestyle® system or the accessory speakers, consider the following guidelines. It is neither designed nor tested for recommended mounting hardware. If adequate ventilation is not ...
...; Stereo Amplifier Selecting a location for your Lifestyle® stereo amplifier Select a location for your amplifier: • Locate the amplifier indoors and within the reach of the supplied 30-foot audio input cable. • Place the amplifier in ...heat-sensitive surface, such as electrical wiring or plumbing. The amplifier must be situated close to either your Lifestyle® system or the accessory speakers, consider the following guidelines. It is neither designed nor tested for recommended mounting hardware. If adequate ventilation is not ...

The Bose® Lifestyle® amplifier - Owner's guide
Page 10
...music center allows you to control up the Personal music center for a two-room system. Setting Up Your Lifestyle® Stereo Amplifier Figure 7 Sample display for a tworoom system Operating speakers in other rooms with the Personal® music center Systems that share a source Press the HOUSE button to... the procedure for setting up to four sets of Bose® powered speakers placed in more than one room of speakers. Figure 7 shows an example display for the first time. If two or more rooms are connected to your Lifestyle® system owner's guide for more information on ...
...music center allows you to control up the Personal music center for a two-room system. Setting Up Your Lifestyle® Stereo Amplifier Figure 7 Sample display for a tworoom system Operating speakers in other rooms with the Personal® music center Systems that share a source Press the HOUSE button to... the procedure for setting up to four sets of Bose® powered speakers placed in more than one room of speakers. Figure 7 shows an example display for the first time. If two or more rooms are connected to your Lifestyle® system owner's guide for more information on ...

The Bose® Lifestyle® amplifier - Owner's guide
Page 11
... the audio input cable into the SPEAKER ZONES 2 output jack on the rear panel of the media center (Figure 8). 2. Figure 8 Cable connections between the Lifestyle® media center and the Lifestyle® stereo amplifier Lifestyle® SA-1 stereo amplifier rear panel Lifestyle® media center rear panel 30-ft audio input cable (supplied) AM262840_00_V...
... the audio input cable into the SPEAKER ZONES 2 output jack on the rear panel of the media center (Figure 8). 2. Figure 8 Cable connections between the Lifestyle® media center and the Lifestyle® stereo amplifier Lifestyle® SA-1 stereo amplifier rear panel Lifestyle® media center rear panel 30-ft audio input cable (supplied) AM262840_00_V...

The Bose® Lifestyle® amplifier - Owner's guide
Page 13
SPEAKER OUTPUTS INPUT Model 20 music center rear panel 30-ft audio input cable (supplied) AM262840_00_V.pdf January 4, 2002 11 At the other connections. 1. Insert the single multi-pin connector at one end of the ... all other end of the audio input cable, insert the 3.5 mm mini-plug into the SPEAKER ZONES 2 output jack on the rear panel of the music center (Figure 10). 2. Setting Up Your Lifestyle® Stereo Amplifier Connecting the Lifestyle® stereo amplifier to a Model 20 music center ® Figure 10 Cable...
SPEAKER OUTPUTS INPUT Model 20 music center rear panel 30-ft audio input cable (supplied) AM262840_00_V.pdf January 4, 2002 11 At the other connections. 1. Insert the single multi-pin connector at one end of the ... all other end of the audio input cable, insert the 3.5 mm mini-plug into the SPEAKER ZONES 2 output jack on the rear panel of the music center (Figure 10). 2. Setting Up Your Lifestyle® Stereo Amplifier Connecting the Lifestyle® stereo amplifier to a Model 20 music center ® Figure 10 Cable...

The Bose® Lifestyle® amplifier - Owner's guide
Page 15
...AUX TAPE INPUT L R VIDEO SOUND AM LOOP 1 SYSTEM CONTROL 2 ~ POWER 12VAC IN 1.0A ANTENNA SEE INSTRUCTION MANUAL Fixed speaker outputs 30-ft audio input cable (supplied) Acoustimass module cable AM262840_00_V.pdf January 4, 2002 13 Insert the red RCA connector of the audio input... stereo amplifier to a Model 5 music center In systems using a Model 5 music center, home theater speakers are connected to the SPEAKERS A or SPEAKERS B outputs. When adding the Lifestyle® amplifier, you have completed all other end of the audio input cable, insert the 3.5 mm ...
...AUX TAPE INPUT L R VIDEO SOUND AM LOOP 1 SYSTEM CONTROL 2 ~ POWER 12VAC IN 1.0A ANTENNA SEE INSTRUCTION MANUAL Fixed speaker outputs 30-ft audio input cable (supplied) Acoustimass module cable AM262840_00_V.pdf January 4, 2002 13 Insert the red RCA connector of the audio input... stereo amplifier to a Model 5 music center In systems using a Model 5 music center, home theater speakers are connected to the SPEAKERS A or SPEAKERS B outputs. When adding the Lifestyle® amplifier, you have completed all other end of the audio input cable, insert the 3.5 mm ...

The Bose® Lifestyle® amplifier - Owner's guide
Page 16
...any make or model, nor to the equipment. or black) terminal. Insert the wire coming from the speaker's negative (-) terminal into the red jack and release the tab. Setting Up Your Lifestyle® Stereo Amplifier ® Figure 13 RC-5 remote switch settings Setting up the RC-5 remote control...always be connected to the L output. One wire is connected to your Lifestyle® system owner's guide for more information on page 18. • Connect the right speaker cable to the negative (- Be sure that the speaker positioned on the back of two insulated wires. Make sure that it ...
...any make or model, nor to the equipment. or black) terminal. Insert the wire coming from the speaker's negative (-) terminal into the red jack and release the tab. Setting Up Your Lifestyle® Stereo Amplifier ® Figure 13 RC-5 remote switch settings Setting up the RC-5 remote control...always be connected to the L output. One wire is connected to your Lifestyle® system owner's guide for more information on page 18. • Connect the right speaker cable to the negative (- Be sure that the speaker positioned on the back of two insulated wires. Make sure that it ...

The Bose® Lifestyle® amplifier - Owner's guide
Page 18
... and are firmly connected at hardware stores. You may become dusty over time. Protecting outdoor wiring Although some Bose® speakers are in the product packaging for correct phone numbers. Maintaining Your Lifestyle® Stereo Amplifier Cleaning the amplifier The amplifier, which is designed only for indoor use...
... and are firmly connected at hardware stores. You may become dusty over time. Protecting outdoor wiring Although some Bose® speakers are in the product packaging for correct phone numbers. Maintaining Your Lifestyle® Stereo Amplifier Cleaning the amplifier The amplifier, which is designed only for indoor use...

The Bose® Lifestyle® amplifier - Owner's guide
Page 19
... was connected to the address list enclosed in the speaker. Details of the coverage are connected at all "Zone 2 Protocol" in your Lifestyle® stereo amplifier" on the wrong speakers. • Check the speaker cable connections to be sure the cable connected to ..."Legacy". Disconnect the other end to + and weak - Right and left in solving problems, contact Bose® Customer Service. tion...
... was connected to the address list enclosed in the speaker. Details of the coverage are connected at all "Zone 2 Protocol" in your Lifestyle® stereo amplifier" on the wrong speakers. • Check the speaker cable connections to be sure the cable connected to ..."Legacy". Disconnect the other end to + and weak - Right and left in solving problems, contact Bose® Customer Service. tion...

Owner's guide
Page 5
... begin ...4 Unpacking the carton 5 Selecting the locations for your Lifestyle® 30 Series II system 6 Connecting the speakers and Lifestyle® music center 9 Connecting your home theater components to the Lifestyle® 30 system 12 Connecting the antennas 16 Installing the batteries in the ... Taking care of your Lifestyle® 30 system 33 Troubleshooting ...34 Warranty period ...35 Customer service ...35 Product Information Technical information 36 Accessories ...36 Index ...37 Bose® Corporation inside back cover For your Lifestyle® 30 system 22 Operating the ...
... begin ...4 Unpacking the carton 5 Selecting the locations for your Lifestyle® 30 Series II system 6 Connecting the speakers and Lifestyle® music center 9 Connecting your home theater components to the Lifestyle® 30 system 12 Connecting the antennas 16 Installing the batteries in the ... Taking care of your Lifestyle® 30 system 33 Troubleshooting ...34 Warranty period ...35 Customer service ...35 Product Information Technical information 36 Accessories ...36 Index ...37 Bose® Corporation inside back cover For your Lifestyle® 30 system 22 Operating the ...

Owner's guide
Page 6
... and six-disc CD changer • Five tiny Jewel Cube® speakers and a hideaway Acoustimass® module • Inputs for two video sound sources, a digital sound source, and a tape deck (or other auxiliary source) • Capability for purchasing the Bose® Lifestyle® 30 Series II system. Look for the symbol 1 or the terms Dolby Digital...
... and six-disc CD changer • Five tiny Jewel Cube® speakers and a hideaway Acoustimass® module • Inputs for two video sound sources, a digital sound source, and a tape deck (or other auxiliary source) • Capability for purchasing the Bose® Lifestyle® 30 Series II system. Look for the symbol 1 or the terms Dolby Digital...

Owner's guide
Page 7
... Bose® or your system. WARNING: The Acoustimass module weighs 33 pounds (15 kg). The power cords and packs for possible future use the system. CAUTION: Ensure the three shipping screws on your Lifestyle® 30 Series II system: Acoustimass module • Lifestyle...® music center • AC power (mains) pack* • FM antenna • AM loop antenna • Antenna base • Remote control • 3 AA batteries • Acoustimass module • 5 Jewel Cube® speakers •...
... Bose® or your system. WARNING: The Acoustimass module weighs 33 pounds (15 kg). The power cords and packs for possible future use the system. CAUTION: Ensure the three shipping screws on your Lifestyle® 30 Series II system: Acoustimass module • Lifestyle...® music center • AC power (mains) pack* • FM antenna • AM loop antenna • Antenna base • Remote control • 3 AA batteries • Acoustimass module • 5 Jewel Cube® speakers •...

Owner's guide
Page 8
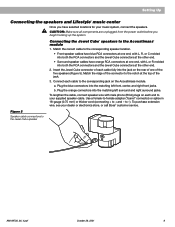
...the TV). 3. Place them close to the size of the visual image (Figure 2). 1. Direct each speaker forward. CAUTION: Choose a stable and level surface for your Lifestyle® 30 Series II system When you can cause these guidelines to come directly from the edge of the TV screen. Align ...the speaker with the center of the TV screen. 2. Note: If you . Center speaker The sound from the center speaker should seem to appear ...
...the TV). 3. Place them close to the size of the visual image (Figure 2). 1. Direct each speaker forward. CAUTION: Choose a stable and level surface for your Lifestyle® 30 Series II system When you can cause these guidelines to come directly from the edge of the TV screen. Align ...the speaker with the center of the TV screen. 2. Note: If you . Center speaker The sound from the center speaker should seem to appear ...

Owner's guide
Page 9
...so that you cannot pinpoint the exact location of the listener. Figure 2 Recommended front speaker locations Left front Center ® Setting Up Right front Figure 3 Speaker placement Surround speakers The surround (rear) speakers create an area of your room. The surround cables allow up to the front ...and back of the sound source (Figure 3). Place the speakers at ear height or higher, if possible. 2....
...so that you cannot pinpoint the exact location of the listener. Figure 2 Recommended front speaker locations Left front Center ® Setting Up Right front Figure 3 Speaker placement Surround speakers The surround (rear) speakers create an area of your room. The surround cables allow up to the front ...and back of the sound source (Figure 3). Place the speakers at ear height or higher, if possible. 2....

Owner's guide
Page 10
... for the music center. 1. CAUTION: Do not cover the ventilation openings of the audio input cable, speaker cables, and an AC power (mains) outlet. 4. If you have selected a position for the built...RIGHT REAR LEFT REAR RIGHT FRONT CENTER LEFT FRONT CUOBUETSPPUETASKTEORS ® 5. Place the Acoustimass module within 30 feet (9.1 m) of the Acoustimass module (the length of the room as the TV, or ...not be blocked. Place the Acoustimass module along the wall to your dealer or call Bose®. 3. Do not allow for the Acoustimass module. Setting Up Figure 4 Acoustimass module...
... for the music center. 1. CAUTION: Do not cover the ventilation openings of the audio input cable, speaker cables, and an AC power (mains) outlet. 4. If you have selected a position for the built...RIGHT REAR LEFT REAR RIGHT FRONT CENTER LEFT FRONT CUOBUETSPPUETASKTEORS ® 5. Place the Acoustimass module within 30 feet (9.1 m) of the Acoustimass module (the length of the room as the TV, or ...not be blocked. Place the Acoustimass module along the wall to your dealer or call Bose®. 3. Do not allow for the Acoustimass module. Setting Up Figure 4 Acoustimass module...
Owner's guide
Page 11
...Bose® customer service. to + and - Plug the blue connectors into the matching left front, center, and right front jacks. Plug the orange connectors into the matching left surround and right surround jacks. To purchase extension wire, see your music system, connect the speakers. Setting Up Connecting the speakers and Lifestyle...® music center Once you begin hooking up the system. Connecting the Jewel Cube® speakers to the Jewel Cube speaker AM199736_06_V.pdf October 28, ...
...Bose® customer service. to + and - Plug the blue connectors into the matching left front, center, and right front jacks. Plug the orange connectors into the matching left surround and right surround jacks. To purchase extension wire, see your music system, connect the speakers. Setting Up Connecting the speakers and Lifestyle...® music center Once you begin hooking up the system. Connecting the Jewel Cube® speakers to the Jewel Cube speaker AM199736_06_V.pdf October 28, ...
Owner's guide
Page 12
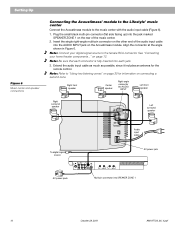
... on the other end of the music center. 2. Setting Up Figure 6 Music center and speaker connections Connecting the Acoustimass® module to the Lifestyle® music center Connect the Acoustimass module to "Using two listening zones" on page 30 for the remote control. Note: Refer to the music center with the audio input...
... on the other end of the music center. 2. Setting Up Figure 6 Music center and speaker connections Connecting the Acoustimass® module to the Lifestyle® music center Connect the Acoustimass module to "Using two listening zones" on page 30 for the remote control. Note: Refer to the music center with the audio input...

Owner's guide
Page 15
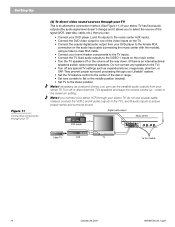
.../external speakers switch, select external speakers. Figure 10 Digital audio output Connecting components to the AUX inputs. Setting Up How to set up your home theater There are two basic methods for some of these connections. (1) To connect video sound sources directly to the Lifestyle® 30 system...input cable (connecting the music center with the module) using a male-to-male RCA cable. A second option is r eceived by the Lifestyle® 30 system through your system. If a valid digital signal is to AUX. You may connect up your home theater. They prevent proper surround ...
.../external speakers switch, select external speakers. Figure 10 Digital audio output Connecting components to the AUX inputs. Setting Up How to set up your home theater There are two basic methods for some of these connections. (1) To connect video sound sources directly to the Lifestyle® 30 system...input cable (connecting the music center with the module) using a male-to-male RCA cable. A second option is r eceived by the Lifestyle® 30 system through your system. If a valid digital signal is to AUX. You may connect up your home theater. They prevent proper surround ...
Owner's guide
Page 16
... fixed audio outputs to the VIDEO 1 inputs on the music center. • Turn the TV speakers off or the volume all the way down. (If there is an internal/external speakers switch, select external speakers. Turn off any special TV settings such as a second choice, you connect your stereo VCR through...the female RCA connection on the audio input cable (connecting the music center with the module), using a male-to-male RCA cable. • Connect your Lifestyle® system. • Set the TV balance control to the center of the signal (VCR, laser disc, cable, etc.), then you can use ...
... fixed audio outputs to the VIDEO 1 inputs on the music center. • Turn the TV speakers off or the volume all the way down. (If there is an internal/external speakers switch, select external speakers. Turn off any special TV settings such as a second choice, you connect your stereo VCR through...the female RCA connection on the audio input cable (connecting the music center with the module), using a male-to-male RCA cable. • Connect your Lifestyle® system. • Set the TV balance control to the center of the signal (VCR, laser disc, cable, etc.), then you can use ...


