The Bose® Lifestyle® amplifier - Owner's guide
Page 1
The Bose® Lifestyle® Amplifier Owner's Guide January 4, 2002 AM262840_00_V.pdf
The Bose® Lifestyle® Amplifier Owner's Guide January 4, 2002 AM262840_00_V.pdf
The Bose® Lifestyle® amplifier - Owner's guide
Page 2
... to rain or moisture. It will help you set up and operate your owner's guide for future reference. ©2001 Bose Corporation. Bose, Acoustimass, Lifestyle, Personal and Wave are located on the system, is intended to alert the user to the presence of uninsulated dangerous voltage ...equilateral triangle, as marked on the bottom panel of Bose Corporation. 2 January 4, 2002 AM262840_00_V.pdf IL NE SE TROUVE À L'INTÉRIEUR AUCUNE PIÈCE POUVANT ÊTRE RÉPARÉE PAR L'USAGER. Save your Lifestyle® stereo amplifier properly. Safety Information ...
... to rain or moisture. It will help you set up and operate your owner's guide for future reference. ©2001 Bose Corporation. Bose, Acoustimass, Lifestyle, Personal and Wave are located on the system, is intended to alert the user to the presence of uninsulated dangerous voltage ...equilateral triangle, as marked on the bottom panel of Bose Corporation. 2 January 4, 2002 AM262840_00_V.pdf IL NE SE TROUVE À L'INTÉRIEUR AUCUNE PIÈCE POUVANT ÊTRE RÉPARÉE PAR L'USAGER. Save your Lifestyle® stereo amplifier properly. Safety Information ...
The Bose® Lifestyle® amplifier - Owner's guide
Page 3
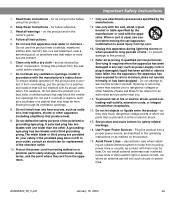
... proper power source, as described in the operating instructions or as radiators, heat registers, stoves or other hazards. Please call Bose to be fatal. See product enclosure bottom for your outlet, consult an electrician for all servicing to keep air from the ...ventilation openings. 8. Protect the power cord from the apparatus. 11. When a cart is used, use attachments/accessories specified by Bose® Corporation. Servicing is damaged; Read these instructions - Heed all instructions. 5. Unplug this product yourself. as they exit from being ...
... proper power source, as described in the operating instructions or as radiators, heat registers, stoves or other hazards. Please call Bose to be fatal. See product enclosure bottom for your outlet, consult an electrician for all servicing to keep air from the ...ventilation openings. 8. Protect the power cord from the apparatus. 11. When a cart is used, use attachments/accessories specified by Bose® Corporation. Servicing is damaged; Read these instructions - Heed all instructions. 5. Unplug this product yourself. as they exit from being ...

The Bose® Lifestyle® amplifier - Owner's guide
Page 4
... Section 810-21) Ground clamps Power service grounding electrode system (NEC ART 250, Part H) Note to CATV system installer This reminder is practical. ©2001 Bose Corporation, The Mountain, Framingham, MA 01701-9168 USA 255805 AM Rev.00 JN10494 2b January 10, 2002 AM262840_00_V.pdf
... Section 810-21) Ground clamps Power service grounding electrode system (NEC ART 250, Part H) Note to CATV system installer This reminder is practical. ©2001 Bose Corporation, The Mountain, Framingham, MA 01701-9168 USA 255805 AM Rev.00 JN10494 2b January 10, 2002 AM262840_00_V.pdf

The Bose® Lifestyle® amplifier - Owner's guide
Page 5
...; stereo amplifier to a Model 20 music center 11 Connecting the Lifestyle® stereo amplifier to a Model 5 music center 13 Connecting speakers to your Lifestyle® stereo amplifier 14 Checking to a Lifestyle® media center 9 Setting up your system 15 Maintaining Your Lifestyle® Stereo Amplifier Cleaning the amplifier 16 Protecting outdoor wiring 16 Troubleshooting...
...; stereo amplifier to a Model 20 music center 11 Connecting the Lifestyle® stereo amplifier to a Model 5 music center 13 Connecting speakers to your Lifestyle® stereo amplifier 14 Checking to a Lifestyle® media center 9 Setting up your system 15 Maintaining Your Lifestyle® Stereo Amplifier Cleaning the amplifier 16 Protecting outdoor wiring 16 Troubleshooting...

The Bose® Lifestyle® amplifier - Owner's guide
Page 6
...the amplifier, and write it into an AC (mains) outlet until you want to add Bose® non-powered environmental speakers or Bose non-powered accessory speakers to your Lifestyle® system. Using the wrong voltage setting may need them later. Carefully unpack the shipping carton. You...the plug in the product packaging for use it. If any way. If the power cord does not fit your Lifestyle® stereo amplifier. Contact Bose Customer Service for use . Unpacking the carton WARNING: To avoid danger of suffocation, keep the plastic bags out of the...
...the amplifier, and write it into an AC (mains) outlet until you want to add Bose® non-powered environmental speakers or Bose non-powered accessory speakers to your Lifestyle® system. Using the wrong voltage setting may need them later. Carefully unpack the shipping carton. You...the plug in the product packaging for use it. If any way. If the power cord does not fit your Lifestyle® stereo amplifier. Contact Bose Customer Service for use . Unpacking the carton WARNING: To avoid danger of suffocation, keep the plastic bags out of the...

The Bose® Lifestyle® amplifier - Owner's guide
Page 7
...well-ventilated area. • DO NOT PLACE THE AMPLIFIER IN A COMPLETELY ENCLOSED AREA - The amplifier must be situated close to either your Lifestyle® system or the accessory speakers, consider the following guidelines. Figure 4 Wall mounting • To mount the amplifier on a wall (...such as the finished surface of fine furniture. It is important to the following guidelines when selecting a location for your Lifestyle® stereo amplifier and mount it to limit its temperature. • DO NOT place the amplifier on any material...
...well-ventilated area. • DO NOT PLACE THE AMPLIFIER IN A COMPLETELY ENCLOSED AREA - The amplifier must be situated close to either your Lifestyle® system or the accessory speakers, consider the following guidelines. Figure 4 Wall mounting • To mount the amplifier on a wall (...such as the finished surface of fine furniture. It is important to the following guidelines when selecting a location for your Lifestyle® stereo amplifier and mount it to limit its temperature. • DO NOT place the amplifier on any material...
The Bose® Lifestyle® amplifier - Owner's guide
Page 8
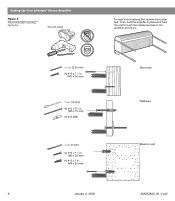
Setting Up Your Lifestyle® Stereo Amplifier Figure 5 Recommended mounting hardware You will need: To mark hole locations, first remove the rubber feet. Then, hold the amplifier in place and mark the wall through the clearance holes in the amplifier enclosure. /3 32 in. (2.25 mm) (4) #10 x 11/2 in. (M5 x 36 mm) 1/2 in. (12 mm) (4) #10 x 21/2 in. (M5 x 75 mm) (4) #10 (M5) 1/4 in. (6 mm) (4) #10 x 11/2 in. (M5 x 36 mm) (4) #10 x 1 in. (M5 x 25 mm) Wood wall Wallboard Masonry wall 6 January 4, 2002 AM262840_00_V.pdf
Setting Up Your Lifestyle® Stereo Amplifier Figure 5 Recommended mounting hardware You will need: To mark hole locations, first remove the rubber feet. Then, hold the amplifier in place and mark the wall through the clearance holes in the amplifier enclosure. /3 32 in. (2.25 mm) (4) #10 x 11/2 in. (M5 x 36 mm) 1/2 in. (12 mm) (4) #10 x 21/2 in. (M5 x 75 mm) (4) #10 (M5) 1/4 in. (6 mm) (4) #10 x 11/2 in. (M5 x 36 mm) (4) #10 x 1 in. (M5 x 25 mm) Wood wall Wallboard Masonry wall 6 January 4, 2002 AM262840_00_V.pdf

The Bose® Lifestyle® amplifier - Owner's guide
Page 9
...jack of the supplied cable into the L (left) INPUT jack. Figure 6 Cable connections between a multi-room interface and the Lifestyle® stereo amplifier Lifestyle® stereo amplifier rear panel Multi-room interface rear panel 4 Ω MINIMUM LL R L SYSTEM RR CONTROL L... R +- Setting Up Your Lifestyle® Stereo Amplifier Connecting the Lifestyle® stereo amplifier to a multi-room interface CAUTION: Before making any connections, turn the Lifestyle® system off and disconnect the music center from the AC (...
...jack of the supplied cable into the L (left) INPUT jack. Figure 6 Cable connections between a multi-room interface and the Lifestyle® stereo amplifier Lifestyle® stereo amplifier rear panel Multi-room interface rear panel 4 Ω MINIMUM LL R L SYSTEM RR CONTROL L... R +- Setting Up Your Lifestyle® Stereo Amplifier Connecting the Lifestyle® stereo amplifier to a multi-room interface CAUTION: Before making any connections, turn the Lifestyle® system off and disconnect the music center from the AC (...

The Bose® Lifestyle® amplifier - Owner's guide
Page 10
...ROOM and HOUSE buttons, and room indicators (A, B, C, and/or D). Setting Up Your Lifestyle® Stereo Amplifier Figure 7 Sample display for a tworoom system Operating speakers in more than one room of Bose® powered speakers placed in individual rooms. These rooms are referred to as one -room... system). Note: Refer to your Lifestyle® system owner's guide for the first time. The Personal ...
...ROOM and HOUSE buttons, and room indicators (A, B, C, and/or D). Setting Up Your Lifestyle® Stereo Amplifier Figure 7 Sample display for a tworoom system Operating speakers in more than one room of Bose® powered speakers placed in individual rooms. These rooms are referred to as one -room... system). Note: Refer to your Lifestyle® system owner's guide for the first time. The Personal ...

The Bose® Lifestyle® amplifier - Owner's guide
Page 11
...piggyback connector of the amplifier. Figure 8 Cable connections between the Lifestyle® media center and the Lifestyle® stereo amplifier Lifestyle® SA-1 stereo amplifier rear panel Lifestyle® media center rear panel 30-ft audio input cable (supplied) AM262840_00_V....pdf January 4, 2002 9 Setting Up Your Lifestyle® Stereo Amplifier Connecting the Lifestyle® stereo amplifier to a Lifestyle® media center CAUTION: Before making connections, turn the Lifestyle® system off and disconnect the media center from ...
...piggyback connector of the amplifier. Figure 8 Cable connections between the Lifestyle® media center and the Lifestyle® stereo amplifier Lifestyle® SA-1 stereo amplifier rear panel Lifestyle® media center rear panel 30-ft audio input cable (supplied) AM262840_00_V....pdf January 4, 2002 9 Setting Up Your Lifestyle® Stereo Amplifier Connecting the Lifestyle® stereo amplifier to a Lifestyle® media center CAUTION: Before making connections, turn the Lifestyle® system off and disconnect the media center from ...

The Bose® Lifestyle® amplifier - Owner's guide
Page 12
... down . this ensures that the house code settings (switches 1, 2, 3, and 4) match those in more ...". Setting Up Your Lifestyle® Stereo Amplifier Figure 9 Setting up a Zone 2 remote control Setting up the remote control You need to set up , and... 8 9 0 PLAYBACK Stop Pause Play Shuffle Repeat Settings Settings ( ) System Setup Enter System Setup (3 of 3). While your Lifestyle® DVD system is Zone 2 Protocol. 4. Scroll down with a Lifestyle® media center, you will now see a menu entitled System Setup (1 of 3) Zone 2 Protocol: Legacy 10 January 4,...
... down . this ensures that the house code settings (switches 1, 2, 3, and 4) match those in more ...". Setting Up Your Lifestyle® Stereo Amplifier Figure 9 Setting up a Zone 2 remote control Setting up the remote control You need to set up , and... 8 9 0 PLAYBACK Stop Pause Play Shuffle Repeat Settings Settings ( ) System Setup Enter System Setup (3 of 3). While your Lifestyle® DVD system is Zone 2 Protocol. 4. Scroll down with a Lifestyle® media center, you will now see a menu entitled System Setup (1 of 3) Zone 2 Protocol: Legacy 10 January 4,...

The Bose® Lifestyle® amplifier - Owner's guide
Page 13
...supplied) AM262840_00_V.pdf January 4, 2002 11 At the other connections. 1. Lifestyle® stereo amplifier rear panel 4 Ω MINIMUM LL R L SYSTEM RR CONTROL L R +- Setting Up Your Lifestyle® Stereo Amplifier Connecting the Lifestyle® stereo amplifier to a Model 20 music center &#...174; Figure 10 Cable connections between the Model 20 music center and the Lifestyle® stereo amplifier CAUTION: Before making connections, turn the Lifestyle® system off and disconnect the music center from the AC (mains) power outlet. ...
...supplied) AM262840_00_V.pdf January 4, 2002 11 At the other connections. 1. Lifestyle® stereo amplifier rear panel 4 Ω MINIMUM LL R L SYSTEM RR CONTROL L R +- Setting Up Your Lifestyle® Stereo Amplifier Connecting the Lifestyle® stereo amplifier to a Model 20 music center &#...174; Figure 10 Cable connections between the Model 20 music center and the Lifestyle® stereo amplifier CAUTION: Before making connections, turn the Lifestyle® system off and disconnect the music center from the AC (mains) power outlet. ...

The Bose® Lifestyle® amplifier - Owner's guide
Page 14
Make sure that the house code settings (switches 1, 2, 3, and 4) match those in your system in more information on ). Note: Refer to your Lifestyle® system owner's guide for Zone 2 If your system uses a Model 20 music center, you need to set up (on operating your first... remote. 3. ON K40 l 2345678 12 January 4, 2002 AM262840_00_V.pdf Setting Up Your Lifestyle® Stereo Amplifier Figure 11 Setting up a Zone 2 remote control Setting up the RC-20 remote control for more than one room. Remove the remote...
Make sure that the house code settings (switches 1, 2, 3, and 4) match those in your system in more information on ). Note: Refer to your Lifestyle® system owner's guide for Zone 2 If your system uses a Model 20 music center, you need to set up (on operating your first... remote. 3. ON K40 l 2345678 12 January 4, 2002 AM262840_00_V.pdf Setting Up Your Lifestyle® Stereo Amplifier Figure 11 Setting up a Zone 2 remote control Setting up the RC-20 remote control for more than one room. Remove the remote...

The Bose® Lifestyle® amplifier - Owner's guide
Page 15
...of the audio input cable, insert the 3.5 mm mini-plug into the R (right) FIXED OUTPUT jack. CAUTION: Before making connections, turn the Lifestyle® system off and disconnect the music center from the FIXED R and FIXED L OUTPUT jacks. Insert the single multi-pin connector at one end... on the rear panel of the music center. Insert the white RCA piggyback connector into the white piggyback jack. Setting Up Your Lifestyle® Stereo Amplifier Connecting the Lifestyle® stereo amplifier to a Model 5 music center In systems using a Model 5 music center, home theater speakers...
...of the audio input cable, insert the 3.5 mm mini-plug into the R (right) FIXED OUTPUT jack. CAUTION: Before making connections, turn the Lifestyle® system off and disconnect the music center from the FIXED R and FIXED L OUTPUT jacks. Insert the single multi-pin connector at one end... on the rear panel of the music center. Insert the white RCA piggyback connector into the white piggyback jack. Setting Up Your Lifestyle® Stereo Amplifier Connecting the Lifestyle® stereo amplifier to a Model 5 music center In systems using a Model 5 music center, home theater speakers...

The Bose® Lifestyle® amplifier - Owner's guide
Page 16
...left speaker cable to the SPEAKER OUTPUT L terminals in the listening area (as you need to set up a second RC-5 remote control to operate your Lifestyle® stereo amplifier. 1. Notice which speaker cable is connected to the L (left in the same way. Slide switch 5 down (off) ...terminal into the red jack and release the tab. Remove the remote control battery cover and locate the miniature switches (Figure 13). 2. Setting Up Your Lifestyle® Stereo Amplifier ® Figure 13 RC-5 remote switch settings Setting up the RC-5 remote control If your system uses a Model 5 music center...
...left speaker cable to the SPEAKER OUTPUT L terminals in the listening area (as you need to set up a second RC-5 remote control to operate your Lifestyle® stereo amplifier. 1. Notice which speaker cable is connected to the L (left in the same way. Slide switch 5 down (off) ...terminal into the red jack and release the tab. Remove the remote control battery cover and locate the miniature switches (Figure 13). 2. Setting Up Your Lifestyle® Stereo Amplifier ® Figure 13 RC-5 remote switch settings Setting up the RC-5 remote control If your system uses a Model 5 music center...

The Bose® Lifestyle® amplifier - Owner's guide
Page 17
...; amplifier • Dual voltage units have a voltage selection switch on the rear panel of the Lifestyle® stereo amplifier and your Lifestyle® music system to an AC (mains) outlet. 3. If you plan to connect your amplifier to 115V (North America), slide this switch... to the 115V position. Move this switch to your liking. 115 V Setting Up Your Lifestyle® Stereo Amplifier Checking to see if your unit has this switch. • This switch is a power switch on the amplifier AM262840_00_V....
...; amplifier • Dual voltage units have a voltage selection switch on the rear panel of the Lifestyle® stereo amplifier and your Lifestyle® music system to an AC (mains) outlet. 3. If you plan to connect your amplifier to 115V (North America), slide this switch... to the 115V position. Move this switch to your liking. 115 V Setting Up Your Lifestyle® Stereo Amplifier Checking to see if your unit has this switch. • This switch is a power switch on the amplifier AM262840_00_V....

The Bose® Lifestyle® amplifier - Owner's guide
Page 18
... amplifier are plugged in and turned on page 14. 16 January 4, 2002 AM262840_00_V.pdf If the problem still exists, contact your Lifestyle® stereo amplifier" on . • Make sure the plugs are inserted fully and the outlets are in good condition and are... firmly connected at hardware stores. Problem What to the address list enclosed in the product packaging for service, or contact Bose Customer Service. To clean the amplifier, use any solvents, chemicals, or cleaning solutions containing alcohol, ammonia, or abrasives. Refer to...
... amplifier are plugged in and turned on page 14. 16 January 4, 2002 AM262840_00_V.pdf If the problem still exists, contact your Lifestyle® stereo amplifier" on . • Make sure the plugs are inserted fully and the outlets are in good condition and are... firmly connected at hardware stores. Problem What to the address list enclosed in the product packaging for service, or contact Bose Customer Service. To clean the amplifier, use any solvents, chemicals, or cleaning solutions containing alcohol, ammonia, or abrasives. Refer to...

The Bose® Lifestyle® amplifier - Owner's guide
Page 19
...with the product. Connect it to the address list enclosed in the speaker. Refer to Bose. Volume suddenly decreases • Lower the volume setting to see if the level returns to your Lifestyle® DVD system's owners guide. This engages automatically if the volume is set to... OUTPUTS R at all "Zone 2 Protocol" in solving problems, contact Bose® Customer Service. Please fill out the information section of the cable to "Legacy". Zone 2 does not • If you are using a Lifestyle® DVD system, the stereo amplifier will not work unless...
...with the product. Connect it to the address list enclosed in the speaker. Refer to Bose. Volume suddenly decreases • Lower the volume setting to see if the level returns to your Lifestyle® DVD system's owners guide. This engages automatically if the volume is set to... OUTPUTS R at all "Zone 2 Protocol" in solving problems, contact Bose® Customer Service. Please fill out the information section of the cable to "Legacy". Zone 2 does not • If you are using a Lifestyle® DVD system, the stereo amplifier will not work unless...
The Bose® Lifestyle® amplifier - Owner's guide
Page 20
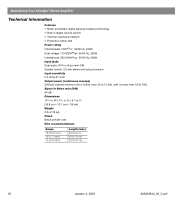
... ft (14 m) 70 ft (21 m) 18 January 4, 2002 AM262840_00_V.pdf Signal to 15 kHz, with no more than 0.5% THD. Maintaining Your Lifestyle® Stereo Amplifier Technical information Features • Bose® proprietary digital signal processing technology • Built-in digital volume control • Thermal overload protection • Protective rubber feet Power rating...
... ft (14 m) 70 ft (21 m) 18 January 4, 2002 AM262840_00_V.pdf Signal to 15 kHz, with no more than 0.5% THD. Maintaining Your Lifestyle® Stereo Amplifier Technical information Features • Bose® proprietary digital signal processing technology • Built-in digital volume control • Thermal overload protection • Protective rubber feet Power rating...
